1
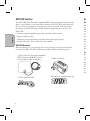
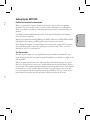
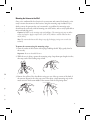
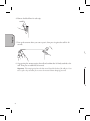
ANT1150F
Ultra-Thin Indoor Amplified HDTV Antenna
User’s Guide / Guide de l’utilisateur / Guía del Usuario
English
FCC Statement
This device complies with part 15 of the FCC Rules. Operation is subject to the following two conditions: (1) This device
may not cause harmful interference, and (2) this device must accept any interference received, including interference that
may cause undesired operation.
This equipment has been tested and found to comply with the limits for a Class B Digital Device, pursuant to Part 15 of
the FCC Rules. These limits are designed to provide reasonable protection against harmful interference in a residential
installation. This equipment generates, uses, and can radiate radio frequency energy and, if not installed and used in
accordance with the instructions, may cause harmful interference to radio communications. However, there is no guarantee
that interference will not occur in a particular installation. If this equipment does cause harmful interference to radio or
television reception, which can be determined by turning the equipment off and on, the user is encouraged to try to correct
interference by one or more of the following measures:
• Reorient or relocate the receiving antenna.
• Increase the separation between the equipment and receiver.
• Connect the equipment into an outlet on another circuit.
• Consult the dealer or an experienced radio/TV technician for help.
Caution: Any changes or modifications not expressly approved by the party responsible for compliance could void the user’s
authority to operate this equipment.
Industry Canada Regulatory Information
CAN ICES-3 (B)/NMB-3 (B)
Avis d’Industrie Canada
CAN ICES-3 (B)/NMB-3 (B)
Congratulations on your purchase of the ANT1150F Ultra-Thin Indoor Amplified HDTV
Antenna. This antenna’s paper-thin design lets you hang it virtually anywhere on walls
or windows. Its 12-foot cable gives you room to roam to find the best spot for optimum
reception, with an multi-directional reception pattern that gets signals from every direction.
And this antenna’s new amplifier design outperforms all other brands.
Multi-Directional Antennas
An RCA multi-directional antenna is able to receive signals from any direction. Useful
for both analog and digital reception, the ANT1150F has a paper-thin design that hangs
virtually anywhere. The patented multi-directional technology ensures that the antenna
does not need to be adjusted according to the location of the transmitting signal.
1
English
ANT1150F Features
Setting
The ANT1150F Ultra-Thin Indoor Amplified HDTV Antenna is packed with features that
make it a great addition to your home theater. Because the ANT1150F is multi-directional,
there is no need to constantly turn the antenna to improve reception. And, with its ultrathin design, the ANT1150F hangs virtually anywhere, disappearing into any decor. The
ANT1150F:
• Features a optimized amplifier design that outperforms other antennas
• Hangs virtually anywhere
• Eliminates constant adjustments with multi-directional reception pattern
• Installs easily, with a 12-foot cable and in-line amplifier
Find the
ANT1150F Hardware
Before attempting to use your antenna, please remove all parts from the box and read the
instructions carefully. The ANT1150F antenna package includes the following items:
1 ANT1150F Ultra-Thin Indoor Amplified
HDTV Antenna with Built-In 12-Foot
Coaxial Cable and In-Line Amplifier
1 USB to mini-USB cable
2
1 USB power adapter
Removable two-sided mounting tape
Before yo
reception
Then, try
antenna.
It is highl
tower or a
Because o
high-defin
Note: Pla
isn’t perfo
channels
Test the
Broadcast
room. In
wall as po
Before yo
idea to te
of scotch
for chann
is, you ca
better cha
ad the
ms:
Setting Up the ANT1150F
Find the best location for the antenna
Before you connect the antenna, determine the best spot in your home for optimum
reception. Visit www.tvsetfree.com to see where your local broadcasts are coming from.
Then, try as much as possible to avoid obstructions between these transmitters and your
antenna.
It is highly recommended that the flat surface of the antenna should face the broadcast
tower or as close as practical.
Because of its multi-directional capabilities, the ANT1150F receives UHF, VHF, and local
high-definition broadcasts, providing quality reception from most locations.
Note: Placing the antenna on a metal surface may interfere with reception. If the antenna
isn’t performing as well as expected, try placing it on another surface. Then, re-scan for
channels on your TV or converter box.
English
tures that
ectional,
ultra. The
Test the Location
Broadcast signal strength can vary significantly inside your home even within the same
room. In most homes, the best signal strength will usually be in a window or as high on the
wall as possible.
Before you mount the antenna to the wall using the provided mounting tape, it’s a good
idea to test the location you want to use. Temporarily mount the antenna using 2-3 pieces
of scotch tape. Then continue with the connection instructions below. Once you’ve scanned
for channels on your TV, you’ll be able to tell if this is a good location to use or not. If it
is, you can continue with the mounting instructions that follow. If it isn’t, you can try for
better channel scan results with the antenna in a different location in the room.
nting tape
3
Connecting the ANT1150F to Your TV
1.Make sure your TV is turned off.
2.Connect the ANT1150F’s built-in cable to the antenna
input on your TV.
5
ANT1150F
Built-In
Coaxial Cable
Important: Make sure you uncoil the antenna’s coaxial cable
completely. Leaving it coiled will reduce reception performance.
Mountin
Once you
ready to m
decide to
detach fro
most reta
Cautio
well to
105°F
Note: T
include
English
3
ANTENNA
In-Line Amplifer
TV/STB
2
4
6
To moun
1. Clean
the are
TV
3.Plug one end of the included USB to mini-USB cable
into the amplifier on the ANT1150F’s built-in cable.
4.Plug the other end of the included USB to mini-USB
cable into the power adapter provided.
Note: If your TV has a USB power outlet, you can plug the USB
to mini-USB cable directly into it for power instead of using
the power adapter. If you use a TV USB power outlet, you can
skip step 5.
Import
2. While
then sn
3. Remov
the ant
metal s
5.Plug the power adapter’s power cord into an electrical
outlet.
Important: This power unit should be plugged in so that it stays
vertical or lies flat.
6.Scan for channels on your TV.
Note: You can bypass the amplifier on this antenna if you notice
that some channels are not coming in as consistently as you’d
expect. Simply unplug the power supply (see step 3). This bypasses
the amplifier.
4
al cable
ormance.
cable
cable.
Once you’ve confirmed the best location for your antenna and scanned for channels, you’re
ready to mount the antenna to that location, using the mounting strips included. If you
decide to move the antenna after you’ve mounted it, no problem: the mounting strips
detach from the wall easily, without harming your wall’s surface, and are easily replaceable at
most retail and drug stores.
Caution: DO NOT use the mounting strips with wallpaper. The mounting strips may not adhere
well to vinyl surfaces. Apply to surfaces above 50°F (10°C). Adhesive could lose adhesion above
105°F (40°C).
Note: The antenna also has two holes along its top edge for hanging it using screws or tacks (not
included).
English
antenna
Mounting the Antenna to the Wall
To mount the antenna using the mounting strips:
1. Clean the surface of the location with isopropyl rubbing alcohol. Wipe gently, then let
the area dry.
Important: Do not use household cleaners.
2. While the area is drying, separate the mounting strips. Snap them apart length-wise first,
then snap each of the resulting strips in half.
-USB
ug the USB
using
you can
3. Remove the red liner. Press the adhesive strip onto one of the top corners of the back of
the antenna. Repeat for the other top corner. Then place a single mounting strip on the
metal section in the bottom middle of the antenna, with the strip facing down.
ctrical
hat it stays
you notice
you’d
his bypasses
5
4. Remove the black liner for each strip.
English
5. Line up the antenna where you want to put it, then press it against the wall for 10
seconds.
6. Stop pressing the antenna against the wall and confirm that it’s firmly attached to the
wall. Then press an additional 30 seconds.
Important: The mounting strips have tabs that extend beyond the borders of the adhesive. Leave
these in place--they will allow you to remove the antenna without damaging your wall.
6
To remove the antenna (and mounting strips) from the
wall:
1. Hold the antenna against the wall gently to keep it in
place. DO NOT press the antenna against wall.
2. Find the tab for the single mounting strip at the bottom
of the antenna (on the metal part). Stretch the tab
straight down (away from the antenna) at least 12 inches
until the strip releases.
10
English
Important: NEVER pull the strip tab towards you.
3. Pull the antenna off the wall slightly so that you can
reach the tabs for the two mounting strips at the top of
the antenna. Repeat step 2 for each of these tabs as well.
Note: If you can’t reach the tabs, you can remove the antenna
from the mounting strips using a piece of dental floss. Gently run
the floss behind the antenna, between the strips and the antenna,
until the strips separate. Then perform step 2 above for each of
the strips by themselves.
o the
Leave
4.Remove the mounting strips from the antenna.
If you want to mount the antenna to the wall again, you
can find replacement strips at most retail or drug stores.
To mount the antenna using thumbtacks
(not included):
Insert two thumbtacks (not included) into
the two holes on the top of the antenna.
Hold the thumbtacks in place and lower the
holes onto the thumbtacks. Make sure to line
up the holes with the thumbtacks.
7
Coaxial Cable Installation Precautions
English
• Do not bend coaxial cables into less than a three-inch radius. Tighter bends can cause
shorts and can change a cable’s impedance.
• Do not install a coaxial cable where it will have a pulling tension greater than 15 pounds
during installation. After installation, make sure there is no tension on the cable.
• Use only round-headed staples. Any clamps or securing devices used with coax should
grip the cable evenly about the circumference without crushing the cable. Flat staples can
damage the coaxial cable.
• Do not expose a coaxial cable to a temperature greater than 176 degrees Fahrenheit. Keep
the cable away from heating vents and water heaters.
• Make sure you uncoil the antenna’s coaxial cable completely. Leaving it coiled will reduce
reception performance.
12 Month Limited Warranty
VOXX Accessories Corporation (the “Company”) warrants to the original retail purchaser of this product that should this
product or any part thereof, under normal use and conditions, be proven defective in material or workmanship within 12 months
from the date of original purchase, such defect(s) will be repaired or replaced (at the Company’s option) without charge for
parts and repair labor. To obtain repair or replacement within the terms of this Warranty, the product along with any accessories
included in the original packaging is to be delivered with proof of warranty coverage (e.g. dated bill of sale), specification of
defect(s), transportation prepaid, to the Company at the address shown below. Do not return this product to the Retailer.
This Warranty is not transferable and does not cover product purchased, serviced or used outside the United States or Canada.
The Warranty does not extend to the elimination of externally generated static or noise. This Warranty does not apply to costs
incurred for installation, removal or reinstallation of the product, or, if in the Company’s opinion, the product has been damaged
through acts of nature, alteration, improper installation, mishandling, misuse, neglect, or accident. This Warranty does not cover
damage caused by an AC adapter not provided with the product.
THE EXTENT OF THE COMPANY’S LIABILITY UNDER THIS WARRANTY IS LIMITED TO THE REPAIR OR
REPLACEMENT PROVIDED ABOVE AND, IN NO EVENT, SHALL THE COMPANY’S LIABILITY EXCEED THE
PURCHASE PRICE PAID BY PURCHASER FOR THE PRODUCT.
This Warranty is in lieu of all other express warranties or liabilities. ANY IMPLIED WARRANTIES, INCLUDING ANY
IMPLIED WARRANTY OF MERCHANTABILITY OR FITNESS FOR A PARTICULAR PURPOSE, SHALL BE
LIMITED TO DURATION OF THIS WARRANTY. ANY ACTION FOR BREACH OF ANY WARRANTY HEREUNDER,
INCLUDING ANY IMPLIED WARRANTY, MUST BE BROUGHT WITHIN A PERIOD OF 24 MONTHS FROM THE
DATE OF ORIGINAL PURCHASE. IN NO CASE SHALL THE COMPANY BE LIABLE FOR ANY CONSEQUENTIAL
OR INCIDENTAL DAMAGES WHATSOEVER. No person or representative is authorized to assume for the Company any
liability other than expressed herein in connection with the sale of this product.
Some states/provinces do not allow limitations on how long an implied warranty lasts or the exclusion or limitation of incidental
or consequential damage so the above limitations or exclusions may not apply to you. This Warranty gives you specific legal rights
and you may also have other rights which vary from state/province to state/province.
U.S.A.: Audiovox Return Center, 150 Marcus Blvd., Hauppauge, New York 11788
CANADA: Audiovox Return Center, c/o Genco, 6685 Kennedy Road, Unit 3, Door 14, Mississauga, Ontario L5T 3A5
©2014 VOXX Accessories Corporation
Indianapolis, IN
Trademark(s) Registered
8
All other brands and product names are trademarks or registered
trademarks of their respective owners.
Product specifications are subject to change.
Printed in China
ANT1150F_IB_01
Déclaration
Cet appareil
(1) cet appar
y compris le
Cet équipem
classe B, con
protection ra
peut émettre
un brouillage
produira dan
ce qu’il est po
brouillage au
• Réoriente
• Éloigner
• Connecte
• Consulte
Attention : L
de la conform
Information
CAN ICES-3
Avis d’Indus
CAN ICES-3
Nous vous
Cette ante
de 3,65 m
assurant un
signaux de
toutes les a
Antenn
Une anten
n’importe
ANT1150
multidirec
l’endroit d