1
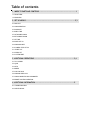
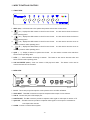
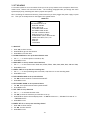
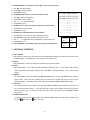
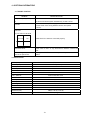
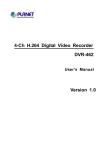
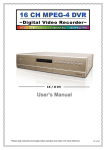
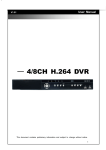
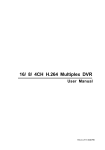
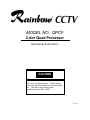
MODEL NO.: QPCF
Color Quad Processor
Operating Instructions
CAUTION
This is an intelligent device. Please connect
the video cable on channel one and then power
on. The device will detect system
automatically for PAL or NTSC.
QPCF-V0.1
PRECAUTIONS
Safety
The unit operates on DC12V, 500mA
To reduce risk of fire or electric shock, do not expose this appliance to rain or moisture.
Do not attempt to service this unit yourself as opening or removing the cover, it may expose you to
risk of electric shock.
Refer servicing to qualified service personnel.
Notice
The information in this operating instruction was current when published.
The manufacturer
reserves the right to revise and improve its products. All specifications are therefore subject to
change without notice.
WELCOME!
Thank you for purchasing COLOR QUAD PROCESSOR. It’s a single page real time color quad processor and
4 channels auto switcher with best quality and price is your only choice. Here are some of the features
you’ll enjoy with this product.
Real time refresh rate (NTSC: 30 frame/sec.; PAL: 25 frame/sec.)
High Resolution 720(H) x 484(V) <NTSC> high resolution, 720(H) x 576(V) <PAL>
Best quality with 16.7 million true colors
Connect up to 4 + 1(VCR) cameras
Quad and switch video output
Independent full screen
Auto sequential switching
System auto detection
Video adjustable on channels
Video loss indication
Freeze feature
VCR Play Zoom Back
Alarm I/O to cooperate with security system
OSD user friendly (On Screen Display)
Table of contents
1. INDEX TO PARTS AND CONTROLS…………………………………………………………………..……….…1
1.1 FRONT VIEW
1.2 REAR VIEW
2. SET UP MENUS…………………………………………………………………………………………………...……2,3
2.1 MAIN LIST
2.2 ALARM DURATION
2.3 BAUD RATE
2.4 DWELL TIME
2.5 INT AUDIBLE ALARM
2.6 EXT AUDIBLE ALARM
2.7 SET TIME
2.8 DWELL SET UP
2.9 ALARM POLARITY
2.10 CAMERA TITLE SET UP
2.11 EVENT LIST
2.12 VIDEO SET
2.13 SYSTEM RESET
3. ADDITIONAL OPERATIONS………………………………………………………………….………….………3,4
3.1 FULL SCREEN
3.2 QUAD
3.3 AUTO
3.4 FREEZE
3.5 VCR PLAY BACK
3.6 ALARM & VIDEO LOSS
3.7 ALARM CONNECTOR PIN ASSIGNMENTS
3.8 REMOTE CONTROL OPERATION
4. ADDITIONAL INFORMATION…………………………………………………………………….………………5
4.1 TROUBLESHOOTING
4.2 SPECIFICATIONS
1. INDEX TO PARTS AND CONTROLS
1.1 FRONT VIEW
R
1. MENU (exit) - It allows access to the system setup menus and exit the current status.
2.
( ▲ ) - Displays the CH1 camera in the full screen format. It is also used to select the function
under operating menu.
3.
( ▼ ) - Displays the CH2 camera in the full screen format. It is also used to select the function
under operating menu.
4.
( ◄ ) - Displays the CH3 camera in the full screen format. It is also used to move the cursor to
necessary location under operating menu.
5.
( ► ) - Displays the CH4 camera in the full screen format. It is also used to move the cursor to
necessary location under operating menu.
6. QUAD ( + ) – Display 4 cameras in quad screen format. It is also used to increase value and select
function under operating menu.
7. AUTO ( - ) – Starts automatic switching of cameras. This button is also used to decrease value and
select function under operating menu.
8. VCR PLAY/FREEZE (enter) - Gets into freeze or VCR play back mode.
This button is also used to
confirm/execute the current status.
1.2 REAR VIEW
DC 12V
500 mA
1
2
VIDEO INPUT
3
4
VCR
IN
MONITOR
OUT
QUAD
OUT
ALARM
1. DC12V – This 2.1mm pin jack accepts the center positive source of 12VDC at 500mA.
2. VIDEO INPUT – These BNC connectors accept the composite video output of color cameras.
3. VCR IN – Connect this port to VCR output port.
4. MONITOR OUT – This BNC connector provides a composite video signal to video input of monitor or TV.
5. QUAD OUT – This BNC connector provides a composite video signal to record input of a standard or
time-lapse video recorder.
6. ALARM – Connect to external alarm system.
<1>
2. SET UP MENUS
A convenient system of on-screen menus allows you to set up key features such as sequencer dwell time,
camera titles, camera color and time & date. The following paragraphs take you through the menu
system step-by-step, describing each menu’s purpose and options.
After connecting all cameras and monitor, please make sure you have plugged the power supply to quad
too. Then you’ve already turned on the Digital Color Quad Processor.
<MAIN LIST>
( MENU )
►ALARM DURATION: 02 SEC
BAUD RATE: 9600 BPS
DWELL TIME: 02 SEC
INT AUDIBLE ALARM: ON OFF
EXT AUDIBLE ALARM: ON OFF
SET TIME: YY:MM:DD:HH:MM:SS
DWELL SETUP (CH 01): ON OFF
ALARM POLARITY (CH 01): HIGH LOW OFF
CAMERA TITLE SETUP (CH 01): CH1
EVENT LIST
VIDEO SET
SYSTEM RESET
2.1 MAIN LIST
1. Press ▲▼ to select function
2. Press ENTER to get into the selection
3. Press MENU to exit the menu
2.2 ALARM DURATION: to set up the alarm duration time
1. Use “+”, “-“ to set this option in seconds (1-99).
2. Press MENU to exit
2.3 BAUD RATE: to set up remote control baud rate
1. Use “+”, “-“ to set remote control baud rate (115200, 57600, 19200, 9600, 4800, 3600, 2400 and 1200)
2. Press MENU to exit
2.4 DWELL TIME: to set up the auto switching time
1. Use “+”, “-“ to set up switching time in seconds (1-30) when it’s on auto switching mode.
2. Press MENU to exit
2.5 INT AUDIBLE ALARM: to set up internal alarm
1. Use ◄► to select the built-in internal alarm ON/OFF
2. Press MENU to exit
2.6 EXT AUDIBLE ALARM: to set up external alarm
1. Use ◄► to set up the external alarm system ON/OFF
2. Press MENU to exit
2.7 SET TIME: to set up date time
1. Use “+”, “-“ to increase/decrease value.
2. Use ◄► to select the item that you would like to set up.
3. Press ENTER to choose the time display mode “ YY/MM/DD/hh/mm/ss “, “DD/MM/YY/hh/mm/ss” or
“TIME DISPLAY OFF”
4. Press MENU to exit
2.8 DWELL SET UP: to set up auto switching channel
1. Press ▲▼ to select channel
2. Use ◄► to select ON/OFF.
3. Press MENU to exit
<2>
2.9 ALARM POLARITY: three options HIGH, LOW or OFF for polarity set up
1. Use ◄► to select polarity.
2. Press ▲▼ to select channel
4. Press MENU to exit
2.10 CAMERA TITLE SETUP: to set up each camera’s title
1. Use ◄► to select the position
2. Press ▲▼ to select channel
3. Use “+”, “-“ to select the words
4. Press MENU to exit
2.11 EVENT LIST: to check the record of video loss or alarm status
1. Press ENTER to clear records
2. Press MENU to exit
2.12 VIDEO SET: video adjustment of each channel
CH EVENT YY/MM/DD HH:MM:SS
----------------------------CH1 VLOSS 01/02/10 12:20:15
CH2 ALARM 02/01/15 22:10:25
--- ----- --/--/-- --:--:---- ----- --/--/-- --:--:---- ----- --/--/-- --:--:---- ----- --/--/-- --:--:---- ----- --/--/-- --:--:---- ----- --/--/-- --:--:---- ----- --/--/-- --:--:---- ----- --/--/-- --:--:--
1. Press ENTER, you will get into video adjustment screen
2. Use ▲▼◄► to select the item that you want to set up
3. Use “+”, “-“ to adjust the value of brightness, contrast and color
4. Press MENU to exit
2.13 SYSTEM RESET: Press ENTER, system will go back to default value
Brightness
Contrast
Color
Brightness
Contrast
Color
Brightness
Contrast
Color
Brightness
Contrast
Color
3. ADDITIONAL OPERATIONS
3.1 FULL SCREEN
Press any key of full screen, the picture of the corresponding quadrant will fill the whole screen of the
monitor display.
Press Quad key, screen will return to quad screen.
3.2 QUAD
Press Quad button, screen will show you 4 cameras in quad screen format.
3.3 AUTO
Press AUTO button, it will enter the auto sequential switching mode.
screen sequentially according to what you set in the MENU.
screen.
It will display quad and full
Press Quad button, it will return to quad
3.4 FREEZE
For freeze function, just press VCR PLAY/FREEZE (ENTER) button, you will see FREEZE on the right top
screen firstly. Then press the channel that you would like to freeze and you will see Z on the
selected channel. To escape freeze mode, just press VCR PLAY/FREEZE (ENTER) button again.
3.5 VCR PLAY
For VCR play back function, please press VCR PLAY/FREEZE (ENTER) button around 2-3 seconds, you
will see VCR play back picture. You could press full screen or quad button to zoom in the picture
when VCR play back.
button again.
To escape the VCR play back mode, just press VCR PLAY/FREEZE (ENTER)
3.6 ALARM & VIDEO LOSS
If you turn on the internal audible alarm and external audible alarm, the right side of camera title
when alarm or
when video loss.
will show
<3>
3.7 ALARM CONNECTOR PIN ASSIGNMENTS
3.7.1
25PIN COM PORT:
3.7.2
9PIN COM PORT:
3.8 REMOTE CONTROL OPERATION
If you would like to connect this device to computer, please find following ASCII codes for reference.
A
Q
M
V
F
1
2
3
4
AUTO
QUAD
MENU
VCR
FREEZE
CH1
CH2
CH3
CH4
<4>
4. ADDITIONAL INFORMATIONS
4.1 TROUBLE SHOOTING
PROBLEM
SUGGESTED ACTION
Bad picture quality after power Please connect the video cable on channel one before power on.
The device will detect system automatically for PAL or NTSC.
on
1. Please check if the power supply is connected.
2. Please check if the wiring between monitor and quad is
correct.
No Video
Video Loss
Ex. CH1 video loss at 04:08
LOSS 04:08
CH2
CH3
CH4
Please check CH1 camera is connected properly.
Continuous Alarm
Please check if there is any disconnection between camera and
quad.
Different Brightness, Color and
Please get into VIDEO menu to set up the video parameters of each
camera.
Contrast in quad screen.
4.2 SPECIFICATION
Video input port
Video output port
Alarm input
4 +1 (VCR) cameras
1 switch & 1 quad output
4
Alarm output
Alarm duration
Camera Title
Time / Date set
Dwell Time
1
1 – 99 sec.
10 characters
Built-in real time clock
1 – 30 sec.
RS-232 port
Load impedance
Operating environment
Power source
Power consumption
Yes
75Ω
10~80%RH, 0oC~50oC
DC 12V ± 10%, 500mA
6W maximum
Dimension (mm)
Weight
240(W) x 45 (H) x 150 (D)
1,300g
<5>