1
Quick Start Guide
DVR Setup
16 Channel DVR
Model: QSTD501616C
1 Connect
2 Setup
3 Enjoy
What’s
Whatís in the box? check that your package includes the following:
DVR
.
Manual
USB Mouse
RCA-BNC x2
500 GB Hard Drive
Ethernet Cable
Remote Control
QPSCDCA Power Supply x4
60 ft. Camera Cables
with Audio x4
Cameras x4 - QD28414
x4 - QD28414W
Digital Peripheral Solutions, Inc.
8015 East Crystal Drive,
Anaheim, CA 92807
www.Q-See.com
Q-See is a registered trademark of Digital Peripheral Solutions, Inc.
Cameras x4 - QSC48030
Power Supply
& 8 Way Adapter
for QD28414
60 ft. Camera Cables x12
Cameras x4 - QPSCDCA
QSC48030 Power Supply x4
1 Connect
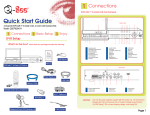
1 CONNECTING CAMERAS: QD28414W & QD28414
A Connect the 60 ft. extension cable to the camera
B Connect the female power end of the cable to the splitter
C Connect the 8 way splitter to the AC adapter
D Connect the video end to the video port on the DVR
Repeat the same process for cameras 2 through 8
DVR and Cameras
FRONT VIEW
1
2
4
3
5
6
7
8
1
8
Yellow: Video Out
Black: Power In
X
A
D
9
10
1
2
3
4
5
6
7
8
11 12
HEAT RELEASE VENT
HDD LOCK
NUMBER BUTTONS
MULTI-SCREEN BUTTON
DIRECTION
ENTER BUTTON
INDICATOR LIGHTS
SHUTTLE
9
10
11
12
13
14
15
16
13
14
15
POWER
HDD STATUS LIGHTS
INFO
AUTO/P.T.Z.
BACKUP
MENU
REC
16 17 18 19 20 21
22
23
17
18
19
20
21
22
23
SEARCH
PLAY
REWIND
FAST FORWARD
STOP
IR RECEIVER
USB PORT (BACKUP)
REAR VIEW
1
5
1
2
3
4
5
6
7
2
6
7
VIDEO OUT
VIDEO IN PUT
eSATA PORT
LOOP OUT
SPOT OUT
AUDIO IN
AUDIO OUT
Page 1
8
9
10
11
8
9
10
11
12
13
14
3
12 13
14
S-VIDEO
PS/2 PORT
USB MOUSE
RJ45 PORT
VGA PORT
COM PORT
ALARM IN
15
4
16 17
18
15
16
17
18
ALARM OUT
POWER PORT
POWER SWITCH
FAN
C
B
2 CONNECTING CAMERAS: QSC48030
A Connect the video and power connectors to the camera
B Connect the power connector on the other end of the cable to the power supply
C Connect the video connector on the other end of the cable to the Video In on the DVR
Repeat the same process for cameras 2 through 4
2
4
X
A
C
B
Yellow: Video Out
Black: Power In
Page 2
4 CONNECTING TO A TV OR VGA MONITOR
3 CONNECTING CAMERAS: QPSCDCA
A
B
C
D
E
Connect the video and power connectors from the cable to the camera
Connect the other video connector on the other end to the Video In port on the DVR
Connect the power connector on the other end of the cable to the power adapter
Attach the power adapter to a power source
NOTE: To record sound from the camera attach the audio connector to the camera
Attach the audio connector on the other end of the cable to an Audio In port on the DVR
Repeat the same process for cameras 2 through 4
A
B
A
B
3
Connect to a TV:
Plug the BNC to RCA adapter to the Video Out port on the DVR and then connect a RCA
cable (not included) to the adapter
Connect the other end of the RCA cable to the Video Input on the TV
Connect to a VGA monitor:
Plug in the VGA cable (not included) to the VGA port on the DVR
Connect the other end of the VGA cable to the Monitor
4
A
A
B
A
E
C
D
B
B
CAUTION: Use only the power adapters supplied with the Q-See unit.
We recommend Plugging the DVR and Cameras into a Transient
Voltage Surge Protector (UL-449 Rating)* 330 or lower clamping
voltage, Joule rating 400.
Page 3
Page 4
2 Setup
To navigate through the DVR menu, three options are available:
1. DVR Front Panel: Use the DIRECTION keys to move the cursor and the
ENTER key to select
2. Remote Control
3. USB Mouse (included)
B Setting up the DVR to Record: This system offers four modes for recording:
1) Manual, 2) Schedule, 3) Motion Detection, and 4) External Sensor.
For setup of external sensor alarms refer to sections 2.3.2 and 3.3.5 of the user’s manual.
B1
B2
A Accessing the DVR menus
A1
Press the MENU key on the DVR front
panel, which will display the LOGIN
SCREEN (A1). Enter the default user
name: admin, and password: 123456.This
will display the SYSTEM SCREEN (A2).
Use the direction keys to move the cursor
and the ENTER key to select.
Manual Recording:
Setup and enable the cameras you want to record by going to the System Menu
and selecting the RECORD option (B1, Red Box) this will display the Record Screen
(B2). Put check marks in the cameras you want to record, and set the quality and
frame rate you prefer for each camera. Push the RECORD button on DVR to start
recording. Push the stop button to stop recording.
B3
A2
The system screen offers the following
setup features:
BASIC option: set time, date, enable
audio and password check.
LIVE option: adjust the camera images
RECORD option: (B2) to set up
resolution, frame rate, video quality and
enable cameras for recording.
PTZ option: setup Pan-Tilt-Zoom cameras
USER option: setup users on the system
NETWORK option: setup remote access
TOOLS option: to access hard drive
information, update firmware, and restore
system defaults.
Refer to Chapter 3 of the user’s manual
for more information on the SYSTEM
menu.
Page 5
B4
Time Schedule Recording:
Go to the System Menu and select the SCHEDULE option (B3, Red Box). The
SCHEDULE screen (B4) will appear. Put a check mark in the Schedule box (B4, Red
Box). Select or de-select the Days and Hours you want the cameras to record. The
Green area shows the hours that are enabled to record, and the transparent area
shows the hours which are not enabled to record. Select OK to save the settings.
Repeat this feature for all cameras.
Motion Detection Recording:
You must first setup the days and times for recording on motion detection, by going
to the System Menu and selecting the SCHEDULE option (B3, Red Box). The Green
area shows the hours that are enabled to record, and the transparent area shows
the hours which are not enabled to record. Select the hours you wish to record. Put a
check mark in the Motion Box (B4, Green Box).
Page 6
C Setting up the DVR to Playback Files
C1
B5
C2
Display the SYSTEM screen (B5) and
select the MOTION option (GREEN box).
Press the SEARCH key on the DVR, enter User Id and Password if the system is
password protected. The SEARCH option will display (C1). Select Time Search
(C1 RED box) and press the ENTER key.
B6
Push ENTER to put a check mark in the
enable option (BLUE box), and select
the SET button (RED box) in the Trigger
options to display (B7).
B7
B8
Page 7
Select the cameras you wish to record
when motion is detected on CH 1 (CH
1=Camera 1). You also have the option to
record on any PTZ cameras on the system
if motion is detected on this channel. In
(B7), we’ve selected cameras 1, 2, and 3
to record if motion is detected on CH 1,
including the PTZ camera which we have
set on CH 3. Select OK to save the settings
and select the Area Set option (B6 GREEN
box) to display (B8).
Use the Direction keys and ENTER key to
select the areas of the camera screen to
detect motion. Blue areas will detect motion
and Red areas will not trigger recording.
Select ALL in the upper right corner to make
the entire screen motion sensitive. Next
choose the sensitivity level. (Sensitivity Level
1 = least sensitive and Sensitivity Level 8 =
most sensitive.) Select the Save option to
save the settings. Repeat steps B6 through
B8 for channels 2-16.
C4
C3
The Time Calendar (C2) will display (the highlighted dates are the files available
to play). Select the dates you wish to view, and push ENTER. The Time Search
menu (C3) will appear.
Select the channels (cameras) to search, and the display mode you wish to
view. Then select the files on the timeline. Hit play which will display the file
player (C5).
TO SEARCH BY EVENT: Follow (C1) to select Event search (C1 GREEN box),
(C4) will display. Click the Date icon to select the date, and the available files
to playback will display in the box on the bottom of the screen. Select a file and
push ENTER. The File Player (C5) will open and play the selected recording.
C5
NOTE: Recording will not be interrupted while you are in Playback mode.
Page 8
D Setting up the DVR to Backup Files
NOTE: If you stop recording while backing
up the files, the backup will go faster.
Insert a USB flash drive into the USB port
located on the front of the DVR. Press
the BACKUP button and enter the User Id
and Password if the system is password
protected. This will display the BACKUP
screen shown in (D1). Select the Date icon
and push ENTER. Select the date of files to
backup. The days with files will be highlighted. Select the START TIME and END
TIME and push the BACKUP button. This
will display the BACKUP INFO screen (D2).
This screen will show the START and END
time, the device, the space required, and
how much space is available. Select OK,
and the backup will start. A progress bar will
display (D3). Once the backup is complete,
a dialog box will display.
3 Enjoy
D1
CONGRATULATIONS
on your purchase!
D2
This Q-See product has undergone extensive quality control. If you have
any issues during the setup process, please contact our support department
before returning the product.
We have your solution!
D3
1) Need assistance setting up the remote monitoring feature with your Q-See
DVR? Visit www.portforward.com/qsee
2) Visit our Q-See Support Section at www. Q-See.com for instant
troubleshooting tips, FAQs, DVR firmware downloads, Live Chat and More.
3) Contact our Support Team:
On the Web: (24/7) Visit the Technical Support Section
www.Q-See.com
By Phone (Monday thru Friday, 9am-5pm (PST)
Tech Support 1 (877) 998 3440, ext 539
Customer Service 1 (877) 998 3440 ext. 538
@
Page 9
By Email:
[email protected]
Page 10