1
WARNING:DO NOT WATCH WHILE VEHICLE IN MOTION,
ITCAN BE HAZARDOUS
o
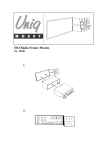
PYLE view
INSTRUCTION MANUAL
| J
PLVWR910R
8.8 ROOF MOUNT TFTLCD MONITOR
5
| qu ©
qe ©
mafbile electronics
certified professional
consumer electronics
ufa ssociat
AA
SZ,
SPECIFICATIONS
Congratulations on your purchase of our 8.8 inch TFT LCD monitor.
Screen size: - -- + + ++ +++ 11110 = - BBinch
This monitor has been built to deliver the highest quality video Display Method: 17 TFT Active matrix system
reproduction. Display ratio: fe ee ee a ee ee ee ee ee ee ee ee ee ee a 4:3
Power consumption: -- -- ===... ........ 10W
We are sure you'll enjoy watching your favorite movies with this Weight: 11100001 1 9009
component as a part of your multimedia.
Е ACCESSORIES
or best please consult a professional mobile electronics
installer for application advice or troubleshooting. Metal mounting plate Mounting screws Remote controller
6 pin din cable Instruction manual
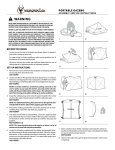
1.Powerindicator
Itturns onwhenpowerisconnected
2.) Power On/Off
Pressittoturnon/offthe monitor
3.+:Positiveadjustment
Pressittoadjustthevalues positively.
4.MENU:active menu
Press itto active the menu,it shows
VOLUME-BRIGHTNESS-CONTRAST-SATURATION-
HUE-SOURCE INPUT-AVINVERSE-AV MIRROR
5.-:Negative adjustment
Pressittoadjustthe values negatively.
6.REM:IR sensor
7.Dome lights
8.Monitorrelease button
Pressittoreleasethe monitor.
9.Dome light switch
Press it to turn On/Offthe dome lights.
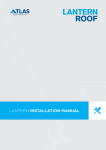
REMOTE CONTROL
® Power On/Off the monitor
& Brightness negative adjustment
& Brightness positive adjustment
Contrast negative adjustment
@ Contrast positive adjustment
{Saturation negative adjustment
E Saturation positive adjustment
& Negative adjustment
& Active the OSD menu and shows
CONTRAST-BRIGHTNESS-SATURATION-HUE-VOLUME-SOURCE V1 OR V2
& Positive adjusment
& Nouse
& No use
& Switch between V1 and V2
w No use
& Only Showed on the screen menu but without function
& Volume negative adjustment
& Volume positive adjustment
Thank you for the purchase of this roof mounting 8.8inch TFT-LCD monitor.
Before operating the unit, please read this manual thoroughly and keep it for
future reference.
PREAUTIONS
The set is for use in DC 12V,negaiveground vehicles.
Do not operate the set in ways other than described in this guide. Doing so
may damage it and may void your warranty.
SAFETY FIRSTIFOR REAR SEAT USE ONLY. Do not install on dashboard or
anywhere else that would permit monitor to be viewed by the driver. Monitor
must never be used in any manner that will distract driver or interfere with the
driver's safe operation of the motor vehicle.
Be careful not to run down the car battery while using the set with the car
stopped.
Do not disassemble or modify the set. Doing so may damage it and voids
your warranty.
Keep drinks and drops from umbrellas away from the set. Water may damage
the internal circuitry.
Do not let the set become hot. If temperature in the car is high or the set
has been exposed to direct sunlight and is hot, lower the temperature
before using it.
In extremely cold temperatures, the movement of the picture may be slow
and the picture may be dark, but this is not a malfunction. The set will work
normally once the temperature increases.
Small Black and shiny dots inside the liquid crystal panel are normal for liquid
crystal product.
Front panel
A
La]
Contents and apcoffiontions con bo aufject to change without prior notice.
2
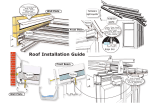
REMOTE CONTROL BATTERY
м й
-
=
Pa - Fr
; и ja =
a E
E —
Pul % Push
1.Always use new batteries when replacing the old set.
2.Do not attempt to charge, short-circuit, disassemble, heat orburn
used batteries.
3.Batteryreplacementis necessary whenremote cntrol acts
sporadically or stops operating this device.
4 Do not place objects between the remote controol and remote
receiver.
5.1ftha Monitor does not operate even when operating the remote
controlfromacloserange, itis timetoreplace the batteries{Product
number:(cr2025).
INSTALLATION
The device is an overhead, fold-downe.s inch monitor with an Infrared IReye.
It will accept a video signal from any video source with composite video out.
1.look over the vehicle for a location for the monitor. Each vehicle |s different
And locations will vary. Make sure the monitor will not interfere with the
Driver.
2.0ncea location has been determined, connect the IR, A/V RCAs end
Powercables to thedesignated sources.
3.Feedthe cables through the hole in the mounting bracket and screw the
bracketto the headliner. Use short screws so as notto damage the roof.
4. Plug the cable into the monitor's 6 Pin Din connector. Mount the monitor
with the provided hardware.
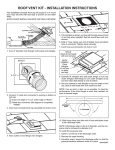
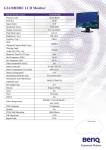
WIRING
Read all wiring precautions. If you are not sure of the connections, contact your
authorized dealer.
1.Disconnect the negative (-) lead of the battery before making any power
connections.
2.Whencreating passage holes for the power wirea, use grommets to eliminate
any sharp edges created during drilling. This will protect the wire from
being nicked and causing a short circuit.
3. When connecting the ground lead, fasten the ground |lead(black) securely to
a clean metal plate on the vehicle.
i nn
a 7 | J
“ |
Red wire DC 174+
Black wire: Chassis ground
Video input 1 {yellow RCA)
—ill qu
Video input 2 {white RCA)
Im = ЩИ
Audio Input left(black RCA)
EME. — ВЫ
Audio input right{Rad RCA)
— ——
L
Pa
a
— a
LA
Video
Audio(L)
Audio{R)
IR wireless hesdphone(Optlonal)