1
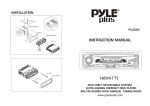
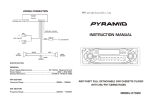
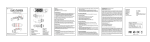
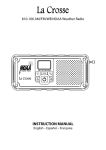
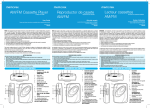
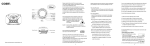
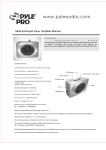
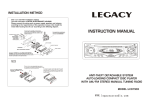
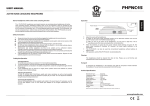
INSTALLATION
PRECAUTIONS
1. Choose the mounting location carefully so that the unit will not interfere with the
normal driving functions of the driver.
2. Avoid installing the unit where it would be subject to high temperatures, such as
from direct sunlight or hot air from the heater, or where it would be subject to
damp, dust, dirt or excessive vibration.
3. Use only the supplied mounting hardware for a safe and secure installation.
AT-3040
DASH BOARD
METAL MOUNTING STRAP
INSTRUCTION MANUAL
HEX NUT
SPRING WASHER
PLAIN WASHER
CONSOLE
SLIDE BRACKET HOUSING
TAPPING SCREW
KEY PLATE
HEX BOLT
To remove the player from the Cage, insert the supplied key
into the slot of the chassis then pull the chassis out of the
cage as shown.
H
AUTO STOP
PWR
REL
TUNE
BD
VOL
F/C
ST
BAL
LOC
TONE
FM MHz
CD IN
M
SPECIFICATION
GENERAL
Power Supply Requirements
Unit Dimensions
DC 12Volts. Negative Ground.
178[W]X150[D]X50[H] mm.
FM SECTION
Frequency Range
88MHz - 108MHz.
AM SECTION
Frequency Range
530KHz - 1700KHz.
THEFT DETERRENT DETACHABLE SYSTEM
AUTO-STOP CAR CASSETTE PLAYER
AM/FM 2 BAND LCD DISPLAY TUNING RADIO
www.pyleaudio.com
LOCATION AND FUNCTION OF CONTROLS
11
1
2
6
3
4
16
H
AUTO STOP
PWR
REL
TUNE
BD
VOL
F/C
ST
BAL
TONE
FM MHz
LOC
CD IN
M
5 12
9
8
13 10 14
7
15
1. POWER ON/OFF BUTTON
Press this button to turn the power supply on or off.
2. VOLUME CONTROL
Slide this control up or down to increase or decrease the volume level.
3. CASSETTE TAPE DOOR
In RADIO mode, insert a cassette into this slot, the tape playback starts automatically.
4. EJECT KEY
In TAPE mode, push this key half way to fast forward, and fully to stop tape playback
and release cassette tape. The car radio cassette player will automatically go into
radio mode.
5. BAND SELECTOR BUTTON
Each press for AM / FM reception. The character of band which has been selected
will be visible on the display indicating the status of tuning.
6. TUNING CONTROL
Rotate this control at radio mode to select your desired radio broadcasting station
within AM/FM. While the frequency appears on the display.
7. LCD DISPLAY
8. MO/ST BUTTON
This operation is effective on FM reception only.
In RADIO mode, press this button to change between mono or stereo sound effect.
The ST will appear on the display while there is a strong signal from an FM station
that is broadcasting in stereo. Mono improves the reception of the distant stereo FM
stations.
9. Local/Distance Reception Button
This operation is effective on FM reception only.
In RADIO mode, press this button to change between local and distant reception.
Press LOC to improve local reception in some areas where the signal is too strong.
Press LOC to improve distant reception when you are located at a weak signal location.
10,11& 12. CLOCK DISPLAY AND SETTING BUTTON
Press F/C at radio or tape mode for frequency or clock display.
Time setting:
With time appeared on the LCD display, press and hold F/C button, then press the
H and M button at the same time to adjust hour and minute.
13. BALANCE CONTROL
Rotate this knob to adjust the audio output balance of left and right speaker.
14. TONE CONTROL
Rotate this knob to adjust the TONE sound effect.
15. EXTERNAL CD INPUT JACK
This car radio cassette player can be connected to a portable CD player through this
jack.
16. RELEASE BUTTON
Press this button to eject the detachable front face panel from the chassis.
WIRING DIAGRAM
ANTENNA JACK
BLUE AUTO ANTENNA
RED
R.
3A
RCA LINE OUT
RED
B+ POWER
L.
WHITE
0.5A
YELLOW
B+ MEMORY
LEFT
L.
SPEAKER
+ WHITE
GRAY
-
+
-
RIGHT
R. SPEAKER
BLACK GROUND
NOTE:
Speakers with load impedance less than 4 ohms could damage the equipment.
Make sure use a speaker with 4 ohms load impedances to reduce the distortion
during high volume level.