1
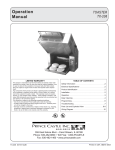
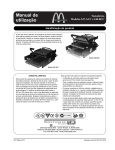
OPERATING INSTRUCTIONS Conveyor Toaster Model No. 428 Series TABLE OF CONTENTS PAGE Installation ..................................................................... 2 Operating ....................................................................... 2 Preventive Maintenance ............................................... 2 Cleaning ........................................................................ 2 Exploded View .............................................................. 4 Parts List....................................................................... 4 Troubleshooting Chart .................................................. 5 Wiring Diagram ............................................................. 6 LIMITED WARRANTY This product is warranted to be free from defects in material and/or workmanship for a period of two (2) years from date of original installation, not to exceed 30 months from date of shipment from our factory. (18 months for heater burnout.) On-location service for failure within 30 days of installation. Prince Castles line of Radiant Conveyor Toasters feature compact designs with easy to use controls. All models feature reliable metal sheathed radiant elements for durabilty, removable crumb tray, and loading chute. ELECTRICAL INFORMATION Two Slice Models Model Volts Watts 428-A 120 1700 428-B 208 2600 428-C 220 2600 428-D 240 2600 428-E 240 2600 Three Slice Models 428-3B 208 3400 428-3C 220 3400 High Power Units 428-HB 208 4800 428-HC 220 4800 Printed in 2000 Prince Castle Inc. Amps Hz Plug 14.2 60 5-15P 12.5 50/60 6-2OP 11.8 50 None 10.8 60 6-20P 10.8 50 None 16.3 15.5 60 50 6-30P None 23.1 21.8 60 50 L6-30P None Any component which proves to be faulty in material and/or workmanship will be replaced or repaired (at the option of Prince Castle, Inc.) without cost to the customer for parts or labor. This warranty is subject to the following exceptions/ conditions: l Use of any non-genuine Prince Castle parts voids this warranty. l This equipment is portable; charges for on-location service (e.g., trip charges, mileage) are not included in the provisions of this warranty. l All labor shall be performed during regular work hours. Overtime premium will be charged to the buyer. l All problems due to operation at voltages other than specified on equipment nameplates do not apply to warranty. Conversion to correct voltage must be the customers responsibility. l Damage caused by carelessness, neglect, and/or abuse (e.g., dropping, tampering or altering parts), equipment damaged in shipment, by fire, flood or an act of God is not covered under this warranty. l This toaster must be serviced by a Prince Castle Authorized Service Center or a Prince Castle Service Technician. Failure to do so can void this warranty. 355 East Kehoe Blvd. l Carol Stream, IL 60188 Tel: (630) 462-8800 l Fax: (630) 462-1460 Toll Free: 1-800-PCASTLE 428-501 7. The toaster fan located on the bottom of the toaster in the rear draws in cool room air and circulates it through the toaster sides and tops. To insure adequate heat dissipation do not position the toaster where the fan would draw in hot discharge from another appliance. INTENDED USE This toaster is designed to toast breads bagels or English muffins.Do not attempt to toast croissants. Their butter content will cause them to stick to the conveyor. Do not attempt to toast products that have been buttered or spread with jam or other coating. Do not attempt to bake in the toaster. OPERATION INSTALLATION 2. Set Power switch to l for On. 1. Plug unit into the proper voltage receptacle. 1. After you have removed the toaster from the carton, inspect the unit for signs of damage. If there is damage to the unit: l l l Notify carrier within 24 hours after delivery. Save carton and packing materials for inspection purposes. Contact your local dealer or, if purchased directly, the Prince Castle Customer Sales Department at 1-630-462-8800 to arrange for a replacement to be sent. 3. Turn upper and lower heater controls to maximum. 2. Verify that all parts have been received. Remove Protective Coating. 3. Attach four (4) legs to toaster by screwing in each leg clockwise. 4. Adjust legs so toaster is level. 5. Remove packaging from bun slide and install bun slide in toaster by hooking it into the two pins in the rear of the chamber. (See Detail 1) 4. Allow 20 minutes for toaster to warm up. 6. Attach heat shield by hooking its top tabs onto the two mounting pins just under the crumb tray then allow the shield to swing down so it touches the two lower mounting pins. Lift shield slightly to hook onto the lower pins. Attach the product slide tray by hooking its tabs onto the two uppper mounting pins at the top front of the toaster. (See Detail 2) 5. Lay Bread, Bagel or Muffin, cut side up on the inlet ramp and push into toaster until it slides on to the conveyor chain. To control toast color, vary the conveyor speed or the heater settings. PREVENTIVE MAINTENANCE 1. The toaster is cooled using air flowing through the electrical areas. DO NOT operate the toaster without either side cover or the rear cover. 2. The conveyor chain should not touch the top surface of the crumb tray holder. If the chain does touch, retension it by unplugging the unit, remove both side covers, loosen the front bearing mounting screws and pivot the bearing until the chain no longer touches. Re-tighten bearing screws and replace side covers. 2 3. The toaster has an internal high temperature switch. If internal temperature becomes too hot the switch will shut off power to the top heaters. The switch will reset automatically once the toaster has cooled. CLEANING 1. Set the POWER switch to OFF. Allow toaster to cool for 30 minutes. 2. Unplug toaster. 3. Remove crumb tray and clean toaster and parts by wiping with damp cloth. Note: Some units come with a Teflon coated return chute. Do Not use an abrasive cleaning agent or scrub brush on the Teflon. 3 EXPLODED VIEW 428-122 Top Cover 428-126 Side Cover 428-108 Rear Cover 421-072S Idler Sprocket 428-120S(428-B) 86-256S 428-121S(428-C Sprocket 428-132S(428-D&E) Heater Assy. 421-134S Speed Control Switch 78-173S 428-112 Heat Control Switch Lead In Ramp 70-043 Speed Control Knob 428-223 Crumb Tray 70-042 Heat Control Knobs 78-184S Power Switch 428-138 Chain Assy. 87-018S Motor 428-142S Fan 72-159S (428-B&D) 72-163S (428-C&E) Line Cord 428-107 Bottom Ramp 86-255S Legs (Pkg of 4) 86-271 Fan Guard 428-127 Bun Chute 4 428-126 Side Cover TROUBLESHOOTING CHART PROBLEM High limit tripped. CAUSE SOLUTION Toaster overheating due to blockage of airflow. Clean any debris from the fan guard that might be blocking the flow. Airflow fan inoperable. Replace fan . No power. Circuit breaker tripped. Power switch inoperable. Broken wire in power cord. Reset circuit breaker. Replace power switch. Replace power cord. Toaster conveyor not turning. Conveyor motor inoperable. Conveyor switch inoperable. Motor chain is loose Replace motor. Replace speed switch. Retension motor chain. Conveyor chain binds up in operation. Sprockets worn. Excessive slack in conveyor chain. Replace sprockets. Remove a chain link. Toaster overheating. Airflow blockage. Clean any debris from fan guard Airflow fan inoperable Replace fan motor. Upper and lower heat tubes not heating. Heater switch inoperable. Heater tube inoperable. Replace heater switch. Replace heater tube. Bread product burning. Conveyor speed too slow. Adjust to proper settings Bread product too light. Conveyor speed too fast. Adjust to proper settings Lower heat tubes heating but top tubes are not. High Limit Switch Tripped See High Limit Tripped section CAUTION: Turn off power switch, unplug toaster from wall outlet, and let toaster cool down before doing any repairs. All repairs should be done by a qualified service technician. 5 WIRING DIAGRAM 6 7 8