1
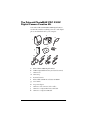
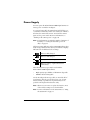
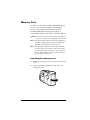
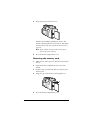
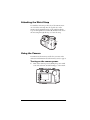
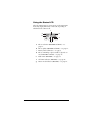
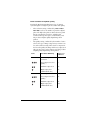
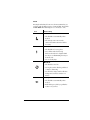
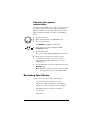
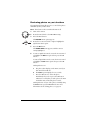
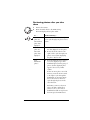
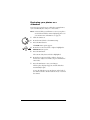
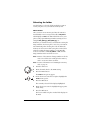
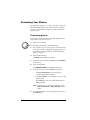
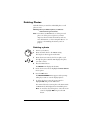
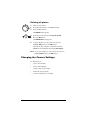
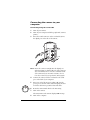
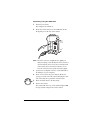
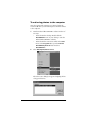
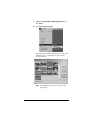
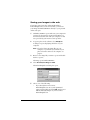
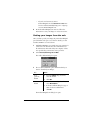
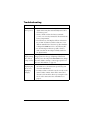
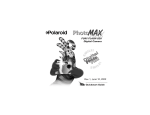
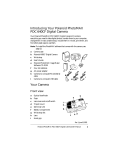
PDC 2300Z
Digital Camera
Creative Kit
User's Guide
Rev. 1, June 10, 2002
PDC 2300Z User Manual Addendum
PDC 2300Z cameras whose serial number ends with the letter “D” contain
additional features not documented in the User Manual packed with the camera.
This addendum highlights the added features.
Suppport for DPOF-based Photo Printing
1
2
Turn the camera on.
Set the camera controldial to PLAY mode and display the desired photo on the
color LCD, as described in the camera manual.
3 Press the MENU button to display the PLAY menu.
4 Use the camera’s zoom control to highlight DPOF Settings. Press the OK button.
5 Quantity is highlighted. Press the OK button.
6 Use the camera’s zoom control to display the number of prionts that you want to
make. (The default is 1.) Press the OK button.
7 Use the camera’s zoom control to highlight Print Size. Press the OK button.
8 Use the camera’s zoom control to display the print size:
•
Printer Dependent (default; uses the printer’s current settings)
•
3 x 5 inch
•
4 x 6 inch
•
5 x 7 inch
•
8 x 10 inch
9 Press the OK button.
10 Use the camera’s zoom control to highlight Enable and press the OK button to
“tag” the photo for DPOF printing.
11 Press the Menu button to redisplay the photo on the color LCD and press the
LCD button to display the photoinformation. A yellow printer icon
appears at
the upper-left corner of photos tagged for printing.
Note: To remove the DPOF tag from a photo, redisplay the photo on the color
LCD, highlight Disable in the DPOF Settings menu, and press the OK button.
12 Press the Menu button to return to the photo display.
13 Repeat steps 2 through 12 for each photo you want to print.
14 When you’re ready to print, turn the camera off, remove the CompactFlash card,
and insert it into the DPOF-enabled printer. For information about using the
memory card with a DPOF-enabled printer, see your printer’s user manual or the
printer’s onling help.
Note: To quickly tag a photo for DPOF printing without using the above procedure:
1 Display the desired photo in PLAY mode, as described in the camera manual.
2 Press the LCD button to display the photo information.
3 Press the OK button to turn DPOF printing for the photo on or off. When DPOF
printing is on, a yellow printer icon
appears at the upper-left corner of the
photo. When you tag a photo using this method, the print size defaults to Printer
Selectable and the number of prints defaults to 1.
PDC 2300Z User Manual Addendum (page 2)
Save Settings Feature
A Save Settings menu line item allows the user to save the EV and White Balance
settings. The original model camera would not save these settings changes when the
camera power was turned off.
Saving White Balance or EV settings
1
2
3
4
5
6
7
Turn on the power.
Move the mode dial to the Record position.
Push the Menu button on the back of the camera.
Scroll to the White Balance or EV selection and push the OK button.
Select a new setting and push the OK button.
Scroll to the Save Settings choice in the Record menu and push the OK button.
You will see an Are you sure? message.
• Selecting Yes will save the White Balance or EV settings when the camera is
turned off. This also saves White Balance and EV settings when the camera
batteries are removed.
• Selecting No will not save the new settings when the camera is turned off. No
will also restore White Balance and EV settings to default (White Balance = Auto,
EV = 0) when camera is turned off.
Flash works when White Balance setting is changed
Note: This is an undocumented feature. It is not mentioned in the literature or help
files included with the camera. In the previous camera model you were unable to use
the flash when a non-auto White Balance was selected. The updated camera allows
the flash to fire with any White Balance setting.
Table of Contents
Introduction . . . . . . . . . . . . . . . . . . . . . . . . . . . . . . . . . . . . . . 1
The Polaroid PDC 2300Z Digital Camera Creative Kit . . . . 2
Camera Features . . . . . . . . . . . . . . . . . . . . . . . . . . . . . . . . . . . 3
Power Supply . . . . . . . . . . . . . . . . . . . . . . . . . . . . . . . . . . . . . . 5
Memory Card . . . . . . . . . . . . . . . . . . . . . . . . . . . . . . . . . . . . . 8
Attaching the Wrist Strap . . . . . . . . . . . . . . . . . . . . . . . . . . . 10
Using the Camera . . . . . . . . . . . . . . . . . . . . . . . . . . . . . . . . . 10
Turning on the camera power . . . . . . . . . . . . . . . . . . . . 10
Using the Status LCD . . . . . . . . . . . . . . . . . . . . . . . . . . . 11
Using the LCD . . . . . . . . . . . . . . . . . . . . . . . . . . . . . . . . . 15
Using the Zoom control . . . . . . . . . . . . . . . . . . . . . . . . . 16
Using the zoom features . . . . . . . . . . . . . . . . . . . . . . . . . 16
Using the camera modes and menus . . . . . . . . . . . . . . . 17
Taking Photos . . . . . . . . . . . . . . . . . . . . . . . . . . . . . . . . . . . . 20
Setting the self-timer . . . . . . . . . . . . . . . . . . . . . . . . . . . . 22
Changing the LCD brightness . . . . . . . . . . . . . . . . . . . . 23
Adjusting the white balance . . . . . . . . . . . . . . . . . . . . . . 24
Adjusting the exposure compensation . . . . . . . . . . . . . 25
Reviewing Your Photos . . . . . . . . . . . . . . . . . . . . . . . . . . . . . 25
Protecting Your Photos . . . . . . . . . . . . . . . . . . . . . . . . . . . . . 32
Deleting Photos . . . . . . . . . . . . . . . . . . . . . . . . . . . . . . . . . . . 33
Changing the Camera Settings . . . . . . . . . . . . . . . . . . . . . . . 34
Installing Polaroid PhotoMAX Pro Software . . . . . . . . . . . 40
Transferring Photos to Your Computer . . . . . . . . . . . . . . . . 41
Using PhotoMAX Pro with the Internet . . . . . . . . . . . . . . . 46
Troubleshooting . . . . . . . . . . . . . . . . . . . . . . . . . . . . . . . . . . 51
FCC Notice . . . . . . . . . . . . . . . . . . . . . . . . . . . . . . . . . . . . . . . 55
Camera Precautions . . . . . . . . . . . . . . . . . . . . . . . . . . . . . . . 56
Battery Handling . . . . . . . . . . . . . . . . . . . . . . . . . . . . . . . . . . 57
Contacting Polaroid . . . . . . . . . . . . . . . . . . . . . . . . . . . . . . . 57
Internet Support . . . . . . . . . . . . . . . . . . . . . . . . . . . . . . . . . . 57
Warranties . . . . . . . . . . . . . . . . . . . . . . . . . . . . . . . . . . . . . . . 58
i
Introduction
Thank you for purchasing the Polaroid PhotoMAX
PDC 2300Z Digital Camera Creative Kit. This kit contains
everything you need to enter the world of digital imaging.
After taking photos, you will find it easy to transfer them to
your computer, edit and correct your images—even display
them on a TV!
Once the photos are on your computer, use the Polaroid
PhotoMAX Pro Software to change them in many creative
ways, include them in e-mails, print them, or find other
great ways to use them.
Polaroid digital cameras and Polaroid PhotoMAX Pro
Software are easy to use, and are designed to work together
to produce high-quality results. Use your imagination. Have
fun!
This user’s guide covers basic camera features, startup,
installation procedures, and how to take photos and transfer
them to your computer. For detailed information about the
features and operation of your camera, see the online
Polaroid PhotoMAX Pro User’s Guide. The online user’s guide
is included on the Polaroid PhotoMAX Pro Software
CD-ROM and is installed automatically with the software.
Please fill out and mail in your registration card!
1
The Polaroid PhotoMAX PDC 2300Z
Digital Camera Creative Kit
Your Polaroid PhotoMAX PDC 2300Z Digital Camera
Creative Kit contains everything you need to take digital
photos and transfer them to your computer.
aa
dd
c
b
f
e
g
j
h
i
a
b
c
d
e
f
g
h
i
j
k
2
k
Polaroid PDC 2300Z Digital Camera
8 MB CompactFlash memory card (inside camera)
Camera case
Wrist strap
Four AA batteries
Polaroid PhotoMAX Pro Software CD-ROM
User’s Guide
AC power adapter
Camera-to-TV connector (video cable)
Camera-to-computer RS-232C serial cable
Camera-to-computer USB cable
Polaroid PhotoMAX PDC 2300Z User’s Guide
Camera Features
Top view
b
g
a
h
c d e f
a
b
c
d
e
f
g
h
Mode knob (page 17)
Status LCD (page 11)
Resolution/Quality selection button (page 11 and
page 12)
Macro mode enable button (page 11 and page 14)
Self-timer enable button (page 11 and page 14)
Flash mode button (page 11 and page 13)
Shutter button (page 20)
Zoom control/menu select (page 16 and page 17)
3
Rear view
b
d
a
e
f
g
c
a
b
c
d
e
f
g
4
Power on-off switch (page 10)
Power/status indicator LED (page 5)
LCD (page 15)
Optical viewfinder (page 20)
LCD on/off button (page 15)
Menu display button (page 15)
OK/menu selection/2x digital zoom button (see
page 15, page 16, and page 17)
Polaroid PhotoMAX PDC 2300Z User’s Guide
Power Supply
You can operate the Polaroid PDC 2300Z Digital Camera on
battery power or with the AC adapter.
To conserve battery life, the camera shuts itself off after 1, 2,
or 3 minutes of inactivity; if there is no activity for 2 minutes
after that, the camera lens retracts. To activate the camera
again, use the power switch. For more information, see
“Turning on the camera power” on page 10.
Note: For information on setting the number of minutes of
inactivity, see “Setting the automatic power-off
delay” on page 39.
The battery status indicator on the Status LCD indicates how
much energy remains in the batteries. The indicator displays
different icons for different levels of charge:
Battery is fully charged.
Battery is half-charged.
Battery is in a low charge state.
Battery is empty—replace the batteries
immediately.
The following battery types may be used with the
Polaroid PDC 2300Z Digital Camera:
•
High-capacity super alkaline or lithium AA disposable
•
NiMH or NiCad rechargeable
Use the AC adapter whenever possible to extend the life of
your batteries. It is also a good idea to keep a set of extra
batteries handy, especially on a trip when it may not be
possible to find replacement batteries easily.
Note: Whenever you remove or replace the batteries, most
of the camera settings reset to their defaults.
Note: For more information on the Status LCD, see “Using
the Status LCD” on page 11.
5
Loading batteries
1
Open the battery compartment cover on the bottom of
the camera by pressing down on the battery
compartment cover and lifting it as shown.
2
Insert four AA-size batteries.
Make sure the + and – terminals are oriented correctly
as shown inside the battery compartment. Do not mix
old and new batteries, or batteries of different types.
3
6
Close the battery compartment cover securely.
Polaroid PhotoMAX PDC 2300Z User’s Guide
Connecting the AC adapter
Here are some important notes for using the AC adapter
with your camera:
•
Only use the AC adapter that came with your camera.
Using a different AC adapter may damage your camera.
•
Turn the camera power off before connecting or
disconnecting the AC adapter.
•
Grasp the plug, not the cord, when you unplug the
adapter from an outlet. Avoid bending, pulling, or
twisting the AC adapter cord. Do not try to lengthen the
cord by splicing it with another wire.
•
Replace a damaged power cord with a new one (to avoid
electrical shock).
Note: The AC adapter may become warm to the touch after
extended periods of use. This is no cause for alarm.
Note: If you are using rechargeable batteries, using the AC
adapter will not recharge them. For more
information on how to recharge the batteries, see the
instructions provided by the battery manufacturer.
1
Connect one end of the AC adapter (a) to the AC power
adapter connector on the camera.
a
c
2
Connect the other end of the AC adapter to an electrical
outlet.
7
Memory Card
The photos you take with your PDC 2300Z Digital Camera
are stored on a removable 8 MB Type I CompactFlash
memory card (included in the kit and pre-installed).
The PDC 2300Z Digital Camera supports all Type I
CompactFlash memory cards, and is not limited by MB size.
Caution: Do not insert or remove the memory card while the
power is on. Doing so may damage the memory card.
Note: You must insert the memory card before turning on
the camera. If the memory card is not installed, the
camera beeps quickly but does not turn on.
Note: You may want to format the memory card if it has
become corrupt, if you want to clear the card of all
protected and unprotected photos, or if you want to
reset the image numbers. For more information, see
page 31, page 32, or page 37.
Inserting the memory card
8
1
Make sure the camera power is off (lens is retracted and
closed).
2
Open the memory compartment on the side of the
camera as shown:
Polaroid PhotoMAX PDC 2300Z User’s Guide
3
Insert the memory card into the slot.
Push the card carefully, but firmly, into the slot. The
card fits completely into the slot in only one way. When
it is inserted correctly, the eject button above the card
pops out.
Note: If the card does not seem to fit correctly, do not
force it. Turn over and retry.
4
Close the memory compartment cover.
Removing the memory card
1
Make sure the camera power is off (lens is retracted and
closed).
2
Open the memory compartment on the side of the
camera.
3
Push the card-eject button (a) in the slot just above the
memory card.
4
Grasp the edge of the memory card and pull it out.
a
5
Close the memory compartment cover.
9
Attaching the Wrist Strap
To attach the wrist strap to the body of the camera, insert
one end of the wrist strap into the top hole (a) on the
memory card compartment side of the camera. Push the
loop out through the bottom hole (b). Pull the wide end of
the wrist strap through this loop to secure the strap.
a
b
Using the Camera
You must insert the memory card before you turn on the
camera. For information about the memory card, see page 8.
Turning on the camera power
1
10
Turn on the camera power by sliding the power switch
to the left (as shown) and then letting go of the switch.
Polaroid PhotoMAX PDC 2300Z User’s Guide
Using the Status LCD
After the camera turns on, icons appear on the Status LCD.
Icons may display differently or not at all, depending on
which mode the camera is in.
c
a
b
d
e
g f
a
b
c
d
e
f
g
Photo resolution (RECORD and PLAY)—see
page 12.
Photo quality (RECORD and PLAY)—see page 12.
Battery status (all modes)—see page 5.
Photos remaining or photo number (depends on
mode: RECORD or PLAY)—see page 12.
Flash status (RECORD)—see page 13.
Self-timer indicator (RECORD)—see page 14.
Macro mode indicator (RECORD)—see page 14.
11
Pixel resolution and photo quality
Pressing the Resolution/Quality button (top of camera)
cycles through the settings for pixel resolution and quality.
•
The resolution setting—indicated by 1792 x 1200 or
896 x 600—refers to the number of pixels in a digital
photo. The higher the pixel resolution, the more pixels
that are contained in your photo. A higher pixel
resolution takes up more space on the memory card,
but produces a higher quality digital image when
printed.
•
The quality setting—indicated by the number of stars—
refers to the type of image compression you want to use
for each resolution setting. The lower the compression,
the better the quality. An image with lower compression
takes up more space on the memory card, but produces
a higher quality digital image when printed.
Icons
Resolution & Quality
1792 x 1200
1792 x 1200 pixel
resolution
896 x 600
12
# Photos per
8 MB Card
Low compression (best
quality)
7
Medium compression
14
High compression
(minimum file size)
29
896 x 600 pixel resolution
Low compression (best
quality)
29
Medium compression
58
High compression
(minimum file size)
116
Polaroid PhotoMAX PDC 2300Z User’s Guide
Flash
Pressing the Flash mode button on the Status LCD lets you
cycle through the different types of camera flash. The default
is Auto Flash. The flash range is 1.6 to 10 ft (0.5 – 3 m).
Icon
Flash setting
Auto Flash:
• The flash fires automatically when
needed.
• The autoexposure sensor in the
camera determines when the flash is
necessary.
Fill Flash:
• The flash fires for every photo.
• Use to fill in and soften strong
shadows when there is a light behind
the subject or illuminating the subject
from the side.
• Use on cloudy days.
No flash:
• The flash does not fire.
• Use in places where flash is prohibited
or may be distracting.
• Use when shooting toward a reflective
background, such as a window or a
mirror.
Red Eye Reduction:
• The flash fires automatically when
needed.
• Each flash is preceded by a preflash to
reduce red-eye effect.
13
Macro lens
Pressing the Macro enable button on the top of the camera
turns the Macro (close-up) lens on or off. Use the Macro
lens for subjects 1.5 to 18 in. (3.8 to 46 cm) from the camera.
For more information, see “Taking Photos” on page 20.
Note: When using the Macro lens, make sure the zoom lens
is set all the way to Wide Angle; otherwise, the
camera may not focus properly.
Icon
Macro Setting
Subjects 1.5 to 18 in. (3.8 to 46 cm)
from the camera.
Self-timer
Pressing the Self-timer button on the top of the camera turns
the camera self-timer on or off. The self-timer applies to the
next picture you take; you can set the self-timer for each
photo you want to delay. For more information, see “Setting
the self-timer” on page 22.
Note: After you take a photo with the self-timer, it resets;
you must set the self-timer each time you take a
timed photo.
Icon
Self-timer Setting
Delays the camera shutter 10 seconds
when you press the shutter button.
14
Polaroid PhotoMAX PDC 2300Z User’s Guide
Using the LCD
You can use the LCD on the back of the camera as a
viewfinder for taking photos, to review the photos you have
taken, and to view and change camera menus.
•
Press the LCD button to toggle the LCD on and off in
RECORD mode, or to cycle through three different
ways of viewing photos in PLAY mode (photo with or
without data displayed, and thumbnails). For more
information, see “Taking Photos” on page 20 or
“Reviewing Your Photos” on page 25.
•
Press the Menu button while in the RECORD, PLAY, or
ERASE modes to change options for taking, reviewing,
and erasing photos. For more information, see “Using
the camera modes and menus” on page 17.
•
Press the OK button to select highlighted options when
using the camera menus . When using the LCD as a
viewfinder for taking photos, press the OK button to
turn 2x digital zoom on or off . For more information,
see “Using 2x digital zoom” on page 16 or “Using the
camera modes and menus” on page 17.
15
Using the Zoom control
Use the Zoom control on the top of the camera to zoom the
lens between Wide Angle and Telephoto, scroll through and
change camera menus, and cycle through photos or photo
thumbnails.
Using the zoom features
There are two ways to zoom in or out when taking a photo:
•
Optical zoom: Use the Zoom control to zoom in or out
when taking a photo using either the optical viewfinder
or the LCD.
•
2x digital zoom: Press the OK button to zoom in and
out on the LCD when taking a photo using the LCD.
Using the Zoom control to zoom (optical zoom)
Rotate the Zoom control left or right to zoom in and out
from Wide Angle to Telephoto when taking photos in
RECORD mode.
Icons on the Zoom control indicate which direction to rotate
for Wide Angle or Telephoto:
a
a
b
b
Zoom out (toward Wide Angle lens)
Zoom in (toward Telephoto lens)
Using 2x digital zoom
When using the LCD as a viewfinder for taking your photos,
press the OK button once to zoom in digitally. The message
2x D Zoom displays on the LCD. Once you have enabled 2x
digital zoom, press the OK button again to disable it.
Note: 2x digital zoom automatically reduces the pixel
resolution of the photo to 896 x 600, and the Status
LCD changes to reflect this.
16
Polaroid PhotoMAX PDC 2300Z User’s Guide
Using the camera modes and menus
Your Polaroid PDC 2300Z Digital Camera has five separate
modes, each of which has different features and menus.
Rotate the Mode knob to perform different functions with
the camera:
•
RECORD mode. Take photos and adjust settings.
•
PLAY mode. Review photos and adjust settings.
•
ERASE mode. Erase single photos or all photos at once.
•
SETUP mode. View and adjust your camera’s options.
•
PC mode. Transfer photos from the camera to your
computer.
Each of the RECORD, PLAY, ERASE, and SETUP camera
modes has a different menu that allows you to set moderelated options for the camera.
Note: The exception is PC mode, which does not have any
menu options; you need only to switch the camera to
that mode to allow the camera to transfer photos to
your computer. For more information, see
“Transferring Photos to Your Computer” on page 41.
Using the Zoom control with camera menus
Rotate the Zoom control left or right to:
•
Scroll through different options in the menus
•
Increase or decrease numeric settings in the menus
Icons on the Zoom control indicate which direction to rotate
for scrolling up or down in menus:
a
a
b
b
Scroll down one menu option
Scroll up one menu option
17
Using RECORD menu options
1
Turn the camera on.
2
Rotate the Mode knob to the RECORD setting.
3
Press the Menu button.
Use the RECORD menu options to:
•
Change the LCD brightness (page 23)
•
Set the white balance for photos, if needed
(page 24)
•
Set exposure value for brightness compensation
(page 25)
•
Set Quick View mode (page 26)
Note: Press the Menu button again to escape the menu.
For more information on using the RECORD menu
options, see “Taking Photos” on page 20.
Using PLAY menu options
1
With the camera on, rotate the Mode knob to the PLAY
setting.
2
Press the Menu button.
Use the PLAY Menu options to:
•
Change the LCD brightness (page 23)
•
Display a slideshow of your photos (page 28)
•
Set the video mode to view your photos on a TV
(page 29)
•
Select the folder (page 31)
•
Protect (lock) current or all photos (page 32)
Note: Press the Menu button again to escape the menu.
For more information on using the PLAY menu options,
see “Reviewing Your Photos” on page 25.
18
Polaroid PhotoMAX PDC 2300Z User’s Guide
Using ERASE menu options
1
With the camera on, rotate the Mode knob to the
ERASE setting.
2
Press the Menu button.
Use the ERASE menu options to:
•
Delete the current unprotected photo from the
camera (page 33)
•
Delete all of the unprotected photos from the
camera (page 34)
Note: Press the Menu button again to escape the menu.
For more information on using the ERASE menu
options, see “Deleting Photos” on page 33.
Using SETUP menu options
1
With the camera on, rotate the Mode knob to the
SETUP setting.
The SETUP menu displays in the LCD.
Use the SETUP menu options to:
•
Change the date and time (page 35)
•
Set the menu languages (page 36)
•
Toggle camera beeps on or off (page 37)
•
Format the memory card (remove or renumber all
protected and unprotected photos) (page 37)
•
Set the automatic power-off delay (page 39)
Note: Rotate the Mode knob to a different mode to
escape the SETUP menu.
For more information on using the SETUP menu
options, see “Changing the Camera Settings” on
page 34.
Using PC mode
1
With the camera on, rotate the Mode knob to the PC
setting. Use this mode to transfer photos to your
computer. For more information, see “Transferring
Photos to Your Computer” on page 41.
19
Taking Photos
The Polaroid PhotoMAX PDC 2300Z Digital Camera
Creative Kit contains everything you need to take photos and
transfer them to your computer.
You can take photos using the optical viewfinder or using the
viewfinder LCD.
Use the optical viewfinder:
•
For faster processing and flash recharge time
•
To optimize battery life
Use the LCD viewfinder:
•
To see the photo framed exactly as it will be taken
•
When using the macro distance setting
•
To enable 2x digital zoom
To take photos:
1
Turn the camera on.
2
Rotate the Mode knob to the RECORD setting.
3
Press the Resolution/Quality button (top of camera) to
set the picture resolution and quality. For more
information, see page 12.
4
Press the Flash enable button (top of camera) to set the
flash. For more information, see page 13.
5
Look through the optical viewfinder.
If you want to use the LCD as a viewfinder, press the
LCD button to turn it on.
6
Frame the photo in the optical viewfinder or the LCD.
7
To zoom in or out using optical zoom, rotate the Zoom
control toward the left for a Wide Angle lens, or toward
the right for a Telephoto lens.
To zoom in using the LCD (2x digital zoom), press the
OK button once. The LCD displays the message
2x D Zoom and zooms in digitally. To zoom out, press
the OK button again.
20
Polaroid PhotoMAX PDC 2300Z User’s Guide
8
9
Press the shutter button halfway down.
•
If the LED next to the optical viewfinder lights solid
green, the shot is in focus.
•
If the LED next to the optical viewfinder is blinking
red and the camera beeps twice (if beeps are
enabled), the shot is either not in focus or the
lighting conditions are inadequate. The camera
may be too close to the subject. Press the Macro
enable button (top of camera) to set the lens to
Macro, then take your photo.
Press the shutter button down fully.
Note: After you take a photo, the red status LED beside
the optical viewfinder lights to confirm that the
camera is processing the photo.
For close-up photos
Press the Macro mode enable button on the top of the
camera for subjects that are from 1.5 to 18 in.
(3.8 to 46 cm) from the camera.
Note: For best results with the Macro lens, the camera’s
zoom setting should be set all the way to Wide Angle
(turn the Zoom control left for Wide Angle).
21
Setting the self-timer
Use this feature to take a photo ten seconds after you press
the shutter button.
Note: For best results, mount the camera on a tripod when
using the self-timer.
1
Turn on the camera.
2
Rotate the Mode knob to the RECORD setting.
3
Press the Self-timer enable button (top of camera).
The self-timer is now turned on and the self-timer icon
appears on the Status LCD.
Note: To cancel the self-timer, press the Self-timer
button again.
4
Frame the photo using the optical viewfinder
or the LCD.
5
Press the shutter button.
For 7 seconds, the red status LED on the front of the
camera lights while the green status LED on the back of
the camera blinks.
In the last 3 seconds before the camera takes the photo,
the red status LED on the front of the camera begins to
blink while the camera beeps (if beeps are enabled).
22
Polaroid PhotoMAX PDC 2300Z User’s Guide
Changing the LCD brightness
Use this feature to change the brightness of the LCD when
reviewing or taking photos.
1
Turn on your camera.
2
Rotate the Mode knob to the RECORD or PLAY setting.
3
Press the Menu button.
Depending on the camera mode, the RECORD or PLAY
menu appears in the LCD.
4
Rotate the Zoom control to highlight the LCD
Brightness menu option.
5
Press the OK button.
The current setting displays highlighted in the LCD.
6
Rotate the Zoom control left or right to increase or
decrease the setting. You can set the LCD brightness
from –5 (darkest) to +5 (lightest). The default is +0.
7
Press the OK button to save your changes and return to
the main menu.
23
Adjusting the white balance
If you are shooting indoors without a flash—or sometimes
in certain daylight conditions—your resulting photos may
be tinted with strange colors (such as green or blue). If this
happens, use the white balance setting to compensate for the
problem.
Note: It is generally a good idea to keep your camera’s white
balance setting at Auto (the default) for most lighting
conditions.
Note: In situations in which flash is prohibited indoors, you
may need to change the white balance settings.
1
Turn the camera on.
2
Rotate the Mode knob to the RECORD setting.
3
Press the Menu button.
The RECORD menu displays in the LCD.
4
Rotate the Zoom control to highlight the White
Balance menu option.
5
Press the OK button. The WHITE BALANCE menu
displays in the LCD, with the current setting
highlighted.
6
Rotate the Zoom control left or right to highlight the
appropriate selection based on the lighting condition:
7
Lighting condition
White Balance
setting
General lighting conditions
Auto
Daylight lighting
Daylight
Interior, non-fluoresecent
lighting (tungsten)
Incandescent
Interior, cool white fluoresent
Fluorescent1
Interior, standard fluorescent
Fluorescent2
Press the OK button to save the setting and return to the
RECORD menu.
Note: Each time you turn the camera off and on again,
white balance resets to the default, Auto.
24
Polaroid PhotoMAX PDC 2300Z User’s Guide
Adjusting the exposure
compensation
If your photos are coming out too dark or too light, you can
use the EV compensation setting to adjust the amount of
light the lens allows into the camera. You may also want to
lighten or darken your photos to achieve special lighting
effects.
1
Turn the camera on.
2
Rotate the Mode knob to the RECORD setting.
3
Press the Menu button.
The RECORD menu displays in the LCD.
4
Rotate the Zoom control to highlight the EV
Compensate setting.
5
Press the OK button.
The current setting displays (highlighted) in the LCD.
6
7
Rotate the Zoom control left or right to increase
or decrease the setting. You can set the exposure
compensation from –1.5 (darker photos) to +1.5
(lighter photos).
Press the OK button to save the setting and return to the
RECORD menu.
Note: Each time you turn the camera off and on again,
EV compensation resets to the default, +0.0.
Reviewing Your Photos
You can review your photos in the following ways:
•
As you take each photo (Quick View mode)
•
One photo at a time without photo data displayed
•
One photo at a time with photo data also displayed
•
Nine thumbnail photos at a time (3 x 3 table)
•
As a slideshow
•
On your TV
25
Reviewing photos as you take them
The Quick View feature allows you to see and delete photos
immediately after you take them.
Note: This feature works even when the LCD is off.
1
Turn on the camera.
2
Rotate the Mode knob to the RECORD setting.
3
Press the Menu button.
The RECORD menu options appear.
4
Rotate the Zoom control left or right to highlight the
Quick View menu option.
5
Press the OK button.
The QUICK VIEW menu appears, with the current
setting highlighted.
6
To turn on Quick View mode, rotate the Zoom control
to highlight the ON menu option, then press the OK
button.
To turn off Quick View mode, rotate the Zoom control
to highlight the OFF menu option, then press the OK
button.
With Quick View on:
The photo taken displays on the LCD (even if you
have turned the LCD off).
b The Delete option displays for two seconds.
c
Press the OK button to delete this photo
immediately. If you do not press the OK button
within two seconds after you take a photo, the LCD
viewfinder turns off and the photo is saved.
With Quick View off, you delete photos normally, using
the Erase menu option in ERASE mode. For more
information about deleting photos, see page 33.
a
26
Polaroid PhotoMAX PDC 2300Z User’s Guide
Reviewing photos after you take
them
1
Turn on the camera.
2
Rotate the Mode knob to the PLAY setting.
The LCD displays the last photo taken.
To. . .
Do the following. . .
View one
photo at a
time without
photo data
displayed
Rotate the Zoom control to the right or
left to cycle through your photos one at
a time.
View one
photo at a
time with
photo data
displayed
1
Press the LCD button once to see
the data displayed over the photo.
2
Rotate the Zoom control to the
right or left to cycle through your
photos one at a time, displaying
the photo data for each.
View
thumbnail
photos
1
Press the LCD button two times, to
see a 3 x 3 display of up to nine
thumbnail photos. In the group of
photos, the last displayed photo
appears “selected” by a white
outline.
If there are more photos stored in
memory, rotate the Zoom control
to the right to cycle through the
thumbnails one at a time. Rotate
the Zoom control to the left to
cycle through the photos in the
other direction.
Each time you move to the next
photo, the white outlined box
encloses it. To see the selected
thumbnail as a full-screen photo in
the LCD, press the LCD button.
27
Reviewing your photos as a
slideshow
You can review your photos as a slideshow, setting them to
cycle automatically at a delay of 1 to 10 seconds.
Note: It is most likely you will want to review your photos
as a slideshow with the camera displaying photos on
your TV. For more information, see page 29.
1
Turn the camera on.
2
Rotate the Mode knob to the PLAY setting.
3
Press the Menu button.
The PLAY menu options appear.
4
Rotate the Zoom control left or right to highlight the
Slideshow menu option.
5
Press the OK button.
The current delay between slides is highlighted.
6
Rotate the Zoom control left or right to decrease or
increase the delay between slides (up to a maximum of
10 seconds).
7
Press the OK button to save your changes.
The last photo displayed appears, and the slideshow
automatically begins.
To stop the slideshow, press any button on the back of
the camera, switch to another camera mode, or turn off
the camera.
28
Polaroid PhotoMAX PDC 2300Z User’s Guide
Reviewing photos on your TV
1
Turn on the camera.
2
Rotate the Mode knob to the PLAY setting.
3
Press the Menu button.
The PLAY menu options appear.
4
Rotate the Zoom control left or right to highlight the
Video Mode menu option.
5
Press the OK button.
The VIDEO MODE menu appears, with the current
setting highlighted.
6
7
Rotate the Zoom control left or right to highlight the
correct video mode:
•
Select NTSC to use the video format for North
America, Japan, South America, and other
countries.
•
Select PAL to use the video format for Europe, Asia,
and other countries.
Press the OK button to save changes and exit the menu.
Once you have set the video mode, you do not have to
set it again unless you remove the camera batteries or
use the camera with a TV that uses a different type of
video format.
8
Turn off the camera (the video mode will be saved).
9
Make sure your TV is off.
29
10 Connect the camera to your TV.
a
b
Insert one end of the AC power adapter (a) into the
power port on the side of the camera and plug the
other end of the cable into a grounded electrical
outlet.
Insert one end of the video cable (b) into the Video
port on the camera and insert the other end into
the video input port on your TV.
a
b
Turn the TV on and set it to the channel used for
video input. Set your TV to video mode, if
necessary.
Note: For more information about using your TV for
video input, see the manufacturer’s manual for
your TV.
c
Note: Once you have set up your TV to display images
from the camera, you can also take photos using
your TV screen as a viewfinder. Simply take a
photo using the TV just as you would using the
LCD. For more information, see page 20.
11 Turn on the camera.
The last photo taken displays on the TV screen.
12 Choose one of the following:
30
•
To review your photos as a slideshow, see page 28.
•
To review your photos by cycling through them
manually, see page 27.
Polaroid PhotoMAX PDC 2300Z User’s Guide
Selecting the folder
Use this feature to select the folder in which you want to
review your photos on your camera’s memory card.
About folders
Once you insert a new memory card into the camera, it
automatically creates a storage folder called 100_POLA,
which displays as 100 in the LCD. This folder stores your
photos using sequential image numbers starting at 1. For
example, PDC_0001.jpg, PDC_0002.jpg, etc.
Each time you format a memory card without resetting the
image numbers, the newest photos stored on your camera
start numbering where the last photo left off. When the
memory card stores more than 9,999 photos in the folder
without resetting the image numbers, it automatically
creates a new folder (called 101_POLA, or 101) and the
image numbers in the new folder reset to 1.
Note: Because of the amount of image numbers needed to
create a new folder, it is not likely for the memory
card to create more than one folder.
Note: For more information on formatting the memory
card, see page 37.
1
Turn the camera on.
2
Rotate the Mode knob to the PLAY setting.
3
Press the Menu button.
The PLAY menu options appear.
4
Rotate the Zoom control left or right to highlight the
Folder menu option.
5
Press the OK button.
The currently-selected folder displays highlighted.
6
Rotate the Zoom control to highlight the appropriate
folder, if any.
7
Press the OK button.
The lowest-numbered photo in that folder displays in
the LCD.
31
Protecting Your Photos
Use this feature to protect, or “lock,” your photos to prevent
them from being deleted. Once photos are protected, they
cannot be deleted until you unprotect them or format the
memory card.
Protecting photos
You can protect either the photo currently displayed in the
LCD, or all of your photos at once.
1
Turn on your camera.
2
Rotate the Mode knob to the PLAY setting.
3
If you want to protect only one photo, rotate the Zoom
control left or right to display the appropriate photo in
the LCD. For more information, see “Reviewing Your
Photos” on page 25.
4
Press the Menu button.
The PLAY menu displays in the LCD.
5
Rotate the Zoom control to highlight the Protect Files
menu option.
6
Press the OK button.
The PROTECT FILES menu displays in the LCD.
7
Rotate the Zoom control to highlight your choice:
•
Select Protect Current to protect the photo
currently displayed in the LCD.
•
Select Protect All to protect all photos stored on the
memory card.
•
Select Cancel to cancel out of this menu without
making changes.
Note: To unprotect, or “unlock,” your photos, select
Unprotect Current or Unprotect All from this
menu.
8
32
Press the OK button to save your changes and return to
the PLAY menu.
Polaroid PhotoMAX PDC 2300Z User’s Guide
Deleting Photos
With this feature you can delete individual photos or all
photos at once.
Warning: Once you delete a photo, it cannot be
retrieved—it is gone forever!
Note: You cannot use ERASE mode to delete protected
photos. To delete protected photos, you must
unprotect them or format the memory card. For
more information, see “Protecting Your Photos” on
page 32 or “Formatting the memory card” on
page 37.
Deleting a photo
1
Turn on your camera.
2
Rotate the Mode knob to the ERASE setting.
The last photo taken appears in the LCD.
3
Rotate the Zoom control to the left or right to cycle
through the photos until the LCD displays the photo
you want to delete.
4
Press the Menu button.
The ERASE menu displays in the LCD.
5
Rotate the Zoom control to highlight the Erase Current
menu option.
6
Press the OK button.
The ERASE CURRENT menu appears, with a prompt
asking if you want to erase the displayed photo.
7
To delete the photo, rotate the Zoom control to
highlight YES then press the OK button.
The camera deletes the current photo. The LCD returns
to ERASE mode and displays the next available photo.
Note: To not delete the current photo, rotate the Zoom
control to highlight NO then press the OK
button.
33
Deleting all photos
1
Turn on your camera.
2
Rotate the Mode knob to the ERASE setting.
3
Press the Menu button.
The ERASE menu appears.
4
Rotate the Zoom control to highlight Erase All.
5
Press the OK button.
The ERASE ALL menu appears.
6
To delete all photos, rotate the Zoom control to
highlight YES then press the OK button.
The camera deletes all photos. The LCD returns to
ERASE mode and displays the message No images.
Note: To not erase all photos, rotate the Zoom control to
highlight NO, and press the OK button.
Changing the Camera Settings
Use this feature to:
34
•
Set the date and time
•
Set the menu language
•
Toggle sound (beep) settings
•
Format the storage media
•
Set the automatic power-off delay
Polaroid PhotoMAX PDC 2300Z User’s Guide
Setting the date and time
Note: You can reset the date and time on your camera as
necessary.
1
Turn on the camera.
2
Rotate the Mode knob to the SETUP setting.
The SETUP menu appears in the LCD.
3
Rotate the Zoom control left or right to highlight the
Date/Time menu option.
4
Press the OK button.
The DATE/TIME menu appears in the LCD.
5
Rotate the Zoom control to change the value of the
highlighted part of the date and time you want to
change.
As you finish each date and time setting, press the OK
button to move to the next setting.
6
When you finish changing all desired date and time
settings, repeatedly press the OK button to scroll
through the remaining settings and return to the
SETUP menu.
The date and time settings are saved when you return to
the SETUP menu.
7
Rotate the Zoom control left or right to highlight any
other Setup option that you want to configure, and
press the OK button to display its menu. See the
appropriate section in this book for details about each
SETUP menu option.
35
Setting the menu language
1
Turn on the camera.
2
Rotate the Mode knob to the SETUP setting.
The SETUP menu appears in the LCD.
3
Rotate the Zoom control left or right to highlight the
Language menu option.
4
Press the OK button.
The LANGUAGE menu appears in the LCD with the
current language setting highlighted.
5
Rotate the Zoom control left or right to highlight your
language choice.
6
Press the OK button.
The camera returns to the SETUP menu. The menus
will now display in the new language.
7
36
Rotate the Zoom control left or right to highlight any
other Setup option that you want to configure, and
press the OK button to display its menu. See the
appropriate section in this book for details about each
SETUP menu option.
Polaroid PhotoMAX PDC 2300Z User’s Guide
Setting the camera beep
When beeps are enabled, the camera beeps when you press
most buttons or cycle through menus, during the last three
seconds of a self-timed photo, and when taking a photo.
If sound is not enabled, the camera beeps only when taking a
photo.
1
Turn on the camera.
2
Rotate the Mode knob to the SETUP setting.
The SETUP menu appears in the LCD.
3
Rotate the Zoom control left or right to highlight the
Sound menu option.
4
Press the OK button.
The SOUND menu appears in the LCD, with the
current setting highlighted.
•
To enable camera beeps, rotate the Zoom control
left or right to highlight Beep On, then press the
OK button.
•
To disable camera beeps, rotate the Zoom control
left or right to highlight Beep Off, then press the
OK button.
The camera returns to the SETUP menu.
5
Rotate the Zoom control left or right to highlight any
other Setup option that you want to configure, and
press the OK button to display its menu. See the
appropriate section in this book for details about each
SETUP menu option.
Formatting the memory card
Use this feature to format a new memory card or a card that
has become corrupted.
Note: Formatting the memory card erases all photos, even
if you have protected them.
1
Turn on the camera.
2
Rotate the Mode knob to the SETUP setting.
37
The SETUP menu appears in the LCD.
3
Rotate the Zoom control left or right to highlight the
Format Media menu option.
4
Press the OK button.
The FORMAT MEDIA menu appears in the LCD, with
the NO option highlighted.
5
To format the memory card, rotate the Zoom control to
highlight the YES menu option, then press the OK
button.
Note: If you change your mind about formatting the
memory card, rotate the Zoom control to
highlight the NO menu option, then press the
OK button.
6
Upon completion of formatting, the camera displays a
second menu, asking if you want to reset the image
numbers.
Note: If you do not reset the image numbers, the next
photos you take start numbering where the last
photos left off.
Caution: If you tend to store your images in the same folder on
your computer, resetting the image numbers may
cause you to inadvertently overwrite previous image
files when you transfer your new photos to the
computer. For more information on image numbers,
see page 31.
7
To reset the image numbers, rotate the Zoom control to
highlight the YES menu option, then press the OK
button.
Note: To bypass resetting the image numbers, rotate
the Zoom control to highlight the NO menu
option, then press the OK button.
8
38
Rotate the Zoom control left or right to highlight any
other Setup option that you want to configure, and
press the OK button to display its menu. See the
appropriate section in this book for details about each
SETUP menu option.
Polaroid PhotoMAX PDC 2300Z User’s Guide
Setting the automatic power-off
delay
Use this feature to set the duration of inactivity after which
the camera shuts down automatically.
1
Turn on the camera.
2
Rotate the Mode knob to the SETUP setting.
The SETUP menu appears in the LCD.
3
Rotate the Zoom control left or right to highlight the
Auto Power Off menu option.
4
Press the OK button.
The current setting appears highlighted in the LCD.
Note: The default setting is 1.
5
Rotate the Zoom control left or right until the desired
delay appears, then press the OK button.
Note: Available settings are 1, 2, or 3 minutes.
If sounds are enabled, the camera beeps.
6
Rotate the Zoom control left or right to highlight any
other Setup option that you want to configure, and
press the OK button to display its menu. See the
appropriate section in this book for details about each
SETUP menu option.
39
Installing Polaroid PhotoMAX
Pro Software
This section describes how to install Polaroid
PhotoMAX Pro Software and how to find out more about
using it to manipulate your photos.
1
Insert the PhotoMAX Pro Software CD in your
CD-ROM drive.
2
Follow the installation instructions on your computer
screen.
3
If the installation program does not start automatically,
do the following:
a
b
c
d
e
40
Select Run from the Windows Start menu.
Click Browse to locate your CD-ROM drive.
Select Setup (the Setup.exe installation program).
Click Open.
Click OK. The installation program begins.
Polaroid PhotoMAX PDC 2300Z User’s Guide
Transferring Photos to Your Computer
This section describes how to connect the Polaroid
PDC 2300Z Digital Camera to your computer and transfer
photos from the camera to your computer.
The drivers for the Polaroid PDC 2300Z Digital Camera are
automatically installed with the Polaroid PhotoMAX Pro
Software included in your kit.
To transfer photos from your Polaroid PDC 2300Z Digital
Camera to your computer you can use one of the following
methods:
•
Serial cable (provided).
•
USB cable (provided). USB is supported only for
computers running Windows 98 (or later) operating
systems.
•
Optional CompactFlash card readers that connect
through a USB port, parallel port, or a PCMCIA-slot
(available for purchase).
Note: Use the AC adapter whenever possible to extend the
life of your batteries.
41
Connecting the camera to your
computer
Connecting using the serial cable
1
Turn off your camera.
2
Turn off your computer and all its peripherals (scanner,
printer).
3
Insert the round connector on the serial cable (a) into
the digital port on the side of the camera.
DC IN
7V
VIDEO
b
DIGITAL
a
Note: Insert the connector straight into the digital port
without twisting, so that the flat side of the connector
(the side with the arrow on it) faces toward the back
of the camera. If you encounter resistance, do not
force the connector, but reposition it and try again.
4
Connect the other end of the serial cable to the serial
port on the back of your computer.
5
Insert one end of the AC power adapter (b) into the
power port on the side of the camera and plug the other
end of the cable into a grounded electrical outlet.
6
Rotate the camera Mode knob to the PC setting.
7
Turn on the camera.
The Status LCD on the camera displays a PC message.
8
42
Turn on the computer.
Polaroid PhotoMAX PDC 2300Z User’s Guide
Connecting using the USB cable
1
Turn off your camera.
The computer can remain on.
2
Insert the round connector on the USB cable (a) into
the digital port on the side of the camera.
DC IN
7V
VIDEO
b
DIGITAL
a
Note: Insert the connector straight into the digital port
without twisting, so that the flat side of the connector
(the side with the arrow on it) faces toward the back
of the camera. If you encounter resistance, do not
force the connector, but reposition it and try again.
3
Connect the rectangular connector on the USB cable to
the USB port on your computer.
4
Insert one end of the AC power adapter (b) into the
power port on the side of the camera and plug the other
end of the cable into a grounded electrical outlet.
5
Rotate the Mode knob to the PC setting.
6
Turn on the camera.
The Status LCD on the top of the camera displays a PC
message and the computer detects the camera.
43
Transferring photos to the computer
Once the camera and computer are connected using the
serial or USB cable, you can transfer photos from the camera
to the computer.
1
Start the Polaroid PhotoMAX Pro software in either of
two ways:
•
From the Windows desktop: Double-click the
PhotoMAX Pro icon on your desktop to start the
Polaroid PhotoMAX Pro Software.
•
2
From the Windows Start menu: Click on the Start
menu, select Programs then open the Polaroid
PhotoMAX by ArcSoft folder and select
PhotoMAX Pro.
Select File/Acquire/Select Source.
The Select Source dialog box appears displaying the list
of supported devices.
44
Polaroid PhotoMAX PDC 2300Z User’s Guide
3
Highlight Polaroid PDC 2300Z Digital Camera and
click Select.
4
Select File/Acquire/Acquire.
The Polaroid PDC 2300Z TWAIN software opens. From
this dialog box, you can manage the photos in the
camera’s memory.
Note: The TWAIN software can be used with other
applications.
45
Using PhotoMAX Pro with the Internet
In addition to PhotoMAX Pro’s robust photo manipulation
features, PhotoMAX now offers you direct access to the
internet through the new Internet menu option. You can:
•
Automatically send e-mail attachments of your photos
using your e-mail software
•
Go directly to the PolaroidDigital web site
•
Upload and download your photos from the web
Note: Your purchase of the PDC 2300Z Digital Camera
also gives you access to a free membership at
PolaroidDigital.com, with 50 MB of your own
web space! See below for details.
Surfing directly to the web site
1
Start the Polaroid PhotoMAX Pro software in either of
two ways:
•
From the Windows desktop: Double-click the
PhotoMAX Pro icon on your desktop to start the
Polaroid PhotoMAX Pro Software.
•
From the Windows Start menu: Click on the Start
menu, select Programs then open the Polaroid
PhotoMAX by ArcSoft folder and select
PhotoMAX Pro.
2
Make sure your computer is connected to the internet.
For more information, see the instructions that came
with your computer or that were provided by your
internet service provider.
3
Select Internet/Go to Polaroiddigital.com.
A web browser opens and navigates directly to the
PolaroidDigital web site. Follow the instructions on the
site to have fun with your photos!
46
Polaroid PhotoMAX PDC 2300Z User’s Guide
Sending your images via e-mail
PhotoMAX Pro can work in conjuction with your e-mail
software to automatically create new e-mail messages with
your images as attachments.
1
With PhotoMAX Pro open, make sure your computer is
connected to the internet. For more information, see
the instructions that came with your computer or
provided by your internet service provider.
2
To open a photo in the software, select File/Open.
A dialog box opens, displaying the folders on your
computer.
Note: If you have not yet transferred your photos from
the camera to the computer, see page 41.
3
Browse to the image file you want to open, and doubleclick it to open it.
The image opens in PhotoMAX Pro. If you have more
than one image open in the software, make sure the
image you want to send is in the active window (click on
a window to make it active).
4
Select Internet/Send.
A dialog box from your e-mail software opens,
displaying your user profile.
5
Choose the user profile you want to use.
Note: Usually, your profile is your full name. If you’re
not sure, consult the documentation for your
e-mail software.
6
Click OK.
Your e-mail software automatically creates a new e-mail
message with the image file attached.
Note: If you have any problems sending the message,
consult the documentation for your
e-mail software or your computer.
47
Saving your images to the web
If you have created your free online membership at
PolaroidDigital.com (see below for details), you can save
your images from PhotoMAX Pro directly to your personal
online web space.
1
With PhotoMAX Pro open, make sure your computer is
connected to the internet. For more information, see
the instructions that came with your computer or that
were provided by your internet service provider.
2
To open a photo in the software, select File/Open.
A dialog box opens, displaying the folders on your
computer.
Note: If you don’t have any image files on your
computer or you haven’t yet transferred your
photos from the camera to the computer, see
page 41.
3
Browse to the image file you want to open, and doubleclick it to open it.
The image opens in PhotoMAX Pro.
4
Select Internet/Save Image To Web.
The PolaroidDigital.com dialog box opens.
5
Choose one of the following:
•
48
If you already have an account at
PolaroidDigital.com, enter your login ID and
password in the fields, then click OK. Your browser
will automatically navigate to your account at
PolaroidDigital.com.
Polaroid PhotoMAX PDC 2300Z User’s Guide
•
6
If you do not have an account at
PolaroidDigital.com, click Create Account. Your
browser will automatically bring you to a sign-up
screen at PolaroidDigital.com.
From the PolaroidDigital.com web site, follow the
instructions to save your images or create an account.
Getting your images from the web
Once you have posted your images in your PolaroidDigital
personal online web space (see below for details), you can
use PhotoMAX Pro to retrieve them.
1
With PhotoMAX Pro open, make sure your computer is
connected to the internet. For more information, see
the instructions that came with your computer or that
were provided by your internet service provider.
2
Select Internet/Get Image From Web.
The Add to Album dialog box opens.
3
Choose a PhotoMAX Pro photo album in which you
want to download your images.
To...
Then...
Use a
previous
album
a
From the Album drop-down list,
select the album.
b
Click OK.
Create a new
album
a
From the Album drop-down list,
select New Album.
In the New Album dialog box, type a
name for the new album and
click OK.
b
The PolaroidDigital.com dialog box opens.
49
4
Choose one of the following:
•
If you already have an account at
PolaroidDigital.com, enter your login ID and
password in the fields, then click OK. Your browser
will automatically navigate to your account at
PolaroidDigital.com.
•
If you do not have an account at
PolaroidDigital.com, click Create Account. Your
browser will automatically bring you to a sign-up
screen at PolaroidDigital.com.
From the PolaroidDigital.com web site, follow the
instructions to download your images or create an
account.
For more about using the software:
50
1
Go to the Help menu on the Polaroid PhotoMAX Pro
main window to open the PhotoMAX Pro Online User’s
Guide, which provides a searchable topic index and
simple step-by-step procedures for using your Polaroid
PhotoMAX Pro Software.
2
You can also get help with any button or feature in the
software by moving your mouse cursor over it and
clicking your right mouse button. This brings up
context-sensitive help that explains the software button
or feature.
3
Also visit our Help site on the Web for more
information about your software and camera:
www.PolaroidDigital.com
Polaroid PhotoMAX PDC 2300Z User’s Guide
Troubleshooting
Problem
Solution
The camera
has no power.
• Turn off and then turn on the digital camera. The
digital camera may have automatically turned off to
save battery power.
• Check to make sure that the battery terminals
(+ and –) are correctly orientated as shown inside the
battery compartment.
• The batteries are dead. Replace all four AA batteries.
Do not mix old batteries with new batteries, or use
different manufacturer’s batteries together. Purchase
rechargeable NiMH batteries to extend battery life.
• Use the AC adapter whenever possible. Check to
make sure that the AC adapter is firmly attached to
the digital camera.
My photos
display strange
hues such as
orange or blue.
The digital camera’s white balance setting may be
inappropriate for the type of lighting conditions in
which you are shooting. In the RECORD menu, change
the white balance settings to a more appropriate level.
For more information, see page 24.
My TV isn’t
displaying my
photos or is
displaying
strangely
• Make sure the TV is set to the video setting. For more
information, see the instructions provided by your
television manufacturer.
• You may not have set the video mode correctly on the
camera (NTSC or PAL). Turn off the camera and
disconnect it from the TV, then try resetting the video
mode on the camera. For more information, see
page 29.
51
Problem
Solution
The
PhotoMAX
Pro Software
does not see
the digital
camera.
• Ensure that the digital camera power is turned on and
a PC message appears on the Status LCD. Use the AC
adapter when downloading photos.
• For serial port connections, connect one end of
the serial cable to the computer serial port. Connect
the other end of the cable to the Digital port on
the camera. Make sure that the cables are firmly
attached to the camera and computer.
• For serial port connections, turn off the camera,
computer and all computer peripherals and connect
the camera. Turn on the camera and then turn on the
computer.
• For USB port connections, connect one end of
the USB cable to the computer USB port. Connect
the other end of the cable to the Digital port on
the camera. Make sure that the cables are firmly
attached to the camera and computer. If you cannot
establish a connection, turn the computer off and
then on. Launch the software.
• Your serial port may have a conflict. Another software
application or hardware device (such as a hand-held
computer device) may be using your COMM port
settings. Turn off these other software and hardware
devices when the digital camera is connected to your
computer.
• Your computer may have an internal BIOS conflict.
Read the instructional manual and other
documentation that came with your computer, or
check with the computer manufacturer for more
information.
• Purchase and install an external memory card reader
for transferring your photos. See your local computer
retailer for more information.
52
Polaroid PhotoMAX PDC 2300Z User’s Guide
Problem
Solution
Cannot take a
photo.
• Press the shutter button down halfway to focus the
camera. Press the shutter button all the way down to
take the photo.
• The flash is charging. Wait until the flash is charged
and then take the photo.
• The digital camera is processing a photo. Wait until
the photo has finished processing before taking
another photo.
• Check to make sure that the memory card is inserted.
If the camera beeps when you turn on the power, the
memory card is not inserted. Turn the camera off,
reinsert the memory card, and turn the camera on
again.
• The memory card is full. Connect the camera to your
computer and download photos on the card. Delete
photos from the card to free up space for more
photos.
• The digital camera is connected to your computer.
You can use the software controls in the TWAIN
driver window to take a photo while the camera is
connected to a computer.
• The memory card is corrupted. Reformat the
memory card or purchase a new memory card.
The LCD does
not turn on.
• Turn on the camera and press the LCD button to see
if it turns the LCD on.
• The digital camera is connected to a computer.
Disconnect the digital camera to turn on the LCD.
• The digital camera is connected to a TV. Disconnect
the camera from the TV and try the LCD again.
• The batteries are weak. Replace the batteries or use
the AC adapter. To save battery power, use the optical
viewfinder when composing photos.
The live photo
in the LCD
viewfinder
looks “jumpy.”
• The camera is being used in low light conditions.
Increase the amount of light, or use the optical
viewfinder to compose your photo.
53
Problem
Solution
The flash
doesn’t work.
• The flash is turned off. Press the Flash enable button
(top of camera) to change the flash setting. Use the
Auto Flash setting for best results.
• The camera is set to the Auto Flash setting and the
sensor determined that there was sufficient light to
take the photo without the flash.
My photo
looks blurry.
• The subject of your photo moved while the photo was
being taken. Remember to have your subjects remain
still while a photo is being taken.
• The camera moved while the photo was being taken.
Hold the camera steady while taking a photo, or use a
tripod. There is a tripod mount on the bottom of the
camera.
• The wrong focal setting was used. Use the Macro lens
setting only for subjects from 1.5 to 18 in.
(3.8 to 46 cm) away from the camera.
My photo
looks dark.
• There was not enough light available when the photo
was taken. Use the Auto Flash setting and increase the
amount of light (if possible).
• The subject was too far away from the camera. The
ideal flash range is 1.6 to 10 ft. (0.5 – 3 m).
• The Exposure Value (EV) menu setting is too low. In
the RECORD menu, increase the EV setting and take
the photo again.
My photo
looks too light.
• The flash fired when lighting conditions didn’t need
it. Use the Auto Flash setting.
• The digital camera was focused on a bright object or
light. Try taking the photo from a different angle to
avoid bright spots in photos.
• The subject was too close to the flash when the photo
was taken. Turn off the flash when using the Macro
lens setting, or take the photo from a greater distance
(ideally 3 to 10 ft. from the camera).
• The Exposure Value (EV) menu setting is too high. In
the RECORD menu, decrease the EV setting and take
the photo again.
54
Polaroid PhotoMAX PDC 2300Z User’s Guide
FCC Notice
Warning: Changes or modifications to this unit not
expressly approved by the party responsible
for compliance could void the user's authority
to operate the equipment.
Note: This equipment has been tested and found to comply
with the limits for a Class B digital device, pursuant
to Part 15 of the FCC rules. These limits are designed
to provide reasonable protection against harmful
interference when the equipment is operated in a
residential installation.
This equipment generates, uses, and can radiate radio
frequency energy and, if not installed and used in
accordance with the instruction manual, may cause harmful
interference to radio communications.
However, there is no guarantee that interference will not
occur in a particular installation. If this equipment does
cause harmful interference to radio of television reception,
which can be determined by turning the equipment off and
on, the user is encouraged to try to correct the interference
by one or more of the following measures:
•
Reorient or relocate the receiving antenna.
•
Increase the separation between the equipment and
receiver.
•
Connect the equipment into an outlet on a circuit
different from that to which the receiver is connected.
•
Consult the dealer or an experienced radio TV
technician for help.
55
Camera Precautions
Observe the following precautions when you use this digital
camera:
56
•
This camera is battery operated. Supervise children
when the camera is operated by them or used in their
presence. To avoid electrical shock, do not expose the
camera to or immerse it in water or other fluids. Do not
disassemble or operate the camera if dropped or
damaged. Contact a Polaroid Service Center for repair
information.
•
Do not open the camera case or attempt your own
repairs. High-voltage internal components create the
risk of electrical shock when exposed. Return your
camera to authorized Polaroid service providers for all
maintenance and repairs.
•
Keep the camera away from water and other liquids.
Moisture creates the danger of fire and electrical shock.
Do not use the camera in the rain, at the seashore, or
any location where there is the possibility of exposure to
liquids.
•
Turn the camera off, unplug the AC adapter, and
remove the batteries immediately if the camera is
exposed to water or any other liquid.
•
Do not open the battery compartment or unplug the AC
adapter while the camera is on. If the camera loses
power while processing a new photo, the photo cannot
be stored and may cause corruption of other stored
photos.
Polaroid PhotoMAX PDC 2300Z User’s Guide
Battery Handling
When using batteries:
•
Use only AA high-capacity super alkaline or lithium
disposable batteries or NiCad or NiMH rechargeable
batteries with the camera.
•
Never mix old batteries with new batteries, or mix
different types of batteries or batteries from different
manufacturers.
•
Do not expose batteries to direct heat or dispose of
them by burning. Dispose of batteries according to local
laws and regulations.
•
Remove batteries from the camera if you are not going
to use it for an extended period of time.
•
Remove dead batteries from the camera. Dead batteries
are susceptible to leakage, and may cause significant
damage to your camera.
Caution: Camera damage caused by misuse of batteries is
not covered under the terms of the One Year
Limited Warranty.
Contacting Polaroid
Polaroid Corporation provides technical support for digital
cameras at www.PolaroidDigital.com, and within the United
States by calling 800-897-0356 from 8 A.M. to 8 P.M. EST,
7 days a week. Please note that phone-support and repair
services are regional and may not be available for a
particular product outside the country where it was
purchased. To obtain parts for cameras purchased in the
United States, call 800-343-4846. A list of Polaroid
International sales and customer support offices is available
at www.polaroid.com/service/phone.html.
Internet Support
Technical support is available via the Internet. Visit our Web
site at: www.PolaroidDigital.com.
57
Warranties
One Year Limited Warranty
Polaroid PhotoMAX PDC 2300Z Digital Camera
Polaroid will, at our option, repair or replace any unit found
defective in manufacture within the warranty period. The
warranty period is determined by the date of purchase. Keep
the receipt as proof of purchase. Otherwise, the warranty
period is determined by the date of manufacture. This
warranty does not apply to damage caused by accident,
misuse or tampering, and excludes all consequential
damages except in jurisdictions not allowing such
exclusions or limitations.
Ninety Day Limited Warranty
Polaroid PhotoMAX Pro Software
Polaroid warrants that the software media will be free of
defects in materials and workmanship for a period of 90 days
from the date of purchase. Polaroid's entire liability and your
exclusive remedy shall be to repair or replace the software
that does not meet Polaroid's Limited Warranty and is
returned to Polaroid with a copy of your sales receipt. This
Limited Warranty is void if failure of the software has
resulted from accident, abuse, or misapplication. Any
replacement software will be warranted for the remainder of
the original warranty period or 30 days, whichever is longer.
Polaroid makes no other warranties with respect to the
software, either express or implied, including but not limited
to implied warranties of merchantability and fitness for a
particular purpose.
©1999-2000 Polaroid Corporation, Cambridge, MA 02139,
U.S.A., owner of the trademarks “Polaroid”, “PhotoMAX”
and “PDC”. All other product names may be the property of
their respective owners. All rights reserved, Printed in the
U.S.A.
PU-21652M-0 10/00
58
Polaroid PhotoMAX PDC 2300Z User’s Guide
©1999-2000 Polaroid Corporation, Cambridge, MA 01239, U.S.A., owner
of the trademarks “Polaroid”, “Polaroid PhotoMAX” and “PDC”.
All other product names may be the property of their respective owners.
Printed in the U.S.A. All rights reserved.
PU-21641M-0
10/00
PDC 2300Z
Technical Support Information
(This information replaces that found on Page 57)
Polaroid Corporation provides technical support for digital cameras at
http://www.polaroid.com/, and within the United States by calling
800-897-0356 from 10 A.M. to 7 P.M. EST, (Mon - Fri) and 10 A.M.
to 4 P.M. EST (Sat). Please note that phone support and repair services are
regional and may not be available for a particular product outside the
country where it was purchased. To obtain parts for cameras purchased in
the United States, call 800-343-4846 from 9 a.m. to 5 p.m. EST, Mon. - Fri.
(Note: No technical support is available at this number.) A list of Polaroid
international sales and customer support offices is available at
http://www.polaroid.com/service/phone.html.
Technical support is available via the Internet. Visit our Website at:
http://www.polaroid.com/.