1
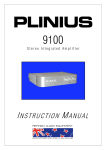
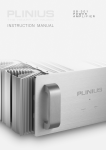
TIKI
N E T W O R K A U D I O P L AY E R
INSTRUCTION MANUAL
www.pliniusaudio.nzld.com
Contents
Introduction ...............................................................................................................2
Design Philosophy ...............................................................................................3
Unpacking ....................................................................................................................4
Placement & Ventilation ....................................................................................4
Care & Maintenance............................................................................................5
Precautions ................................................................................................................6
Front Panel Functions ........................................................................................7
Rear Panel Functions .........................................................................................7
Installation & Operation ....................................................................................9
Product Features ..................................................................................................11
Playback Control .....................................................................................................11
Firmware Upgrade.................................................................................................11
Troubleshooting .......................................................................................................12
Specifications ..........................................................................................................13
Quick Start Guide ..................................................................................................14
Index ................................................................................................................................16
All operational, technical and descriptive material in this publication
is subject to change at any time without notice. For further product
information or queries, please contact your Plinius dealer.
Plinius products are designed and manufactured by
Plinius Audio Limited, New Zealand.
Introduction
Congratulations on your decision to become the proud owner of this Plinius Tiki
Network Audio Player.
This manual has been prepared to help you understand the operation of your network
audio player, and to provide information about its design and the variety of ways it
may be used.
We have designed and manufactured this network audio player to reproduce your
favourite music faithfully and accurately. With a little care and a full understanding of
the operating recommendations in this manual, your Plinius Tiki Network Audio Player
will provide years of high-quality, trouble-free performance.
Please take the time to read this manual thoroughly before using your network audio player.
SERIAL NUMBER
FINAL TEST CERTIFIED BY
2
PLINIUS TIKI
Design Philosophy
From a distance you can see that the design of the Plinius products is more than
an applied styling exercise to the front panel. We have started from the ground up
to produce a casing for our electronics that is unrivalled in its physical strength and
visual simplicity.
Wherever possible we have reduced the number of parts needed and then invested
massively in refining and producing the remaining parts to the highest quality
achievable with state of the art computer controlled machines allied with expert
craftsman. Examples of this approach include the hydraulically formed corners on
the amplifiers giving much greater strength and the one piece housing for the remote
control that looks, feels and genuinely is robust.
As with music that you are not familiar with, truly innovative new designs can take time
to understand and enjoy. How often have you heard music that you were first unsure
of, that over repeated listening, has become a firm favourite?
Our designs are fundamentally different to many other companies, and we hope that
you will take the time to explore their unique character and qualities because we have
not made them different simply to be different. We genuinely believe that their visual
and tactile qualities do improve the experience of listening to music and that is our
design goal!
Ross Stevens
DESIGN DIRECTOR
N E T W O R K A U D I O P L AY E R
3
Unpacking
Open the box from the top and remove the accessories from the foam end caps.
You may now proceed to lift the unit from the box, Once the unit is removed you can
proceed with the removal of the foam end caps. These caps are designed to fit on
the front and back of the unit for maximum protection. Retain the packaging for future
transportation of this unit.
Placement & Ventilation
Your Plinius product may operate at a moderately high temperature, especially
during extended listening sessions. With this in mind, we recommend the following
guidelines for placement and ventilation:
•
The ideal location is upon a rigid stand, away from direct contact with any
temperature sensitive materials, furniture or deep pile carpets.
•
Ventilation through and around the amplifier should be kept unimpeded.
•
Ensure heat vents (slots in the lid) are not covered or restricted in any way.
•
Equipment racks should be of an open type with no closed side panels and no
closed front or rear panels. Ensure a minimum of 100mm clearance on all sides of
your Plinius unit to other equipment and the shelf above. If the unit is in an enclosed
cabinet, the clearance should be greater than 200mm on all sides. Ensure the space
between the chassis and shelf below the unit is unobstructed at all times.
•
When stacking separate audio components, apply the minimum clearances above,
as well as a minimum of 400mm clearance above the top unit for suitable airflow.
•
NOTE: This unit has been designed for use in moderate climates only, not for tropical
conditions.
The design of this Plinius product incorporates a very high level of mechanical
decoupling of the input and output. It can however still be influenced by acoustical
feedback in the operating environment. The use of acoustic cones or a suitably
spiked amplifier stand or table may further enhance the performance of this amplifier.
Consult your Plinius dealer for further advice if required.
4
PLINIUS TIKI
Care & Maintenance
With simple care and maintenance your Plinius product can be kept looking and
operating like new for many years to come.
MAINTAINING THE CONNECTORS
Exposed connectors such as the RCA connectors will be subject to environmental
factors, and over time the surface may degrade. This can be greatly reduced by fitting
readily available ‘RCA caps’ to reduce the effects of environmental elements on the RCA
connectors. These RCA caps or RCA shorting caps can also provide sonic benefits.
Connector cleaning products are also available to clean the RCA and cable connectors
and frequent checks and cleaning will help maintain a good signal connection.
NOTE: DO NOT use RCA shorting caps on output connectors or power amplifier input
connectors. Use RCA shorting caps on unused preamplifier stage input connectors only.
Standard RCA shielding caps can be used on any unused input or output connectors.
MAINTAINING THE SWITCHES
Switches should be maintained by using each various switch setting periodically.
Even if a switch or a switch setting is not used, it is a good idea to toggle small
switches and turn rotary switches though the full range of the switch several times in
succession to keep the contacts active. Performing this simple action will promote
longevity of the switch contacts.
SURFACE CLEANING
From time to time you may wish to clean the surface of your Plinius equipment to
remove dust, or any material build up from the atmosphere or on commonly used
controls. Your Plinius product is made up of parts that have a hard anodised or a
powder coat finish and will clean easily without being damaged.
Cleaning should be carried out using a soft cleaning cloth, dry or with either a small
amount of water or a very mild surface cleaner, while observing the following guidelines:
•
As a safety precaution, always switch the equipment off prior to cleaning
•
Always use a cloth that is soft and clean
•
Never use abrasives or polishing compounds anywhere on the unit
•
Never apply liquid directly to the surface of the unit
•
Use the cloth dry or with mild surface cleaners of either liquid or foaming type
•
Apply only small amounts of cleaner to the cloth
•
DO NOT rub the surface but wipe clean only. Excessive rubbing may dull powder
coat or wear the screen printed text.
N E T W O R K A U D I O P L AY E R
5
Precautions
PLEASE TAKE SPECIAL NOTE OF THE FOLLOWING PRECAUTIONS
BEFORE OPERATING YOUR NEW NETWORK AUDIO PLAYER.
•
DO NOT leave flammable material on the network audio player whilst running, as
this could pose a serious fire risk.
•
The Tiki Network Audio Player operates at hazardous voltage levels. There are
some alterations that may be made by you, the owner. However, we recommend
that any work requiring removal of the lid be referred to a suitably qualified and
experienced service technician.
•
DO NOT attempt to connect any input of this network audio player to its own outputs.
•
DO NOT earth any output terminal or connect any of these terminals together
without following the instructions in this manual or seeking qualified assistance.
•
DO NOT place this network audio player in any position where liquids, or any
foreign material may accidentally enter it.
•
DO NOT connect any voltage source, short circuit, earth/ground or appliance (other
than suitable audio preamplifiers) to the Tiki Network Audio Player output terminals.
•
DO NOT expose the unit to dripping or splashing.
•
DO NOT place objects filled with liquids on the unit, e.g. vases.
•
DO NOT place sources of naked flame on the unit, e.g. candles.
6
PLINIUS TIKI
Front Panel Functions
1. DISPLAY LED
An LED on the front panel indicates that the power is on. When first switched on, the
display LED will immediately light and will remain lit during the time the network audio
player is powered on.
1
Rear Panel Functions
This panel incorporates the terminal for connecting the input signal from a Network
storage device, outputs to the preamplifier, ground lift switch and also the mains
supply. Please remember that your Plinius Tiki Network Audio Player is a high quality
electronic instrument. Be sure that you understand your system’s requirements fully
before you make any connection to this network audio player.
4
1
1
2
5
3
1. OUTPUT TERMINALS
Connections for preamplifiers or integrated amplifiers are provided on the rear panel.
Connections are available for analogue single ended RCA and balanced XLR cables.
The XLR output pin configuration used in all Plinius product is:
PIN 1 to GND
PIN 2 to +Signal
PIN 3 to –Signal
NOTE: Because of the way balanced XLR outputs are configured it is not possible to
connect both XLR and RCA at the same time.
N E T W O R K A U D I O P L AY E R
7
2. GROUND LIFT SWITCH
This switch allows the signal ground to be disconnected from the chassis. In some
installations, a hum loop may exist due to duplicate ground paths from different
equipment. Use this switch to remove the connection from 0V to ground thus allowing
some flexibility in your particular set-up.
3. ETHERNET INPUT CONNECTOR
The RJ45 Ethernet connector allows connection to the Router or Computer Network
Device.
4. MAINS POWER CORD IEC CONNECTOR
This connector is where the mains supply cable from your wall connects to the
network audio player. You will notice that a fuse holder is mounted within this
connection, and it holds a mains fuse to provide surge and overload protection for
your network audio player.
5. MAINS SWITCH
The heavy-duty rocker switch on the right of the panel diagram turns the Mains/
Line Power to the network audio player ON or OFF. For your safety, this switch should
remain accessible at all times in case of an emergency.
8
PLINIUS TIKI
Installation & Operation
WARNING: RISK OF ELECTRIC SHOCK. TERMINALS MARKED WITH
SHOULD BE CONSIDERED HAZARDOUS LIVE AT ALL TIMES.
This network audio player operates at hazardous voltage levels. We recommend
that any work requiring removal of the lid be referred to a suitably qualified and
experienced service technician. DO NOT place this network audio player in any
position where liquids or any foreign material may accidentally enter it.
PLEASE READ & UNDERSTAND THE PRECAUTIONS WITHIN THIS MANUAL
FOR CORRECT PLACEMENT & OPERATION OF THIS PRODUCT.
CONNECTIONS
Connections to your Plinius Tiki Network Audio Player should be made in the same
order as they are listed in this section. DO NOT attempt to connect your Tiki Network
Audio Player until you have read and fully understood these instructions. Although these
instructions refer to the connection of the Plinius Tiki to a preamplifier, the Tiki can also
be safely installed into multimedia systems by following the same installation guidelines.
Should you require any further assistance, please contact your Plinius dealer.
ETHERNET INPUT
Connect your Network device (Router, Computer etc) to the Ethernet input on the
back the Plinius Tiki using suitable CAT-5 or CAT6 Ethernet cables only. Make sure the
connector is a snug fit and inserted all the way in.
NAS MEDIA SERVER
NETWORK ROUTER
TIKI ETHERNET INPUT
OUTPUT TERMINALS
The connection of the outputs of the Tiki Network Audio Player must be made by an
‘instructed person’ or by suitable ready made interconnect cables only.
Connections for preamplifiers are provided at the rear of the unit. If using singleended RCA outputs connect your Tiki to the ‘line level’ RCA inputs on the back of
the preamplifier. Make sure you connect the red coded cable to the red RIGHT RCA
output, and the black (or white) cable to the white LEFT RCA output. Also make sure
the RCA connectors are a snug fit and are inserted all the way in.
N E T W O R K A U D I O P L AY E R
9
TIKI OUTPUTS
PREAMPLIFIER LINE INPUT
For XLR output connection, make sure you connect the RIGHT XLR output and LEFT
XLR output to the right and left ‘line level’ inputs of your Preamplifier respectively. Also
make sure the XLR connectors click into place.
NOTE: DO NOT connect XLR and RCA at the same time, use only one or the other. DO
NOT connect the output of the Plinius Tiki to a preamplifier phono input. Connect only
to line level inputs such as CD, Line 1, Tuner, etc.
CONNECTING THE MAINS SUPPLY
Firstly, check that the mains supply voltage printed on the rear of this network audio
player is similar to the mains supply voltage in your area. If in doubt, please consult
your Plinius dealer. Mains supply power connection is via the plug-in lead supplied
with your Plinius Tiki. Where possible, check the wall outlet is switched OFF, then
connect the local mains plug end of the lead to the wall outlet. Check the Tiki is
switched OFF, and connect the IEC end of the cable to the IEC socket at the back of
the Tiki. With the cord fully connected, switch the wall outlet ON.
Now that the Plinius Tiki is configured correctly, switch the power switch on the rear
panel to ON. You can now enjoy your new Plinius Tiki Network Audio Player.
NOTE: This unit must be connected to a mains socket outlet with a protective earthing
connection. The wall outlet socket or mains switch must be accessible at all times in
case of emergency.
WARM-UP PERIOD
You will find that the Plinius Tiki will become noticeably ‘warmer’ in sound after being on
for a period of time. We usually recommend waiting at least 24 hours before expecting the
best quality of sound reproduction from your network audio player.
10
PLINIUS TIKI
Product Features
MAINS/LINE FUSE
A Mains/Line fuse is fitted within the IEC socket on the rear of the power supply pack.
A small drawer at the bottom of this socket may be removed (after the IEC plug is
removed) by levering it out with a flat blade screwdriver. The fuse fitted should be
rated at no greater than that specified on the rear panel.
IMPORTANT: DO NOT FIT A FUSE WITH A HIGHER RATING.
NOTE: Fuse failure may indicate a severe problem. Should the network audio player
continue to exhibit mains fuse failure contact your Plinius dealer.
Playback Control
The Plinius Tiki Network Audio Player is designed to be operated with UPnP Mobile
Digital Media Controllers or Digital Media Controllers.
Control of the files from the Media Server to the Tiki can be performed by
Smartphone, iPod/iPad or iPhone applications designed for UPnP Mobile Media Server
Control. The application is used to select and control digital audio library files to be
played through the Tiki digital to analogue converter.
Alternatively, Digital Media Controllers that operate within compatible Media Servers
can be used without the requirement for wireless connectivity.
Firmware Upgrade
To ensure the best ongoing operation, firmware upgrades may become available
periodically. The upgrade process requires connection of the Tiki Network Audio
Player to the Internet so it may receive the upgrade files from the Plinius upgrade
server. Your Plinius dealer can inform you of the features and benefits of a firmware
upgrade, and confirm if the upgrade is applicable to your hardware.
Should you choose to apply the available upgrade, your Plinius dealer will arrange
activation of the upgrade for your particular hardware. After the upgrade has been
activated at the upgrade server, you will be advised to switch off and then re-power
your unit. Once the product is re-powered, the upgrade process will begin and takes a
maximum of 5 minutes. After this time the product is ready to be used as normal.
Following an upgrade you will receive advice that the upgrade process was successful.
N E T W O R K A U D I O P L AY E R
11
NOTE: During the upgrade do not switch off, or re-power the unit, or attempt to
operate playback functions through the unit. Should the firmware upgrade fail, you will
be advised that the firmware upgrade was unsuccessful and your dealer will again
have to activate the upgrade at the upgrade server.
Troubleshooting
NO SOUND FROM THE UNIT
If the unit is not reproducing audio take the following steps:
•
Check the Tiki is correctly connected to an appropriate input on the preamplifier.
Refer to the Installation & Operation section on page 9.
•
Check the file from the Media Server is playing. If it has adjustable volume, check
this is at full volume.
•
Check the preamplifier is set to select the correct source input. Adjust the source
selector for the Tiki as the source component.
•
Check the volume. Turn the volume up to a point just below the normal listening
level. DO NOT turn the volume up to maximum in case the sound begins to come
through the speakers.
•
Check the system is working with another source to confirm the fault is not due
to the preamplifier or power amplifier stages.
•
Check the Network components are working correctly. Ensure the Music Service
is active and the control device has recognised the Tiki as the Renderer and has
also recognised the Media Server Library device.
•
Check the Network connections are active. Check the router is operating
correctly and any wireless connections have a strong signal. Try other network
connected devices to confirm connectivity across the network is active.
POWER FAILURE
The unit may have suffered mains fuse failure. Check the mains fuse and replace if
needed.
NOTE: If the unit immediately or repeatedly suffers mains fuse failure, there may be a
major problem and you should contact your Plinius dealer.
12
PLINIUS TIKI
Specifications
PRODUCT DESCRIPTION
DLNA Digital Audio Renderer functionality
DLNA 1.0/1.5 compatible
AUDIO FILE SERVER
DLNA Digital Media Servers
PLAYBACK CONTROL
DLNA Digital Media Controllers
UPnP Smartphone applications
UPnP iPod/iPad, iPhone applications
DAC CAPABILITY
24 bit, 96ks/s
AUDIO CODEC SUPPORT
FLAC (up to 24/96)
LPCM (up to 24/96)
AIFF, MP3
INPUT
1 x RJ45 connector
CONNECTIVITY
10/100 Ethernet
OUTPUT:
1 x RCA stereo Pair
1 x XLR stereo Pair
FREQUENCY RESPONSE
20Hz to 20kHz +/-0.2dB
DISTORTION
<0.01% THD at Rated Input Level
HUM AND NOISE
-100dB at Rated Input Level, A Weighted
MAXIMUM OUTPUT LEVEL
2V RMS Into 10k or Higher
OUTPUT SOURCE IMPEDANCE
Typically 100R
DIMENSIONS
Height:
Width:
Depth:
Weight:
80mm
450mm
400mm
5.5kg
(3.5”)
(17.75”)
(15.75”)
(12lbs)
COLOUR
Available in silver or black
N E T W O R K A U D I O P L AY E R
13
Quick Start Guide
COMPONENT CHECKLIST
Check you have all the components to get the system working. This list outlines the
components you need, and some common examples of these components.
THE PLAYER ................................. DIGITAL MEDIA RENDERER (DMR)
The Plinius Tiki will perform this function.
THE SERVER ................................ DIGITAL MEDIA SERVER (DMS)
This is a DLNA compatible device for storage of your music library
and software to manage the files. This may be a Ripping-NAS, NAS,
PC or Mac and a program such as Asset UPnP, Windows Media
Player, TwonkyMedia Server etc.
DIGITAL AUDIO FILES
These files may be ripped from CD’s you own or files you have
purchased and downloaded online. You may rip the CD’s using a
Ripping NAS or software such as dBPowerAmp, or you may use a
professional CD ripping service. NOTE: Copyrights exist around
recorded music and its use. Do not rip CDs for use unless you are
the owner of the original disc.
THE CONTROLLER ................ MOBILE DIGITAL MEDIA CONTROLLER (M-DMC)
The Mobile Digital Media Controller is a DLNA UPnP application
(or “App”) installed on your mobile device for control of the digital
audio. The App may be a common type such as PlugPlayer or
Songbook UPnP, or another application you have selected. The
device the app is installed on may be Smartphone, iPhone, iPad,
iPod etc that you have chosen or that has been recommended by
your dealer.
THE NETWORK .......................... WIRELESS ROUTER
This device connects to your Plinius Tiki and to your media server
and has capability to create a wireless connection between this
point and your Controller. This may be a wireless router or similar
component.
COMPONENT CONNECTIONS
There are several ways to connect your components. The most
simple is to use LAN cables between the Plinius Tiki, Wireless
Router and Media Server. Alternatives are using a set of Powerline
products to make use of your home power wiring instead of one of
these LAN cables, or you may use wireless bridge devices to send
and receive at each end instead of one of these LAN cables.
14
PLINIUS TIKI
1
Amplifier
2
DMR Plinius Tiki
COMPONENT SET UP
Connect the components and power them ON.
Let the components establish a connection and then
3
DMS Server
Network Wi-Fi Router
4
M-DMC Controller
navigate and control the Digital Media Server files
using the Mobile Digital Media Controller.
1
CONNECT TIKI TO AUDIO SYSTEM
Connect the DMR (Plinius Tiki) audio outputs
to your audio system line inputs.
2
CONNECT TIKI TO NETWORK
• Connect the Tiki to the Network with one
of the following:
- CAT5 or CAT6 LAN Cable
- Ethernet over Powerline kit
- LAN Wireless bridge.
• Power the Tiki ON now.
3
CONNECT SERVER TO NETWORK
• Connect the DMS (NAS/PC/Mac or other)
to the Network with one of the following:
- CAT5 or CAT6 LAN Cable
- Ethernet over Powerline kit
- Wireless LAN bridge.
• Power the Network components ON now.
• Power the DMS ON now.
4 CONNECT CONTROLLER TO NETWORK
• Take the M-DMC and establish a wireless
connection to the Network Wi-Fi Router of
the Tiki System.
• Launch the M-DMC App you will use to
control playback through the Tiki.
• Check the Plinius Tiki is connecting to the
M-DMC as a DMR device on the Network.
• Select the Tiki as the active DMR device.
• Check the Server is connecting to the
M-DMC as a DMS device on the Network.
• Select the Server as the active DMS
device.
5 USE YOUR PLINIUS TIKI
Use the M-DMC to browse the library of
songs, select songs for playback, and
control the songs as they play.
Remember to consult the manufacturer’s documentation for any questions you have
about the Digital Media Server, Mobile Digital Media Controller, control point App or
network connectivity of the products you are using with the Plinius Tiki.
N E T W O R K A U D I O P L AY E R
15
Index
Display LED.................................................................................................7
Ethernet Input...........................................................................................8, 9
Firmware Upgrades .............................................................................11
Front Panel Layout ...............................................................................7
Ground Lift Switch ................................................................................8
IEC Power Connector ........................................................................8, 10
Mains/Line Fuse .....................................................................................11
Mains Supply Connection .............................................................10
Mains Switch .............................................................................................8
Output Terminals ...................................................................................7, 9
Placement ...................................................................................................4
Playback Control ....................................................................................11
Quick Start Guide .................................................................................14
Rear Panel Layout.................................................................................7
Safety Precautions ...............................................................................6
Serial Number ..........................................................................................2
Troubleshooting ......................................................................................12
Ventilation .....................................................................................................4, 6
Warm-Up Period .....................................................................................10
16
PLINIUS TIKI
TIKI
N E T W O R K A U D I O P L AY E R
INSTRUCTION MANUAL
www.pliniusaudio.nzld.com