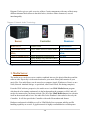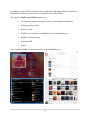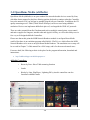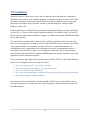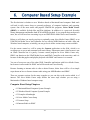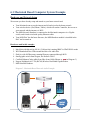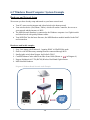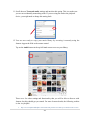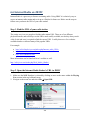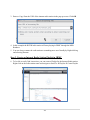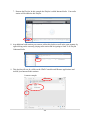
1
Network Renderer Module Analog DAC, DAC V, Select DAC User Manual Revision 1.3 (12/5/2015) This manual applies to all the MSB Renderer products but illustrates its operation using the Analog DAC. Table of Contents Table of Contents.........................................................................................................2 1. Introduction ...........................................................................................................4 1.1 Overview .............................................................................................................5 1.2 Features ..............................................................................................................6 1.3 In the Box ...........................................................................................................6 2. Quick Start.............................................................................................................7 3. Module Installation ..............................................................................................13 4. UPnP / DLNA Guide ..............................................................................................19 3.1 UPnP (Universal Plug and Play)...........................................................................19 3.2 UPnP AV ............................................................................................................19 3.3 DLNA (Digital Living Network Alliance) ..............................................................23 3.4 OpenHome Media (ohMedia) .............................................................................24 3.5 Conclusion ........................................................................................................25 5. Networked Audio Setup .......................................................................................26 2 6. Computer Based Setup Example ...........................................................................27 6.1 Macintosh Based Computer System Example .....................................................28 6.2 Windows Based Computer System Example .......................................................29 6.3 Examples Afterthought .....................................................................................30 6.4 Jriver Media Center Setup ..................................................................................31 6.5 Jremote Installation ...........................................................................................38 6.6 Internet Radio on JRMC .....................................................................................44 7. NAS Based Setup Example ....................................................................................47 7.1 NAS Based System Example ...............................................................................48 7.2 NAS and UPnP Server Installation .......................................................................49 7.3 MinimWatch Installation ....................................................................................69 7.4 UPnP Controller Installation - Lightning DS .......................................................75 7.5 Internet Radio on a NAS ....................................................................................80 7.6 Open Home Media Emulation on a NAS ............................................................87 7.7 8. Tidal Streaming Service on a NAS...................................................................98 Support .............................................................................................................101 3 1. Introduction Thank you for choosing the MSB Network Renderer module. Please take a few moments to read through the relevant sections of the manual for important installation and setup information. The MSB Network Renderer is a small input module for the Analog DAC, the DAC IV or the DAC V line, but it contains some very complex technology. The most important part of the design is a passionate attention to audio quality, but at the same time it provides you with the ability to enjoy network based audio. You will now be able to use a variety of audio sources, from computers to network attached storage (NAS) devices to stream audio files directly to your MSB DAC using an Ethernet cable. In addition you can use your pads, tablets, or phones to access your music library and manage audio playback. An understanding of the various parts involved in network audio is important and can initially be daunting, so we have included a chapter below on UPnP (Universal Plug and Play) concepts along with a few examples of system setup to get you started with enjoying network based audio 4 1.1 Overview There are many naming conventions and terminology used with this class of product, so let’s start with a picture. Diagram 1: Network Audio Components Server Controller Renderer DAC In simple terms, audio files are stored on a Server, which can be a laptop, desktop computer or network attached storage (NAS) device. A Controller is a program that runs on a laptop, tablet, or phone, and accesses your music library and asks the Server to serve the files to a Renderer. The Renderer receives and converts the audio files into a digital audio stream which is then sent to the DAC. The Server, Controller and Renderer are all connected on your home network The DAC receives the digital audio stream from the Renderer and converts it into analog audio. It is very sensitive to noise and requires a very low jitter clock. The advantage of plugging the MSB Renderer into the MSB DAC is: 1. Clock is synchronized by the very low jitter DAC master clock 2. Grounds are isolated and dedicated clean power is provided MSB DACs are designed with modular inputs to take full advantage of the Network Renderer Input Module, and the results are stellar. There is a huge selection and variety of software and hardware combinations that can fulfill each of these networked audio functions. In this manual we will show you a few examples to get you started with enjoying the MSB Network Renderer, but is by no means the only way of setting up your Networked Audio system. 5 1.2 Features Main Features 1. Digital Media Renderer 2. UPnP AV 2.0 / DLNA 3. Plays and decodes common audio formats from HTTP streams 4. PCM (Pulse Code Modulation) resolution up to 32 bits, with sampling rate up to 384kHz 5. One-bit DSD (Direct-Stream Digital) in DSD64 (2x), DSD128 (4x), and DSD256 (8x) 6. Internet Radio (depends on UPnP Server and Controller software and stream availability) 7. Bit-perfect data transmission 8. Support for gapless playback (depends on UPnP Server and Controller software) 9. On-board low-jitter oscillators 10. DAC master clock synchronization 11. Ethernet RJ45 input 12. I2S digital audio output 13. Compact and low EMI design Supported Audio formats 1. 2. 3. 4. 5. 6. 7. FLAC (Free Lossless Audio Codec) WAV (Waveform Audio File Format) MP3 (Mpeg Audio Layer 3) ALAC (Apple Lossless Audio Codec) AAC (Advanced Audio Coding) AIFF (Audio Interchange File Format) DSF and DFF (DSD stream file) 1.3 In the Box 1. MSB Network Renderer 2. User Manual 6 2. Quick Start Although the MSB Renderer module is physically small, it is a key part of a networked audio system, which can be quite complicated and multi-faceted. This manual allows an absolute beginner to follow all the steps and examples to become more comfortable with networked audio. And for the experienced user who is replacing or adding to their current networked audio setup with the MSB Renderer, this manual can serve as a refresher or a reference. There are a few ways in which you can quickly start enjoying your MSB Renderer module and just utilize the chapters in this manual that are of interest: 1. Your dealer has already setup and installed your module 2. You are already familiar with the concepts of UPnP/DLNA networked audio 3. You are already using an UPnP server and UPnP controller setup Starting on the next page, a simple 8-step summary is provided so that you can start using your MSB Renderer as quickly as possible. Please note that this does assume a level of experience and installation completion. For detailed installation information of various elements, links to internet guides and program download sites, please refer to the relevant chapters in this manual. 7 Typical Networked Audio Wireless Router Home Network connects all devices together Media Server Media Controller Computer or NAS stores and serves your music library iPad Controller App to browse and control your music library Media Renderer MSB Network Renderer plays back audio files to the DAC For a typical networked audio system setup, the following is required: MSB Network Renderer module installed in the DAC iPad connected via WiFi to your Home Network and running an UPnP controller such as the AudioNet IMM, Lightning DS or Linn Kinsky Application Home Network setup, including WiFi connection A computer or a NAS (Network Attached Storage) as your music library server running an UPnP server such as Jriver Media Center (computer only) or MinimServer And of course amplification and speakers 8 Step 1: Install the MSB Renderer Install the MSB Renderer module into the desired slot within the DAC. Connect your DAC to your pre-amplifier or amplifier. Step 2: Connect to your Home Network Connect the MSB Renderer and your Music Library Computer or NAS to your Home Network router with WiFi capability, using Ethernet cables 9 Step 3: Turn on the MSB Renderer Turn on the DAC and select the STR (Streamer) input for the MSB Renderer Step 4: Connect your iPad Connect your iPad to your Home Network using WiFi 10 Step 5: Turn on your UPnP Server Turn on your computer or NAS and start the UPnP Server of choice Using a NAS MinimServer is recommended Using a Computer Jriver Media Center (JRMC) or MinimServer is recommended Make sure you have music files loaded in the required music folder and library indexing is complete for the UPnP Server : Step 6: Turn on your UPnP Controller Turn on the UPnP Controller App of choice on your iPad Free ones to start with are Linn Kinsky or Lightning DS Audionett IMM is also a good one but costs for the unlimited version If you are using Jriver Media Center (JRMC) on a computer the JRemote control application is recommended but not free 11 Step 7: Select your MSB Renderer on the iPad Select the MSB Renderer from your iPad UPnP Controller: Wait a few moments for the Audio Renderer –X to show up in your UPnP Controller and select it as the playback device. This is the default name for the MSB Renderer, where X is the last digit of the IP Address given to the MSB Renderer by your router Step 8: Select your UPnP Server on the iPad Select the UPnP Server containing your music library from your iPad UPnP Controller: When your UPnP Server is running it will automatically be seen in your Controller App. The first time you select the library it might take a while to load the library index and album art. Now start browsing your music library and playing back your music. Enjoy! 12 3. Module Installation The installation of the MSB Network Renderer can be done by your dealer or, since it is quite simple to do, with a few steps shown below and a screwdriver you can complete it within 5-10 minutes. The modules are designed to be easily installed or replaced. Please follow these instructions. Step 1: Determine which slot to use The order of the modules determines the priority of input selection in the auto-select mode. The highest priority input will always interrupt the lower priority. So if you have a source that is always on, it should be set as the lowest priority so any other source can interrupt it. The highest priority input is closest to the analog outputs. There is no sonic difference in which slot you use for the Network Renderer module. Please note: Do not use the slightly larger looking slot adjacent to the power input. Step 2: Disconnect the DAC from any power or audio cables Make sure you do not ha connected to the DAC, especially power. Turn the DAC over and place it on a soft surface like a towel. 13 Step 3: Open up the desired slot You can either switch out an existing module, or remove the plastic dust cover of an empty slot. 1. When installing a module in an empty slot, remove the two screws on the bottom adjacent to the module. Then remove the black plastic dust cover. It is easy to remove with your fingers when the two screws are removed and slides out. 2. When swapping out a module that is already installed, first remove the installed module. To remove a module from the space you have selected for the Network Renderer module, first remove the Phillips head screw in the jack panel at the front of the input module if it has one. Some modules do not have this screw, in which case you can skip this step. 14 2b. Next, remove the two screws on the bottom adjacent to the module. 2c. Next, remove the knurled screw from the base of the DAC, near the power input plug. This is your removal tool. Please note: If the module does not have a Phillips head screw in the jack panel at the front of the module, you can skip the next two steps and just gently remove the module from its slot. Wiggle gently if needed. The module will slide out along the grooves within the DAC. 15 2d. Screw it in hand tight into the back of the Input Module. Please note: Do not force it. Please double check that you have removed the necessary screws if it requires too much force. 2e. Pull firmly on the removal tool. Wiggle gently if needed. The module will slide out along the grooves within the DAC. 16 Step 4: Install the Network Renderer Module To install a new module, slide the new module into the grooves on both sides, and push firmly into place. There are handy metal ears on the front of the module that allows for ease of handling. Please note: Do not force it. It should slide easily along the grooves if aligned properly. Now put the screws back into the base, and return the installation tool to its place on the base. 17 Step 5: Verify Your Firmware The MSB Renderer module does require the latest DAC firmware. For the Analog DAC for example, the firmware M16 and D16 are required to make the Renderer show up as the STR (Stands for Streamer, which is another term for Renderer) input and be functional. Please check the following MSB Tech Support website for the required firmware for your DAC and follow the instructions: http://www.msbtech.com/updates/updateHome.php Congratulations! Your MSB Network Renderer module is now ready for use. 18 4. UPnP / DLNA Guide When first diving into the world of networked audio it can be quite confusing, with the amount of different terms used and the huge variation of hardware and software available. To provide you with a basic understanding of some of the main terminology, we have provided you with a helpful summary guide focused on the audio aspect of UPnP, UPnP AV and DLNA below. If you are already familiar with the UPnP concepts and would like to start setting up your system you can skip to the next chapter. The MSB Network Renderer is UPnP AV 2.0 and DLNA compliant, but what does that mean? 3.1 UPnP (Universal Plug and Play) UPnP stands for Universal Plug and Play and is one of the most common networked audio architectures, allowing devices to communicate with each other using common Internet technologies. It is a common protocol, or set of rules, that governs the communication between computers and devices on a network. In other words, in order for two devices to talk to each other, they must speak a common language, which UPnP provides. An UPnP compatible device from any vendor can dynamically join a network, obtain an IP address, advertise its name and capabilities, and learn about the presence and capabilities of other devices in order to communicate. 3.2 UPnP AV UPnP AV is an audio and video extension of UPnP, supporting a variety of devices such as TVs, CD/DVD/BD players, Receivers, Cameras and personal computers. It allows devices to support different types of formats of audio and video entertainment content. In version 2.0 of UPnP AV, the Media Server (MS) and Media Renderer (MR) enhancements added important capabilities allowing for a higher level of interoperability between products made by different manufacturers. It specifies three important components of networked audio, each with its own services for audio playback: 1. Media Server 2. Control Point 3. Media Renderer 19 Diagram 2 below gives a quick overview of these 3 main components with some of their many different alternate labels shown in the table below, which are either elements of, or used interchangeably. Diagram 2: Network Audio Terminology Server Controller Renderer Media Server Control Point Media Renderer UPnP Media Server Digital Media Server (DMS) UPnP AV Media Server UPnP Media Server Control Point Digital Media Controller (DMC) UPnP Media Renderer Digital Media Renderer (DMR) Streamer UPnP Rendering Control DCP UPnP Remote User Interface (RUI) UPnP AV Client Devices UPnP Control Point 1. Media Server The media server can be seen as two entities combined into one, the physical hardware and the software side. Physically it is the main location for your music library and contains all your music files. You audio library can be stored on a computer (Apple, Windows or Linux) or on a NAS (Network Attached Storage –a specialized, often Linux based, file sharing computer). From the UPnP software perspective, the media server is an UPnP Media Server program which needs to be running continuously in the background on the computer or NAS, and will need to be connected to your home network. The job of the UPnP Media Server is to advertise itself on the network and to 'serve' the audio files to the 'Renderer' when asked to do so by the Controller. It will also provide the Controller with audio file metadata and format. Hardware and network reliability as well as UPnP Media Server program stability and file handling capability are crucial. A gigabit network is highly recommended to avoid dropouts. 20 Some popular UPnP Media Server programs are: • Jriver Media Center (Not available on a NAS, but handles both PCM and DSD) • MinimServer (Handles both PCM and DSD playback) • Foobar (Uses Bubbleguuum component as the UPnP media server) • Synology Media Server (Only available on a Synology NAS) • Logitech Media Server (LMS) • Plex 2. Controller Every system needs a way to find and select the music you want to play. This is the Controller or Media Server Control Point in UPnP terminology, which essentially is a program that runs on a handheld device like a phone, pad, laptop or tablet and acts as the remote control for your music library. The Controller does not get involved with the actual processing or playback of the file, but it acts as a traffic controller for your music files and is the user friendly music library interface for you. It has absolutely nothing to do with audio quality as it just communicates with the server and renderer and sends instructions. The Controller checks for any available UPnP Media Servers that are on the network, it shows you what music you have in your library and helps you find the music you want to play. When you have made your selection, it tells the 'server' to send the audio file to the 'renderer' for processing. It is the Controller’s task to keep track of the song position, communicate commands such as play, pause, skip forward or backward to another song, fast forwarding and rewinding within the song, or allow for creation of playlists for sequential playback. Gapless playback, where sequential songs from for example a live concert blend seamlessly from one to the next, is important but tricky. Gapless playback requires both the controller and renderer to be capable and communicate at the right time. The MSB Renderer module is capable of gapless playback, but there are very few UPnP controller programs that do this well. There is 21 an alternative to the UPnP Control Point that is much better with gapless playback called Open Home Media (ohMedia) which will be covered briefly later in this chapter. Some popular UPnP Control Point programs are: • Jriver Media Center (In conjunction with its remote application JRemote) • Lightning DS by Auralic • Kinsky by Linn • PlugPlayer (It can also act as a Renderer on your handheld device) • Bubble DS (Android only) • Audionett iMM • Foobar Some examples of what a controller looks like on your handheld device: 22 3. Media Renderer Now here is the heart of the network audio system. The Renderer receives the audio file from the Media Server and creates from it a digital music stream to be sent to and converted into analog audio by a DAC. It communicates with the Controller and acts on transport commands such as play, pause, skip forward or backward to another song, fast forwarding and rewinding within the song. It also provides controller with information on formats it can accept, such as: 1. Sample rates that can be played (e.g. 44.1, 192, up to 384 KHz) 2. File formats that can be decoded (e.g. FLAC, MP3, etc.) 3. DSD compatibility up to DSD256 The Renderer needs a low jitter clock and clean power, which is provided by the MSB DAC’s master Femto second clock and its multi-rail isolated linear power supply. 3.3 DLNA (Digital Living Network Alliance) DLNA (Digital Living Network Alliance) is a trade organization established by Sony, and is responsible for defining interoperability guidelines and certification to enable the ease of sharing digital media between multimedia devices on a local network. DLNA uses Universal Plug and Play (UPnP) for media management, discovery and control, but then applies a layer of restrictions over the types of media file format, encodings, resolutions and audio file transcoding that a device must support to achieve interoperability. Generally DLNA certified devices will work with UPnP devices but always vice versa. 23 3.4 OpenHome Media (ohMedia) OpenHome Media (ohMedia) is an open standard for networked audio devices created by Linn, which has better support for playlists, allowing gapless playback to continue when the Controller leaves the network or if you navigate to another program on your Controller. In addition, the CD quality streaming service Tidal (Called WimP in Europe) can be accessed using ohMedia emulation. Devices can implement ohMedia in place of, or alongside the UPnP AV protocols. There are other potential benefits if implemented such as multiple control points, room control, and native support for Songcast, internet radio and Apple's AirPlay, as well as the ability to use a few very well designed ohMedia Controllers. Please note that at this point the MSB Network Renderer module is not Open Home Media certified, but there is an emulation program called Bubble UPnP Server which allows the MSB Network Renderer to be seen as an Open Home Media Renderer. The emulation server setup will be covered in Chapter 7 of this manual for a NAS setup, and is for the more advanced users. For more detail, the following website is the place for the program information, download and instructions: http://bubblesoftapps.com/bubbleupnpserver/ ohMedia Controllers: • Kazoo by Linn –Has a Tidal streaming function • Lumïn • Kinsky by Linn, PlugPlayer, Lightning DS by Auralic controllers can also function in ohMedia mode 24 3.5 Conclusion Networked audio is a great way to enjoy music without necessarily having your computer or NAS in the same room as your listening equipment, potentially lowering your noise floor. With the variety of options to control your music library, and with the ability to easily browse and playback your complete library from the comfort of your listening chair, using the MSB Renderer is truly a joy. Keep in mind that you would still need a program to maintain your library, edit tags, add album art, rip CDs, etc., but one of the software options mentioned, Jriver Media Center, can do all of these actions on a Macintosh or Windows computer, in addition to being the UPnP/DLNA Media Server and Controller. It is crucial for a networked audio system to have a reliable wired and wireless network setup. There are so many options of setting up your network with all the routers, switches, and wireless access points available to a consumer, but those will not be covered in this manual. It is recommended to use a gigabit network to avoid drop outs, and it is assumed that you have a stable home network already in place. A wired Ethernet connection is the best for streaming audio files between the Media Server and the MSB Renderer, but for the Controller on your pad or phone a wireless connection is perfect. If you would like to dig deeper into the technicalities of UPnP, UPnP AV, DLNA and ohMedia, below are a few helpful internet sites with more detail: http://en.wikipedia.org/wiki/Universal_Plug_and_Play http://en.wikipedia.org/wiki/Digital_Living_Network_Alliance http://www.openhome.org/wiki/OhMedia http://www.computeraudiophile.com/content/524-complete-guide-hifi-upnp-dlna-network-audio/ http://bubblesoftapps.com/bubbleupnpserver/ Now that you have a clearer high level understanding of UPnP, how it works and the various associated extensions, we can go to the next step of setting up a Networked Audio system with the MSB Renderer. 25 5. Networked Audio Setup So what is the best way to integrate the MSB Renderer into an audio system? Well that depends on your vision of what that perfect system looks like and your personal preferences of hardware, operating system, software, and handheld device for a controller. Below we will take you through the setup of a few sample systems. We are not saying that the hardware and software we picked in the examples are better than other brands or options, but these are good options to start with to enjoy your MSB Renderer. In the next chapters we will cover the networked audio setup using a: 1. Computer Based System Macintosh or Windows computer with Jriver Media Center as the UPnP Media Server and UPnP Control Point Jremote application as the remote control on an iPad MSB Network Renderer 2. NAS Based System Synology Network Attached Storage device (NAS) running on Linux MinimServer as the UPnP Media Server Lightning DS as the UPnP Controller on an iPad MSB Network Renderer As you set up and become comfortable with your networked audio system you might decide that a different approach works better for you. That is the flexible aspect of a Networked Audio system using UPnP/DLNA, as there is a huge variety of hardware and software available to meet your preferences. In addition many of the software packages mentioned in this document are also being continuously improved upon by their developers, and new ones become available as well. 26 6. Computer Based Setup Example The first decision is whether to use a Windows based or Macintosh based computer. Both work well and it really comes down to personal preference of computer hardware and operating system. One of the more stable and popular UPnP/DLNA programs, Jriver Media Center (JRMC), is available for both Mac and Win platforms. In addition it is a great tool for audio library management and handles both PCM and DSD playback. It is a program that can do much more, but we will focus here on setting it up as an UPnP/DLNA Media Server and Controller. Below we will show you step-by-step how to optimally setup Jriver Media Center (JRMC) as an UPnP/DLNA Media Server and Controller for use with the MSB Renderer on both a Mac and Windows based computer, as initially you can get lost in all the various setup screens available. For the remote control we will be using the Jremote application on the iPad, which is an excellent way to access and command your music library. Important to note is that Jremote is not an UPnP Controller but it is purely a remote control program for Jriver Media Center only. JRMC can function as the UPnP Media Server and UPnP Controller at the same time, and it is because of this that gapless and playlist playback with JRMC and Jremote is so smooth. You can of course use any of the other UPnP Controller applications with Jriver Media Center, but Jremote is tailor-made for JRMC and will be much more user-friendly. Because listening to internet radio is often a desired feature, below there will be a few simple steps shown on how to listen to internet radio using your MSB Renderer and JRMC. There are separate sections for the setup examples so you can skip to the section which is of interest. The Jriver Media Center setup follows the same steps whether you are using a Macintosh or Windows based computer setup. Computer Based Setup Chapters: 6.1 Macintosh Based Computer System Example 6.2 Windows Based Computer System Example 6.3 Examples Afterthought 6.4 Jriver Media Center Setup 6.5 Jremote Setup 6.6 Internet Radio in JRMC 27 6.1 Macintosh Based Computer System Example Hardware and Network Setup We assume you have already setup and turned on your home network and: Your Macintosh can access the internet and is hard-wired to the home network Your wireless device (Pad, Phone, Tablet), which will run the Controller, has access to your network and the internet via WiFi The MSB Network Renderer is connected to the Macintosh computer via a Gigabit switch, and is hard-wired with quality Ethernet cables Your MSB DAC has the latest firmware, the MSB Renderer module is installed in the DAC and is turned on Hardware used in this example: 1. 2. 3. 4. 5. 6. 7. Mac Mini with Mavericks OS 10.9.5 (Mavericks) running JRMC in UPnP/DLNA mode WD Thunderbolt Duo 4TB external hard drive for audio files iPad Air with 16GB memory running JRemote connected through WiFi Small gigabit switch from Netgear, the ProSafe GS105 Certified Ethernet Cat6a cables from Blue Jeans Cable (Shown as in Diagram 3) Netgear Nighthawk AC1750 (R6700) Wireless Dual Band Gigabit Router MSB Network Renderer Diagram 3: Macintosh Based Network Audio Example 1 2 1 4 5 6 3 4 2 1Internet 4 3 2 7 4 3 2 3 2 1 3 2 1 6 4 3 2 3 2 1 Modem 28 6.2 Windows Based Computer System Example Hardware and Network Setup We assume you have already setup and turned on your home network and: Your PC can access the internet and is hard-wired to the home network Your wireless device (Pad, Phone, Tablet), which will run the Controller, has access to your network and the internet via WiFi The MSB Network Renderer is connected to the Windows computer via a Gigabit switch and is hard-wired with quality Ethernet cables Your MSB DAC has the latest firmware, the MSB Renderer module installed in the DAC and is turned on Hardware used in this example: 1. 2. 3. 4. 5. 6. Sony Vaio laptop with Windows 8.1 running JRMC in UPnP/DLNA mode iPad Air with 16GB memory running JRemote connected through WiFi Small gigabit switch from Netgear, the ProSafe GS105 Certified Ethernet Cat6a cables from Blue Jeans Cable (Shown as in Diagram 4) Netgear Nighthawk AC1750 (R6700) Wireless Dual Band Gigabit Router MSB Network Renderer Diagram 4: Windows Based Network Audio Example 1 3 2 4 3 2 3 2 1 6 3 2 3 2 1 Internet Modem 5 4 3 2 3 2 1 29 6.3 Examples Afterthought A few additional thoughts with regards to the sample setups shown above in Diagram 3 and 4: An external WD Thunderbolt drive is optional for extra space depending on how large your audio library is or will be in the future. External Firewire and USB drives or even a large or second internal drive are other alternatives for extra audio library space. Some Internet Modems provided by your internet provider might already contain a WiFi router and switch functions, in which case it could be used instead of the wireless gigabit router shown in the example. However, keep in mind that most modems provided are not gigabit speed and you might not have full control. There is a huge variety in quality and stability amongst wireless routers. The newest and advertised fastest ones are not necessarily more stable. A basic 802.11 AC type with an inbuilt gigabit switch will be fast enough. A 5 GHz antenna will help reduce interference from other devices in your home but is not required. Wireless audio file streaming is certainly possible with an 802.11 AC wireless router, and a gigabit wireless bridge, but we recommend a hard-wired setup to avoid any possible drop-out issues. Network Isolators are sometimes used, but just keep in mind that some do drop the bandwidth down from Gigabit speed. There are a few available that are gigabit speed. Different types of mobile devices can be used not just Apple, but different controllers are available for different mobile operating systems. Different operating system versions for both Apple and Windows will work as well. 30 6.4 Jriver Media Center Setup Step 1. Download Jriver Media Center Open up your Internet Browser and navigate to the following URL: http://www.jriver.com/download.html Download the correct version for your Operating System (OS): The Download (Windows) section has a Windows Download button for the EXE installation file The Download (Mac) section has a hyperlink to download the DMG installation file A 30 day free trial is available after which you will have to purchase a license from Jriver. The installation file will initially be found in your Downloads folder after the download is complete. 31 Step 2. Install Jriver Media Center For Macintosh: Double click on the MediaCenterXX.dmg (XX denotes the JRMC version) installation package and follow the instructions for installing it on your Mac. This includes agreeing to the license and copying the Media Center XX.app into your Applications folder. For Windows: Double click on the MediaCenterXX.exe (XX denotes the JRMC version) installation executable file, wait for the extraction process to complete and follow the instructions for installing it on your PC, which includes agreeing to the license. Step 3. Open Jriver Media Center (JRMC) For Macintosh: In your Applications folder double click on the Media Center XX.app to start JRMC. Note: For ease of use you can always add the application to your Dashboard. 32 For Windows: On your desktop, double click on the shortcut that was installed initially in order to start Jriver Media Center. Step 4. Complete DLNA Setups for Jriver Media Center (JRMC) There is much functionality available within JRMC with many setup screens, but we will only focus on those needed for optimal playback with the MSB Renderer. These are one time setups only needed the first time you use JRMC with the MSB Renderer. 1. Navigate to Tools Options 2. From the Options menu left panel select Media Network. Check the box next to the “Use Media Network to share this library and enable DLNA” option. 33 3. The following pop-up window will appear. Just click Next. 4. The following pop-up window will appear. Just click Next. 5. In order to provide a secure and easy way to link the remote controller application Jremote with JRMC, an Access Key is provided. Important: Please write down the code for the JRemote setup step later on. You can always come back to the Options Media Network screen to find it. Click Ok. 34 6. Select Audiophile 24-bit DAC from the list in the following screen and click Finish 7. Once back at the Options screen, click on Add or configure DLNA servers… 8. In the DLNA Servers page that pops up, navigate to Audio Mode and change to Mode: Original. This selection sends the original audio file to the MSB Renderer. If you have files that cannot be played by the MSB Renderer for which transcoding is required you might want to select the other options, but it will no longer be bit-perfect. 35 9. Still in the DLNA Servers page, navigate to Audio Format and select to PCM 24 Bit for the highest quality. 10. Still in the DLNA Servers page, navigate to Advanced and make sure that the checkbox next to “Bitstream DSD (Requires DoPE compliant renderer)” is Unchecked. Click OK 11. Once back at the Options screen, check the box next to the option Authentication (username: Your Mac Name, password: ●●●●). Add your computer user name and password in the pop up page. Click OK This is to secure your music library when using it with JRemote remote control app. Important: Please write down the username and password for the JRemote setup step later on 36 12. Click OK to save the Option setting changes and leave the Options screen. Congratulations, you have now completed the main JRMC DLNA setup for the MSB Renderer. Step 5. MSB Renderer Playback from Jriver Media Center (JRMC) The next step is to have JRMC find the MSB Renderer. When you start JRMC it might take a few moments for JRMC to see the MSB Renderer, but it should show up automatically in the list of “Playing Now” devices as Audio Renderer-X or MSB Tech Renderer–X (Where X is the last digit of the IP Address given to the MSB Renderer by your router). 1. Optionally, you can right-click on the default Renderer name and rename it if you like. 2. Select the MSB Renderer by clicking once on the name within the Playing Now section. Now you can go to Audio section and select a song to play. It will automatically start playing through the MSB renderer, and the arrow icon next to the Audio Renderer (or what you renamed it to) will turn to green. You can see below that the Audio Renderer-9 was renamed to MSB. Note: For more details on Jriver Media Center DLNA you can go their help website: http://wiki.jriver.com/index.php/DLNA 37 6.5 Jremote Installation For the remote control we will be using the Jremote application on the iPad, which is an excellent way to access and command your music library. Important to note is that Jremote is not an UPnP Controller but it is purely a remote control program for Jriver Media Center only. JRMC can function as the UPnP Media Server and UPnP Controller at the same time, and it is because of this that gapless and playlist playback with JRMC and Jremote is so smooth. It is not free, and you can of course use any of the other free UPnP Controller applications with Jriver Media Center, but Jremote is tailor-made for JRMC and will be much more user-friendly and stable. Step 1. Purchase and Install Jremote Application on your iPad On your iPad open the App Store and search for Jremote. Click on INSTALL and follow the instructions to purchase the App. 38 Note: For more details on the Jremote control program for JRMC you can go their help website: http://www.jremote.net/ Step 2. Open the JRemote App and Setup 1. Open the Jremote app on the iPad Note: Make sure your DAC is turned on, JRMC is running and sees the MSB Renderer before starting 2. Tap on the Settings button in the top left hand corner 39 3. Tap on Add a new server. We need to have JRemote find and link securely to the Jriver Media Center server. 4. There are two ways to add a JRMC server, either using the Access Key which you noted down earlier in the JRMC installation, or using an IP address. The easiest and quickest way is to use the Access Key. Tap on Connect with access key. 40 5. Enter the JRMC Access Key provided by JRMC in the allocated field 6. Enter the Username and Password of the computer running the JRMC server. This is the Username and Password that you entered during the JRMC install earlier 7. Tap Add and connect. Follow any additional prompts until you are back at the main screen. At the main screen you can see handy hint messages are setup for your use. 41 8. Tap on the Current Zone button in the bottom left of the screen to view and select the Renderer. It will show as Audio Renderer X (Where X is the last digit of the IP Address given to the MSB Renderer) or the name you had changed it to within JRMC. In this example the MSB Renderer was renamed to MSB, and your current zone will be the renderer currently selected for playback. 9. Select the renderer by tapping on it. 10. Tap on the Settings button in the top left hand corner again for one final setting change 42 11. Scroll down to Transcode audio settings and unselect this option. This is to make sure you are not accidentally transcoding audio. If you are using the iPad as the playback device, you might need to change this setting back. 12. You are now ready to enjoy your music library by accessing it remotely using the Jremote App on the iPad as the remote control. Tap on the Audio button in the top left hand corner to access your library. There are a few other settings and functionality that you will be able to discover with Jremote, but this should get you started. For more Jremote details, the following website is also very helpful: http://www.computeraudiophile.com/content/478-jremote-ios-remote-jriver-media-center-review/ 43 6.6 Internet Radio on JRMC Internet Radio is a great way to listen to streaming audio. Using JRMC it is relatively easy to access an internet radio station and set it up as a Playlist for future use. Below are the steps to follow once you know the URL of your radio station. Step 1. Find the URL of your radio station The easiest way is to use google to find the radio station URL. There are a few different playback formats, and not always are the URLs made readily available, nor do they always work. A bit of trial and error is required to find the correct URL. Luckily there are a few websites available that have collected many of the popular URLs. For example: http://wiki.slimdevices.com/index.php/Internet_radio_URLs http://www.mikesradioworld.com/ http://www.shoutcast.com/ More information can be found on Jriver’s website as well: http://wiki.jriver.com/index.php/Web_Media_(Radio) Step 2. Open the Internet Radio Station’s URL in JRMC 1. Make sure the MSB Renderer is selected by clicking on once on the name within the Playing Now section in the top left hand corner 2. Navigate to the menu bar and select File Open URL 44 3. Enter or Copy-Paste the URL of the internet radio station in the pop-up screen. Click OK 4. In this example the KCRW radio station will start playing in JRMC through the MSB Renderer. 5. You can always rename the radio station to something more user friendly by Right-clicking and selecting Rename. Step 3. Create an Internet Radio Station Playlist in JRMC 6. To be able to easily find it next time, you can create a Playlist for the Internet Radio station. Right-click on the radio station name and navigate to Send To Playlist Create Playlist. 45 7. Rename the Playlist. In this example the Playlist is called Internet Radio. Your radio station will be added to this Playlist. 8. Any additional radio station you can now add to this playlist as well in the same manner, by right-clicking on the currently playing radio station and navigating to Send To Playlist Internet Radio 9. This playlist will now be visible on the UPnP Controller and JRemote applications and include your Internet Radio stations. Jremote example: 46 7. NAS Based Setup Example A NAS is a Network Attached Storage device, a specialized but easy to use, often Linux based, file sharing computer. The main benefits are that you can place it anywhere in your house, easily expand storage space, is highly reliable, easily maintained, and provides storage that is available to your entire network. There is a certain simplicity in such a networked audio system once setup. The job of the NAS is to store your audio library files and run the UPnP Server program. This setup does not involve a standard computer in playback, although you will still need one for such tasks as ripping CDs, set up and audio library management. There are quite a few options of NAS hardware available, but two of the more popular options are by QNAP and Synology. A NAS usually includes a few UPnP server programs, but some may limit what file types and resolutions can be played. MinimServer is a stable and free UPnP server, and one of the few which can handle both PCM and DSD audio playback. There are many UPnP controllers that can be used to access and play your music from the NAS. They can be used on most mobile devices even though in the example we are using an Apple iPad. Once setup it is as simple as pointing the Controller to the library on the NAS, selecting the MSB Renderer, and enjoy the playback. The Lightning DS UPnP Controller is a relative newcomer but has much development focus on it still, is one of the better looking ones that can handle gapless playback and is free. Linn Kinsky and PlugPlayer are other popular UPnP Controllers, each with their own look and feel, advantages and disadvantages. Below we will show you step-by-step how to setup the NAS with MinimServer as the UPnP Server, and Lightning DS on the iPad as the UPnP Controller, for use with the MSB Renderer. We are not saying that the hardware and software we picked in the examples are better than other brands or options, but these are good options to start with to enjoy your MSB Renderer. 47 7.1 NAS Based System Example Hardware and Network Setup We assume you have already setup and turned on your home network and: Your NAS can access the internet and is hard-wired to the home network Your wireless device (Pad, Phone, Tablet), which will run the Controller, has access to your network and the internet via WiFi You have a computer or laptop on the network that can function in setup tasks The MSB Network Renderer is connected to the NAS via a Gigabit switch and is hardwired with quality Ethernet cables Your MSB DAC has the latest firmware, the MSB Renderer module installed in the DAC and is turned on Hardware used in this example: 1. 2. 3. 4. 5. 6. 7. Synology DS412+ NAS running DSM 5.1 OS and UPnP MinimServer Sony Vaio laptop on Windows 8. Only used for NAS setup activities, not audio purposes. iPad Air with 16GB memory running JRemote connected through WiFi Small gigabit switch from Netgear, the ProSafe GS105 Certified Ethernet Cat6a cables from Blue Jeans Cable (Shown as in Diagram 4) Netgear Nighthawk AC1750 (R6700) Wireless Dual Band Gigabit Router MSB Network Renderer Diagram 5: NAS Based Network Audio Example 1 4 7 3 2 3 2 1 3 2 1 2 3 4 3 2 6 4 3 2 3 2 1 Internet Modem 48 7.2 NAS and UPnP Server Installation Step 1. Install the NAS Your NAS will come with an installation manual and a program to access the NAS through a web browser on your computer or laptop for setup and maintenance purposes. Follow the instructions closely and install the software on your computer or laptop. Attach the NAS via quality Ethernet cable to your network. The Synology comes with the Synology Assistant which was installed on the laptop also connected to the network. The laptop is only used for installation and setup purposes and not any audio related streaming activities. There is much additional functionality the NAS can be used for, but below we will focus only on those setups pertaining to setting it up as a UPnP music file server. 1. Click on the Synology Assistant desktop shortcut that was created during the installation on the laptop. The Synology Assistant will search for your NAS on the network in the Management tab. Just click on the Search button and wait for a few moments. Once found, the NAS will be listed and the status will show Ready when it is up and running. 49 2. Double click on the Server name: DiskStation412 (the DS412+ NAS). The log in screen will show. 3. Enter the NAS user name and password. Consult the manual for the initial admin user name and password. You can always change it later. 4. Click on Sign In The main desktop of the Synology NAS now shows. 50 Step 2. Setup File Sharing The setup is important in being able to access the files on the NAS via the Windows Explorer on your laptop, easily allowing copying, dragging and dropping of files and managing your audio library. 1. Click on the Control Panel icon. 2. Click on User. 3. Click on the Advance Tab and scroll down to User Home 4. Check the Enable user home service box 51 5. Enable Windows File Service by clicking on File Services in the Control Panel. Check the box for Enable Windows file service 6. Navigate back to the Synology Assistant main screen. Click on the Map Drive button on the Management tab. 52 7. A setup wizard will ask for the user name and password to the Synology NAS. After entering them click Next 8. Select the Music folder from the list. This is where your music files will be stored. It will be preceded with the IP Address given to your NAS. Click Next 53 9. Select your choice of Drive letter for the Mapped Drive. This is how it will show in Windows Explorer on your laptop. Click Next. 10. Confirm the Mapped Drive setup information. Click Finish. 54 11. The Mapped Drive to your Audio folder on the NAS will now show in Windows Explorer on your laptop. 12. Now you can easily copy your music library into the NAS Music folder and maintain it. Copy a few albums to your NAS for initial testing purposes. 13. On the NAS a similar tool to the Windows Explorer used to browse and update the file structure is called the File Explorer. After copying from your laptop to the NAS, the files appear in the Music folder on the NAS. 55 Step 3. Update the Synology Operating System DSM to the latest version Since you purchased the NAS updates may have been made by Synology for additional functionality, security or bug fixes. 1. On the NAS Desktop Click on the Control Panel icon. 2. Click on Update & Restore. 3. The NAS will automatically start checking if you have the latest version. You can check the progress in the Status. 56 4. If there is an update available, follow the prompts to install Once you are up to date the following up-to-date Status will show. 57 Step 4. Install Java MinimServer UPnP server requires Java to be running in order to function. The Synology operating system currently only supports version 7 of Java, so do not install the absolute latest from Oracle. 1. On the NAS desktop click on the Package Center and select Utilities from the Package Center screen. Click on the Install button for the Java Manager package. 2. Wait for the Installing process to complete. 58 3. Click on the Open button. 4. Click on the Install Java button in the Java Manager screen 59 5. Click on the Java SE Downloads hyperlink. This will open up your internet browser on your computer, not the NAS, and automatically navigate to the following Oracle website to download Java SE Development Kit 7. http://www.oracle.com/technetwork/java/javase/downloads/jdk7-downloads1880260.html 6. Be sure to check which version you need for your specific NAS, click on the Accept License Agreement radio button and click on the download link. In this example we will be using the latest version 7 release available for Linux x86. The installation file is called: jdk-7u71-linux-i586.tar.gz 7. Save the installation file to a folder on your computer 60 8. Back on the NAS Install Java screen, click on Browse button and select the installation file that you had just saved to a folder on your computer. Click OK. 9. Wait a few moments for the installation is complete and you will see the following message. Click OK. 10. Back in the Java Manager screen you will now see installation status is Installed with the Java version showing. 11. Back in the Package Center, if you click on Installed you will now see Java Manager Installed and with the Status of Running 61 Step 5. Install the UPnP Media Server MinimServer 1. The Synology NAS comes with the MinimServer package, but it needs to be installed. On the NAS desktop click on the Package Center and select Multimedia from the Package Center screen. Click on the Install button for the MinimServer package. 2. Wait for the Downloading and Installation process to complete. 62 3. Click the checkbox to accept the license. Click Next. 4. Click the checkbox to run after installation checkbox. Click Next. 63 5. Back in the Package Center, if you click on Installed you will now see MinimServer Installed and with the Status of Running 6. Back in the NAS Desktop, click on the Main Menu button 7. Click on the MinimServer program button 64 8. The MinimServer Status webpage will open up in your internet browser on your laptop. This page shows a few important elements of the MinimServer UPnP Server. a. It will show the UPnP Server status: Started is when it is up and running b. The Rescan button allows you to re-index the library. This is helpful if you have just added a few new albums to your library folder. c. The Content Directory points to the folder where your audio files are stored d. Helpful hyperlinks to a Getting Started guide and File Station to find your library directory 9. Add your NAS music folder in the Content Directory field and click the Update button. You can find the music folder name using the File Station (NAS version of Windows Explorer). You will only have to do this once. 10. More information about MinimServer can be found on their website: http://minimserver.com/synology/contentdir.html 65 Step 6. Update the NAS Firewall Setting Depending on your firewall setting, UPnP activity can sometimes be blocked on certain ports. The following steps update the firewall on the NAS to allow UPnP traffic. 1. Navigate to the Control Panel on the NAS. Click on the Security button. 2. Navigate to the Firewall and click on the Create button. In the Ports section of the Create Firewall Rules page click on the “Select from a list of built in applications”. Click on the Select button. 66 3. Check the Enabled checkboxes for MinimServer TCP, MinimServer UDP and UPnP Services. Click OK. 4. Back in the firewall page click on the Save button. 67 5. The following message will show. Click OK. Note: The NAS firewall setting shown above is just one option and specific to UPnP playback. As you can see there are many settings that you can use to change the firewall settings further if that is required for your use. 68 7.3 MinimWatch Installation MinimWatch is not necessary to start enjoying your MSB Renderer with MinimServer, but it is a separate program which will be run on your laptop. It is used to make further setting changes and updates to the way the MinimServer UPnP server functions. It is MinimServer’s optional administrator monitor and control program. It is also where you can setup elements such as library name, transcoding rules, tag options, MinimStreamer, update the MinimServer program versions and review log notifications. 1. Navigate to the MinimServer download website on your laptop (Not the NAS) and be careful to choose correct version for your Operating System. If you are using 32 bit java on your laptop use 32 bit MinimWatch. http://minimserver.com/downloads/ 2. In this case since the laptop is using 32 bit Java on Windows 8.1 the installation file is called: MinimWatch-0.8.3b-install-x86.exe 3. Save the installation file on a folder on your laptop 69 4. Run the installation file by double clicking on the executable installation program. Click Next on the Setup screen 5. Accept the agreement by clicking the radio button. Click Next. 70 6. Leave the default installation folder, or change if your desire. Click Next. 7. Click Next. 71 8. Click Next. It will create a desktop shortcut for you by default. 9. Click Next. 72 10. Click Finish. MiminWatch will launch automatically in the background. 11. In the bottom right corner you will see an icon of a musical note for the MinimWatch program when it is running. It will try to connect with the MinimServer running on your NAS automatically. The icon will show yellow when MinimServer is starting The icon will show green when MinimServer is up and running and MinimWatch has connection Please note: If the icon stays grey and MinimWatch cannot connect to the NAS it is often the firewall on your laptop that is blocking the connection. A suggestion is to temporarily turn off the firewall on your laptop just for the duration of any MinimWatch setup changes you want to make. You can close down MinimWatch and turn back on the firewall after you are done. It will not change the running of the MinimServer on the NAS, nor impact your audio streaming. For more details on MinimWatch please check out the following website: http://minimserver.com/install-windows-mwatch.html 73 12. Right-Click on the MinimWatch icon on the bottom right corner, and select from the pop-up menu. Various selection are available: Rescan – If you have recently added files or folders to your music library and you want them to become visible to your UPnP Server and Controller Properties – Any additional setting changes and version updates are done here Show log – This provides you detailed information on possible issues with the server or your library Stop – To stop the MinimServer UPnP Server Restart – To restart the MinimServer UPnP Server Options – Select the detail of logging Exit – Close MinimWatch program 13. Initially no setup changes are required, but it is a good idea to see whether there are new versions available. Right-Click on the MinimWatch icon on the bottom right corner, and select Properties from the pop-up. Navigate to the Packages tab. If any additional available packages are showing you can select and install them from here. Follow the prompts. If the Available packages list is empty you are up-to-date and exit out of MinimWatch. 74 7.4 UPnP Controller Installation - Lightning DS For the UPnP remote control we will be using the Lightning DS application on the iPad to access and command your music library in this example. It is free, and you can of course use any of the other UPnP Controller applications with MinimServer, but Lightning DS, although not perfect, is one of the few that handles gapless and has a user friendly look and feel. Step 1. Purchase and Install Lightning DS Application on your iPad On your iPad open the App Store and search for Lightning DS. Click on INSTALL and follow the instructions to purchase the App. Note: For more details on the Lightning DS Controller you can go their website for a user guide: http://www.auralic.com/en/LightningDS/guide.html 75 Step 2. Open the Lightning DS App and Setup 1. Open the Lightning app on the iPad Note: Make sure your DAC and NAS are turned on and MinimServer is running. 2. Tap on the Settings button in the bottom left-hand corner. Select Device. Make sure the MSB Renderer (default name is Audio or MSB Tech Renderer-X, where X is the last digit of the IP Address given to the MSB Renderer by your router) is showing and select it. 76 3. Tap on Music Library. Select the correct UPnP Server. In this example the MinimServer UPnP Server is running on the DiskStation412. A checkbox will appear next to the selected library. 4. The first time you choose the library, or when you Refresh the Cache if there is a library change, the application will update the album index and art on the iPad. Do NOT close the application at this time. It could take up to 5-10 minutes the first time with subsequent refreshes being much quicker, depending on the library size. 77 5. There are more setting changes you can make to personalize your experience. There is also a link to the User Guide from within the Settings screen. 6. You are now ready to enjoy your music library by accessing it remotely using the Lightning DS application on the iPad as the remote control. Refer to the Lightning DS User Guide for helpful details. Please keep in mind with any UPnP controller, when you select and album or playlist for playback, do not navigate away from the Controller or the music will stop playing after the current song. It is recommended to completely reboot the iPad after the initial library load and whenever you run into responsiveness issues as the memory on the iPad might run low. 78 7. Tap on the Audio button in the top left hand corner to access your library. Select the album to play. Use the icon on the right to add a complete album or individual song to the Queue for playback. Click on the Play Now. 79 7.5 Internet Radio on a NAS Internet Radio is a great way to listen to streaming audio. Using MinimServer to access an internet radio station is simple once you know how, but is not intuitive. MinimServer supports network streams as http:// entries in .m3u playlist files via a small extension called MinimStream. To route a network stream such as an internet radio station via the MinimStreamer extension, the name of the stream must be specified in an .m3u playlist file using a specific format. This sounds more complicated than it is, so below are the steps to follow. Step 1. Find the URL of your radio station The easiest way is to use google to find the radio station URL. There are a few different playback formats, and not always are the URLs made readily available, nor do they always work. A bit of trial and error is required to find the correct URL. Luckily there are a few websites available that have collected many of the popular URLs. For example: http://wiki.slimdevices.com/index.php/Internet_radio_URLs http://www.mikesradioworld.com/ http://www.shoutcast.com/ Step 2. Add the Streamer extensions to MinimServer Using MinimWatch, the admin program for MinimServer that was installed earlier, you can quickly add the MinimStreamer extension. 1. Open the MinimWatch program using the shortcut on your laptop’s desktop: 80 2. Right-Click on the MinimWatch icon on the bottom right corner, and select Properties from the pop-up menu. 3. Navigate to the Packages tab. If the minimstreamer package already shows in the installed packages tab you can skip this step. If it has not been installed yet, select it from the Available packages tab and click Install. 81 4. Click OK to confirm 5. Click Accept. 6. Wait until the installation process is complete 82 7. Once installation is complete the minimstreamer package will show in the Installed packages tab. Click Relaunch. In addition to the ability to play certain internet radio stations, when MinimStreamer is running, the stream.converter, stream.record and stream.transcode setup options will become available in the System tab as well. Please refer to the MinimServer’s website for additional information should you want to use this functionality in the future. For more details on MinimServer please check out the following website: http://minimstreamer.com/userguide.html 83 Step 3. Create an Internet Radio Playlist UPnP Controllers and Servers are able to view and start playback on a playlist. You can create one playlist with multiple radio stations, or multiple playlists for each radio station. The example below will add two internet radio stations on one Playlist. 1. Open the Notepad program on your laptop The format of the text to add in the Notepad is as follows. One playlist header followed by two lines for each radio station’s URL: One Playlist header row : #EXTM3U The radio station name row with the prefix: #EXTINF:-1, The URL row #EXTM3U #EXTINF:-1,Radio538 http://37.203.223.150:80/RADIO538_MP3 #EXTINF:-1,KCRW http://kcrw.ic.llnwd.net/stream/kcrw_music In this example the green text denotes the Radio538 internet radio stream and the orange denotes a second radio station KCRW. To add more stations you would add an additional two lines for each radio station in similar fashion. 84 2. Add the necessary text in the Notepad for all your desired radio stations 3. Save the notepad file as an .m3u file in your Audio Library folder on the NAS. Select File Save As Change the filename and extension to Internet Radio.m3u In this example a separate Internet Radio folder is created in the NAS Music Folder for easy maintenance. 85 4. Right-Click on the MinimWatch icon on the bottom right corner, and select Rescan from the pop-up menu. This will provide the UPnP server MinimServer with the added folder and playlist files for visibility and playback 5. Open up the UPnP Controller. The Lightning DS Controller does not at this time handle Internet Radio, but another free UPnP Controller Linn Kinsky does. Download it on to your iPad from the App Store and Open it up. 6. Make sure the MSB Renderer (Audio Renderer – X) is selected as the room and MinimServer on Diskstation412 library is selected. Navigate to the folder Internet Radio and select the radio station that was added as a playlist. You can see both stations show. 86 7.6 Open Home Media Emulation on a NAS As mentioned before, OpenHome Media (ohMedia) is an open standard for networked audio devices created by Linn, which has better support for playlists, allowing gapless playback to continue when the Controller leaves the network or if you navigate to another program on your Controller. In addition, the CD quality streaming service Tidal (Called WimP in Europe) can be accessed using an ohMedia emulation. Devices can implement ohMedia in place of, or alongside the UPnP AV protocols. The following steps will show you how to setup Bubble UPnP Server, using the example of a Synology NAS. The goal is to provide the ability to use some of the better ohMedia Controllers such as Linn Kazoo or Lumin, as well as a way to stream the CD quality Tidal streaming service. A few important notes before we get started: Note 1: At this point the MSB Network Renderer module is not Open Home Media certified, but there is an emulation program called Bubble UPnP Server which allows the MSB Network Renderer to be seen as an Open Home Media Renderer. Note 2: Bubble UPnP Server should not be confused with being an UPnP Server, as it is not, but instead runs on top of your UPnP Server to provide additional functionalities. Note 3: Your UPnP Server, in our example MinimServer, and Java Manager should be installed and already running on your NAS before starting the installation of Bubble UPnP Server. Note 4: Your MSB Renderer module should be installed on your network and turned on. Step 1. Prepare NAS and Download Bubble UPnP Server From your computer, Log into your Synology NAS as the administrator 1. Click on the Synology Assistant desktop shortcut that was created during the installation on the laptop. 87 The Synology Assistant will search for your NAS on the network in the Management tab. Just click on the Search button and wait for a few moments. Once found, the NAS will be listed and the status will show Ready when it is up and running. 5. Double click on the Server name: DiskStation412 (the DS412+ NAS). The log in screen will show. 6. Enter the NAS user name and password. Consult the manual for the initial admin user name and password. You can always change it later. 7. Click on Sign In The main desktop of the Synology NAS now shows. 88 Before being able to install a third party package, you will need to change the Manual Install Settings to allow the Trust Level to Any publisher 8. Click on the Package Center icon 9. Click on the Settings button from within the Package Center screen and within the Trust Level section click on the Any Publisher radio button Note: If you do not complete this step, you will get the following error message when trying to install the Bubble UPnP Server 89 10. Navigate to the following Bubblesoftapps developer website to download the correct installation file of Bubble UpnP Server for your NAS from the Downloads section. http://bubblesoftapps.com/bubbleupnpserver/ 11. In our example, from the NAS packages bullet, click on the Synology hyperlink. Right click on the Download Synology package and save the BubbleUPnPServer.spk file to your computer’s hard drive. 90 Step 2. Install Bubble UpnP Server 12. Click on the Package Center icon 13. Click on the Manual Install button from within the Package Center screen, and click on the Browse button 14. Navigate to the folder where you saved the BubbleUPnP Server.spk installation file 15. Select the BubbleUPnP Server.spk installation file and click Next 91 16. Check the box to accept the license and click Next 17. Check the box to select the Run after installation, and click Apply 92 18. Wait a few minutes for the package to install. Please be patient. 19. Once the installation is complete, click on the Installed section of the Package Center. You should now see 3 key packages running: BubbleUPnP Server – The ohMedia emulation server Java Manager – Required to run MinimServer MiniServer – The UPnP Server 93 20. If the Bubble UPnP Server setup screen did not automatically open, click on the Main Menu icon in the top left hand corner. 21. Click on the Bubble UPnP Server icon to open the setup menu 94 22. The BubbleUPnP Server menu will open on the status page. This is where you would be able to restart the Server if needed at a future time. No action is needed on this page. 23. Click on the Media Servers tab. This will show your UPnP Media Server, MinimServer, or others if there are more available. 95 24. Click on the Media Renderers tab. This will show your UPnP Media Renderers on the network. MSB Network Renderer will show as its default name of Audio or MSB Tech Renderer-X, where X is the last digit of the IP Address given to the MSB Renderer by your router. Select the MSB Tech Renderer. Click on the checkbox to Create an OpenHome renderer Change the Name according to your preference Change the Room according to your preference Check on the checkbox for Gapless playback Note: Because your ohMedia controllers will see both the UPnP Renderer and the emulated UPnP ohMedia Renderer version it is useful to put a prefix or suffix denoting the ohMedia emulation. In this example, OHM was added to the name. 96 25. Click on the Settings Tab, followed by the Advanced sub tab. Uncheck the box with the selection Transcode high-res audio to 44.1/16 or 48/16 FLAC This is important, since we want to play back all our high resolution audio files at the high resolution. 26. You will now be able to use ohMedia Controllers such as : • Kazoo by Linn –Has a Tidal streaming function • Lumïn • Kinsky by Linn, PlugPlayer, Lightning DS by Auralic controllers can also function in ohMedia mode 97 7.7 Tidal Streaming Service on a NAS Tidal (or WiMP in Europe) is a music streaming service based in Norway which provides high fidelity sound quality and is gaining popularity. It is a paid service with a monthly fee but it provides a limited free trial. Please check out details on the following website: http://tidalhifi.com/us In order to enjoy Tidal through the MSB Tech Renderer, the following steps need to be completed. Please refer to the previous chapters for the various installation steps. 1. Create an account with Tidal streaming service 2. Install the MSB Tech Renderer and have it up and running on your network 3. Install and run the MinimServer UPnP server and have it up and running on your network 4. Install and run the Bubble UPnP Server to have the MSB Tech Renderer run in ohMedia emulation. 5. Install and run the Linn Kazoo ohMedia Controller on your pad 98 Once you have installed all the pre-requisites shown above, open up Linn Kazoo on your pad. We are using an iPad in this example. Once Linn Kazoo is open, make sure that your MSB ohMedia emulation renderer is selected. Click on the Tidal tile. 99 Log into Tidal using your login and password, and click on the Login button Note: If you have just created a Tidal account and it is not being accepted. Please restart your MinimServer, Bubble UPnP Servers and Kazoo and try again. Search for music and enjoy listening to the selection from your MSB Tech Renderer. 100 8. Support Thank you for selecting the MSB Renderer Module. Please visit our support website for any additional information http://www.msbtech.com/support/supportHome.php For technical support with your MSB Product please contact: [email protected] Warranty All MSB products carry a one year warranty in the country of origin although extended warranties are offered in many countries. No returns accepted without an RMA. All units must be returned to the distributor in the country of origin. The DAC displays the distributor in the “about” tab of the menu. The power base has the distributor and country printed on the box. MSB will not make warranty repairs on grey market products. Be sure the product you purchased is authorized to be in your country. Upon receipt, MSB will repair or replace any defective product. All product shipped FOB Aptos. Shipping and shipping damage is the responsibility of the consignee. 101