1
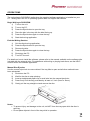
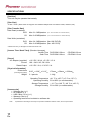
(This page intentionally left blank.) 1 En Thank you for buying this Pioneer product. The User Manual for this product is on the enclosed CD-ROM. Before using this product, be sure to read and fully understand all warnings, cautions, notices and other important safety information contained in the User Manual. Also, be sure to read the entire User Manual before using this product for other important information, such as operating information, regulatory information, software license agreement(s), product registration information, service information and the manufacturer's limited warranty. If for any reason you cannot access the User Manual on the enclosed CD-ROM, please contact Pioneer at [email protected] for a free replacement CD-ROM or a free paper copy of the User Manual. WARNING: Handling the product’s cord or cords WARNING: associated with accessories sold with the unit can expose This product is not waterproof. To prevent a fire or shock hazard, do not place a container filled with liquid near this unit or expose it to other sources of moisture. you to lead, a chemical known by the State of California and other governmental entities to cause cancer and birth defects or other reproductive harm. Wash Hands After Handling Cords. This product complies with the Low Voltage Directive (73/23/EEC, amended by 93/68/EEC), EMC Directives (89/336/EEC, amended by 92/31/EEC and 93/68/ECC). Precautions Regarding Use • Pioneer may not be held liable for the loss of any data or any other direct or indirect damage suffered as the result of the use or breakdown of this product. It is strongly recommended to regularly back up all critical data. • Care must be taken not to infringe copyright restrictions under the laws of each country. If this device is used to record copyrighted materials, approval must be obtained from the respective copyright holders. The recording of copyrighted materials without the express approval of the respective copyright holders may result in legal penalties. Pioneer disclaims any and all responsibility for any legal damages resulting from the use of this device in the unauthorized copying of copyrighted materials. • All names of corporations, products, and systems listed herein, even when the (™) or (®) symbols are omitted, are considered the registered trademarks of the respective owners. CAUTION This product is a Class 1 laser product but this product contains a laser diode higher than Class 1. To ensure continued safety, do not remove any covers or attempt to gain access to the inside of this product. Refer all servicing to qualified personnel. The caution label shown to the right appears on top of internal drive unit. CLASS 1 LASER PRODUCT IMPORTANT CAUTION RISK OF ELECTRICAL SHOCK DO NOT OPEN The lightening flash with arrowhead symbol within an equilateral triangle is intended to alert the user to the presence of un-insulated “dangerous voltage” with the product’s enclosure that may be of sufficient magnitude to constitute a risk of electrical shock to individuals. CAUTION: TO PREVENT THE POSSIBLE RISK OF ELECTRICAL SHOCK OR INJURY, DO NOT REMOVE THE COVER (FRONT, BACK, OR TOP). NO USER-SERVICABLE PARTS ARE INSIDE. REFER SERVICING TO QUALIFIED SERVICE PERSONNEL. The exclamation mark within an equilateral triangle is intended to alert the user to the presence of important operating and maintenance (servicing) instructions in the literature accompanying the product. 2 En Information to User: Alteration or modifications carried out without appropriate authorization may invalidate the user’s right to operate the equipment. Replacement and mounting of an AC plug on the power supply cord of this unit should be performed only by qualified service personnel. [For Canadian Model] This Class B apparatus complies with Canadian ICES-003. Note: This equipment has been tested and found to comply with the limits for a Class B digital device, pursuant to Part 15 of the FCC Rules. These limits are designed to provide reasonable protection against harmful interference in a residential installation. This equipment generates, uses, and can radiate radio frequency energy and, if not installed and used in accordance with the instructions, may cause harmful interference to radio communications. However, there is no guarantee that interference will not occur in a particular installation. If this equipment does cause harmful interference to radio or television reception, which can be determined by turning the equipment off and on, the user is encouraged to try to correct the interference by one or more of the following measures: Reorient or relocate the receiver or receiving antenna. Increase the separation between the equipment and the receiver. Plug the equipment into an outlet on a circuit different from the receiver. Consult the dealer or an experienced technician for assistance. DANGER – VISIBLE AND INVISIBLE LASER RADIATION WHEN OPEN. AVOID DIRECT EXPOSURE TO BEAM. CAUTION: Use of controls or adjustments or performance of procedures other than those specified herein may result in hazardous radiation exposure. CAUTION: The use of optical instruments with this product will increase eye hazard. Federal Communications Commission Declaration or Conformity This device complies with part 15 of the FCC Rules. Operation is subject to the following two conditions:(1) This device may not cause harmful interference, and (2) this device must accept any interference received, including interference that may cause un-desired operation: Product Name: External DVD / CD Writer Model Numbers: DVR-X122 Responsible Party Name: PIONEER ELECTRONICS SERVICE INC. Address: 1925 E. Dominguez Street, Long Beach, CA 90810 U.S.A. Caution: This product satisfies FCC regulations when shielded cables and connectors are used to join the unit to other equipment. To prevent electromagnetic interference with electrical appliances such as radios and televisions, use shielded cables and connectors. Operating Environment Operating environment temperature and humidity: +41ºF – +95 ºF (+5ºC – +35 ºC); less than 85% RH (cooling vents not blocked) Do not install in the following locations: • Exposed to high humidity or poor ventilation IMPORTANT NOTICE – RECORD THE MODEL NUMBER AND SERIAL NUMBER OF THIS UNIT BELOW. THE NUMBERS ARE ON THE REAR PANEL. MODEL #: DVR-X122 SERIAL #: KEEP THESE NUMBERS FOR FUTURE REFERENCE. is a trademark of the DVD Format / Logo Licensing Corporation. 3 En SAFETY INSTRUCTIONS To ensure your personal safety and to maximize the full operating potential of your unit, read and follow these safety instructions. Read & Retain Instructions – Read all operating and user information provided with this drive. Cleaning – Use a damp cloth to clean the exterior housing. Avoid using any fluids including liquid, aerosol or alcohol-based cleaning products. Water or Moisture – Avoid operating or locating this drive near water or other sources of fluid. Accessories – Do not place this product on an unstable cart, stand, or table. The product may fall and be seriously damaged. Ventilation – Slots and openings in the chassis are for cooling and proper operation of the unit. Do NOT block or cover the openings. Do NOT place this unit on a bed, rug, etc. as this can block the openings. This unit should not be placed in a built-in installation unless properly ventilated. Environment – Avoid installing this drive in a location with exposure to large quantities of dust, high temperatures, high humidity, or subject to excessive vibrations or shocks. Power Sources – Operate this drive only from the recommended power sources. If you are unsure of the power source, consult an authorized Pioneer representative. Power-Cord Protection – When unplugging the unit, pull on the plug – not on the cord. Do not handle the cord or plug with wet hands; doing so could cause an electric short or shock. Do not allow anything to pinch or rest on the power cord and do not place in a walkway. Power – Turn OFF the system before installing this or any other hardware device. Overloading – Avoid connecting too many devices to a single wall socket or power source as this can cause fires or short circuits. Object & Liquid Entry – Never push inappropriate objects in to the device. Avoid spilling any liquids in to or on the outside of the drive. Condensation – Moisture can form in the operating section of the product if the drive is taken from cool surroundings to a room with a warmer temperature. Let the drive stand for one to two hours in the new location before turning it ON. Servicing – Opening or removing the cover exposes you to possible electrical shock or other danger. Contact a Pioneer authorized service representative for repairing this drive (refer to the enclosed Service & Support Card). Damage Requiring Service – Unplug the unit and refer servicing to qualified service personnel in the following situations: When the power cord, plug, or chassis is damaged If liquid has been spilled, or objects have fallen into the video product If the product has been exposed to rain or water If the product does not operate normally when the operating instructions are followed. Adjust only those controls that are covered by the operating instructions. Improper adjustment of other controls may result in damage and can require extensive work by a qualified technician to restore the unit to its normal operation. When the product exhibits a distinct change in performance – this indicates a need for service 4 En About DualDisc Playback – DualDisc is a new two-sided disc with one side containing DVD video / audio / etc. content and the opposite side containing non-DVD content such as digital audio material. The non-DVD audio side is not compliant with the CD Audio Specification; therefore, may not play. The DVD side of DualDisc media plays in this unit. For more details about the DualDisc specification, please refer to the disc manufacturer or your retailer. Note: Some discs may not be playable due to different recording formats or the physical condition of the disc at the time of recording or playback. 5 En FEATURES Interface: USB 2.0 Write Speed (*:CAV, **CLV) DVD-R 1X, 2X, 4X, 6X, 8X**, 12X**, 16X*, 18X* DVD-R (DL) 2X, 4X, 6X, 8X**, 10X** DVD-RW 1X, 2X, 4X, 6X DVD+R 2.4X, 4X, 6X, 8X**, 12X**, 16X*, 18X* DVD+R (DL) 2.4X, 4X, 6X, 8X**, 10X** DVD+RW 2.4X, 3.3X, 4X, 6X, 8X** DVD-RAM 2X, 3X, 5X, 6X, 8X, 12X CD-R 4X, 10X, 16X, 24X**, 32X**, 40X* CD-RW 4X, 10X, 16X, 20X**, 24X**, 32X** Maximum Read Speed DVD-ROM (single) DVD-R, DVD+R DVD-RW, DVD+RW CD-ROM, CD-R DVD-RAM DualDisc 16X 12X 8X 40X 12X DVD-ROM (DL) DVD-R (DL) DVD+R (DL) CD-RW 12X 8X 8X 32X (please refer to the previous page in this document) Buffer Size 2 MBytes (Read/Write) LCD Tilt-Servo Mechanism Horizontal orientation Low vibration mechanism by DRA System Disc Format (Read/Write) DVD single layer/dual layer / 120mm / 80mm disc DVD-R (when writing, use only 650nm – for General use – media) DVD-R (4X, 8X, 16X, 18X write speed) Dual Layer DVD-R and Double Layer DVD+R DVD-RW (1X, 2X, 4X, 6X write speed) DVD+R (2.4X, 4X, 8X, 16X, 18X write speed) DVD+RW (2.4X, 4X, 8X write speed) DVD-RAM (non-cartridge, Version 2.0, Version 2.1) CD-ROM Mode 1 CD-R XA Mode 2 (form 1, form 2) Photo CD (single and multiple sessions) CD-DA CD-Extra (CD PLUS) Video-CD CD Text CD-R CD-RW / High Speed CD-RW / Ultra Speed CD-RW Note: A specific application program is necessary to write the formats listed above. Supported media required for specific DVD and CD writing speeds. When writing to DVD at 12X, 16X, and 18x use Pioneer-tested media. For media brand information, refer to the Pioneer website: www.pioneerelectronics.com 6 En INTERFACE Front View 4 1 2 3 1) Forced Ejection Hole If the tray fails to eject when the Eject button is pressed, insert a stiff rod into the hole and push to eject the tray. During normal operation, the eject button should be used to unload the tray. Turn the power to the drive OFF then wait approximately one minute until the disc stops spinning before trying to eject the tray using the Forced Ejection Hole. 2) BUSY Indicator Operation status is indicated as follows: During reading Lights During writing Lights 3) Eject Button Press the button to unload / load the disc. 4) Disc Tray Press the Eject button to open the loading tray then place a CD or DVD disc onto the tray with the label facing up. Press the Eject button again or gently push the tray to close and load. Do not attempt to pull out the disc tray forcibly – use the Forced Ejection Hole (1). ABOUT REGION CODES The region code can only be changed five (5) times, including the initial setting. Please be aware that the fifth change becomes PERMANENT. Therefore, avoid changing the region code unless absolutely necessary. Region codes are part of the DVD Standard. However, region codes on DVD discs are optional. DVD discs with no specified region code can be played on all compliant players. 7 En INTERFACE Rear View 5 6 5) USB 2.0 4-pin USB 2.0 I/O Connector 6) DC In AC Adapter Connector Pin 1 2 3 4 Name +5 V +5 V +12 V Ground 5 Ground 3 2 5 1 4 8 En CONNECTIONS Connect the unit to the supplied AC adapter and connect the USB. AC Adapter Connection Connect the AC adapter plug for the DC IN connector on the unit’s rear panel. Use the supplied power cord to connect the AC adapter to a wall outlet. connect to wall outlet AC Adapter (supplied) USB Cable Connection This is a hot-plug unit. 1) Confirm that your computer (PC) has an available USB port. 2) With your Windows® operating system running, use the supplied USB cable to connect the external drive to the PC. Note: This unit can operate with a USB 1.1 port but will not provide the specified optimum performance. Warning: Do not disconnect the unit during data transfers. Computer (PC) 9 En UBS cable (supplied) OPERATIONS The unit writes to DVD-R/RW media when the supplied software application is installed on your PC. Writing fails if the PC or operating system does not support the software. Begin Writing to DVD-R/RW: 1) Turn on the unit. 2) Turn on the PC. 3) Press the Eject button to open the tray. 4) Place the disc in the tray with the label facing up. 5) Press the Eject button again to close the tray. 6) Start the burning application. End the Writing Session: 1) Quit the disc burning application. 2) Press the Eject button to open the tray. 3) Remove the disc. 4) Press the Eject button again to close the tray. 5) Shut down the PC. 6) Turn OFF the unit. For details on how to install the software, please refer to the manual available on the software disc included with the external drive. For assistance with writing or playing back discs, see the HELP function within the software application. Manual Disc Ejection Use the manual eject hole to remove discs if the tray fails to open and all other methods have been exhausted. 1) Shut down the PC. 2) Wait for the disc to stop spinning. 3) Insert a straightened paper clip or small wire into the manual eject hole. 4) Press firmly until the tray protrudes by at least a ½ inch (5mm to 10mm). 5) Gently pull the tray straight out and remove the disc. Notes: To prevent injury and damage to the unit, do NOT force the tray open while the disc is spinning. Do not place objects in front of the tray while in operation. 10 En SPECIFICATIONS [Position] This unit may be operated horizontally. [Disc Size] 12 cm / 8 cm (Drive does not support non-standard shapes such as business cards, diamond, etc.) [Disc Transfer Rate] Data Read (sustained) DVD CD Max. 21.6 MBytes/sec. Max. 6.00 MBytes/sec. Data Write (sustained) DVD CD Max. 24.3 MBytes/sec. (Max 18X DVD-R) Max. 6.00 MBytes/sec. (Max. 40X CD-R) (6.6X – 16X CAV Mode over 16 block transfer) (16.2X – 40X CAV Mode over 16 block transfer) * Media that is dirty or damaged can affect the transfer rate. [Access Time / Seek Time] (Random Averages) Access Time Seek Time [Power] AC Adapter (supplied) Source Rated Output [Physical Information] Dimensions (including front panel) Weight DVD-ROM 130 ms DVD-ROM 120 ms CD-ROM 120 ms CD-ROM 110 ms +12 V DC / 0.9 A, +5 V DC / 1.5 A 100 – 240 V AC, 50 / 60 Hz +12 V DC / 2 A, +5 V DC / 2 A 6.69”W x 2.28”H x 9.13”D 170mmW x 58mmH x 232mmD 3.1 pounds 1.4 Kg Operating Temperature Operating Humidity Storage Temperature Storage Humidity +41˚ F to +95˚ F (+5˚ C to +35˚ C) 5% al 85% (no condensation) – 41˚ F to +140˚ F (–40˚ C to +60˚ C) 5% to 90% (no condensation) [Accessories] Software disc (x 1) AC Adapter (x 1) USB Cable (1.0 m) (x 1) Warranty Card (x1) Operating Instructions included on software disc Note: 11 En Specifications and designs are subject to possible modifications without notice, due to improvements. (This page intentionally left blank.) (Cette page a été laissée blanche intentionnellement.) 12 Fr Nous vous remercions pour cet achat d’un produit Pioneer. Le manuel d’utilisation de ce produit est présenté sur le cédérom inclus. Avant d’utiliser ce produit, assurez-vous de lire et de comprendre toutes les mises en garde, tous les avertissements, tous les avis ainsi que tous les renseignements importants sur la sécurité qui apparaissent dans le manuel d’utilisation. De plus, assurez-vous de lire tout le manuel avant d’utiliser ce produit ; vous y découvrirez des renseignements importants sur le fonctionnement, la réglementation, les licences d’utilisation des logiciels, l’enregistrement des produits, le service et la garantie limitée du fabricant. Si, pour quelque raison que ce soit, vous ne pouvez pas accéder au manuel d’utilisation sur le cédérom inclus, nous vous prions de communiquer avec Pioneer au [email protected] pour obtenir gratuitement un cédérom de rechange ou une copie papier du manuel. AVERTISSEMENT: Cet appareil n’est pas étanche. Pour éviter les risques d’incendie et de décharge électrique, ne placez près de lui un récipient rempli d’eau, tel qu’un vase ou un pot de fleurs, et ne l’exposez pas à des gouttes d’eau, des éclaboussures, de la pluie ou de l’humidité. AVERTISSEMENT:La manipulation du cordon de ce produit ou du cordon des accessoires vendus avec cette unité peut provoquer une exposition au plomb, un produit chimique reconnu par divers organismes gouvernementaux comme cause de cancer, d’anomalies congénitales et d’autres dangers pour la reproduction. Veuillez vous laver les mains après avoir manipulé de tels cordons. Ce produit est conforme à la directive relative aux appareils basse tension (73/23/CEE), à la directive CE relative à la compatibilité electromagnétique (89/336/CEE, amendements 92/31/CEE et 93/68/CEE). Précautions relatives à l’utilisation • Pioneer n’est responsable d’aucune perte de donnée ni d’aucun autre dommage direct ou indirect que ce soit découlant de l’utilisation ou de la défaillance de ce produit. Il est fortement recommandé que vous fassiez régulièrement des copies de secours de vos données importantes. • Assurez-vous de ne contrevenir à aucune restriction de droit d’auteur imposée par les lois de tout pays que ce soit. Si ce dispositif est utilisé pour enregistrer du matériel protégé par des droits d’auteur, vous devez d’abord obtenir l’approbation des titulaires respectifs de tels droits. L’enregistrement du matériel protégé par des droits d’auteur sans l’approbation expresse préalable des titulaires respectifs de tels droits peut entraîner des sanctions judiciaires. Pioneer rejette toute responsabilité en cas de dommages légaux découlant de l’utilisation de ce dispositif pour faire des copies non autorisées de tout matériel protégé par des droits d’auteur que ce soit. • Tous les noms de corporations, de produits et de systèmes indiqués dans les présentes, MC MD même lorsque les symboles ( ) ou ( ) sont omis, doivent être considérés comme des propriétés commerciales de leur titulaire respectif. ATTENTION Cet appareil est un produit laser de Classe 1, mai la diode laser qu’il renferme est supérieure à la Classe 1. Pour garantir une sécurité constante, ne retirez aucun des couvercles et n’essayez pas d’avoir accès à l’intérieur de l’appareil. Confiez toute réparation à un personnel qualifie. L’étiquette suivante se trouve sur votre appareil. Emplacement : sur le dessus du couvercle. 13 Fr CLASS 1 LASER PRODUCT IMPORTANT ATTENTION DANGER D’ELECTROCUTION NE PAS OUVRIR Ce symbole de l’éclair, placé dans un triangle équilatéral, a pour but d’attirer l’attention de l’utilisateur sur la présence, à l’intérieur du coffret de l’appareil, de “tensions dangereuses” non isolées d’une grandeur suffisante pour représenter un risque d’électrocution pour les êtres humains ATTENTION: Pour éviter tout risque d’électrocution, ne pas enlever le couvercle (ni le panneau arrière). Aucune pièce réparable par l’utilisateur ne se trouve à l’intérieur. Confier tout entretien à un personnel qualifie uniquement. Ce point d’exclamation, place dans un triangle équilatéral, a pour but d’attirer l’attention de l’utilisateur sur la présence, dans les documents qui accompagnent l’appareil, d’explications importantes du point de vue de l’exploitation ou de l’entretient. [Pour le modèle Canadien] Cet appareil numérique de le Classe B est conforme à la norme NMB-003 du Canada. Le remplacement et la fixation d’une prise c.a. sur le cordon électrique de cette unité doivent être faits par un technicien de service qualifié seulement. Réglementation 3 d’information sur bruits de machine, GPSGV: Le niveau de pression sonore mazimum est de 70 dB(A) ou moins, conformemént à EN ISO 7779. Cadre d’exploitation Température et humidité de l’environnement d’exploitation : +41 ºF – +95 ºF (+5 ºC – +35 ºC) ; humidité relative de moins de 85 % (orifices d’aération non obstrués) Consignes importantes pour le produit : • Ne l’exposez pas à une forte humidité et ne l’installez pas dans un endroit mal aéré Avis important – Inscrivez le numéro de modèle et le numéro de série de l’unité ci-dessous. Ces numéros apparaissent sur le panneau arrière du produit. N° de modèle : DVR-X122 N° de série : Conservez ces numéros à titre de référence ultérieure. est une marque de commerce de la société DVD Format / Logo Licensing Corporation. 14 Fr INSTRUCTIONS DE SÉCURITÉ Pour garantir votre sécurité personnelle et obtenir le maximum de votre lecteur, lire et suivre ces consignes de sécurité. ENVIRONNEMENT – Ne pas utiliser cet appareil dans des endroits avec beaucoup de poussière, une température ou une humidité élevée. Utiliser l’appareil à un endroit ou il n’est pas soumis à des vibrations ou des chocs. PUISSANCE – Couper l’alimentation du système et des dispositifs joints avant l’installation. LIRE LES INSTRUCTIONS – Lire toutes les instructions de sécurité et d’utilisation avant d’actionner le lecteur. CONSERVER LES INSTRUCTIONS – Garder les instructions de sécurité et d’utilisation pour une future référence. SUIVRÉ LES INSTRUCTIONS – Suivre toutes les instructions de fonctionnement et d’utilisation. ATTENTION AUX AVERTISSEMENTS – Observer tous les avertissements. NETTOYAGE – NE PAS utiliser de liquides, de détachants en aérosol ou de l’alcool. N’utiliser qu’un chiffon humide pour nettoyer les surfaces extérieures du boîtier. EAU ET HUMIDITE – NE PAS utiliser ce produit à proximité d’eau. SOURCES D’ALIMENTATION – Utiliser ce produit à avec le type d’alimentation indiqué sur l’étiquette de fabrication. En cas de doute à propos du type d’alimentation disponible, consulter un revendeur Pioneer agréé. SURCHARGE – NE PAS surcharger les prises murales et les rallonges pour ne pas entraîner d’incendie ou de secousse électrique. PENETRATION D’OBJETS ET DE LIQUIDES – No jamais enfoncer d’objet d’aucune sorte dans ce produit. Le contact avec des points de tension dangereux peut provoquer un court-circuit, entraînant un incendie ou une secousse électrique. Ne pas verser de liquide d’aucune sorte sur ce produit. CONDENSATION – De l’humidité se forme sur la section de fonctionnement du produit entraînant une baisse de performances s’il est amené d’un endroit trais vers un environnement plus chaud. En cas de déplacement de l’appareil vers un endroit ayant une température plus chaude, laisser le produit perdant 1 à 2 heures dans le nouvel endroit avant de le remettre sous tension. ENTRETIEN – Ne pas essayer de réparer soi-même ce produit. L’ouverture ou le retrait des capots peut vous exposer à une tension dangereuse ou d’autres dangers. Pour tout entretien, demander à un personnel d’entretien qualifie. (Se reporter à la carte d’entretien et de support jointe.) AU SUJET DE LA LECTURE DES DISQUES À DOUBLE COUCHE – Un disque à double couche (DualDisc en anglais) est un tout nouveau disque deux faces. L’une de ces faces comprend le contenu DVD – vidéo, audio, etc. – et l’autre, le contenu non-DVD tel que le matériel audio numérique. La face audio non-DVD de ces disques n’est pas conforme aux spécifications CD audio, ce qui pourrait empêcher sa lecture. La face DVD des disques à double couche peut être jouée sur ce produit. Pour plus de détails sur la spécification des disque à double couche, veuillez communiquer avec le fabricant du disque ou votre détaillent. Note: Il se peut que quelques disques ne jouent pas a cause des différents formats d’enregistrement ou de l’état physique du disque à l’heure de l’enregistrement ou de lecture. 15 Fr CARACTÉRISTIQUES Interface USB 2.0 Vitesse écriture (*CAV, **CLV) DVD-R 1X, 2X, 4X, 6X, 8X**, 12X**, 16X*, 18X* DVD-R (DL) 2X, 4X, 6X, 8X**, 10X** DVD-RW 1X, 2X, 4X, 6X DVD+R 2.4X, 4X, 6X, 8X**, 12X**, 16X*, 18X* DVD+R (DL) 2.4X, 4X, 6X, 8X**, 10X** DVD+RW 2.4X, 3.3X, 4X, 6X, 8X** DVD-RAM 2X, 3X, 5X, 6X, 8X, 12X CD-R 4X, 10X, 16X, 24X**, 32X**, 40X* CD-RW 4X, 10X, 16X, 20X**, 24X**, 32X** Vitesse de lecture maximale DVD-ROM (single) 16X DVD-ROM (DL) 12X DVD-R, DVD+R 12X DVD-R (DL) 8X DVD-RW, DVD+RW 8X DVD+R (DL) 8X CD-ROM, CD-R 40X CD-RW 32X DVD-RAM 12X (veuillez vous reporter à la page précédente du document) DualDisc Taille de la mémoire tampon 2 MBytes (Écriture, Lecture) Sevomécansime de bascule d’écran a cristaux liquides Horizontale au choix Mécanisme a faible vibration par système DRA Format du Disque (Lecture / Écriture) DVD simple couche / double couche / disque de 120 mm / disque de 80 mm DVD-R (En cas écriture, disque 650nm pour usage général seul) DVD-R (4X, 8X, 16X, 18X vitesse écriture) Couche Duelle DVD-R et Double Couche DVD+R DVD-RW (1X, 2X, 4X, 6X vitesse écriture) DVD+R (2.4X, 4X, 8X, 16X, 18X vitesse écriture) DVD+RW (2.4X, 4X, 8X vitesse écriture) DVD-RAM (non-arrondi, Version 2.0, Version 2.1) CD-ROM Mode 1 CD-R XA Mode 2 (forme 1, forme 2) Photo CD (simple et plusieurs sessions) CD-DA CD-Extra (CD PLUS) Video-CD CD Text CD-R CD-RW / Haute Vitesse CD-RW / Ultra Rapide CD-RW Note: Un programme d’application prenant en charge le format ci-dessus est nécessaire pour écriture Médias supportent requis pour la vitesse écriture DVD et CD spécifiques. Pour effectuer une écriture sur DVD aux vitesse 12X, 16X, ou 18X utilises des disques désignes par Pioneer. Pour plus de détails, consultez les informations disponibles sur le site web de Pioneer www.pioneerelectronics.com 16 Fr INTERFACE Front View 4 1 2 3 1) Orifice d’éjection forcée Insérer une tige rigide dans l’orifice et pousser pour éjecter le tiroir lorsque celui-ci ne s’ouvre pas lors d’un appui sur la touche d’éjection. En fonctionnement, utiliser uniquement la touche d’éjection pour ouvrir le tiroir. Veiller à ce que l’alimentation du lecteur soit coupée et attendre l’arrêt de la rotation du disque pendant plus d’une minute avant de tenter d’éjecter le tiroir au moyen de l’orifice d’éjection. 2) Voyant BUSY (occupé) L’état de fonctionnement est signalé comme suit: Pendant la lecture S’allume Pendant l’écriture S’allume 3) Touche d’Éjection Pour décharger / charger le disque, appuyer sur la touche. 4) Tiroir du Disque Ouvrir le tiroir de chargement en appuyant sur la touche d’éjection, puis placez un CD ou un DVD dans l’emplacement prévu avec l’étiquette tournée vers le haut. Appuyer sur la touche d’éjection ou sur la partie avant du tiroir pour charger le disque. N’essayez pas de retirer de force le plateau du disque. A PROPOS DES CODES REGIONAUX Le code régional peut être modifie 5 fois SEULEMENT (premier réglage compris). Comme la cinquième modification sera DEFINITIVE, soyez particulièrement prudent lorsque vous décidez de modifier les codes régionaux. Les codes régionaux sont couverts par la norme DVD. Toutefois, les codes régionaux des disques DVD sont facultatifs. Les disques DVD qui ne possèdent pas de code régional peuvent être reproduits sur tous les lecteurs. 17 Fr INTERFACE Rear View 6 5 5) Conneteur d’USB 2.0 4-goupilles Connecteur d'USB 2.0 I/O 6) Entrée cc {DC} pour l'adapteur Broche 1 2 3 4 Nom +5 V +5 V +12 V Gnd (terre) 5 Gnd (terre) 3 2 5 1 4 18 Fr RACCORDEMENTS Raccordez l’unité à l’adaptateur c.a. inclus puis faites le raccordement USB. Raccordement de l’adaptateur c.a. Branchez l’adaptateur c.a. au connecteur DC IN situé sur le panneau arrière de l’unité. Utilisez le cordon électrique inclus pour raccorder l’adaptateur c.a. à une prise murale. raccordez à une prise murale Adaptateur c.a. (inclus) Raccordement du câble USB Cette unité utilise une connexion à chaud. 1) Confirmez que votre ordinateur présente une borne USB disponible. 2) Une fois que votre système d’exploitation WindowsMD est en marche, servezvous du câble USB inclus pour raccorder l’unité externe à votre ordinateur. Nota : Cette unité peut fonctionner avec une borne USB 1.1, mais son rendement ne sera pas conforme aux spécifications optimales spécifiées. Avertissement : Ne débranchez pas l’unité au cours du transfert des données. Ordinateur 19 Fr Câble UBS (inclus) OPÉRATIONS La gravure sur médias DVD-R/RW est possible lorsque l’application logicielle incluse est installée sur votre ordinateur. La gravure sera impossible si votre ordinateur ou votre système d’exploitation est incompatible avec le logiciel. Pour commencer la gravure sur DVD-R/RW : 1) Allumez l’unité. 2) Allumez votre ordinateur. 3) Appuyez sur le bouton d’éjection pour ouvrir le plateau. 4) Placez un disque dans le plateau, étiquette vers le haut. 5) Appuyez à nouveau sur le bouton d’éjection pour fermer le plateau. 6) Amorcez l’application de gravure. Pour terminer la session de gravure : 1) Sortez de l’application de gravure de disque. 2) Appuyez sur le bouton d’éjection pour ouvrir le plateau. 3) Retirez le disque. 4) Appuyez à nouveau sur le bouton d’éjection pour fermer le plateau. 5) Éteignez votre ordinateur. 6) Éteignez l’unité. Pour plus de détails sur la façon d’installer le logiciel et de graver ou lire des disques, voyez le fichier logiciel inclus ou la fonction d’aide au sein de l’application. Éjection manuelle d’un disque Servez-vous du trou d’éjection manuelle pour retirer un disque si jamais le plateau ne s’ouvre pas (après avoir essayé toutes les autres méthodes possibles). 1) Éteignez votre ordinateur. 2) Attendez que le disque cesse de tourner. 3) Insérez un trombone ou un petit fil métallique dans le trou d’éjection manuelle. 4) Appuyez fort jusqu’à ce que le plateau avance de 5 à 10 mm (½ pouce). 5) Tirez doucement sur le plateau, en ligne droite, et retirez le disque. Remarques : Pour éviter de vous blesser et d’endommager l’unité, NE FORCEZ PAS l’ouverture du plateau pendant que le disque tourne. Ne placez aucun objet devant le plateau au cours de l’opération. 20 Fr FICHE TECHNIQUE [Position] Ce lecteur doit être utilisé en position horizontale. [Taille du Disque] 12 cm / 8 cm [Vitesse de Transfert des Données] Lecture de données (soutenu) DVD Max. 21.6 Mo/s CD Max. 6.00 Mo/s (Mode de vitesse angulaire constante 6.6 a 16X sur 16 transferts de blocs) (Mode de vitesse angulaire constante 17.2 a 40X sur 16 transferts de blocs) Écriture de données (soutenu) DVD Moy. 24.3 Mo/s (Écriture 18X sur DVD-R) CD Moy. 6.00 Mo/s (Écriture 40X sur CD-R) * La vitesse de transfert des données peut varier en fonction de l’état du disque (rayures, etc.) [Temps d’accès é temps de recherche] Temps d’accès (Moyenne aléatoire) Temps de recherche (Moyenne aléatoire) DVD-ROM 130 ms DVD-ROM 120 ms CD-ROM 120 ms CD-ROM 110 ms [Caractéristiques Audio] Sortie ligne 0.70 ± 0.15 Veff. (charge de 10 Ω) [Autres] Dimensions externes (façade comprise) Alimentation Poids 6.69”W x 2.28”H x 9.13”D 170mmW x 58mmH x 232mmD +12 V CC, 1.5 A 1.4 Kg +5 V CC, 1.5 A Température de fonctionnement Humidité de fonctionnement Température de remisage Humidité de remisage + 5˚ C à + 35˚ C 5% à 85% (sans condensation) – 40˚ C à + 60˚ C 5% à 90% (sans condensation) [Accessoires] Disque e logiciel ( x 1 ) Adapteur À C.A ( x 1 ) Câble d'USB (10 m) ( x 1 ) Carte De Garantie (x 1 ) Consignes d'utilisation incluses sur le disque de logiciel Note: 21 Fr Les caractéristiques techniques et présentation de ce produit sont sujets à des changements sans préavis pour améliorations. (Cette page a été laissée blanche intentionnellement.) 22 AFTER SALES SERVICE FOR PIONEER PRODUCTS Please contact the dealer or distributor where you purchased this product for its after-sale service (including warranty conditions) or any other information. In case the necessary information is not available, please contact the Pioneer’s subsidiaries (regional service headquarters) listed below. PLEASE DO NOT SHIP YOUR PRODUCT TO THE COMPANIES at the addresses listed below for repair without advance contact as these locations are not repair facilities. UNITED STATES PIONEER ELECTRONICS SERVICE INC. P.O. Box 1760 Long Beach, CA 90801-1760 United States of America CANADA PIONEER ELECTRONICS OF CANADA, INC. Customer Support 300 Allstate Parkway Markham, Ontario L 3 R – 0 P 2 Canada Published by Pioneer Corporation All Rights Reserved Copyright ® 2007 Pioneer Corporation ® PIONEER CORPORATION PIONEER CORPORATION 4-1, Meguro, 1-Chrome, Meguro-ku, Tokyo 153-8654, Japan Pioneer Electronics (USA) Inc. Industrial Solutions Business Division th 2265 E. 220 Street, Long Beach, CA 90810 USA PIONEER ELECTRONICS SERVICE INC. 1925 East Dominquez Street, Long Beach, CA 90810 USA www.pioneerelectronics.com/DVRX122support/ Pioneer Electronics of Canada, Inc. Industrial Products Division 300 Allstate Parkway, Markham, Ontario, L3R-0P2 Canada www.pioneerelectronics.com/DVRX122support/ For software related issues, please contact: NERO www.nero.com email support: [email protected] Tel: 888/309-4212 (toll call) FAQs: http://www.nero.com/enu/Support.html electronic version created in the USA <DVRX122_OI>