1
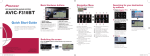
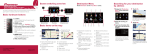
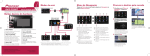
Navigation Menu Basic Hardware buttons FLASH MEMORY NAVIGATION AUDIO RECEIVER AVIC-U310BT Searching for your destination by address Touch Menu on the map screen. 6 1 Display Navigation Menu 1 and touch Address. 1 2 2 3 4 8 9 a 3 5 4 Quick Start Guide This guide is intended to guide you through the basic functions of this navigation system. For details, please refer to the operation manual. 1MODE button 2MULTI-CONTROL Rotate to adjust the audio volume. Pressing this button when the audio source is selected plays the track, file or skips chapter. 3LIST button The list lets you see the list of file names or folder names. 4SRC/OFF button Selecting the audio source. 5BAND/ESC button Changes the band for the radio. 6DETACH button Press to remove the detachable device from the head unit. Switching the screen Press the MODE button to switch between map screen and audio screen. Published by Pioneer Corporation. Copyright © 2009 by Pioneer Corporation. All rights reserved. <KYTZX> <09E00000> Printed in China <CRB3017-A/S> UC Audio screen Map screen 2 Input the information that you want to set as the destination. 5 6 7 1 Search by address 2 Shortcut key for calculating route of going home 3 Search for stores, restaurants, and other businesses in the points of interest database 4 Searching for POIs by using the data on external storage devices (SD) 5 Select a destination from your address book 6 Select a previously routed destination 7 Canceling your current route b c 4 Touch OK. d 8 Searching for a location by coordinates 9 Gas Mileage Management a Switching to “PC Mode” b Checking the current route conditions c Replicating the settings d Exporting and importing the data This navigation systems gives Touching the one of options. After narrowing down your destination, “Location confirmation screen” will appear. 3 Touch OK. After searching for the destination, the “Route confirmation screen” appears. you route guidance both visually and by voice. Basic items on the map 1 2 3 4 5 7 6 1 Information for the next guidance point 2 Current time 3 Estimated time of arrival (or distance to the destination) 4 Current route 5 Current position 6 Street name that your vehicle is traveling along 7 Changing the map scale and the map orientation Scrolling the map Dragging the map allows scrolling. The scroll speed will change depending on your drag speed. Pairing your phone 1 Activate the Bluetooth 1 Connect the cellular 2 Touch the keys in the fol- 2 Touch Transfer on Phone function on your phone. lowing order;Phone ➡ Settings 1Touch Settings on the “Navigation Menu” screen. 2Touch Sound. phone. Menu. 3 Turn Bluetooth On/Off to On. 4 Touch the keys in the fol Setting the volume for navigation system Transferring the phone book lowing order; Connections ➡Add ➡ Search devices 3 Touch OK to enter the waiting screen. 4 Operate your phone to transfer the phone book entries during waiting screen. 5 After transferring, touch OK. When the transferring is successful, “Completed data loading!” will appear. Selecting the audio source Tuner source screen 1 2 3 1 Press the MODE button You can control an iPod by connecting the USB interface cable for iPod (CD-IU50) (sold separately) to the navigation system. 1 Connect your iPod. when the map of the current location is displayed. 2 Press the SRC/OFF button repeatedly to switch between the following sources. XM (XM tuner)➡SIRIUS (SIRIUS tuner)➡HD Radio (HD Radio tuner)➡TUNER (tuner)➡CD (built-in CD player) ➡USB (USB storage device)/iPod (iPod connected using USB input)➡EXT1 (external unit 1)➡EXT2 (external unit 2)➡AUX (auxiliary device)➡XM (XM tuner) Playing your Apple iPod 4 1 Shows which band the radio is tuned to: FM1 to FM3. Notes: ・ The audio source is disabled if the equipment is not connected or inserted. ・ When the tuner has been tuned in to an HD Radio broadcasting, “TUNER” can not be selected. cable for iPod 2 Shows what preset item has been selected. 3 Shows the frequency. 4 Storing and recalling broadcast frequencies 2 Switch the audio source to iPod. 1 2 3 The system tries to find and lists nearby devices. 5 Touch your phone on the list and then enter the PIN code from your phone. (The PIN code is “1111”.) When the pairing is successful, the message will appear. USB interface USB connector 4 5 1 Text display area 2 Switches the strings in the text area 3 Sets iPod control mode. This navigation system’s iPod function can be operated from the connected iPod. 4 Playing songs in random order 5 Playing songs related to the currently playing song ・ Pressing MULTICONTROL right or left Skips the track forward or backward. ・ Pressing and holding MULTI-CONTROL right or left Perform fast forward or backward. ・ Pressing the center of MULTI-CONTROL The advanced function screen appears. ・ MULTI-CONTROL Rotating Adjusts the audio source volume. ・ Pressing LIST button Shows the list to select a song. Note: In this manual, iPod and iPhone will be referred to as iPod.