1
e
d
i
u
G
t
r
a
t
S
Quick
1
Connections
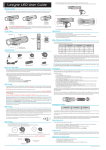
Connection to an External Tuner
1) Disconnect the power cords of the devices from the AC outlet.
2) Make the connection as illustrated below.
e.g.)
DIGITAL VIDEO DISC RECORDER
DVDR3475/37
rear of your TV
VIDEO IN
AUDIO IN
R
L
RF coaxial cable
TV signal
ANT. IN
RCA video cable
P l a ya ble Di s cs
This unit is compatible to play back
the following discs / files.
is a trademark of DVD
Format/Logo Licensing
Corporation.
Playable discs
Logos
Playable discs
RF coaxial cable
Logos
AUDIO OUT
R
L
DVD-video
VIDEO
OUT
S-VIDEO
OUT
RCA video
cable
VIDEO
IN
VIDEO
OUT
PB/CB
RCA
audio cable
L
IN
R
OUT
R
IN
DVD+RW
Y
L
CD-DA (audio CD)
or
video CD
RCA
audio cable
AV IN
S-VIDEO AV OUT
OUT
PR/CR
COMPONENT
VIDEO OUTPUT
S-VIDEO
VIDEO
IN
VIDEO
OUT
Y
L
PB/CB
HDMI OUT
L
S-video cable
DVD+R
R
IN
external tuner
CD-RW
AV IN
R
S-VIDEO AV OUT
PR/CR
COMPONENT
VIDEO OUTPUT
OUT
S-VIDEO
COAXIAL
DIGITAL AUDIO OUTPUT
PCM / BITSTREAM
rear of this unit
3) Plug in the power cords of the devices to the AC outlet.
* Refer to the user manual for other connection methods.
DVD+R Double Layer
CD-R
Playable files
DVD-RW
(Finalized video mode discs only)
DVD-R
(Finalized video mode discs only)
CD-DA
MP3
Windows Media™ Audio
JPEG
DivX®
Media
CD-RW/-R
CD-RW/-R
DVD+RW/+R
DVD-RW/-R
How to Select External Input Channel on Your TV
After you have completed the connections, switch the input selector on your TV to an appropriate external
input channel. Press a button on the TV’s original remote control that selects an external input channel
repeatedly until the DVD recorder’s opening picture appears. Check your TV owner’s manual for details.
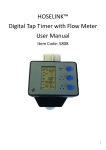
Settings For the Video Input
You must let the unit know which video input jack you are using before
making a recording.
R eg i on C o d e s
The number inside the globe refers to region of the world.
This unit can play back DVDs that are labeled for ALL regions or for region 1.
R ec ord a b l e Di s cs
Logo
Attributes
This unit can record to DVD+RW, DVD+R, DVD-RW and DVD-R. DVD+R/
DVD-R can only be recorded to once. DVD+RW/DVD-RW can be recorded
to and erased many times.
• Following discs are recommended for good recording quality and are
DVD+R
DVD+RW
8cm/12cm, single-sided, single layer disc
proven to be compatible with this unit. However, depending on the
Approx. max. recording time (SLP mode):
media condition the unit may not read the disc properly.
360 minutes (4.7GB) (for 12cm)
Verbatim DVD+R 8x, DVD+RW 4x, DVD-R 8x, DVD-RW 2x,
108 minutes (1.4GB) (for 8cm)
JVC DVD-RW 4x,
Maxell DVD+R 4x/8x/16x, DVD-R 8x/16x,
SONY DVD+R 4x/8x/16x, DVD+RW 4x,
DVD-RW
DVD-R
TDK DVD+R 4x/8x/16x
Performance of any other discs are not guaranteed.
• You can play back DVD+RW on most DVD players without finalizing. However, if you have added or deleted chapters, or made
chapters hidden, you must perform “Make Edits Compatible” before being able to see those effects on other units (see page 72 in
the user manual). To play back discs other than DVD+RW on other DVD players, you will need to finalize.
Unrecordable Discs
• DVD-RW recorded in the mode other than +VR is not recordable on this unit unless you erase all contents in the disc
(see page 71 in the user manual).
• DVD-R recorded in the mode other than +VR is not recordable on this unit.
1
2
3
4
5
6
Press [SETUP] and use [K // L] to
select “General Setting”, then press [OK].
Use [K // L] to select “Video”, then
press [OK].
Use [K // L] to select “Video Input”,
then press [OK].
Use [K // L] to select desired external
input position, then press [OK].
Use [K // L] to select the input jack
type to connect, then press [OK].
General Setting
Playback
Display
Video
Recording
Clock
DivX
HDMI
Reset All
Progressive Scan
TV Aspect
Video Input
Video Input
E1 (Rear)
E2 (Front)
General Setting
Playback
Display
Video
Recording
Clock
DivX
HDMI
Reset All
Progressive Scan
TV Aspect
Video Input
E1Video
(Rear)Input
In
E1Video
(Rear)
E2S-Video
(Front)In
Press [SETUP] to exit.
Follow to the back side of this sheet.
2
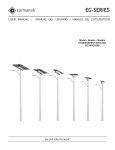
Initial Setting
3 –2
Timer Recording
You can program the unit to record up to 12 programs within a month in
advance. Daily or weekly program recordings are also available.
Before recording, make sure
You need to follow these steps when you turn on this unit for the first time.
1
2
• Connect the external tuner to either E1 or E2 and set it to output audio/video
signals when it comes to the time you want to start recording.
• Do not change the external tuner’s channel while you are recording. You cannot
watch one channel and record another at the same time.
• Set the clock before setting a timer programming.
• Insert a recordable disc with enough recordable space.
Press [STANDBY-ON y].
Turn the TV on. Select the input to which the unit is connected.
Initial Setup
OSD Language
Use [K / L] to select your desired
language, then press [OK] to set language.
3
4
English
Français
Español
1
2
3
4
5
Press [TIMER].
Initial Setup
Press [OK] to activate “Clock Setting”.
Clock Setting
--- / -- / ---- (---)
-- : -- --
Initial Setup
Use [{ / B] to select an item to set, and
use [K / L] to select the contents to suit
your preference, then press [OK].
Clock Setting
JAN / 01 / 2007 ( MON )
12 : 00 AM
Timer Programming
MON JAN/01 11:00AM
Date
Use [K / L] to select “New Program”,
then press [OK].
Start
End
New Program
E1/E2
1/1
Set a timer programming.
Press [OK].
3
DVD Recording
3 –1
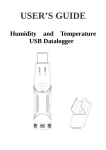
Basic Recording
2
Press [REC MODE] to select a recording mode.
This unit has no tuner system
so cannot receive TV broadcasts
without external tuner or such
devices.
3
Set the date.
Recording Mode
Recording
mode
HQ (1Hr)
SP (2Hr)
SPP (2.5Hr)
LP (3Hr)
EP (4Hr)
SLP (6Hr)
Recording
time
8cm Disc 12cm Disc
18 min
60 min
36 min
120 min
45 min
150 min
54 min
180 min
72 min
240 min
108 min
360 min
Date
JAN/02
E1/E2
E1
Good
Start
--:-Mode
SP
End
--:--
SP
Date
JAN/02
E1/E2
E1
Start
12 : 00AM
Mode
SP
End
--:--
SP
2 : 00
Select the appropriate
external input position (E1/E2).
Then select the desired channel
to record on the external tuner.
Date
JAN/02
E1/E2
E1
Start
12 : 00AM
Mode
SP
End
1 : 00AM
SP
2 : 00
Select a recording mode.
Date
JAN/02
E1/E2
E1
1 : 00
Start
12 : 00AM
Mode
SP
End
1 : 00AM
SP
1 : 00
Poor
4
5
Press [REC I] to start recording.
4
1
Press [OPEN/CLOSE A].
Playback
2
Insert your disc with
its label facing up.
3
Press [PLAY B] to start
playback.
4
Press [STOP C] to stop
playback.
Press [STOP C] to stop recording.
Press [OPEN/CLOSE A] to open the disc tray and
insert your disc with its label facing up.
Align the disc to the disc tray guide.
* Make sure the disc is compatible
with this unit. (Refer to page 24 in the
user manual for the list of compatible
discs.)
Printed in China
Set start and end time.
Video/sound
quality
Press [SOURCE] to select the appropriate external
input position (E1/E2) to which your external
tuner is connected. Then select the desired
channel to record on the external tuner.
1
Press [STANDBY-ON y] to set a timer
programming.
To set one-touch timer recording (OTR)...
This is a simple way to set the recording time in blocks
of 30 minutes.
Press [REC I] repeatedly until the desired recording
time (30 minutes to 6 hours) appears on the TV screen.
One-touch timer recording will start.
• To cancel one-touch timer recording within the
specified time, press [STOP C].
You will need to finalize DVD+R, DVD-RW or DVD-R to play them back on other DVD players (see
page 40 in the user manual).
E7E4AUD_QG ★★★★★
1VMN23519/ 8239 300 55611