1
CONTENTS
1. CONTENTS
2. INSTALLING TELEPHONE AND BASE STATION
• Placing the base station
• Inserting/Replacing batteries
• Telephone connection
• Charging/Recharging the telephone
• Telephone range
• Installing another KALA 200 handset
3. PRESENTATION OF TELEPHONE AND ACCESSORIES
4. THE DISPLAY
• Programming icons
• Icons for common functions
5. USING THE TELEPHONE
• Calling directly/hanging up
• Taking a call
• Placing a call on hold/Transferring a call
• Operating the loudspeaker
6. USING THE PHONEBOOKS
• Storing your phone numbers
• Consulting a phonebook
• Calling from a phonebook
• Changing a phonebook entry
• Deleting an entry from the phonebook
• Selecting the ringer type
7. USING THE ANSWERING MACHINE (TAM)
• Activating/Deactivating the answering machine
• Accessing the answering machine
• Listening to messages on your answering machine
• Deleting messages from your answering machine
• Listening to your recorded message
• Recording/Changing the outgoing message
• Recording an internal message
• Call screening
• Remote control of the answering machine
8. THE LIST OF REDIAL NUMBERS AND INCOMING CALL LOG
• List of numbers to redial
• Incoming call log
9. HOW TO PROGRAM YOUR PHONE
• Example: selecting and navigating
10. PROGRAMMING OPTIONS
• Answering machine programming options
• Melody programming options
• How to register the handset with another base station
• Settings programming option
• Identifying the caller
• Earpiece programming options
• Other indirect programming options
11. TROUBLESHOOTING
12. YOUR PHILIPS WARRANTY
13. DECLARATION OF CONFORMITY
14. ENVIRONMENT AND SECURITY
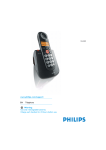
Kala 200 Vox (TD6533)
1
INSTALLING TELEPHONE AND BASE STATION
2
Placing the base station
In order to reduce the risk of interference, place the base station at least 1m away from any other
electrical appliance (telephone, television, computer, etc.)
The base station should be placed on a flat surface.
The base station should not be kept in a damp room, near a heat source or close to obstacles such
as thick walls or metallic structures.
Inserting/Replacing batteries
+
+
Your handset is powered by two rechargeable AA/R6 batteries.
Only AA 600 mAh rechargeable batteries should be used as replacements.
Never use non rechargeable batteries.
1. Slide down the cover
on the back of the telephone.
-
2. Insert batteries following the diagram.
1
2
3. Close the cover.
Telephone connection
On the bottom of the base station:
1. Connect the power supply (B) into the base station then
plug the power adaptor into the easily accessible wall
socket.
2. Connect the telephone cord (A) to the base station and
then to the PTT wall socket.
Place the handset on the base station (charging unit).
A
B
A
Charging/Recharging the telephone
While the batteries are being charged,
When the battery icon on the display shows
B
flashes on the screen and shows
, the batteries are fully charged.
.
You will hear a validation beep when you place the handset on the base station.
On first use or when new batteries have been inserted, charge the batteries for at least 24 hours.
You will hear a beep when you activate the telephone if the batteries need to be charged.
Telephone range
Your telephone has a range of : 50m indoors - 350m outdoors.
The
symbol on the display indicates that the handset is connected on the base station.
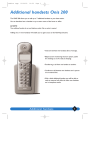
Installing another KALA 200 handset
You can register up to 4 handsets with your base station (See Page 10 Programming options).
Additional handsets do not require additional telephone connections but do need a power
supply adaptor. The reference of Additional Kala 200 handsets is TD 6830.
PRESENTATION OF TELEPHONE AND ACCESSORIES
3
When using your telephone,
3 beep types will
be heard:
Earpiece
• the error beep
Family
phonebook
key
User guide
The key located
on the base station side can be
used to make all
handsets ring at
the same time.
Talk key
To make
an external call,
end an external
call, and answer
an external call.
Mains adapter
Functions keys:
+
-
How to optimise batteries lifespan
If you plan not to use your phone for at least 15 days,
we would suggest you to remove the batteries from
the handset if you disconnect the mains power.
-
Batteries
.
Press
1x : activate loudspeaker
2x : increase or decrease the volume
of the loudspeaker
3x : deactivate loudspeaker
Use this button to increase or decrease
the volume depending on the setting
you have previously chosen.
moves to the left, or displays the previous entry.
moves to the right, or displays the following entry.
The crossed-out dustbin signifies that the battery should not be
disposed of with general household waste.
+
• the invitation beep
To call all internal
handsets recognised
by the base station or
put a call on hold
(with hold music).
(“internal call” key).
Programming
key
The batteries contain Cadmium and must be disposed of in compliance
with the waste disposal regulations. Never use non-rechargeable
batteries. The manufacturer assumes no responsibility for non-respect
of these regulations.
,
Call
log key
Telephone cable
Only use the power and telephone cables
supplied with the telephone.
validates the entry.
Direct access
to listen to messages and program
some functions of
the answering
machine. This back
lit key also
indicates new
messages.
,
• the validation beep
Beep indicators
Friends
phonebook
key
The handset may also be placed
on the base station with the keypad face-up.
Clip
Redial
list key
press: removes a character during entry. press and hold:
exit any mode (programming, phonebooks or lists).
Modes:
list of last incoming calls.
list of last numbers dialled (redial key).
program the telephone.
THE DISPLAY
4
Icons for common functions
icon
status
description
battery
on
1/4 full
off
flashing
full
less than 1/2 hour
discharged
charging
call log
on
off
new log entry
no new log entry
friends
phonebook
on
flashing
being accessed or incoming call (Caller identification service)
programming
external
on
flashing
call in progress or made from call log
call arriving or telephone answering machine operating
on hold/
internal call
on
external call on hold
or if a second or another handset: internal call in progress
family
phonebook
on
flashing
being accessed or incoming call (Caller identification service)
programming
Telephone
Answering
Machine
on
off
flashing
telephone answering machine is on
telephone answering machine is off
telephone answering machine is full
messages
on
off
flashing
old message(s)
no message(s)
new message(s)
antenna
on
off
flashing
in range
handset not registered to the base station
out of range
Settings
Answering
machine
setting
USING THE TELEPHONE
5
Additional
handset
setting
Ringing
melodies
setting
Earpiece
volume
setting
Programming icons
Scrolling
arrows
10 character screen
Phonebook access (see description of the phonebook Page 6)
Press the “Friends“ or “Family“ phonebook key to access the chosen phonebook.
Note: only phonebooks containing entries can be accessed (otherwise, you have a beep error).
Pressing a second time while scrolling will exit the phonebook.
Talk key
Your phone rings. Press the "talk" key to be connected. Press the same key to hang up.
Call directly/Hang up
Enter your number, then press the "talk" key. Press the "talk" key to hang up.
*Caller identification service: This function is available if you have subscribed to your operator’s
Caller identification service. The network sends the caller’s number to your telephone. If this number is stored in the Family or Friends phonebook, the corresponding icon will appear and the relevant melody will sound after the second ring (see Pages 6 and 8).
Operating the loudspeaker
Press the "loudspeaker" key to adjust the loudspeaker:
• pressing the key once activates the loudspeaker,
• pressing the key a second time increases or decreases the volume,
• pressing the key a third time deactivates the loudspeaker.
The previous volume setting is automatically used when the loudspeaker is re-activated.
Placing a call on hold and transferring a call
Press the ”internal call” key to place a call on hold, during which the person calling will hear music.
Press the "internal call" key to transfer a call (this option is only available if you have more than one
handset). All the handsets on the base station will then be called. There is no need to wait for the call
receiver to pick up before hanging up (by pressing the "talk" key).
USING THE PHONEBOOKS
6
You have access to two phonebooks, each containing10 files
(name and numbers).
You can use these phonebooks to make calls and identify incoming calls if
you have subscribed to the Caller identification (see Page 5).
Storing numbers in a phonebook
Each entry is made up of a name (maximum 10 characters) and
a telephone number (maximum 25 characters).
To store an entry:
1. Enter the phone number, or have it displayed using one of
the lists (see Page 8 Incoming call log or list of redial numbers).
or
2. Press the key of the desired phonebook
.
When your receive an incoming call and the caller’s number is stored in
icon will be dis-
3. After the beep, enter the name (see How to obtain the characters*)
and press the
key to validate.
played and the associated melody will play after the second ring if you
A validation beep sounds which indicates you go back to idle mode.
one of the phonebook, the corresponding
or
Selecting the ringer type
You have the possibility to change the pre-recorded
melody of the Friends and Family phonebooks (see
page 9 How to program your phone). See also the
programming example in the programming rules.
* How
to obtain the characters:
Press the
1x
key
several times
2x 3x
5x
4x
have subscibed to the Caller identification service.
Caller identification service:
The Caller identification function is available if you have subscribed
If your country uses local prefixes, you will need to include these
codes in your phonebook entries to ensure the Caller
identification service works correctly.
!
space
A B C 2
D E F 3
G H I 4
J K L 5
M N O 6
P Q R S
7
T U V 8
W X Y Z
9
-
1
to the Caller identification service.
If you have subscribed to the Caller identification service, the screen
will show the caller’s number during the call. The name will be dis-
Calling from a phonebook
Each phonebook can contain 10 names.
Names are listed in alphabetical order.
played if it is stored in one of the phonebooks (see Page 8).
If you wish to know who is calling before you pick up, you can
or
assign a specific melody to the caller; (see Page 10, Programming
to select the
person’s name
options).
Accessing and exiting the phonebook
Press
or
and
0
Changing a phonebook entry
to access the phonebook. Press the same icon to
Example:
Only the phone number can be changed.
exit the phonebook.
or
Accessing and selecting phonebook files
or
and
to select the
person’s name
or
validation
beep
and
to modify the
old number
Deleting an entry from the phonebook
to select a file
or
validation
beep
and
to select the
person’s name
to delete
the entry
To enter the name “Patrick“:
press
once for the letter “P“
press
once for the letter “A“
press
once for the letter “T“
press
three times for the letter “R“
press
three times for the letter “I“
press
three times for the letter “C“
press
twice for the letter “K“
If you make a mistake, simply press
to delete
USING THE ANSWERING MACHINE (TAM)
7
The answering machine is activated by default.
You can record up to 6 minutes of top quality messages or 9 minutes of standard quality
messages (see Page 10, Programming options, to learn how to change the telephone
answering machine recording quality.)
The key
USING THE LIST OF REDIAL NUMBERS AND INCOMING CALL LOG
8
("answering machine" key) is located on the back of the handset.
List of numbers to redial
Pressing the following keys to access or exit the lists:
is used to access the redial list - a list of the last 5 numbers called, from the latest to
the oldest. Each new entry deletes the oldest entry. You can use this function to automatically
redial a caller’s number.
Activating/Deactivating the answering machine
validation
beep
or
activation
deactivation
This key is backlit. Press this key to listen to your messages.
A blinking key indicates receipt of an unread message. Once you have listened to your messages,
press this key again to quit the answering machine function.
Accessing the list of last numbers dialled (redial list)
Use the
key to access the list of last numbers dialled (you will hear a beep if there are no
entries in the list).
Use the same key to exit the list.
Consulting the list
or
!
To update the date and time of messages, see Page 10 Programming options.
previous
redial
next
redial
Calling a displayed number
Accessing the answering machine
Press the
key to access the machine. The number of messages, the day of the week and the time will
be displayed. The telephone will vocally state the number of messages received and play
the message(s) recorded.
or
to select a number
Deleting a number
Listening to messages on your answering machine
or
to select a number
or
previous
message
Entering a number into the phonebook
next
message
or
Deleting messages from your answering machine
(1)
press and hold
(2)
short press
(1)
all messages are deleted
(2)
the current message is deleted
!
If you lose your way,
press and hold
to exit any mode (programming, phonebooks or lists)
Call log
The call log contains the last 10 external calls received, starting with the most recent. If you have
subscribed to the Caller identification service (see Page 5), you will be able to store number or
name in the log (according to the information provided by the network).
Saving/Changing the recorded message
You can personalise your recorded message. However, if you do so, you will be unable to retrieve the
original message.
Caller identification service:
speak after
the beep
Subscription to your operator’s Caller identification service enables the caller’s name and number to be
stored directly in the incoming call log if registered with your operator’s network.
Recording an internal message
Using this function, you can leave a local message for your family members.
Accessing the log
Use the
speak after
the beep
Call screening
When the answering machine is active, callers can leave messages. If you wish to screen your calls,
you can listen to the person leaving the message by pressing
(see Page 5). Press
again to
increase the volume. Press this key to deactivate the loudspeaker. To interrupt the message and take
the call, press
. Press the
key again to deactivate this function.
key to access the log. Use the same key to exit the log.
Consulting the log
You will only be able to access the information shown on the screens below if you have subscribed to the
Caller identification service.
OR
OR
Remote control of the answering machine
6 stars if
unidentified(**) call
a name identified(*)
You can access to your answering machine via a simple telephone call.
The 4-digit remote access “RC code“ is found on the bottom of the base station of the telephone. This
can be personalised using the programming options (see Page 10 Programming options).
On a handset that has the
enter
the name
to select a number
Listening to your recorded message
Press the following keys to listen to the pre-recorded message:
validation
beep
or
key (or using a voice dial telephone):
possibly an
"envelope" icon
if a message has
been left.
a telephone
number
• To remotely activate the answering machine
dial your
phone number
enter the RC code
after 9 rings
and a beep
(*) This function depends on the network.
(**) Unlisted numbers, withheld caller id and calls from abroad.
• To remotely deactivate the answering machine
dial your
phone number
enter the RC code
during the outgoing
message
• To
1.
2.
3.
Calling a number from the log
deactivate
remotely access the answering machine
During the outgoing message, press the
key.
Enter the remote access code.
The system will announce the number of messages received and read recorded messages. Use the
telephone keys to consult your messages.
Remotely reading messages
Once connected to your answering machine, use the following keys:
Key
the time and date
of the call(*)
activate
or
to select a name
or number
Deleting a number from the log
validation
beep
or
to select a name
or number
Entering a number stored in a list into one of the phonebooks
Function
or
twice go to the beginning of the previous message
or
validation
beep
enter
the name
to select a name
or number
go to the beginning of the next message and play it
delete the message being read
4. Hang up to end the access session.
!
If an "envelope" icon is displayed (that means you have a vocal message), you
can press the
key on the back of the handset to listen to the message.
HOW TO PROGRAM YOUR PHONE
9
To access the programming icons, press the
PROGRAMMING OPTIONS (CONT’D)
key.
Melody programming options
5 icons are displayed on the screen.
Programming icons:
• on: programming mode (consultation)
or during a modification
• off: normal mode
• flashing: options can be selected
Function
number
- Answering machine settings
- Other programming option settings
- Earpiece volume settings
To select one of the icons, use the key
and
and then validate your choice by pressing the
key, press
Selects melody volume
+ (1) to ++++ (4)
+++ (3)
2/4
Selects melody of handset (general)
7 melodies proposed
Disco
2x
3/4
Selects melody of handset
(Friends phonebook)
7 melodies proposed
Birdy
3x
4/4
Selects melody of handset
(Family phonebook)
7 melodies proposed
Starry
key.
Note: the sound volume is the same for all melodies.
How to register the handset with another base station
once then press
choice n°1
within the
melody menu
out of 4.
.
Use level 1/4 to select the melody volume. Scroll
through the different volume settings using the
keys. The default setting is "+++" (3).
4 choices
within this
menu
This option allows you to register the handset with another base station. You will need to
switch the base station onto record mode before entering the code. To place a Kala 200
base station in record mode, simply disconnect and re-connect the mains supply. The RC
code is shown on the bottom of the base station.
and
Function
number
Programmable
function
Select
Default
value
Registers the handset
RC Code(1)
Bottom of
the base
Programmable
functions
Select
Default
value
1/5
Enters number of different CLI(4)
List of CLI avalaible
1
1x
2/5
Enters the dial mode(5)
TONE, PULSE
Depends
2x
3/5
Enters network type(6)
A (residential),
B, C, D (PABX)
A
3x
4/5
Enters callback type(7)
(long/short flash)
*** (short),
****** (long)
Depends
4x
5/5
Inserts automatic pause(8)
NO, YES
NO
1/1
Note: the screen will show the default or selected value. If registering an additional
handset, you will need to enter the RC code (4-figure access code) shown on the
bottom of the base station (see Page 10). Enter 4 figures when "0000" is displayed
(and the scroll arrows have disappeared).
To go to level 2/4: change melody type, press the
by default,
name of
the melody
Default
value
1/4
For instance: how to change the melody.
Press the
Select
1x
- Volume and melody settings
- To register the handset with another base
Programmable
functions
Settings programming options
key.
Function
number
To select the “DISCO“ melody, press
to validate.
If you wish to select the “RAIN“ melody, press
to choose the melody and press
to vali-
date.
You can also select a melody specific to the Friends
phonebook
Press
from the 7 melodies available.
when you have selected the melody.
The melody will sound after the second ring. This function is only available if you have subscribed to the
operator’s Caller identification service.
You can select a specific melody for the Family phonebook
from the 7 available. Press
then
once you have chosen the melody.
4. CLI or Caller identification service: the Caller identification service (Name and Number) is
available only if you have subscribed to the service with an operator (according to availablility).
5. Dial mode: this allows you to select either voice frequency dialling (faster dialling, access to operator services) or digital dialling. The availability of this function depends on the country
6. Network type: your telephone has a default configuration for public telephone lines (option A).
You can choose between 3 other network types to adjust the sound qualities for a PABX/ISDN set-up.
7. Flash type: the operation of some services accessed using the
key (Call Waiting, Call
Forward, etc.) will depend on the flash setting (short/long) depending on your installaton type (ISDN,
Public, PAXB).
8. Automatic pause: this function allows you to insert a prefix before the telephone number.
Earpiece programming option
!
Press
to exit the programming options.
Function
number
Programmable
function
Select
Default
value
1/1
Modifies earpiece volume
1 to 4
++ (2)
PROGRAMMING OPTIONS
10
Other indirect programming options
Press
These options can be accessed using a combination of two keys, after pressing:
to enter the programming options.
Enter the following functions by pressing
Sequence
of keys
once or several times.
Enter the programming options on page 9 for more details.
Programmable
functions
Select
Default
value
+
Unregisters
the handset
RC code(1)
Bottom of
the base
+
Selects TAM(9)
- --> (answering
- --> + <- -and recording mode),
- --> + <- -- (answering only mode)
Answering machine programming options
Function
number
1x
Programmable
functions
Select
Default
value
1/5
Modifies the system day
List: 1 (Monday) to 7 (Sunday)
1
2/5
Modifies the system time
Type value (00:00 to 23:59)
00:00
(2)
9. Answering only and Answering & Recording mode: answering only mode carries an outgoing message but does not allow callers to leave messages. Answering & Recording mode allows callers to
leave messages after listening to the outgoing message. Use
and
to switch between modes.
(2)
2x
3/5
Selects number of rings
before machine picks up
List: 2, 3, 4, 5, toll
Toll
3x
4/5
Modifies remote control code(1)
(to show a default)
Type value (0000 to 9999)
RC code(1)
4x
5/5
Modifies telephone answering
machine recording quality
List: ****A (top quality),
**** B (standard quality)
A
1. RC code: 4-figure access code found on the bottom the base station that allows you to register an
additional handset (see the user manual for the additional handset).
2. Toll Saver: the Toll Saver allows you to check to see if you have any messages remotely without activating
the telephone. If you have messages, the machine will activate after 3 rings. If not, the telephone will ring 5
times, giving you time to hang up before the connection is made.
3. Remote access code: you will be asked to give this code to access the answering machine remotely.
By default, this is the RC code, though you can personalise it.
!
Press
to exit the programming options.
11
TROUBLESHOOTING
Error
Beep
Problem
• No dialling tone when
pressing the talk key.
•
Cause or causes
Solution
Yes
The base station is not properly
connected to electricity or to the
telephone sockets.
Check the connections and ensure you
have used the telephone cable provided
in the box.
-
Batteries are low (the insert battery
icon symbol is displayed).
Charge batteries (see Installing telephone
and base station Page 2).
The handset is out of range.
Register the handset to the base station
(see page 10).
Move closer to the base station.
icon not displayed or
blinking.
• When the handset is
placed on the charging
unit, no beep is heard.
-
The handset is not placed correctly
on the base station charging unit.
Take the handset off the base station and
put it back again.
-
Charging contacts are dirty.
Clean them with a clean and dry cloth.
• Battery icon remains empty
although the handset has
charged for 24 hours.
-
Handset batteries are defective.
Please contact your PHILIPS dealer in order
to purchase new rechargeable batteries
(see Inserting/Replacing batteries Page 2).
• No symbol on the display.
-
Batteries are low.
Charge batteries (see Installing telephone
and base station Page 2).
• Answering machine icon
is blinking on the display.
-
The memory of the answering
machine is full.
Consult and delete messages to free
sufficient memory.
• The answering machine
has not recorded your
outgoing message.
Yes
The memory of the answering
machine is full.
Consult and delete messages to free
sufficient memory.
• The answering machine
has stopped.
-
The memory of the answering
machine is full.
Consult and delete messages to free
sufficient memory.
• A phonebook entry has
not been memorised.
Yes
The phonebook you wish to use is
full.
Delete some entries to free memory spaces.
• Bad audio quality (cracks,
mute, echo, vibration,
etc.).
-
Base station plugged too near from
other electrical appliance.
Try to plug the base station in another place.
-
Base station installed in a room
with thick walls.
-
You are using the handset too far
from the base station.
-
The handset is out of range.
• The CLI does not work.
or:
Please change the network type.
or:
Move closer to the base station.
Please select another CLI.
Philips has designed this product to work on PSTN line and cannot guarantee the complete application on ISDN
network.
The KALA 200 VOX is compliant with operator’s analogue interface.
The KALA 200 VOX can only be connected to the British telephone network.
The geographical area in which the equipment may be used is shown on the label on the bottom of the base station.
Product may only be used in this zone.
12
YOUR PHILIPS WARRANTY
13
DECLARATION OF CONFORMITY
Dear customer,
Thank you for purchasing this Philips product which has been
designed and manufactured to the highest quality standards.
If, unfortunately, something should go wrong with this product Philips guarantees free of charge labour and replacement
parts irrespective of the country where it is repaired during
a period of 12 months from date of purchase (6 months for
replacement/rechargeable batteries). This international
Philips guarantee complements the existing national guarantee obligations to you of dealers and Philips in the country of
purchase and does not affect your statutory rights a customer.
The Philips guarantee applies provided the product is handled properly for its intended use, in accordance with its
operating instructions and upon presentation of the original
invoice or cash receipt, indicating the date of purchase,
dealer’s name and model and production number of the
product.
The Philips guarantee may not apply if:
• The documents have been altered in any way or made
illegible;
• The model or production number on the product has been
altered, deleted, removed or made illegible;
• Repairs or product modifications and alterations have
been executed by unauthorised service organisations or person;
• Damage is caused by accidents including but not limited
to lightning, water or fire, misuse or neglect.
Please note that the product is not defective under this guarantee in the case where modifications become necessary in
order for the product to comply with local or national technical standards which apply in countries for which the product was not originally designed and/or manufactured.
Therefore always check whether a product can be used in a
specific country.
In case your Philips product is not working correctly or is
defective, please return your phone to the place of purchase
or 6the Philips National Service Centre. In the event you
require service whilst in another country a dealer address
can be given to you by the Philips Consumer Help Desk in
that country.
In order to avoid unnecessary inconvenience, we advise you
to read the operating instructions carefully before contacting
your dealer.
• Methods of Transport within the UK:
Please be aware whichever method of transport is chosen it
is the consumers’ responsibility to package the faulty unit for
return to a level which prohibits accidental damage. Philips
is not responsible for damage/loss caused during carriage
to the Service Centre.
Freepost: Please write the following address onto your package. This method of transport will take 2-3 working days to
reach the Service Centre.
PHILIPS SERVICE CENTRE
FREEPOST (SCE10569)
RUGBY
Warwickshire
CV21 1BR
NB: Philips recommend all parcels to be returned to the
Philips Service Centre be submitted over the counter at your
Post Office and a proof of postage requested.
Please note the Royal Mail insurance limit for lost/damage
using the Freepost service is £26. Up to £250 insurance and
next day delivery can be obtained via Royal Mail Special
Delivery, however, the consumer will be responsible for this
cost.*
• Methods of Transport within IRELAND:
Please contact Philips Service Support , Dublin
IMPORTANT (for UK only):
Please ensure the following are included when returning a
genuinely faulty phone to the Philips Service Centre:
- Name.
- Return Delivery address.
- Daytime contact number.
- Proof of Purchase (copy)
- For Dect phones both handset and base have to be
returned.
- Accessories: power supply line cords.
- A brief description of the assumed fault
- Despatch note (if your phone has previously been
exchanged).
Failure to include all the necessary information will cause
delays in servicing your phone.
Please allow 2-3 days from receipt at the service centre for
your replacement/repaired product to be returned to you. If
an out of warranty charge applies Philips shall contact you
before the product is returned.
Philips shall pay for the return carriage on all in-warranty
exchanges.
*Should you wish to return your products for service at your
own cost (via a courier service or Royal Mail Special
Delivery) please ensure the items are suitably packed for
transport and sent to the following address:
Philips Service Centre
1 Great Central Way
Butlers Leap
Rugby
Warwickshire
CV21 3XH
For Philips Service Support in UK, (incl. Channel Islands)
please call 0870 900 9070.
(Open during normal business hours, excluding National
holidays and weekends).
We,
PHILIPS Consumer Communications
Route d’Angers 72081
Le Mans Cedex 9
France
Declare that the product Kala 200 Vox (BS 6533 + HS 6830) is in compliance with ANNEX III of the R&TTE-Directive 99/05/EC and then
with the following essential requirements:
Article 3.1 a : (protection of the health & the safety of the user) EN 60950 (92) Ed.2 + amendments 1,2 (93) ; 3 (95) ; 4 (97) and 11 (97)
Article 3.1 b : (protection requirements with respect to electromagnetic compatibility) ETS 300 329 (97)
Article 3.2 : (effective use of the radio spectrum) TBR6 (97)
The presumption of conformity with the essential requirements regarding Council Directive 99/05/EC is ensured.
Date:12/12/2000
14
Le Mans
Cordless Business Director
PHILIPS KALA: ENVIRONMENT AND SECURITY
PHILIPS KALA 200
Your telephone has all advantages of the latest technological advances which make it even simpler and easier to use.
Safety information
This equipment is not designed for making emergency telephone calls when the power fails. An alternative should be made
available for access to emergency calls.
The CE marking certifies compliance with technical regulations in accordance with the Directive 1999/5/EC for
the safety of the user, electromagnetic perturbations and for radio spectrum.
Power r equir ements
This product requires an electrical supply of 220-240 volts, alternating monophased current, excluding IT installations
defined in standard EN 60-950.
WARNING !
The electrical network is classified as dangerous according to criteria in the standard EN60-950. The only way to power
down this product is by unplugging the power cable from the electrical outlet. Ensure the electrical outlet is located to
the apparatus and is always easily accessible.
To be able to make calls in the event of a power cut, it is recommend that this telephone be used as a complement to another telephone which does not require mains power.
Telephone connection
The voltage on the network is classified as TNV-3 (Telecommunication Network Voltages, as defined in the standard
EN 60-950).
Safety precautions
Do not allow the handset to come into contact with water.
Do not open the handset or the base station. This could expose you to high voltages. Contact our after-sales service for all
repairs.
Do not allow the charging contacts or the battery to come into contact with conductive materials such as keys, paper clips,
rings, bracelets, etc.
Make sure you insert the batteries with their polarities in the correct position.
Environmental care
Your telephone has also benefited from the Philips EcoDesign program –Environmental Conscious Product Design – which
considers the environmental impact of a product during its entire life cycle.
Please remember to observe the local regulations regarding the disposal of your packaging materials, exhausted batteries
and old phone and where possible promote their recycling.
Philips has marked the battery and packaging with standard symbols designed to promote the recycling and appropriate
disposal of your eventual waste.
Battery:
* The crossed-out dustbin signifies that the battery should not be disposed of with general household waste.
Packaging:
The mobius loop symbol signifies the labeled packaging material is recyclable.
The green point symbol signifies that a financial contribution has been made to the associated national
packaging recovery and recycling system (e.g EcoEmballage in France).
© 2000 - Philips Consumer Communications - Division of Philips France
UK - 4311 256 07422 - Printed in Europe - All rights reserved


![téléchargez le dans son intégralité [ PDF - 28p - 3.62 Mo ] - Athis-Mons](http://vs1.manualzilla.com/store/data/006467605_1-ad483cc3c5528cc7d7f5459746157e0f-150x150.png)