1
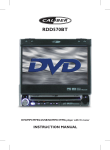
DVD Video Player
Owner’s Manual
DVD978K
1
DVD978K English IFU
1
2000.10.12, 1:03 PM
3141 016 18131
General Information
Laser safety
This unit employs a laser. Due to possible eye injury,
only a qualified service person should remove the cover
or attempt to service this device.
USE OF CONTROLS OR ADJUSTMENTS OR
PERFORMANCE OF PROCEDURES OTHER
THAN THOSE SPECIFIED HEREIN MAY
RESULT IN HAZARDOUS RADIATION
EXPOSURE.
LASER
Type
Wave length
Semiconductor laser GaAlAs
650 nm (DVD)
780 nm (VCD/CD)
Output Power
7 mW (DVD)
10 mW (VCD/CD)
Beam divergence 60 degree
Manufactured under license from Dolby Laboratories.
“Dolby”, “Pro Logic” and the double-D symbol are
trademarks of Dolby Laboratories.
This product incorporates copyright protection
technology that is protected by method claims of
certain U.S. patents and other intellectual property
rights owned by Macrovision Corporation and other
rights owners. Use of this copyright protection
technology must be authorized by Macrovision
Corporation, and is intended for home and other
limited viewing uses only unless otherwise authorized
by Macrovision Corporation. Reverse engineering or
disassembly is prohibited.
“DTS” and “DTS DIGITAL OUT” are trademarks of
Digital Theater Systems, Inc.
TruSurround and the
symbol are trademarks of SRS
Labs, Inc. TruSurround technology is incorporated under
license from SRS Labs, Inc.
The region code for this DVD Video Player is 4.
4
Since DVD movies are released at different times in
different regions of the world, all players have
region codes and discs can have an optional region
code. If you load a disc of a different region code
into your player, you will see the region code
notice on the screen. The disc will not play and
should be unloaded.
CAUTION
VISIBLE AND INVISIBLE RADIATION
WHEN OPEN AVOID EXPOSURE TO
BEAM (WARNING LOCATION: ON THE
BACKPLATE OF SET)
NEVER MAKE OR CHANGE
CONNECTIONS WITH THE POWER
SWITCHED ON.
NOTE:
PICTURES SHOWN MAY BE DIFFERENT
BETWEEN COUNTRIES.
As an Energy Star® partner, Philips has determined
that this product meets the Energy Star® guidelines
for energy efficiency.
For Customer Use:
Read carefully the information located at the bottom of your DVD Video player and enter below the Serial
No. Retain this information for future reference.
Model No. DVD VIDEO 978K
Serial No. __________________________
2
DVD978K English IFU
2
2000.10.12, 1:03 PM
3141 016 18131
E n gl i sh
Index
E sp añ o l
English ......................................................................... 4
Po r tu gu ês
Español ..................................................................... 34
Português ................................................................ 82
3
DVD978K English IFU
3
2000.10.12, 1:03 PM
3141 016 1xxxx
Contents
E n gl i sh
Introduction
Setup Menu
Entertainment for new millennium ...................... 5
Introduction ........................................................... 5-6
Unpacking ................................................................... 6
Maintenance............................................................... 6
Enter Setup menu .................................................. 24
Overview of the Setup menu ............................. 24
Video menu ...................................................... 24-25
Audio menu ...................................................... 26-27
Language menu ...................................................... 28
Control menu .................................................. 29-30
Functional Overview
Front panel ................................................................. 7
Back panel .................................................................. 8
Display ........................................................................ 9
Remote Control .................................................... 10
Disc maintenance
Disc maintenance .................................................. 31
Environmental information
Connection
Environmental information.................................. 31
General explanation ............................................. 11
Video connection .................................................. 11
Audio connection .................................................. 12
General operation
Turning on the power .......................................... 13
Loading discs .......................................................... 13
Remote control battery installation.................. 13
Remote control operation .................................. 13
Before Requesting Service
Before Requesting Service .................................. 32
Specifications
Specifications .......................................................... 33
Playing a DVD-video disc
Icons and Menu bar .............................................. 14
Video control during playback ........................... 15
Audio control during playback ........................... 15
Playing title/chapter ......................................... 16-17
Special DVD Features ..................................... 18-19
Playing a SuperVCD/VCD/CD disc
Icons and Menu bar .............................................. 20
Video control during playback ........................... 20
Audio control during playback ........................... 20
Playing title/track ............................................. 21-23
Screen Control ...................................................... 23
4
DVD978K English IFU
4
2000.10.12, 1:03 PM
3139 246 11171
Introduction
E n gl i sh
Entertainment for the new millennium
Video was never like this before! Digital video discs provide perfect
digital, studio-quality pictures; three dimensional digital, multi-channel
audio; story sequences screened from your choice of camera angle;
sound tracks in as many as eight languages; and up to 32 subtitles (if
available on disc). Whether you watch DVD-Video on wide-screen or
regular TV, you always see it the way it was meant to be.
Digital Video
DVD-Video uses state-of-the-art MPEG2 data compression technology
to register an entire movie on a single 5-inch disc. DVD’s variable bitrate
compression, running at up to 9.8 Mbits/second, captures even the most
complex pictures in their original quality.
The crystal-clear digital pictures have a horizontal resolution of over 500
lines, with 720 pixels (picture elements) to each line.This resolution is
more than double that of VHS, superior to Laser Disc, and entirely
comparable with digital masters made in recording studios.
DVD-Video discs conform to either the PAL or NTSC video standard.
This player can play both PAL and NTSC discs, presenting them in the
best possible way on your multi-standard TV screen.
As the universal video system of the future, DVD-Video offers optimal
pictures on any TV screen.
Introduction
Your Philips DVD-Video player will play digital video discs conforming to
the universal DVD-Video standard. With it, you will be able to enjoy fulllength movies with true cinema picture quality, as well as stereo or multichannel sound (depending on the disc and your playback setup).
The unique features of DVD-Video, such as selection of sound track,
subtitle languages and different camera angles (again depending on the
disc), are all included. What’s more, Philips Child Lock lets you decide
which discs your children will be able to see.You will find the On-Screen
Display, player display, and remote control make the player easy to use.
This manual provides all the information you will need, so read on!
DVD-Video
DVD-VIDEO DISC
TITLE 1
CHAPTER 1
CHAPTER 2
TITLE 2
CHAPTER 1
CHAPTER 2
CHAPTER 3
You will recognize DVD-Video discs by the logo shown on left.
Depending on the material on the disc (a movie, video clips, a drama
series, etc.) the disc may have one or more Titles. Each title may have
one or more chapters.To make playback easy and convenient, your
player lets you move between titles and playback chapters.
5
DVD978K English IFU
5
2000.10.12, 1:03 PM
3141 016 1xxxx
Introduction
E n gl i sh
Video CD
VIDEO CD
TRACK 1
INDEX 1
INDEX 2
TRACK 2
INDEX 1
INDEX 2
INDEX 3
You will recognize Video CDs by the logo shown on left.
Depending on the material on the disc (a movie, video clips, a drama
series, ect) the disc may have one or more tracks. Tracks may have one
or more indexes, as indicated on the disc case. To make playback easy
and convenient, your player lets you move between tracks and indexes.
Some Video CDs have Play Back Control (PBC), which is a predefined
playback sequence stored on the disc.
Super VCD
SVCD discs is the super VCD 1.0 Standard based on the Standard of the
information Industry Department of the People’s Republic of China.
Audio CD
Audio CDs contain music tracks only.
You will recognize Audio CDs by their logo which is shown on left.
You can play audio CDs in conventional style through a stereo system,
using the keys on the remote control and/or front panel, or via the TV
using the On-Screen Display (OSD).
Unpacking
First check and identify the contents of your DVD-Video player package.
You should have the following items.
– DVD-Video player
– Remote Control with batteries
– Audio/video cable
– Instructions for use
If any item is damaged or missing, contact your retailer or Philips.
Keep the packaging materials; you may need them to transport your
player in the future.
Maintenance
– Do not expose the player or the batteries to humidity, rain and
excessive dust and keep them away from domestic heating equipment
and direct sunlight to prevent over-heating.
– In a cabinet, allow about 2.5cm (1 inch) of free space all around the
player for adequate ventilation.
– If the DVD-Video player cannot read CDs/DVDs correctly, wash the
CD/DVD lens with water before sending it for repair. Never use
alcohol or other unknown cleaning agents as they may damage the
lens. Always keep the tray closed to avoid dust on the lens.
– The lens may cloud over when the DVD-Video player is suddenly
moved from cold to warm surroundings. Playing a CD/DVD is not
possible then. Leave the DVD-Video player in a warm environment
until the moisture evaporates.
/
6
DVD978K English IFU
6
2000.10.12, 1:03 PM
3141 016 1xxxx
Functional Overview
E n gl i sh
Front Panel
POWER ON/OFF
– Switch the player to on/off mode
Standby indicator
– Lights up red when the player is in standby mode
DISPLAY
– Shows the current status of the player
PROGRESSIVE SCAN
– interupt video output
T NEXT
– title/chapter/track and fast forward
when held
B PLAY – star ts video/audio play
S PREV
– title/chapter/track and fast rewind
when held
; PAUSE
– pause/stop or forward to next
picture frame
/ OPEN/CLOSE
– Opens/closes the disc tray
9 STOP
– stop playing video/audio
Disc tray
Headphone volume control
Headphone socket
ECHO effect control
MIC volume control for karaoke
MIC socket 2 for karaoke
MIC socket 1 for karaoke
7
DVD978K English IFU
7
2000.10.12, 1:03 PM
3141 016 1xxxx
Functional Overview
E n gl i sh
Back Panel
Digital Audio output (optical)
– Connect to a digital (optical) equipment
Digital Audio output (coaxial)
– Connect to a digital (coaxial) equipment
Multichannel connection
– Connect to a multichannel receiver and a subwoofer
– The front audio output can be connected to the stereo input of a TV
Video output (YUV)
– Connect to a TV with YUV video inputs
Video output (CVBS)
– Connect to a TV with CVBS video inputs
Video output (S-Video)
– Connect to a TV with S-Video (Y/C) inputs
Mains socket
– Connect to the AC cord
Caution:
– Do not touch the inner pins of the rear panel. Electrostatic discharge may cause permanent
damage to the unit.
8
DVD978K English IFU
8
2000.10.12, 1:03 PM
3141 016 1xxxx
Functional Overview
E n gl i sh
Display
1
13
2
12
1
Disc format indicator
2
Repeat playback indicator
3
Play/Stop
4
Total disc length in hours, minutes and hours
5
Programmed playback
6
Dolby digital audio output active
7
DTS digital audio output active
8
Disc locked
9
Karaoke active
0
Time display
!
Status indicator
@
Multi-angle camera active (DVD only)
#
Running
4
3
11
5
10
6
9
7
8
9
DVD978K English IFU
9
2000.10.12, 1:03 PM
3141 016 1xxxx
Functional Overview
E n gl i sh
Remote Control
OPEN/CLOSE disc tray .1
45. POWER on/off
RESUME playback .2
44. TIME SEARCH
Number key .4
43. FTS (programmed
playback)
Number key .5
42. Number key
Number key .6
41. Number key
Number key .7
40. Number key
Number key .8
39. Number key
Number key .3
CANCEL .9
Number key .10
RETURN .11
Direction key (up) .12
Direction key (left) /
slow rewind .13
OK .14
PREVious / fast rewind .15
Direction key (down) .16
STOP .17
PLAY .18
SUBTITLE selection .19
ANGLE selection .20
REPEAT .21
38. MENU (setup menu)
37. slow forward / direction
key (right)
36. NEXT / fast forward
35. PAUSE / step
34. AUDIO (language
selection)
33. MENU / PBC
32. PREVIEW
31. OSD (on-screen display)
30. VOLUME+
29. SOUND surround
28. VOLUME 27. MUTE
A-B REPEAT .22
ZOOM .23
VOCAL (channel
selection) .24
KARAOKE .25
MIC on/off .26
NOTE:
¶ See chapter “Setup Menu” for details on using the following keys: MENU (setup menu) (38), SUBTITLE selection
(19), AUDIO language selection (34),
¶ For details on using the remaining keys for general operation, see chapter “Playback DVD” and chapter “Playback
VCD”.
¶ The KARAOKE (2) key is not used.
10
DVD978K English IFU
10
2000.10.12, 1:03 PM
3141 016 1xxxx
General Explanation
¶ Video connections and Audio connections can the totally separated.
That means you can connect the Video output to one equipment and
Audio output to another separate equipment. Depending on your TV
and other equipment you wish to connect, there are various ways you
could connect the player. Possible connections are shown in the
following drawings.
¶ Please refer to the manuals of your TV, VCR, stereo system or other
manuals as necessary to make the best connections.
¶ Do not connect your DVD-player via your VCR because video quality
could be distorted by the copy protection system.
¶ For better sound reproduction, connect your player’s audio output to
the audio input of your amplifier, receiver, stereo or A/V equipment (see
[Audio Connection]).
Caution:
– Do not connect the player’s audio output to the PHONO
IN jack of your audio system.
Video connection
Video CVBS connection
¶ CVBS video output is the most common video format and it combines
brightness signal and chroma signal together by using only one cable for
output. Plugs of the cable are in yellow colour.
¶ Connect the Video output on the rear panel of the player to the
corresponding input on the TV using the cable supplied.
TV
MAINS
CVBS
TV
S-Video connection
¶ S-Video output is a video output that refers to two separated signals,
brightness signal and chroma signal. The advantage of this connection is
by reproducing a high quality picture.
¶ Connect the S-Video output on the rear panel of the player to the
corresponding input on the TV using the S-Video cable (not supplied).
S-VIDEO CABLE
Y
MAINS
Pr
Pb
Y/Pr/Pb CABLE
Y/Cr/Cb connection (Y/Cr/Cb component video with noninterleaving function)
¶ Component video includes three types of signals, they are Y; CBLUE ;
CRED. This video format is compatible with monochromatic TV (use Y
only).
¶ Connect the Y/CB/CR output on the rear panel of the player to the
corresponding input on the TV using the component video cable (not
supplied).
¶ If your TV does not support non-interleaved scanning, you can connect
the Y/Cr/Cb cable to the Y/Cr/Cb connector on the TV instead and
press the PROGRESSIVE SCAN key on the front panel to switch to
interleaved scanning.
Caution:
– Do not connect the component video and S-Video
connection to the TV at the same time (see [Option
between component video and S-Video] for details).
11
DVD978K English IFU
11
2000.10.12, 1:03 PM
3141 016 1xxxx
E n gl i sh
Connection
Connection
E n gl i sh
Audio connection
Connecting audio output to a TV
¶ To use the TV speaker for sound reproduction, connect the audio
output on the rear of the player to the audio input on the TV using the
supplied cable. Then, set the ANALOG OUTPUT to 2-CHANNEL on
the Audio Menu (see chapter “Setup Menu” for details).
TV
R
L
MAINS
R
Note:
– This player uses the front left (FL) and front right (FR) audio output for
stereo output.
L
AUDIO CABLE
Connecting to an A/V receiver equipment
¶ Digital multi-channel connection provides the best sound quality. For this
you need a multi-channel receiver that supports one or more of the
audio formats supplied by your DVD player (Dolby DigitalTM , MPEG 2
and DTS).
¶ You can select either 2-channel digital audio output or 6-channel output
available on this DVD player to match the input of your A/V receiver.
RECEIVER
DIGITAL AUDIO
IN
IN
MAINS
MAINS
DIGITAL AUDIO
CABLE (coaxial)
Connecting to A/V receiver with digital coaxial cable
¶ Connect the player’s digital coaxial output to the corresponding input on
the receiver using the normal audio or video cable which is supplied.
¶ Set the DIGITAL OUTPUT item in the Setup Menu to match your
receiver. See chapter “Setup Menu” for details.
RECEIVER
DIGITAL AUDIO
IN
IN
MAINS
MAINS
Connecting to A/V receiver with digital optical cable
¶ Connect the player’s digital optical output to the corresponding input on
the receiver using the digital optical cable (not supplied).
¶ Set the DIGITAL OUTPUT item in the Setup Menu to match your
receiver. See chapter “Setup Menu” for details.
NOTE:
– If the audio format of the digital output does not match the capabilities of
your receiver, the sound will be muted.
DIGITAL AUDIO
CABLE (optical)
MAINS
MAINS
Connecting the multi-channel decoder output to an A/V
receiver
¶ This DVD player contains a 6-channel decoder, which can be connected
to a multi-channel A/V receiver. This enables playback of DVDs recorded
in multi-channel surround without the need of an optional decoder.
¶ Connect the audio output for center speaker, front speakers, surround
speakers and subwoofer to the corresponding input on the receiver.
¶ Set the ANALOG OUTPUT item to 6-CHANNEL audio output. (See
chapter “Setup Menu”).
¶ Only DVD discs can store 6CH audio signals. Playing Super VCD, VCD
and CD discs with this type of connection will produce only the front
left and right output.
12
DVD978K English IFU
12
2000.10.12, 1:03 PM
3141 016 1xxxx
General operation
E n gl i sh
Turning on the power
¶ Make sure that audio and video output has been connected to TV.
¶ Choose the available AV mode and connect your TV set to our DVD
player.
¶ Press power on/off button on the front panel to turn on the player.
Loading discs
¶ Press the OPEN/CLOSE button on the front player to open the disc
tray.
¶ Load your chosen disc in the tray, label side up (also when a double
sided DVD is inserted). Make sure the disc is placed properly in the
correct recess.
¶ Gently push the tray, or press OPEN/CLOSE button to close the tray.
Playback will start automatically.
Remote control battery installation
¶ Open the battery compartment cover.
¶ Insert two batteries inside the battery compartment.
¶ Close the cover.
CAUTION:
– Don’t mix old and new batteries. Never mix different types
of batteries (standard, alkaline, etc.)
Remote control operation
¶ Unless mentioned, all operations can be carried out with the remote
control. Always point the remote control directly at the player, making
sure there are no obstructions in the path of the infrared beam.
¶ When there are corresponding keys in the front panel, they can also be
used.
13
DVD978K English IFU
13
2000.10.12, 1:03 PM
3141 016 1xxxx
Playing a DVD-video disc
E n gl i sh
Icons and Menu Bar
During play, various icons will appear on the TV screen to confirm that a
function has been selected. It will disappear automatically after several
seconds.
.......................... open disc tray
.......................... close disc tray
................ no disc in disc tray
................................................ Play
............................................ Pause
.... Stop at currect position
............................. Fast forward
................................ Fast rewind
............................................... Stop
................... slow forward 1/2
................... slow forward 1/4
................... slow forward 1/8
............... slow backward 1/2
............... slow backward 1/4
............... slow backward 1/8
.............................................. Next
............................................... Prev
....................... Menu selection
..... Operation not available
OSD (On-screen Display) banner icons
You can call up the OSD banner by pressing the OSD key on the remote
control to check the status of the player at any time during playback.
Likewise, you can remove these icons by pressing the OSD button again.
...................................................................... Title/Track
........................................................................... Chapter
................................................ Current playing time
................................................................................ Angle
............................................................................ Subtitle
........................................................................ Language
...................................................................... Repeat off
....................................................... Title/track repeat
........................................................... Chapter repeat
........ Starting point for segment Repeat A-B
.............................. Segment repeat from A to B
....................................... DTS digital audio output
................................... Dolby digital audio output
.......................................................................... Program
........................................................... Bad disc (note)
Note:
– The BAD DISC icon indicates that the disc inserted is damaged or dirty
and should be cleaned or replaced.
14
DVD978K English IFU
14
2000.10.12, 1:03 PM
3141 016 1xxxx
Video control during playback
STOP key on the remote control
¶ You can resume the play from the point at which you stopped last time
by pressing the STOP key once.
¶ It will start from the beginning if you pressed the STOP key twice to
stop a playback.
RESUME key
¶ If the screen prompts you to press the RESUME key when you reload a
disc, press RESUME to resume play from the point at which you
stopped.
¶ The RESUME feature applies not only to the disc in the player, but also
to the last five discs you have played.
PAUSE key on the remote control
¶ To get a still picture, press PAUSE key during playback.
¶ To step forward to the next frame picture, press PAUSE key again.
¶ To replay, press PLAY key.
Search Forward / Backward
¶ To search the content in fast speed, press the ∞ or § key for fast
forward/backward searching.
¶ Press the ∞ key again to accelerate the speed during searching.
¶ While you find the point you want, press PLAY key to return to normal
playback.
Slow Forward / Backward
¶ To get slow motion effect during playback, press ( slow forward / ) slow
rewind key.
¶ Press the ( or ) key again to have different playback speeds (1/2, 1/4 or
1/8).
¶ Pressing the PLAY key will return to normal playback.
Audio control during playback
Mute
¶ Press the MUTE key to switch the sound output.
Volume
¶ Press the VOLUME + or VOLUME – to adjust the loudness.
Surround sound key
¶ The DVD decoder circuit can simulate virtual surround sound effects.
¶ You can press the Sound key to switch the sound effect.
NOTE:
– In Mute mode, volume and surround sound function won’t be affected on
digital coaxial output or digital optical output.
15
DVD978K English IFU
15
2000.10.12, 1:03 PM
3141 016 1xxxx
E n gl i sh
Playing a DVD-video disc
Playing a DVD-video disc
E n gl i sh
Playing title/chapter
DVD disc
T2
T1
C1
C2
C3
C1
C2
Title & chapter (T&C)
A DVD disc may have one or more titles, and each title may have one or
more chapters. It depends on the content (a movie, video clips, a drama
series, etc) on the disc.
Playing a title
¶ After loading a disc, information about the content shows on the screen
waiting for your selection.
¶ If the items of the menu are numbered, press the appropriate number
key on the remote control, if not, use the 341 2 keys to highlight your
selection.
¶ Press the OK key to confirm your selection.
Playing a chapter
¶ When a title is selected, it may include one or more chapters.
¶ Whenever you want to watch another chapter during playback, press
MENU/PBC key to return to the chapter menu and select again, if not,
press the PREV/NEXT key.
REPEAT key
You can repeat a title or a chapter by pressing the REPEAT key.
Refer to the instruction on the screen.
¶ Press the REPEAT key once to repeat the current title.
¶ Press the REPEAT key twice to repeat the current chapter.
¶ Press the REPEAT key third time to quit the repeat mode.
A-B key
A-B key enables you to choose a certain piece of program to repeat.
Refer to the instruction on the screen.
¶ Press the A-B key once to set a start point.
¶ Press the A-B key twice to set an end point. At the same time, it will
begin to repeat from the start point.
¶ Press the A-B key the third time to quit A-B repeat mode.
TIME SEARCH key
You can switch titles, chapters or play from any point of the disc by using
the TIME SEARCH key.
¶ Press the TIME SEARCH keys to set a start point time.
¶ Enter an available number (e.g. 0:34:27) and press the OK key to
confirm. The player skips to the entered time and playback starts.
¶ To quit without entering a time, press the TIME SEARCH key again or
press the CANCEL key to return to normal playback.
NOTE:
– Depending on the DVD discs format, TIME SEARCH key may not be
activated.
16
DVD978K English IFU
16
2000.10.12, 1:03 PM
3141 016 1xxxx
Playing a DVD-video disc
E n gl i sh
FTS - Favourite Track Selection (DVD)
FTS programmed playback key
This function enables you to store your DVD karaoke disc favourite
tracks in certain order.
¶ In stop mode, press the FTS key using the remote control.
Program Mode
Title
Chapter
Time
¶ To create a playback program:
1 Enter a valid title number using the number key on the remote control
and press the OK key to confirm your input. The cursor automatically
moves to the chapter column.
2 Enter a valid chapter number using the number keys on the remote
control and press the OK key to confirm. If the entered value is out of
the valid range, it will be reset for re-input.
3 Repeat steps 1 and 2 to select another title and chapter. Up to 99 items
can be stored in a program.
4 Press the PLAY key to start playing the program.
¶ To delete an item in the playback program:
1 Select the item to delete using the 341 2 direction keys on the remote
control.
2 Press the CANCEL key on the remote control to delete the selected
item. The following items automatically shift upwards.
MIC key
¶ When using karaoke, press the MIC key to turn on MIC. The karaoke
circuit module will combine the MIC input to the front left and right
speakers.
¶ Press the MIC key again to switch off MIC.
17
DVD978K English IFU
17
2000.10.12, 1:03 PM
3141 016 1xxxx
Playing a DVD-video disc
E n gl i sh
Special DVD features
Zoom
¶ Press the ZOOM key on the remote control to get the picture enlarge
twice than the original size. Press ZOOM again to get a four time in size
enlarge. Use the 341 2 key to view the available zoom picture.
¶ Press the ZOOM key the third time to return to the original size.
NOTE:
– Depending on the DVD discs format, ZOOM key may not be activated.
original picture
zoomed picture
Camera angle
¶ Scenes which captured from different camera angles can be recorded in
a DVD disc and it enables you to watch from different angles. You can
switch the camera angles by pressing the ANGLE key on your remote
control.
NOTE:
– Depending on the DVD discs format, ANGLE key may not be activated.
angle 1
angle 2
Bonjour
Hello
Good morning
Bonsoir!
Changing audio languages
¶ If the DVD disc is recorded with multi-language audio tracks, you can
select your preferred language by pressing the AUDIO key on your
remote control.
¶ When a DVD disc formatted with multi-language is loaded, you can see
the information in OSD bar on the screen.
Changing subtitles
¶ If the DVD disc is recorded with multi-subtitle tracks, you can select your
preferred subtitle by pressing the SUBTITLE key on your remote control.
¶ When a DVD disc formatted with multi-subtitle is loaded, you can see
the information in OSD bar on the screen.
18
DVD978K English IFU
18
2000.10.12, 1:03 PM
3141 016 1xxxx
Icons and Menu Bar
During play, various icons will appear on the TV screen to confirm that a
function has been selected. It will disappear automatically after several
seconds.
.......................... open disc tray
.......................... close disc tray
................ no disc in disc tray
................................................ Play
............................................ Pause
.... Stop at currect position
............................. Fast forward
................................ Fast rewind
............................................... Stop
................... slow forward 1/2
................... slow forward 1/4
................... slow forward 1/8
.............................................. Next
............................................... Prev
....................... Menu selection
..... Operation not available
OSD (On-screen Display) banner icons
You can call up the OSD banner by pressing the OSD key on the remote
control to check the status of the player at any time during playback.
Likewise, you can remove these icons by pressing the OSD button again.
...................................................................... Title/Track
........................................................................... Chapter
................................................ Current playing time
............................................................................ Subtitle
........................................................................ Language
...................................................................... Repeat off
....................................................... Title/track repeat
........ Starting point for segment Repeat A-B
.............................. Segment repeat from A to B
.......................................................................... Program
........................................................... Bad disc (note)
Note:
– The BAD DISC icon indicates that the disc inserted is damaged or dirty
and should be cleaned or replaced.
19
DVD978K English IFU
19
2000.10.12, 1:03 PM
3141 016 1xxxx
E n gl i sh
Playing a Super VCD/VCD/CD disc
Playing a Super VCD/VCD/CD disc
E n gl i sh
Disc Specification Icons
This icon indicates the description of functions for CD.
This icon indicates the description of functions for VCD.
This icon indicates the description of functions for SVCD.
Video control during playback
PAUSE key on the remote control
¶ To get a still picture, press the PAUSE key during playback. The ; icon
appears on the display screen.
¶ To step forward to the next picture frame, press the PAUSE key again.
¶ To return to play, press PLAY key.
RESUME key
¶ If the screen prompts you to press the RESUME key when you reload a
disc, press RESUME to resume play from the point at which you
stopped.
¶ The RESUME feature applies not only to the disc in the player, but also
to the last five discs you have played.
Search forward/backward
¶ To search the content in fast speed, press the ∞ or § key for fast
forward/backward searching.
¶ Press the ∞ key again to accelerate the speed during searching.
¶ While you find the point you want, press PLAY key to return to normal
playback.
Slow Forward
¶ To get slow motion effect during playback, press ) slow forward key.
¶ Press the ) key again to have different playback speeds (1/2, 1/4 or 1/8).
¶ Pressing the PLAY key will return to normal playback.
Audio control during playback
Mute
¶ Press the MUTE key to switch on/off the sound output.
¶ Playback is still normal even when the sound is muted.
NOTE:
– This function has no effect on digital coaxial output and digital optical
output.
Surround sound key
¶ The DVD decoder circuit can simulate virtual surround sound effects.
¶ You can press the Sound key to switch the sound effect.
VOCAL (channel selection) key
¶ SVCD has two stereo audio channels which are used for playing karaoke
or audio language selection. (eg. you can choose only one channel for
the music background of the song while playback the karaoke.)
¶ Press the VOCAL key on the remote control to select the audio
channels you want.
¶ VCD has only one stereo audio channel, you can mute the left speaker
or the right speaker by pressing the VOCAL key on the remote control.
20
DVD978K English IFU
20
2000.10.12, 1:04 PM
3141 016 1xxxx
Playing title/track
Using PBC (PlayBack Control)
¶ Playback control is a title/track index protocol between player and discs.
When a disc is recorded with a standard VCD or SVCD format, there
will be a menu which include titles/tracks for users to select the content
of a movie or other video programs.
¶ When you switch on the PBC function you will enter the index menu
which are available for selection after loading the SVCD or VCD disc.
¶ You can switch the PBC function simply by pressing the MENU/PBC key
on the remote control. Refer to the icon in the menu bar on the screen.
¶ Use the PREV/NEXT key on the remote control or on the front panel
to select the page you like.
¶ If the items of the index menu are numbered, press the appropriate
number key on the remote control, if not, use the 34 keys to highlight
it, then press the OK key to confirm your selection.
¶ Press the RETURN key to enter the index menu.
NOTE:
– The content of the index menu depends on the disc. Refer to the disc
instruction for detail.
Turning off PBC
¶ If you switch PBC function off, the disc will start from the beginning.
¶ When you play the karaoke disc, you still can use the PREV/NEXT key
on the remote control or on the front panel to select the page you like,
even if PBC function is off.
¶ You can use the nine-picture preview function for selective playback if
your SVCD/VCD discs does not have PBC control information.
Nine-picture preview
¶ SVCD/VCD discs are recorded with different chapters on different
tracks; SVCD and VCD karaoke discs have different songs on different
tracks.
¶ To preview the start picture of each track/chapter, press the PREVIEW
key in stop mode. Nine pictures are displayed on the screen.
¶ If there are more than nine tracks/chapters, you can use ∞ or § to
turn previous or next page for more pictures.
¶ Enter the chapter you wish to watch using the number keys and press
the OK key to confirm and playback begins.
Note:
– The PBC function is turned off automatically when the nine-picture preview
function is activated.
21
DVD978K English IFU
21
2000.10.12, 1:04 PM
3141 016 1xxxx
E n gl i sh
Playing a Super VCD/VCD/CD disc
Playing a Super VCD/VCD/CD disc
E n gl i sh
A-B key
A-B key enables you to choose a certain piece of program to repeat.
Refer to the instruction on the screen.
¶ Press the A-B key once to set a start point.
¶ Press the A-B key twice to set an end point. At the same time, it will
begin to repeat from the start point.
¶ Press the A-B key the third time to quit A-B repeat mode.
REPEAT key
You can repeat playback a track or a chapter by pressing the REPEAT key
and when the PBC is off.
Refer to the instruction on the screen.
¶ Select an item you wish to repeat using the PREV/NEXT key or the
number keys on the remote control. Press the REPEAT key.
¶ Press the REPEAT key again to cancel repeat playback.
TIME SEARCH key
You can switch tracks, chapters or play from any point of the disc by
using the TIME SEARCH key.
¶ Press the TIME SEARCH keys to set a start point time.
¶ Enter an available number (e.g. 0:34:27) and press the OK key to
confirm. The player skips to the entered time and playback starts.
¶ To quit without entering a time, press the TIME SEARCH key again or
press the CANCEL key to return to normal playback.
MIC key
¶ When using karaoke, press the MIC key to turn on MIC. The karaoke
circuit module will combine the MIC input to the front left and right
speakers.
¶ Press the MIC key again to switch off MIC.
OSD - On Screen Display
¶ This function will provide some information about your disc on the
screen. Press OSD key to activate it.
22
DVD978K English IFU
22
2000.10.12, 1:04 PM
3141 016 1xxxx
Playing a Super VCD/VCD/CD disc
E n gl i sh
FTS - Favourite Track Selection (SVCD, VCD,
CD)
This function enables you to store your VCD karaoke disc favourite
tracks in certain order.
¶ In stop mode, press the FTS key using the remote control.
Program Mode
Track
Time
¶ To create a playback program:
1 Enter a valid item number using the number key on the remote control
and press the OK key to confirm your input. The cursor automatically
moves to the next column.
2 Repeat step 1 to select another item. Up to 99 items can be stored in a
program.
3 Press the PLAY key to start playing the program.
¶ To delete an item in the playback program:
1 Select the item to delete using the 34 direction keys on the remote
control.
2 Press the CANCEL key on the remote control to delete the selected
item. The following items automatically shift upwards.
Screen Control
Zoom
¶ Press the ZOOM key on the remote control to get the picture enlarge
twice than the original size. Press ZOOM again to get a four time in size
enlarge. Use the 341 2 key to view the available zoom picture.
¶ Press the ZOOM key the third time to return to the original size.
original picture
zoomed picture
Good morning
Bonsoir!
Changing subtitles
¶ If the disc is recorded with multi-subtitle tracks, you can select your
preferred subtitle by pressing the SUBTITLE key on your remote
control.
¶ When a DVD disc formatted with multi-subtitle is loaded, you can see
the information in OSD bar on the screen.
23
DVD978K English IFU
23
2000.10.12, 1:04 PM
3141 016 1xxxx
Setup Menu
E n gl i sh
Enter the setup menu
Press the STOP key first
¶ Enter the Setup Menu by pressing the SETUP key in the STOP mode.
Remember the SETUP key will not respond if you press it during
playback.
¶ When you quit the setup, the setting will be stored in the player’s
memory even when the player is switched to power off.
¶ In the Setup Menu, use the 1 2 keys to switch between items in the
horizontal direction and the 34 keys to switch between items in the
vertical direction. Use the 1 key to return to the previous menu and OK
key to confirm the setting.
Overview of Setup Menu
¶ To enter the Setup Menu, press the MENU key on your remote control
in stop mode.
¶ The Setup Menu appears on the screen which consists of 4 pages:
Video Menu
Audio Menu
Language Menu
Control Menu
Video Menu
¶ Use the video menu to set the video output for optimum visual effect.
¶ The Video Menu has 5 setup items:
1) Scanning
2) TV output
3) Screen size
4) Video output
5) Display setup
Scanning
¶ A TV refreshes its screen by scanning. There are two types of scanning
mode: Non-interleaved : scanning is clearer and Interleaved.
¶ Check your television capability before performing this feature because
older range of televisions does not support non-interleaved scanning
and a black screen will appear.
¶ When using Y/Pr/Pb video output, you can use this item to select
interleaved or non-interleaved scanning.
¶ Use the 341 2 keys to highlight item SCANNING and use the 34
keys to select an option. Press OK key to confirm or press MENU key to
save and quit the Setup Menu.
¶ Alternatively, you can also toggle between interleaved and noninterleaved scanning by pressing PROGRESSIVE SCAN button on the
front player.
¶ For details on Y/Pr/Pb video connection, see chapter ‘Video Connection’.
TV Output
PAL
NTSC
Color System
PAL_N
PAL_M
AUTO
¶ There are two major television systems, PAL (popular in Asia) and
NTSC (National Television Systems Committee-popular in America).
Most of TV sets can play with the two systems. Set this feature according
to the system of your TV (PAL,NTSC or AUTO).
¶ Use the 341 2 keys to highlight item TV OUTPUT and use the 34
keys to select an option. Press OK to confirm or press the MENU key to
save and quit the Setup Menu.
Note:
– PAL_N and PAL_M are mainly used in Latin America countries.
– Argentina uses PAL_N and Brazil uses PAL_N, PAL_M and NTSC.
24
DVD978K English IFU
24
2000.10.12, 1:04 PM
3141 016 1xxxx
Screen size
4:3 Letter Box
fig.1
4:3 Pan Scan
fig.2
16:9 Wide Screen
fig.3
¶ The normal TV screen size ratio is 4:3, but there is also a TV screen
which its size ratio is 16:9, wide as cinema screen and it’s call ‘widescreen’.
¶ If a disc is recorded in the size of wide-screen, it will have some problem
in playing on a normal TV set and the feature SCREEN SIZE is used.
¶ There are three selections in the item to modify the distorted screen
picture:
1 4:3 LB — used for 16:9 format movie discs play in 4:3 TV set. It sacrifices
certain top and bottom screen space for getting a 16:9 picture size. (see
figure 1)
2 4:3 PS — used for 16:9 format movie discs play in 4:3 TV set. It sacrifices
certain picture part for getting 4:3 picture size. (see figure 2)
3 16:9 wide-screen — used for 16:9 format movie discs play in 16:9 TV
set. If the disc is recorded in 4:3 format, the picture will also have some
distortion. (see figure 3)
¶ Use the 1 234 keys to highlight the item SCREEN SIZE and use the
34 keys to select an option. Press the OK key to confirm or press the
MENU key to save and quit the Setup Menu.
Video Output
¶ You can select S-Video output or Y/Pr/Pb video output to match your
video connection. For details, see chapter ‘Video Connection’.
¶ Use the 1 234 keys to highlight the item VIDEO OUTPUT and use the
34 keys to select an option. Press the OK key to confirm or press the
MENU key to save and quit the Setup Menu.
Display Setup
¶ You may select one of the three predefined display settings or you may
enter the Customize submenu to do a customized setup.
¶ Use the 1 234 keys to highlight the item DISPLAY SETUP and use the
34 keys to select an option. Press the OK key to confirm or press the
MENU key to save and quit the Setup Menu.
¶ To define a customized setting, highlight CUSTOMIZE and press the OK
key to enter the Customize submenu. The Customize submenu includes
4 setup items:
1) Brightness
range [0-40]
2) Contrast
range [0-80]
3) Saturation
range [1-80]
4) Chroma
range [0-40]
¶ Use the 1 234 keys to highlight the desired setup item. Enter a
numeric value using the number keys or use the 34 keys to change an
option. Press the OK key to confirm. After setup is complete, press 1
key to return to the previous menu or press the MENU key to save and
quit the Setup Menu.
25
DVD978K English IFU
25
2000.10.12, 1:04 PM
3141 016 1xxxx
E n gl i sh
Setup Menu
Setup Menu
E n gl i sh
Audio Menu
¶ Use the Audio Menu to set the audio output for optimum audio effect.
¶ The Audio Menu has 5 setup items:
1) Analog Output
2) Digital Output
3) Dynamic range
4) Speaker setup
5) Balance
Analog Output
¶ There are two options for analog output: 2-channel and 6-channel.
¶ 2-channel mode combines the center, left and right surround and
subwoofer audio signals to the front left and right speaker outputs.
¶ You must set the item ANALOG OUTPUT to 6-CHANNEL when
connecting to 6-channel analog output equipment or there will be no
output at the center left and right surround and subwoofer speakers.
¶ Similarly, you must set the item ANALOG OUTPUT to 2-CHANNEL
when connecting to 2-channel analog output equipment or the center,
left and right surround and subwoofer channels cannot be reproduced
resulting in a movie with no dialog.
¶ Use the 1 234 keys to highlight the item ANALOG OUTPUT and use
the 34 keys to select an option. Press the OK key to confirm or press
the MENU key to save and quit the Setup Menu.
Digital Output
¶ Digital signals output through an optical cable or a coaxial cable. They
contain all the original audio information, recorded on the disc in a
special format. Common formats include PCM, AC-3, DTS and MPEG.
Digital signals cannot be reproduced directly to sound and must be first
restored to an analog signal (by a decoder), amplified (by a receiver) and
used to drive speakers.
¶ There are 2 types of digital audio output: bit-stream (BITSTRM) and
LPCM. Bit-stream output contains Dolby digital or DTS audio signal and
can only be decoded by equipment with Dolby Digital (also known as
AC-3 or Dolby 5.1) or DTS audio decoding capabilities. LPCM is the
standard output for digital audio signals and can be decoded by most
digital decoders.
¶ Digital output and analog output do not conflict.
¶ Use the 1 234 keys to highlight the item DIGITAL OUTPUT and use
the 34 keys to select an option. Press the OK key to confirm or press
the MENU key to save and quit the Setup Menu.
Dynamic Range
¶ Dynamic range is used to moderate the original loudness of a movie
automatically to make it gentler to the ears. When activated, it raises
faint sounds and softens loud sounds to suit nighttime viewing.
¶ Use the 1 234 keys to highlight the item DYNAMIC RANGE and use
the 34 keys to select an option. Press the OK key to confirm or press
the MENU key to save and quit the Setup Menu.
26
DVD978K English IFU
26
2000.10.12, 1:04 PM
3141 016 1xxxx
Speaker Setup
¶ A standard home theater system consists of left and right front speakers, a
center speaker, left and right surround speakers and a subwoofer speaker
which has different characteristics.The subwoofer speaker is designed to
produce bass sounds lower than 150Hz. The center speaker is designed to
produce dialogs in movies. The left and right front speakers are to produce
background sound and music in movies and usually designed with better
capabilities to handle a wide range of low, medium and high pitch sounds.
The surround speaker is used to compensate for insensitivity of the human
ear to sounds from behind and usually a small speaker will suffice.
¶ Speaker setup allows you to set the speaker type to match your home
theater system. For instance, if you have two large left and right front
speakers which can reproduce sounds lower than 50Hz but you do not
have a subwoofer speaker, then you can set the FRONT speaker to LARGE
and set the SUBWOOFER speaker to OFF. With this setup, the bass
component will output from the front speakers producing an optimum
audio effect.
¶ Use the 1 234 keys to highlight item SPEAKER SETUP. Press the OK key
to enter the Speaker Setup submenu. There are 4 setup items on the menu:
1) FRONT
[LARGE/SMALL/OFF]
2) CENTER
[LARGE/SMALL/OFF]
3) SURROUND
[LARGE/SMALL/OFF]
4) SUBWOOFER
[ON/OFF]
¶ Use the 1 234 keys to highlight a setup item and use the 34 keys to
select an option. Press the OK key to confirm. After setup is
completed, press the 1 key to return to the previous menu or press the
MENU key to save and quit the Setup Menu.
REMARKS:
Here are some useful information which may help you to setup your speakers.
1 In a standard home theater system, the center speaker is used to output
dialogs in a movie. If you turned off the center speaker, you will not
hear the conversation in a movie. A small center speaker will suffices.
2 The surround speaker is used to compensate for insensitivity of the
human ear to sounds from behind and a small speaker will suffice.
3 The human ear cannot distinguish the direction of low frequency sound,
so the subwoofer can be installed in any position in the room.
However, avoid corners or the bass may be too strong.
Balance
¶ If we play a music with uniform volume, the high sounds and low sounds
are relatively softer. This is because the human ear is more sensitive to
medium pitch sounds than to low and high sounds. Balance setup is
provided to compensate for this phenomenon.
¶ You may select one of the predefined balance settings or you may enter
the Customize submenu to define your preferred setting. The predefined
balance settings are STANDARD (uniform sound), CLASSICAL (softer
high sounds) or ROCK (louder low and high sounds).
¶ Use the 1 234 keys to highlight the item BALANCE and use the 34
keys to select an option. Press the OK key to confirm or press the
MENU key to save and quit the Setup Menu.
¶ To define a customized setting, highlight CUSTOMIZE and press the OK
key to enter the Customize submenu. The Customize submenu includes
3 setup items:
1) Low frequency
range [-12dbB – 12dB]
2) Mid frequency
range [-12dbB – 12dB]
3) High frequency
range [-12dbB – 12dB]
¶ Use the 1 234 keys to highlight the desired setup item. Enter a
numeric value using the number keys or use the 34 keys to change the
option value. Press the OK key to confirm. After setup is complete,
press the 1 key to return to the previous menu or press the MENU key
to save and quit the Setup Menu.
27
DVD978K English IFU
27
2000.10.12, 1:04 PM
3141 016 1xxxx
E n gl i sh
Setup Menu
Setup Menu
E n gl i sh
Language Menu
¶ Use the Language Menu to set the on-screen display language, subtitle
language and audio language.
¶ The Language Menu includes 4 setup items:
1) OSD Language
2) Subtitle Language
3) Audio Language
4) Transparency
OSD Language
¶ This player supports two languages for the on-screen display: Chinese
and English.
¶ Use the 1 234 keys to highlight the item OSD LANGUAGE and use
the 34 keys to select an option. Press the OK key to confirm or press
the MENU key to save and quit the Setup Menu.
Subtitle Language
¶ A DVD disc can be recorded with many subtitle languages. Use this
setup item to choose one of the common languages as the default
subtitle language.
¶ Use the 1 234 keys to highlight the item SUBTITLE LANGUAGE and
use the 34 keys to select an option. Press the OK key to confirm or
press the MENU key to save and quit the Setup Menu.
¶ You can also use the SUBTITLE key on your remote control to easily
switch the subtitle language during playback. However, this setup is
effective only for the current playback. The player will revert to playing
the next disc using the SUBTITLE LANGUAGE defined in the Setup
Menu.
NOTE:
– If the selected subtitle language is not recorded on a disc, the player will
automatically play the CD using another subtitle language available on the
disc.
Audio Language
¶ A DVD disc can be recorded with many audio languages. This setup
item is used to choose one of the common languages as the default
audio language.
¶ Use the 1 234 keys to highlight the item AUDIO LANGUAGE and use
the 34 keys to select an option. Press the OK key to confirm or press
the MENU key to save and quit the Setup Menu.
¶ You can also use the AUDIO key on your remote control to easily
switch the audio language during playback. However, this setup is
effective only for the current playback. The player will revert to playing
the next disc using the AUDIO LANGUAGE value in the Setup Menu.
NOTE:
– If the selected audio language is not recorded on a disc, the player will
automatically play the CD using another audio language available on the
disc.
Transparency
¶ Use the transparency control to adjust the transparency of the
background of the Setup Menu for optimum viewing comfort.
¶ Use the 1 234 keys to highlight item TRANSPARENCY. Enter a
numeric value using the number keys or use the 34 keys to change the
option value. Press the OK key to confirm or press the MENU key to
save and quit the Setup Menu.
28
DVD978K English IFU
28
2000.10.12, 1:04 PM
3141 016 1xxxx
Setup Menu
E n gl i sh
Control Menu
¶ Use the Control Menu to control which discs can be played.
¶ The Control Menu includes 5 setup items:
1) Setup password
2) Change password
3) Parental control
4) Lock/unlock disc
5) Disc lock on/off
Setup Password
¶ The setup password is the key to activate other options. The setup
password must be entered correctly before performing any setup.
¶ Use the 1 234 keys to highlight item SETUP PASSWORD. Enter a 4digit password using the number keys. Press the OK key to confirm.
Change Password
¶ After entering a setup password, you can change it by selecting
CHANGE PASSWORD.
¶ Use the 1 234 keys to highlight item CHANGE PASSWORD. Enter a
new 4-digit password using the number keys. Press the OK key to confirm.
Parental Control
¶ DVD discs may be set with levels (1-8), indicating increasing degree of
violence, horror or eroticism of its content. If parental control is
activated, only movies below the defined rating can be played. To play a
movie with a rating higher than the defined rating, the password must be
entered correctly at the TV screen prompt.
¶ VCDs, SVCDs and CDs have no level definitions, so the parental control
function has no effect on these discs. The same applies to most illegal
DVD discs.
¶ Use the 1 234 keys to highlight item PARENTAL CONTROL and use
the 34 keys to select a proper option. Press the OK key to confirm or
press the MENU key to save and quit the Setup Menu.
NOTE:
– If you have forgotten your password, you can use the super user password
7890 to login and change your password using CHANGE PASSWORD.
– The Parental control function restricts playback of higher level DVDs only
on this player. It does not lock the DVD disc, which can still be played on
other equipment.
Lock/unlock Disc
¶ Although you cannot use parental control on VCD and SVCD discs as
they have no parental control level definition, you can still the Disc Lock
function to limit their viewing on your player. You can lock up to 40
discs on this player.
¶ When you lock a disc, the player will store its serial number in memory.
When it is next loaded, the user will be prompted to enter a password.
If the password entered is incorrect, the disc cannot be played.
¶ The password to unlock a locked disc is the same as the parental
control password. You can use the super user password 7890 to unlock
the disc if you have not set up a parental control password or if you
have forgotten the parental control password.
¶ Use the 1 234 keys to highlight the item LOCK DISC and use the 34
keys to select an option. Press the OK key to confirm or press the
MENU key to save and quit the Setup Menu.
NOTE:
– The Lock Disc function restricts the playback of a locked disc only on this
player. The disc can still be played on other equipment.
29
DVD978K English IFU
29
2000.10.12, 1:04 PM
3141 016 1xxxx
Setup Menu
E n gl i sh
Disc Lock On/Off
¶ Item DISC LOCK enables or disables the disk lock function. When
enabled, the player performs password authorization for locked discs;
when disabled, all locked discs can be directly played without entering
the password.
¶ Use the 1 234 keys to highlight the item DISC LOCK FUNCTION
and use the 34 keys to select an option. Press the OK key to confirm
or press the MENU key to save and quit the Setup Menu.
30
DVD978K English IFU
30
2000.10.12, 1:04 PM
3141 016 1xxxx
Disc maintenance
¶ Never write on the logo printed on a disc.
¶ Do not paste any label on a disc.
¶ Keep the shiny side of a disc clean. When a disc becomes dirty, wipe it
gently with a cleaning cloth from the center to the edge.
¶ Do not drop or bend a disc.
¶ Do not insert more than one disc in the player.
¶ Do not close the disc tray with an improperly-inserted disc by force.
¶ Do not store discs under direct sunlight, in humid or dusty
environments.
Caution:
– Do not use solvents such as benzine, thinner, commercially
available cleaners, or anti-static spray intended for analog
discs.
Environmental information
Environmental information
All redundant packing material has been omitted. We have done our
utmost to make the packaging easily separable into three mono materials:
cardboard (box), polystyrene foam (buffer) and polyethylene (bags,
protective foam sheet.)
Your set consists of material which can be recycled if disassembled by a
specialized company. Please observe the local regulations regarding to
the disposal of packing materials, dead batteries and old equipment.
31
DVD978K English IFU
31
2000.10.12, 1:04 PM
3141 016 1xxxx
E n gl i sh
Disc Maintenance
Before requesting service
E n gl i sh
If it appears that the DVD Video player is faulty, first consult this checklist.
Something may have been overlooked. Under no circumstances should you
attempt to repair the system yourself; this will invalidate the warranty.
Look for the specific symptom(s). Then perform only the actions listed to remedy
the specific symptom(s).
Symptom
Remedy
No power
–
–
Check if the on/off button on the front of the player is set to on.
Check if there is power at the AC outlet by plugging in another appliance.
No picture
–
–
–
Check if the TV is switched on.
Select the same channel and source on the TV as on the player.
Check the video connection.
Distorted picture
–
Check the disc for fingerprints and clean the disc with a soft cloth,
wiping from the center to the edge.
Sometimes a small amount of picture distortion may appear. This is not a
malfunction.
–
Completely distorted picture
or no color with player menu
–
–
If the picture is distorted completely or if the picture rolls vertically,
make sure the NTSC/PAL setting at the DVD player matches the
video signal of your television.
If your TV video signal is NTSC, select the NTSC setting at the DVD player.
If your video signal is PAL, select the PAL setting. - See ‘SETUP MENU’.
Distorted or black/white picture
with DVD or Video CD
–
The disc format does not match your TV’s video signal (PAL/NTSC).
No sound
–
–
–
Check audio connections.
If you are using a HiFi amplifier, try another sound source.
If you are playing a DTS disc, check whether the item DIGITAL OUTPUT in
the Setup Menu is set to ALL. If DTS is selected, ensure that a DTS decoder
is connected.
Distorted sound from HiFi
amplifier
–
Check to make sure that no audio connections are made to the
amplifier’s phono input.
No audio at digital output
–
–
–
–
Check the digital connections.
Check the Setup Menu to make sure the digital output has been activated.
Check if the audio format of the selected audio language matches
your receiver capabilities.
When using VCD, set item DIGITAL OUTPUT to PCM.
Disc can’t be played
–
–
–
–
Ensure the disc label is facing up.
Clean the disc.
Check if the disc is defective by trying another disc.
Check to see if the disc is defective, badly scratched or warped (not flat).
No return to start-up screen when
disc is removed
–
–
Reset the unit by switching the player off, then on again.
Check to see if the program requires another disc to be loaded.
The player does not respond to
the remote control
–
–
–
Aim the remote control directly at the sensor on the front of the player.
Remove any obstacles between the player and the remote control.
Inspect or replace the batteries in the remote control.
Buttons do not work
–
In order to completely reset the player, unplug the AC cord from the
AC outlet for a few seconds.
Player does not respond to some
–
Operations may not be permitted by the disc. Refer to the instructions of
operating commands during
playback
–
the disc.
32
DVD978K English IFU
32
2000.10.12, 1:04 PM
3141 016 1xxxx
Specifications
* Power consumption
* Video output
E n gl i sh
GENERAL
20W
NTSC/PAL selectable
ANALOG AUDIO OUTPUT
*
*
*
*
Number of audio channels
Output voltage
Frequency responds range
Signal/noise
6
2.0 V ± 2dB
20Hz - 20KHz ± 0.5dB
≥ 90dB
DIGITAL AUDIO OUTPUT
* Digital
MPEG
DTS/AC-3
LPCM
compressed
16,20,24 bits
fs 48,96 kHz
* Fulll decoding of multi-channel surround sound
VIDEO OUTPUT
* CVBS
* S-Video
* Y/Pr/Pb
1 Vpp --- 75Ω
1.00 Vpp --- 75Ω
C: 0.30 Vpp --- 75Ω
Y:1.00 Vpp --- 75Ω
Pr: 0.7 Vpp --- 75Ω
Pb: 0.7 Vpp --- 75Ω
SPEAKER
Speaker dimension
6.3 mm
HEADPHONE
Headphone dimension
6.3 mm
CABINET
* Dimensions (WxDxH)
* Weight
435 x 305 x 90 mm
approx. 4.0 Kg
ENVIRONMENTAL REQUIREMENT
* Temperature
5 - 40ºC
* Humidity
10% - 80%
Specification subject to change without prior notice.
33
DVD978K English IFU
33
2000.10.12, 1:04 PM
3141 016 1xxxx