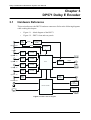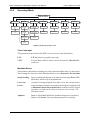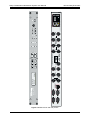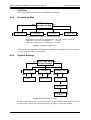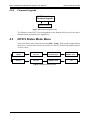
1
Dolby E
Model DP571 Encoder
Model DP572 Decoder
Multichannel Distribution System
User Manual
Issue 3
Version 1.05
Part No. 91685
Dolby Laboratories Inc
www.dolby.com
United States
100 Potrero Avenue
San Francisco, CA 94103-4813
Telephone 415-558-0200
Facsimile 415-863-1373
United Kingdom
Wootton Bassett
Wiltshire SN4 8QJ England
Telephone (44) 1793-842100
Facsimile (44) 1793-842101
WARNING: Troubleshooting must be performed by trained technicians. Do not
attempt to service this equipment unless you are qualified to do so.
DISCLAIMER OF WARRANTIES: Equipment manufactured by Dolby Laboratories is warranted against defects in materials and workmanship for a period
of one year from the date of purchase. All warranties, conditions or other terms implied by statute are excluded to the fullest extent allowed by law.
LIMITATION OF LIABILITY: It is understood and agreed that Dolby Laboratories’ liability whether in contract, in tort, under any warranty, in negligence
or otherwise shall not exceed the cost of repair or replacement of the defective components and under no circumstances shall Dolby Laboratories be
liable for incidental, special, direct, indirect or consequential damages (including but not limited to damage to software or recorded audio or visual material), or loss of use, revenue or profit even if Dolby Laboratories or its agents have been advised, orally or in writing, of the possibility of such damages.
Dolby and the double-D symbol are registered trademarks of Dolby Laboratories.
©2000 Dolby Laboratories Inc. All rights reserved.
S00/12805/13054
Table of Contents
List of Figures ...................................................................................................................... vii
List of Tables ....................................................................................................................... viii
Preface
Regulatory Notices ...................................................................................ix
Chapter 1
Introduction ............................................................................................... 1-1
Chapter 2
1.1
Unpacking and Inspection ....................................................................... 1-3
1.2
System Considerations............................................................................. 1-5
1.2.1 Digital I/O .................................................................................... 1-5
1.2.2 Video Reference........................................................................... 1-5
1.2.3 Signal Characteristics................................................................... 1-5
1.3
Connection with the DP569 Multichannel Encoder ................................ 1-6
1.4
Front-Panel User Interface....................................................................... 1-7
1.4.1 Menu Selection and Push-button Operation ................................ 1-9
1.4.2 Display ....................................................................................... 1-10
1.4.3 Display LEDs............................................................................. 1-10
1.4.4 Remote ....................................................................................... 1-12
1.5
Quickstart Guide for the DP571 and DP572 ......................................... 1-13
1.6
Common Features of the DP571 and DP572......................................... 1-15
1.6.1 PCM Delay Channel .................................................................. 1-15
1.6.2 Metadata..................................................................................... 1-15
1.6.3 Timecode.................................................................................... 1-15
1.6.4 Video Reference......................................................................... 1-15
1.6.5 Channel Configuration............................................................... 1-15
1.7
Configuring Jumper Settings ................................................................. 1-16
Common Dolby E Applications ...................................................... 2-1
2.1
Film.......................................................................................................... 2-1
2.2
Commercial and Interstitial ..................................................................... 2-2
2.3
News and Local Programming ................................................................ 2-2
2.4
Music ....................................................................................................... 2-2
2.5
Live Events .............................................................................................. 2-2
2.6
Postproduction ......................................................................................... 2-3
iii
Chapter 3
Chapter 4
DP571 Dolby E Encoder...................................................................... 3-1
3.1
Hardware Reference ................................................................................ 3-1
3.1.1 Digital Inputs ............................................................................... 3-3
3.1.2 Video Reference........................................................................... 3-3
3.1.3 LTC Input..................................................................................... 3-3
3.1.4 PCM Delay Input ......................................................................... 3-3
3.1.5 Metadata....................................................................................... 3-3
3.1.6 Remote ......................................................................................... 3-3
3.1.7 Main Out ...................................................................................... 3-4
3.1.8 PCM Delay Out............................................................................ 3-4
3.1.9 Status............................................................................................ 3-4
3.1.10 Auxiliary ...................................................................................... 3-5
3.1.11 10BASE-T.................................................................................... 3-5
3.2
DP571 Setup Mode Menu Reference ...................................................... 3-6
3.2.1 Program Config............................................................................ 3-7
3.2.2 Operating Mode ........................................................................... 3-9
3.2.3 Presets ........................................................................................ 3-12
3.2.4 Metadata Params........................................................................ 3-13
3.2.5 System Settings.......................................................................... 3-16
3.2.6 Firmware Upgrade ..................................................................... 3-16
3.3
DP571 Status Mode Menu..................................................................... 3-16
DP572 Dolby E Decoder...................................................................... 4-1
4.1
Hardware Reference ................................................................................ 4-1
4.1.1 Main In......................................................................................... 4-3
4.1.2 Video Reference........................................................................... 4-3
4.1.3 PCM Input.................................................................................... 4-3
4.1.4 Remote ......................................................................................... 4-3
4.1.5 Auxiliary ...................................................................................... 4-3
4.1.6 10BASE-T.................................................................................... 4-3
4.1.7 Metadata....................................................................................... 4-3
4.1.8 Status............................................................................................ 4-4
4.1.9 Digital Outputs............................................................................. 4-5
4.1.10 PCM Delay Output ...................................................................... 4-5
4.1.11 LTC Output.................................................................................. 4-5
iv
Chapter 5
4.2
DP572 Setup Mode Menu Reference ...................................................... 4-6
4.2.1 Operating Mode ........................................................................... 4-7
4.2.2 PCM Chan Config........................................................................ 4-8
4.2.3 Headphone Prog........................................................................... 4-9
4.2.4 Headphone Map ......................................................................... 4-10
4.2.5 System Settings.......................................................................... 4-10
4.2.6 Firmware Upgrade ..................................................................... 4-11
4.3
DP572 Status Mode Menu..................................................................... 4-11
System Specifications ......................................................................... 5-1
v
List of Figures
1-1
Checking the main fuse .................................................................................................. 1-4
1-2
Connection between a DP569 and DP572 ...................................................................... 1-6
1-3
DP571 and DP572 front-panel controls and LEDs ......................................................... 1-8
2-1
Typical Dolby E system in a postproduction facility ..................................................... 2-3
3-1
DP571 Block Diagram .................................................................................................... 3-1
3-2
DP571 front and back panel ........................................................................................... 3-2
3-3
DP571 Unit Setup menus ................................................................................................ 3-6
3-4
Program Config menu ..................................................................................................... 3-7
3-5
Operating Mode menu .................................................................................................... 3-9
3-6
Presets menu ................................................................................................................. 3-12
3-7
Metadata Params menu ................................................................................................. 3-13
3-8
Reversion Preset menu ................................................................................................. 3-14
3-9
System Settings menu ................................................................................................... 3-16
3-10
Firmware Upgrade menu .............................................................................................. 3-16
3-11
DP571 status menus ...................................................................................................... 3-16
4-1
DP572 block diagram ..................................................................................................... 4-1
4-2
DP572 front and rear panels ........................................................................................... 4-2
4-3
DP572 Unit Setup menu ................................................................................................. 4-6
4-4
Operating Mode menu .................................................................................................... 4-7
4-5
PCM Chan Config menu ................................................................................................ 4-8
4-6
Headphone Prog menu .................................................................................................... 4-9
4-7
Headphone Map menu .................................................................................................. 4-10
4-8
System Settings menu ................................................................................................... 4-10
4-9
Firmware Upgrade menu .............................................................................................. 4-11
4-10
DP572 status menus ...................................................................................................... 4-11
vii
List of Tables
1-1
LEDs common to the DP571 and DP572 .................................................................... 1-11
1-2
LEDs unique to the DP571 and DP572 ....................................................................... 1-11
1-3
Channel Activity LEDs for the DP571 and DP572 ..................................................... 1-12
1-4
RS-485 Termination jumper settings ........................................................................... 1-16
3-1
DP571 Status port pin functions .................................................................................... 3-4
3-2
Status port preset selection ............................................................................................ 3-5
3-3
Preset mode tally indication on Status port .................................................................... 3-5
3-4
DP571 Program Configurations ..................................................................................... 3-8
4-1
DP572 Status Port Pin Functions ................................................................................... 4-4
4-2
Status port output routing mode selection ...................................................................... 4-5
viii
Dolby E Multichannel Distribution System User Manual
Preface
Regulatory Notices
FCC
This equipment has been tested and found to comply with the limits for a Class A digital
device, pursuant to part 15 of the FCC Rules. These limits are designed to provide
reasonable protection against harmful interference when the equipment is operated in a
commercial environment. This equipment generates, uses, and can radiate radio frequency energy and, if not installed and used in accordance with this instruction manual,
may cause harmful interference to radio communications. Operation of this equipment in a
residential area is likely to cause harmful interference in which case the user will be required
to correct the interference at his or her own expense.
Canada
This Class A digital apparatus complies with Canadian ICES-003.
UL
Troubleshooting must be performed by trained technicians. Do not attempt to service this
equipment unless you are qualified to do so.
WARNING: Check that the correct fuses have been installed. To reduce the risk of
fire, replace the fuses only with the same type and rating.
Exposed portions of the power supply are electrically “hot.” In order to reduce the risk of
electrical shock, the power cord MUST be disconnected when the cover of this equipment
is removed.
The ground terminal of the power plug is connected directly to the chassis of the unit. For
continued protection against electric shock, a three-pin power outlet that is correctly wired
and earthed must be used. Do not use a ground-lifting adapter and never cut the ground pin
on the three-prong plug.
ix
Dolby E Multichannel Distribution System User Manual
Regulatory Notices
UK
As the colours of the cores in the mains lead may not correspond with the coloured markings
identifying the terminals in your plug, proceed as follows:
•
The core which is coloured green and yellow must be connected to the terminal in
the plug which is marked with the letter E or by the earth symbol
or coloured
green or green and yellow.
• The core which is coloured blue must be connected to the terminal which is marked
with the letter N or coloured black.
• The core which is coloured brown must be connected to the terminal which is
marked with the letter L or coloured red.
This apparatus must be earthed.
IEC Notices
This equipment complies with the EMC requirements of EN55103-1 and EN55103-2 when
operated in an E2 environment in accordance with this manual. This equipment shall not be
exposed to dripping or splashing and no objects filled with liquids, such as coffee cups, shall
be placed on the equipment.
x
Dolby E Multichannel Distribution System User Manual
Important Safety Notice
Regulatory Notices
GB
This unit complies with the safety standard IEC65. To ensure safe operation and to guard against potential shock hazard
or risk of fire, the following must be observed:
•
•
•
•
•
If the unit has a voltage selector, ensure that it is set to the correct mains voltage for your supply. If there is no
voltage selector, ensure that your supply is in the correct range for the input requirement of the unit.
Ensure fuses fitted are the correct rating and type as marked on the unit.
The unit must be earthed by connecting to a correctly wired and earthed power outlet.
The power cord supplied with this unit must be wired as follows:
Live-Brown
Neutral-Blue
Earth-Green/Yellow
The unit shall not be exposed to dripping or splashing and no objects filled with liquids, such as coffee cups,
shall be placed on the equipment.
Important - Note de Securite
F
Ce materiel est conforme à la norme IEC65. Pour vous assurer d'un fonctionnement sans danger et de prévenir tout choc
électrique ou tout risque d'incendie, veillez à observer les recommandations suivantes.
•
•
•
•
•
Le selecteur de tension doit être placé sur la valeur correspondante à votre alimentation réseau.
Les fusibles doivent correspondre à la valeur indiquée sur le materiel.
Le materiel doit être correctement relié à la terre.
Le cordon secteur livré avec le materiel doit être cablé de la manière suivante:
Phase-Brun
Neutre-Bleu
Terre-Vert/Jaune
Ne pas exposer cet appareil aux éclaboussures ou aux gouttes de liquide. Ne pas poser d'objets remplis de liquide, tels que des tasses de café, sur l'appareil.
Wichtiger Sicherheitshinweis
D
Dieses Gerät entspricht der Sicherheitsnorm IEC65. Für das sichere Funktionieren des Gerätes und zur Unfallverhütung
(elektrischer Schlag, Feuer) sind die folgenden Regeln unbedingt einzuhalten:
•
•
•
•
•
Der Spannungswähler muß auf Ihre Netzspannung eingestellt sein.
Die Sicherungen müssen in Typ und Stromwert mit den Angaben auf dem Gerät übereinstimmen.
Die Erdung des Gerätes muß über eine geerdete Steckdose gewährleistet sein.
Das mitgelieferte Netzkabel muß wie folgt verdrahtet werden:
Phase-braun
Nulleiter-blau
Erde-grün/gelb
Das Gerät darf nicht mit Füssigkeiten (Spritzwasser usw.) in Berührung kommen; stellen Sie keine Gefäße, z.B.
Kaffeetassen, auf das Gerät.
Norme di Sicurezza - Importante
I
Questa apparecchiatura è stata costruita in accordo alle norme di sicurezza IEC 65. Per una perfetta sicurezza ed al fine di
evitare eventuali rischi di scossa êlettrica o d'incendio vanno osservate le seguenti misure di sicurezza:
•
•
•
•
•
Assicurarsi che il selettore di cambio tensione sia posizionato sul valore corretto.
Assicurarsi che la portata ed il tipo di fusibili siano quelli prescritti dalla casa costruttrice.
L'apparecchiatura deve avere un collegamento di messa a terra ben eseguito; anche la connessione rete deve
avere un collegamento a terra.
Il cavo di alimentazione a corredo dell'apparecchiatura deve essere collegato come segue:
Filo tensione-Marrone
Neutro-Blu
Massa-Verde/Giallo
Il prodotto non deve essere sottoposto a schizzi, spruzzi e gocciolamenti, e nessun tipo di oggetto riempito con
liquidi, come ad esempio tazze di caffè, deve essere appoggiato sul dispositivo.
xi
Dolby E Multichannel Distribution System User Manual
Regulatory Notices
E
Aviso Importante De Seguridad
Esta unidad cumple con la norma de seguridad IEC65. Para asegurarse un funcionamiento seguro y prevenir cualquier
posible peligro de descarga o riesgo de incendio, se han de observar las siguientes precauciones:
•
•
•
•
•
Asegúrese que el selector de tensión esté ajustado a la tensión correcta para su alimentación.
Asegúrese que los fusibles colocados son del tipo y valor correctos, tal como se marca en la unidad.
La unidad debe ser puesta a tierra, conectándola a un conector de red correctamente cableado y puesto a tierra.
El cable de red suministrado con esta unidad, debe ser cableado como sigue:
Vivo-Marrón
Neutro-Azul
Tierra-Verde/Amarill
La unidad no debe ser expuesta a goteos o salpicaduras y no deben colocarse sobre el equipo recipientes con
liquidos, como tazas de cafe.
Viktiga Säkerhetsåtgärder
S
Denna enhet uppfyller säkerhetsstandard IEC65. För att garantera säkerheten och gardera mot eventuell elchock eller brandrisk, måste följande observeras:
•
•
•
•
•
Kontrollera att spänningsväljaren är inställd på korrekt nätspänning.
Konrollera att säkringarna är av rätt typ och för rätt strömstyrka så somanvisningarna på enheten föreskriver.
Enheten måste vara jordad genom anslutning till ett korrekt kopplat och jordat el-uttag.
El-sladden som medföljer denna enhet måste kopplas enligt foljande:
Fas-Brun
Neutral-Blå
Jord-Grön/Gul
Enheten får ej utsättas för yttre åverkan samt föremål innehållande vätska, såsom kaffemuggar, får ej placeras
på utrustningen.
Belangrijk Veiligheids-voorschrift
NL
Deze unit voldoet aan de IEC65 veiligheids-standaards. Voor een veilig gebruik en om het gevaar van electrische schokken
en het risico van brand te vermijden, dienen de volgende regels in acht te worden genomen:
•
•
•
•
•
Controleer of de spanningscaroussel op het juiste Voltage staat.
Gebruik alleen zekeringen van de aangegeven typen en waarden.
Aansluiting van de unit alleen aan een geaarde wandcontactdoos.
De netkabel die met de unit wordt geleverd, moet als volgt worden aangesloten:
Fase-Bruin
Nul-Blauw
Aarde-Groen/Geel
Dit apparaat mag niet worden blootgesteld aan vocht. Vanwege het risico dat er druppels in het apparaat vallen,
dient u er geen vloeistoffen in bekers op te plaatsen.
xii
Dolby E Multichannel Distribution System User Manual
Chapter 1
Introduction
The Dolby E multichannel distribution system is the first technology that can transport
multichannel audio within the digital broadcast industry’s current two-channel infrastructure. A single Dolby E bitstream can carry up to eight discrete audio channels,
each with its associated Dolby Digital metadata, in a 16- or 20-bit, 48 kHz AES pair.
Since Dolby E’s audio and video frame rates are identical, many common editing and
switching practices can be performed on the encoded bitstream without causing mutes
or other disturbances in the decoded PCM audio. For editing tasks that require decoding,
Dolby E’s sophisticated audio coding algorithm allows ten or more encode/decode cycles
without audible degradation; this exceeds the requirements of even the most elaborate
program contribution, distribution, and emission paths.
Even experienced studio engineers must learn new techniques and terminology to begin
using these Dolby E devices. Fortunately, Dolby Laboratories has greatly simplified the
process of getting started:
•
The DP571 encoder and DP572 decoder employ an almost identical front-panel user interface. The devices are also similar to some of the Dolby Digital series
of encoders and decoders, which may be familiar to broadcast engineers.
•
Choosing the appropriate Program Configuration on the DP571 is logically
connected to the application type. Selecting the Program Config sets most of
the DP571 encoding parameters including the Dolby Digital metadata. Very
few, if any, individual parameters need to be set.
•
The DP572 decoder is almost entirely configured by the settings in the encoded
Dolby E stream from the DP571.
We included both devices in one manual because they will almost always be used in the
same system. This manual is organized to emphasize the similarities between the encoder
and decoder, and to enable engineers with different learning styles access to the material
in the manner they prefer.
1-1
Dolby E Multichannel Distribution System User Manual
Introduction
The rest of this chapter presents important introductory information:
•
Section 1.1 - Unpacking and Inspection
•
Discusses how to unpack, inspect, and check the fuses for both units.
Section 1.2 - System Considerations
•
Discusses Dolby E’s digital I/O, connector types, and signal characteristics.
Section 1.3 - Connection with the DP569 Multichannel Encoder
•
Discusses connection with a Dolby E system and metadata setup of the Dolby
Digital encoder.
Section 1.4 - Front-Panel User Interface
•
Discusses how to navigate the menus, set new values, and interpret the LEDs.
Section 1.5 - Quickstart Guide for the DP571 and DP572
This is the fastest way to begin encoding/decoding.
The remainder of the manual examines the devices and common applications in
greater detail:
•
Chapter 2 – Common Dolby E Applications
•
Emphasizes that most Dolby E applications fall into one of the types discussed
in this chapter. Each application type strongly suggests a program configuration
which, in turn, almost entirely configures both devices.
Chapter 3 – DP571 Dolby E Encoder and Chapter 4 – DP572 Dolby E Decoder
•
Supplies detailed hardware and menu reference information about each device.
Chapter 5 – System Specifications
Presents a complete specifications table.
1-2
Dolby E Multichannel Distribution System User Manual
1.1
Introduction
Unpacking and Inspection
Before unpacking the unit, inspect the outer carton for shipping damage. If the carton
shows damage, inspect the unit in those areas.
Several accessories are provided with the unit. These may include:
•
Rack screws and washers
•
Power cord
•
BNC 75Ω terminators, used on Digital and Video Ref inputs (Part No. 79114)
•
Spare fuse 1 A (Part. No. 56016)
•
Spare fuse, 2 A, used on the internal power supply (Part No. 56017)
•
Hex wrench (to access inside of unit)
Carefully remove the unit from its carton, remove the plastic wrapping, and place on a flat
surface. If there are no signs of damage, proceed to Section 1.1.1 - Fusing Information.
1.1.1
Fusing Information
WARNING: To reduce the risk of fire, replace fuses only with the same type and rating.
Each unit uses a universal switching power supply that handles the full range of nominal
mains voltages between 90 and 264 VAC and any frequency between 50 and 60 Hz.
Check Main Fuse
T 1A L - 1 Amp, 250 V, 20 mm, time-lag fuse, low-breaking capacity (for all operating
voltages)
WARNING: The power to the unit must be off when the following steps are performed.
Ensure that the main power cable to the unit is not connected to a power source.
1.
Open the fuse compartment door in the AC power input housing with a small
flat-blade screwdriver (Figure 1-1).
2.
Check that the fuse in the active (lower) fuse carrier is the correct rating. The
fuse carrier must be inserted into the compartment with the orientation
shown in Figure 1-1. Do not force the carrier into the compartment or both
could be damaged.
3.
Snap the fuse compartment door closed.
1-3
Dolby E Multichannel Distribution System User Manual
Open the door
Introduction
Metal clip installed on
unused side of carrier
rrier
ca
Fuse
Active fuse
Top
Install fuse
Figure 1-1 Checking the main fuse
Internal Fuse
The switching power supply contains a separate fuse. Most fault conditions should be
protected by the main fuse. The internal fuse rating is:
F 2A L - 2 Amp, 250 V, 20 mm, fast-acting, low-breaking capacity (for all operating
voltages)
1-4
Dolby E Multichannel Distribution System User Manual
1.2
System Considerations
1.2.1
Digital I/O
Introduction
The digital input and output connections on the DP571 encoder and DP572 decoder may
seem unfamiliar to the first time user of a digital audio device. The Audio Engineering
Society (AES) created a standard electrical interface for digital audio with a balanced
XLR connector and 110Ω impedance called AES3-1995. This interface was later
expanded to include an unbalanced BNC connector, 1 V peak-to-peak signal level, and
75 Ω impedance; the new standard is known as both AES3-ID-1995 and SMPTE276M. The DP571 encoder and DP572 decoder use this new standard for both digital
audio and Dolby E electrical interface connections.
Note: These signals must be properly terminated with a 75Ω impedance at one point
only. We recommend a standard video terminator.
1.2.2
Video Reference
One of Dolby E’s most significant features is that the audio and video frame rates are
identical. The DP571 encoder and DP572 decoder both require a reference video signal
to lock the audio and video at frame boundaries. Standard black burst or color bars can
be used as reference video if they are locked to the plant reference. A passive loopthrough connection on the encoder and decoder can properly terminate the reference
signal or distribute it to multiple devices.
Note: This reference signal must be terminated with a 75Ω impedance on the last device
in the signal chain.
1.2.3
Signal Characteristics
Although the Dolby E stream is carried on a standard AES pair, its format is different than
that of a conventional digital audio signal. The PCM audio that normally comprises a digital
audio signal is encoded, along with metadata and time code, into the Dolby E bitstream.
The resulting data no longer directly represents the audio. Since a standard Dolby E signal
can appear to the unwitting observer as a clipped or distorted digital audio signal, this
section explains what to expect when measuring or monitoring a Dolby E signal.
For example, a VTR’s meters indicate a digital full-scale signal when recording or playing a Dolby E stream and the clip indicators may flash intermittently. Dolby E uses the
entire audio payload of an AES pair, which creates the appearance of full-scale audio on
the VTR. The Dolby E signal sounds like full-scale noise when monitored through speakers
or headphones; this is useful to quickly verify the VTR is receiving a Dolby E signal.
To simplify working with these new signals and to allow for more detailed analysis,
Dolby Laboratories has recently introduced the DM100 Portable Audio Monitor. This
hand-held unit displays metadata parameters (see Section 3.2.4) and decodes Dolby E,
Dolby Digital, and PCM bitstreams. The decoded audio can be monitored through an
internal speaker or through user-supplied headphones.
1-5
Dolby E Multichannel Distribution System User Manual
1.3
Introduction
Connection with the DP569 Multichannel
Encoder
One of Dolby E’s most important features is its ability to carry Dolby Digital metadata.
The DP571 can receive metadata from an external device, such as a metadata authoring
tool, or it can generate metadata internally. The DP572 decodes the Dolby E signal,
extracts the metadata and sends it to the DP569 Dolby Digital encoder. Use a standard
DB9 male-to-male cable (not a null modem) to connect the Metadata output on the
DP572 decoder to the Aux Data input on the DP569.
Note: To be used effectively in a Dolby E system, the DP569 must have software
version 1.21 or later.
Figure 1-2 shows the audio connections between the DP572 and DP569. Connect the
DP572’s Digital Output channels 1/2, 3/4, 5/6 to the DP569’s Digital Input channels
1/2, 3/4, 5/6, respectively. Install 75 Ω terminators if the loop-through BNC connectors
on the DP569 are unused.
When a DP569 receives external metadata, the following parameters must be explicitly set:
•
Set the Metadata Source to External.
•
Set the Metadata Program to Program 1.
•
Set the Metadata Reversion mode. Last Used is recommended for a DTV
facility because it is the only setting that continues encoding if the external
metadata source is interrupted. See Metadata Revert on page 3-9 for a
complete discussion.
Figure 1-2 also shows signals applied to the PCM Input and Status connectors. The
Status signals can command the DP572 to change modes to allow the PCM Input signal
to be mixed with (Voiceover) or replace (Switched Out) the Dolby E decoded audio.
This feature is particularly useful in a facility that must pass network-originated multichannel audio but can route a maximum of four channels. Voiceover and Switched Out
modes are effected within the DP572 and therefore require no additional processors.
Both modes are described in detail in Output Routing on page 4-8.
Local or
PCM In
Voiceover audio
GPI
Main In
DP572 Dolby E Decoder
Digital Outputs
Status
1/2
3/4
5/6
L/R
VRef
C/LFE
Ls/Rs
Metadata
Metadata
DP569 Dolby Digital Multichannel Encoder
Main Out
Figure 1-2 Connection between a DP569 and DP572
1-6
Dolby E Multichannel Distribution System User Manual
1.4
Introduction
Front-Panel User Interface
The DP571 and DP572 employ the same user interface to access menus and display
status information. This section introduces the interface, controls, and display
features (see Figure 1-3).
Conventions
The + symbol will be used to notate key sequences not simultaneous key combinations.
For example, “press Shift + Setup to enter Status mode” means “press the Shift key
then press the Setup key” not “press the Shift and Setup keys at the same time.”
The Shift key provides access to the functions labeled above and below the Arrow,
Setup, and Enter (DP572) keys. This manual will refer to the marking on the actual key
pressed when giving instructions not the text above the key. For example, access the
Contrast menu by pressing Shift + ↓. Access the headphone level menu on the DP572
by pressing Shift + Enter.
1-7
Model DP572
Dolby E Decoder
Model DP571
Dolby E Encoder
Dolby E
5.1+2
Dolby E
5.1+2
20bit
20bit
1-8
Shift
Remote
Shift
Remote
Contrast
Delete
Contrast
Delete
Enter
Insert
Enter
Insert
Esc
Setup
Status
Esc
Setup
Status
Other
6x1
8x1
3x2
PCM
4x2
5.1+2 x 1
Other
6x1
8x1
20 bit
24 bit
3x2
5.1
5.1 + 2
16 bit
Dolby E Program Config
4x2
Input Data
5.1+2 x 1
24 bit
5.1 + 2
5.1
Dolby E Program Config
PCM
20 bit
16 bit
Output Data
Error
Error
Remote V Ref
Fault
Main PCM In
6
2
7
3
8
4
5
1
6
2
7
3
8
4
Output Channel Activity
5
1
Input Channel Activity
PCM Dly
Remote V Ref
Fault
TC
Remote
Remote
Dolby E Multichannel Distribution System User Manual
Introduction
Figure 1-3 DP571 and DP572 front-panel controls and LEDs
Dolby E Multichannel Distribution System User Manual
1.4.1
Introduction
Menu Selection and Push-button Operation
The DP571 and DP572 share an almost identical push-button user interface.
↓ → Keys
Both keys advance to the next menu or parameter value. When editing a text field, →
moves to the next letter in the name; ↓ changes the value of the current character to the
next alphanumeric character.
↑ ← Keys
Both keys return to the previous menu or parameter value. When editing a text field, ←
moves to the previous letter in the name; ↑ changes the value of the current character
to the previous alphanumeric character.
Enter
Enters the displayed value as the currently active value or descends one level in the
menu hierarchy.
Esc
Aborts the current operation or ascends one level in the menu hierarchy. When setting
a new value in Setup mode, a blinking cursor indicates a new value has been selected
but not set. Press Enter to set the value or Esc to restore the current value; either key
removes the blinking cursor. Pressing Esc again ascends one level in the menu hierarchy.
Shift
Press Shift to access the functions labeled above and below the arrow, Setup, and Enter
(DP572) keys. The Shift key illuminates until another key is pressed. This manual will
refer to the actual key marking when giving instructions, not to the labels above or below
the key. For example: access the Contrast menu by pressing Shift + ↓. Access the headphone level on the DP572 by pressing Shift + Enter.
Status
Press Shift + Setup to enter Status mode to query the device status; values can be
viewed but not set in this mode. See Section 3.3 - DP571 Status Mode Menu and
Section 4.3 - DP572 Status Mode Menu to view the Status mode menus.
Setup
Press Setup to enter Setup mode. Displays DP571 Unit Setup: Program Config or
DP572 Unit Setup: Operating Mode from any mode or menu. Use the Enter, Esc, ↑,
←, ↓, and → keys to navigate and set values in this mode.
1-9
Dolby E Multichannel Distribution System User Manual
1.4.2
Introduction
Display
The display is a 2-line by 16-character alphanumeric display with green LED backlighting. The contrast can be adjusted by pressing Shift + ↓. Use the arrows to set the
contrast.
1.4.3
•
During normal Dolby E encoding, the DP571 displays the Program Config,
frame rate, and the output data width.
•
During normal Dolby E decoding, the DP572 displays signal type (PCM or
Dolby E), Program Config, frame rate, and the input data width.
Display LEDs
Output/Input Data
The DP571 displays the Output Data width. At version 1.05, only the 16- and 20-bit settings are valid. The DP572 displays the Input Data width for the incoming Dolby E stream.
Note: A 24-bit version will be available in the future.
Dolby E Program Config
The DP571 displays the current encoding Program Configuration on one of eight LEDs.
The DP572 displays the Program Configuration on one of eight LEDs for the incoming
Dolby E stream. The LEDs are disabled if the input is PCM audio.
The LEDs are mutually exclusive. The seven most common Program Configs have their
own LEDs; Other denotes any of the other 15 Program Configs. See Section 3.2.1 Program Config for a complete listing.
1-10
Dolby E Multichannel Distribution System User Manual
Introduction
Fault, Remote, PCM Dly, Error, and VRef
Table 1-1 LEDs common to the DP571 and DP572
Name
Function
Fault
Red:
Off:
Hardware related fault condition
No fault condition
Remote
Green: Remote mode enabled with no communication errors
Red:
Remote mode enabled but communication error detected
Off:
Remote mode not enabled
PCM Delay
Green: Valid PCM signal
Yellow: Non-48 kHz signal
Off:
No PCM signal
Error
Red:
Off:
VRef
Green: Lock with a valid analog composite video signal
Red:
Lock not achieved
Yellow: Frame rate of Vref unequal to frame rate of Dolby E Main
Input (DP572) or Main Output (DP571)
Input(s) not valid for current settings
No error condition
TC and Main
Table 1-2 LEDs unique to the DP571 and DP572
Name
Function
TC (DP571)
Green: Valid time code signal
Yellow: Non-29.97 Hz signal
Off:
No TC signal detected
Main (DP572)
Green: Dolby E or PCM signal
Red:
No input signal
Yellow: Non-48 kHz input or
AES3 error condition
Input/Output Channel Activity
The DP571 Input Channel Activity LEDs display the number of channels in the currently
selected program configuration.
The DP572 Output Channel Activity LEDs display the number of active output channels.
1-11
Dolby E Multichannel Distribution System User Manual
Introduction
The following LED color codes describe the same channel activity for both units:
Table 1-3 Channel Activity LEDs for the DP571 and DP572
Name
1.4.4
Function
Yellow
Channel enabled; level < -60 dBFS
Green
Channel enabled; -60 ≤ level < -0.1 dBFS
Red
Channel enabled; level ≥ -0.1 dBFS
Off
Channel disabled
Flashing Yellow
Channel sample frequency out of range (DP571 only)
Remote
Future versions of the DP571 and DP572 will allow remote control operation. The
front-panel Remote port is an RS-232 connector.
1-12
Dolby E Multichannel Distribution System User Manual
1.5
Introduction
Quickstart Guide for the DP571 and DP572
This section supplies necessary information to allow immediate encoding and decoding.
1.
2.
Since neither unit will function without a video reference signal, we recommend
making this connection first.
Connect the digital audio inputs to the DP571.
3.
These are AES3-ID inputs (unbalanced, 75Ω, 1 V peak-to-peak standard output),
and are very similar to analog composite video.1 If the loop-through BNC
connectors are not being used to feed additional equipment, terminate them
with a standard 75Ω video terminator.
Connect the digital audio outputs of the DP572.
4.
1.
After unpacking the DP571 and/or the DP572 but before applying AC power,
plug in a stable analog video reference signal. Standard black burst or color
bars can be used as reference video if they are locked to the plant reference.
These AES3-ID outputs are electrically separate, not loop-throughs, and
should not be terminated at the DP572. Like analog composite video, the
termination should be placed on the last device in the signal chain. For example,
if the DP572 is connected to a DP569, the terminators should be applied to the
loop-through BNC connectors on the DP569.
Connect the Main Out of the encoder to the Main In of the decoder and
terminate the input.
5.
Apply power to the DP571 and/or DP572.
6.
After completing the boot process (about 25 s), both units show their current status
on the display (same configuration as when they were last powered down).
7.
If the VRef LEDs are not green on both units, make sure a valid analog
NTSC or PAL reference signal (black burst) is applied to both units and that
they are properly terminated.
8.
The DP571 shows the current encoding Program Config. Set it to 5.1 + 2 by
pressing Setup + Enter when the display shows DP571 Unit Setup: Program
Config. The display now shows the current program configuration. Press the ↓
or ↑ keys until 5.1 + 2 is displayed and press Enter. The square cursor to the
left stops blinking and disappears to indicate the value has been entered.
Using video equipment for distribution of this AES signal is not generally recommended. Equipment is available designed specifically for passing AES3-ID signals.
1-13
Dolby E Multichannel Distribution System User Manual
9.
Introduction
Verify that the Metadata Revert and Source parameters are in the correct mode.
Press Esc until DP571 Unit Setup: Program Config is displayed again
(home in the setup menu structure). Press the ↓ key until DP571 Unit Setup:
Operating Mode is displayed, then press Enter.
Press the ↓ key until Operating Mode: Metadata Revert is displayed, then press
Enter. Use the ↓ ↑ keys to select Metadata Revert: Last Used and press Enter.
Press Esc to return to the Operating Mode: Metadata Revert screen. Use the
arrow keys to display the Operating Mode: Metadata Source screen, and press
Enter. Use the arrow keys to select Metadata Source: Internal and press Enter.
Selecting the Program Configuration automatically sets the associated Dolby
Digital metadata parameters for that program but they can be modified under
the DP571 Unit Setup: Metadata Params menu.2 (See Section 3.2.4 Metadata Params.)
10. Return to the status screen by pressing Shift + Setup.
11. The DP571 is now set properly.
12. Headphone level can be accessed by pressing Shift + Enter (the headphone
icon is below the Enter key) and adjusted with the arrow keys. Other than
Headphone Mapping and Level, and Voiceover, the DP572 has very few setup parameters that require user attention because it is almost completely configured by the DP571.
13. Like the DP571, pressing Shift + Setup returns the DP572 to the main Status
Screen. The display on both units should now show:
Dolby E
5.1 + 2
20bit
Both units are ready for testing.
2.
Example: In 5.1 + 2 mode, Program One is 5.1-channel, and Program Two is 2-channel.
Each of these programs has its own Dolby Digital Metadata. Similar to a DP569
Dolby Digital encoder, a unit placed into 5.1-channel mode (3/2L) automatically
loads a table of metadata values. In 5.1-channel mode, acmod is set to 3/2L, the LFE
is turned on, etc. In two-channel mode, acmod is set to 2/0, the LFE is turned off, etc.
The same thing occurs in the DP571 when the Program Configuration is changed.
1-14
Dolby E Multichannel Distribution System User Manual
1.6
Introduction
Common Features of the DP571 and DP572
This section discusses the most important common features between the encoder and
decoder. See Chapter 3 – DP571 Dolby E Encoder and Chapter 4 – DP572 Dolby E
Decoder for complete references for both units.
1.6.1
PCM Delay Channel
The encoder and decoder each impart an audio delay equal to one video frame. When
feeding a pair of channels on a digital VTR, the non-encoded pair would be out of sync
with the encoded signal. To compensate for the delay, the encoder and decoder both
contain a one video frame PCM utility delay.
1.6.2
Metadata
Metadata can be supplied to the DP571 encoder via an RS485 connection. During
Dolby E decoding, the DP572 outputs metadata on an RS485 connection. Metadata can
also be generated internally in the DP571.
1.6.3
Timecode
SMPTE Linear Time Code (LTC) can be applied to the unbalanced BNC connector on
the DP571, and can be recovered during decoding from the unbalanced BNC connector
on the DP572. Both connectors are marked LTC. The time code data is carried as part
of the Dolby E bitstream.
1.6.4
Video Reference
An analog composite video reference signal is required for Dolby E encoding and decoding.
Versions 1.05 and later support two frame rates: 29.97 Hz (NTSC) and 25 Hz (PAL).
VITC information can be extracted from the video reference signal sent to the DP571 (for
more information, see Time Code Input on page 3-9).
If the video reference signal is not present or invalid, the:
1.6.5
•
DP571 will not encode a Dolby E bitstream;
•
DP572 will stop decoding the Dolby E bitstream;
•
Dolby E output on the encoder and the PCM outputs on the decoder will be muted;
•
VRef LED will be red (if not present) or yellow (Vref unequal to frame rate).
Channel Configuration
Because neither the DP571 nor DP572 permit internal remapping of the audio channels,
the following channel configuration must be used to input a 5.1-channel signal to
the DP571:
L/R
→ Digital Inputs 1/2
C/LFE → Digital Inputs 3/4
Ls/Rs → Digital Inputs 5/6
1-15
Dolby E Multichannel Distribution System User Manual
1.7
Introduction
Configuring Jumper Settings
Although the DP571 encoder and DP572 decoder will function correctly with no internal
adjustments, five jumpers provide additional termination options. Any necessary
changes to the jumpers should be made before the units are installed.
There are 124 Ω terminations on both units for the RS-485 Metadata and Remote control
ports. The units ship with these terminations bypassed (pins 3 and 4). Refer to the table
below for additional settings.
Table 1-4 RS-485 Termination jumper settings
Connector
Tx Term On
Rx Term On
DP571 Metadata
J13, Pin 1/2
J15, Pin 1/2
DP571 Remote
J12, Pin 1/2
J14, Pin 1/2
DP572 Metadata
J15, Pin 1/2
J13, Pin 1/2
DP572 Remote
J12, Pin 1/2
J14, Pin 1/2
The only remaining terminations are accessed via the passive loop-through BNC
connectors on each unit’s rear panel. The video reference input on both units should be
terminated if the loop through is not used to feed other equipment.
The AES3-ID-1995/SMPTE276-M standard uses a 75 Ω connection and requires proper
termination. As with video, the termination should occur only at the destination of the
signal (i.e., on the inputs to a device). For the DP571, the loop-through BNC connectors
for the inputs must have terminators if they are not being used to feed other equipment.
For the DP572, the loop-through BNC for the Dolby E input must be terminated.
1-16
Dolby E Multichannel Distribution System User Manual
Chapter 2
Common Dolby E Applications
This section presents six common broadcast audio applications with configuration
instructions for the Dolby E encoder and decoder. With minor modifications to these
application settings, most common variations can be easily accommodated.
2.1
Film
The two most common types of major motion picture sound formats are two-channel
Dolby Stereo (compatible with Dolby Surround), and 5.1-channel Dolby Digital. Most
modern films are produced with a 5.1-channel soundtrack that is also compatible with
DVD and Digital TV formats. It is important to note that while not all Dolby Stereo
films have a 5.1-channel Dolby Digital soundtrack, all 5.1-channel Dolby Digital films
have a Dolby Stereo soundtrack. Including a Dolby Stereo soundtrack on Dolby Digital
films ensures that a single film print can play in theatres with or without a Dolby Digital
reproduction system.
A two-channel Dolby Surround film should use the 2 + 2 program configuration. This
allows Program 1 (the first 2 in 2 + 2) to carry the Lt/Rt audio with full dynamic range,
and Program 2 to carry either an NTSC version with a reduced dynamic range or a stereo
foreign language (SAP) version. Since Program 1 is Dolby Surround encoded, the
Dolby Srnd Mode metadata parameter should be set to Indicated. Foreign language
versions of films are also commonly produced in Dolby Stereo, so Program 2’s Dolby
Srnd Mode metadata parameter should be set to Indicated. The Metadata Params
settings Line Mode Pro and RF Mode Pro in both programs should be set to either
Film Standard or Film Light depending on the type of film being encoded. See
Section 3.2.4 - Metadata Params for more information.
Select the 2 + 2 x 1 program configuration to encode a stereo program as Program 1 and
two mono SAP channels as Programs 2 and 3. Since Program 1 is Dolby Surround
encoded, the Dolby Srnd Mode metadata parameter should be set to Indicated. Line
Mode Pro and RF Mode Pro in all three programs should be set to either Film Standard
or Film Light depending on the type of film.
Select the 5.1 + 2 program configuration for a 5.1-channel Dolby Digital film. Program 1
contains a copy of the 5.1-channel master used to create the original film. Program 2
can carry either an Lt/Rt version of the film with a reduced dynamic range for the NTSC
feed, or a stereo SAP. Since Program 2 is Dolby Surround encoded, the Dolby Srnd
Mode metadata parameter should be set to Indicated. Line Mode Pro and RF Mode
Pro in both programs should be set to either Film Standard or Film Light depending on
the type of film.
Select the 5.1 + 2 x 1 program configuration to encode a 5.1-channel program and two
mono SAP channels. Line Mode Pro and RF Mode Pro in all three programs should
be set to either Film Standard or Film Light depending on the type of film.
2-1
Dolby E Multichannel Distribution System User Manual
2.2
Common Dolby E Applications
Commercial and Interstitial
Although current commercial and interstitial material is primarily two-channel stereo,
this fast-growing broadcasting sector will almost certainly catch up to film practice,
thereby ensuring smooth transitions between commercial and feature programs. See
Section 2.1 - Film for the settings to use for two- and 5.1-channel material.
2.3
News and Local Programming
News and local programming is either two-channel stereo or two-channel mono. The
Dolby Srnd Mode metadata parameter should be set to Indicated. Programs that are
Dolby Digital encoded at the DTV station, then decoded by the consumer result in
mono programming directed to the Center channel, while stereo programming is mapped
to the L, C, R channels. During Pro Logic decoding, dialogue emanates primarily from
the Center channel in both cases. This channel placement most closely matches a 5.1channel program and provides smooth transitions between mono, stereo, and 5.1-channel
programming without operator intervention. Line Mode Pro and RF Mode Pro in both
programs should be set to either Speech or Film Light depending on the type of program.
Film Light is a good general purpose setting for programs with speech and music.
2.4
Music
Film and DVD have introduced 5.1-channel music to the general public and these both
require the 5.1 + 2 program configuration. The predominant music format, however,
remains the two-channel compact disc; use the 2 + 2 program configuration. Since music
is generally recorded at a much higher level than film audio, it may be necessary to
increase the dialnorm value (i.e., closer to 0) to apply more attenuation at the Dolby Digital
decoder. Line Mode Pro and RF Mode Pro should be set to either Music Standard
or Music Light depending on the music. See Section 3.2.4 - Metadata Params.
2.5
Live Events
Live events can require encoding techniques from each category mentioned in this
chapter. The most distinguishing feature of a live event is that, although a VTR may
record the event for later broadcast or storage, the tape cannot normally be stopped to
alter encoding parameters and then restarted. This is not an issue for postproduction but
is a serious concern for live events.
Using Presets is an excellent method of changing Program Configs during an encoding
session to match the metadata to the source material being encoded. Pick the most applicable program configuration for a specific task and store it as a Preset. During the live
event, simply recall the Presets as the encoding requirements change and all associated
metadata parameters follow automatically.
See Section 3.2.3 - Presets, Using the Status Port to Select Presets on page 3-4 and
Using the Status Port to Select Voiceover and Switched Modes on page 4-4 for more
detailed information.
2-2
Dolby E Multichannel Distribution System User Manual
2.6
Common Dolby E Applications
Postproduction
Figure 2-1 shows a typical postproduction configuration using Dolby E. The same
VRef black burst signal locks all units; an LTC signal slave-locks a digital multitrack
recorder to a digital VTR. The LTC signal is also sent to the DP571 LTC Input via the
loop-through connector on the multitrack. The DP571 and VTR have the same time code
signal to resynchronize the video and audio if they are separated.
Connect the DP571’s Main Out to channels 3/4 on the VTR. Although the Dolby E signal
could be recorded on either channel pair, using channels 1/2 for PCM stereo or Lt/Rt
allows use of the tape at facilities without a Dolby E decoder. It also allows audio reproduction from these tracks during jog and shuttle operations in which Dolby E is muted.
Connect the VTR’s output channels 3/4 to the DP572 decoder for confidence monitoring.
Headphones can be used to monitor any of the active channels. It is also possible to connect
the DP572’s Digital Outputs to a proper monitoring system to evaluate the entire mix.
Digital Multitrack Recorder
LTC In
VRef
L/R
1/2
C/LFE Ls/Rs
Lt/Rt or SAP
3/4
7/8
5/6
Digital Inputs
DP571 Dolby E Encoder
VRef
LTC In
Main
Digital VTR
Ch. 3/4
LTC Out
VRef
Ch. 3/4
Main
DP572 Dolby E Decoder
VRef
Digital Outputs
1/2
3/4
5/6
7/8
Headphones
To Monitor System
Figure 2-1 Typical Dolby E system in a postproduction facility
2-3
Dolby E Multichannel Distribution System User Manual
Chapter 3
DP571 Dolby E Encoder
3.1
Hardware Reference
This section discusses the DP571 hardware connectors. Refer to the following diagrams
while reading this chapter:
•
Figure 3-1 – block diagram of the DP571
•
Figure 3-2 – DP571 front and rear panels
VREF
Synchron.
HSYNC
Frequency Lock
Module
VSYNC
Video Reference
TC Receiver
LTC Input
AES3
Receiver
Sample Rate
Converter
AES3
Receiver
Sample Rate
Converter
Input Chan. 1/2
Auxiliary
D SP
Input Chan. 3/4
AES3
Receiver
AES3
Transmitter
Sample Rate
Converter
Dolby E
Main Out
Input Chan. 5/6
Meta Data
AES3
Receiver
Sample Rate
Converter
Input Chan. 7/8
AES3
Receiver
AES3
Transmitter
PCM Delay Input
PCM Delay Out
FPO
(LC D &LED s)
Remote
(Front)
M icrocontroller
FPI
(Switches)
Remote
(Rear)
Status
Figure 3-1 DP571 Block Diagram
3-1
3-2
Metadata
Remote
Auxiliary
Status
Model DP571
10BASE-T
Dolby E Encoder
PCM Delay
Dolby E
5.1+2
Out
In
Main Out
20bit
Video Ref
Contrast
Delete
Enter
Insert
Esc
Setup
Status
LTC In
Figure 3-2 DP571 front and back panel
Model DP571
Dolby E Encoder
Dolby Laboratories Inc.
San Francisco and U.K.
Made in U.S.A.
S/N XXXXX
Ch 1/2
4x2
Other
6x1
8x1
3x2
Fault
TC
Error
Ch 7/8
5
1
7
3
Remote
FUSE
T1A
100-240 Vac
24VA 50-60Hz
CAUTION
To reduce the risk of
fire replace only with
same type and rating
250V slow-blow fuse
WARNING: Check fuse rating before applying power.
8
4
WARNING: No user serviceable parts inside. Refer all service to qualified personnel.
6
2
Input Channel Activity
PCM Dly
Remote V Ref
Digital
Ch 5/6
Ch 3/4
Inputs
5.1+2 x 1
24 bit
5.1 + 2
5.1
Dolby E Program Config
PCM
20 bit
16 bit
Output Data
Dolby and the double-D symbol
are trademarks of Dolby Laboratories Inc.
Shift
Remote
Dolby E Multichannel Distribution System User Manual
DP571 Dolby E Encoder
Dolby E Multichannel Distribution System User Manual
3.1.1
DP571 Dolby E Encoder
Digital Inputs
A maximum of eight PCM channels can be sent to the Digital Inputs, each with a loopthrough connection.
3.1.2
Video Reference
An analog composite video reference signal is required for Dolby E encoding. Versions
1.05 and later support two frame rates: 29.97 Hz (NTSC) and 25 Hz (PAL). VITC
information can also be extracted from the video reference signal.
If the video reference signal is not present or invalid, the:
3.1.3
•
DP571 will not encode the Dolby E bitstream;
•
outputs will all be muted;
•
VRef LED will be red (Vref not present) or yellow (Vref unequal to frame rate
of Dolby E Main Output).
LTC Input
The DP571 accepts a SMPTE LTC signal. After decoding in the LTC receiver, the
resulting time code information is passed to the DSP subsystem.
3.1.4
PCM Delay Input
When sending both encoded and non-encoded channel pairs to a digital recorder, the
non-encoded pair must be delayed to remain synchronized with the encoded signal. The
encoder contains a one video frame PCM utility delay that allows the PCM input signal
to be transported in parallel with the Digital Inputs.
3.1.5
Metadata
The DP571 receives, generates, and modifies metadata information. Metadata is received
through the rear-panel input from an external source, such as an authoring system, and
embedded into the Dolby E bitstream. See Section 3.2.4 - Metadata Params for a
discussion of metadata parameters that might need to be explicitly set or checked.
3.1.6
Remote
Future versions of the DP571 will allow remote control via the front- (RS-232) or
rear-panel (RS-485) ports.
3-3
Dolby E Multichannel Distribution System User Manual
3.1.7
DP571 Dolby E Encoder
Main Out
The encoded Dolby E bitstream is output from the rear-panel Main Out connector as
an AES3 coaxial digital signal. Two connectors are available for transmission of
Dolby E data to multiple decoders or monitoring units.
Note: The two Main outputs are electrically separate, not passive loop-through
connections, so there is no need to terminate an unused output.
3.1.8
PCM Delay Out
Encoding delay is added to the PCM signal transmitted from the PCM Delay Out
connector. The DSP subsystem calculates the delay equivalent to the main channel latency
and applies it to the PCM Delay Out.
3.1.9
Status
General Purpose Input/Output (GPI/O) signals for the DP571 are available from the
Status port, a female DB-9 connector. The input and output signals are 0 – 5 V TTL.
The pin configuration is defined in the table below:
Table 3-1 DP571 Status port pin functions
Pin
Connection
Explanation
1
Preset Tally A
Preset tally output
2
Reference Video Valid
1: Valid;
0: Ref video error
3
Dolby E Encoding Valid
1: Valid;
0: Encoding error
4
System Operational
1: Functional; 0: Failed
5
Fault
1: Functional; 0: Hardware fault
6
Preset Tally B
Preset tally output
7
Preset Ctrl A
Preset control input
8
Preset Ctrl B
Preset control input
9
Ground
Using the Status Port to Select Presets
The two inputs on pins 7 and 8 select among the first three (of eight) presets stored in
the DP571. The inputs are normally high (internal pull-up) and trigger a preset recall by
sensing a momentary high-to-low transition. A momentary contact closure between
pins 7 and 9 (ground) or pins 8 and 9 is sufficient to activate a function but a held closure
also works. A low-to-high transition (i.e., a switch release) is ignored. Table 3-2
summarizes the operation of the two inputs.
3-4
Dolby E Multichannel Distribution System User Manual
DP571 Dolby E Encoder
Table 3-2 Status port preset selection
Pin 7 Transition
Pin 8 Transition
Preset
High-to-low
None or low-to-high
1
None or low-to-high
High-to-low
2
High-to-low
High-to-low
3
Presets 1 – 3 also generate corresponding outputs on the Status port that can be used to
indicate selection of a preset via the Status port, Serial Remote port (future), or the front
panel. A high level for both outputs indicates selection of a preset other than 1 – 3 (or
no preset). Table 3-2 summarizes the two outputs.
Table 3-3 Preset mode tally indication on Status port
3.1.10
Preset Tally A
Preset Tally B
Preset
Low
High
1
High
Low
2
Low
Low
3
Auxiliary
The RS-485 auxiliary port will be implemented in future versions.
3.1.11
10BASE-T
This port will be implemented in future versions.
3-5
Dolby E Multichannel Distribution System User Manual
3.2
DP571 Dolby E Encoder
DP571 Setup Mode Menu Reference
DP571 Unit Setup
Program Config
DP571 Unit Setup
Operating Mode
DP571 Unit Setup
Metadata Params
DP571 Unit Setup
Presets
DP571 Unit Setup
System Settings
DP571 Unit Setup
Firmware Upgrade
Figure 3-3 DP571 Unit Setup menus
This is the top level of the DP571 menu hierarchy for editable parameters. Each menu
is discussed in its own section and displayed with all submenus and values.
Conventions
In the menu diagrams, the arrow keys select among menus at the same hierarchical level
and settings within a menu category. Although selection between menus and settings is
indicated in the diagrams by horizontal and vertical arrows, respectively, this is a
graphical convention only. The ↓ → keys both go to the next menu or setting; the
↑ ← keys both return to the previous menu or setting. A double-headed arrow in the
diagrams indicates that an arrow key can select between the two settings or menus.
The Esc and Enter keys ascend and descend, respectively, one menu level. They are
labeled in the menu diagrams and appear as single-headed arrows; down for Enter and
up for Esc.
3-6
Dolby E Multichannel Distribution System User Manual
3.2.1
Program Config
Enter
DP571 Unit Setup
Program Config
Esc
Program Config
5.1 + 2 x 1
Program Config
5.1 + 2
Program Config
4x1
Program Config
2+2x1
Program Config
2+2
Program Config
4
Program Config
6x1
Program Config
2+4x1
Program Config
2x2+2x1
Program Config
3x2
Program Config
4+2x1
Program Config
4+2
Program Config
5.1
Program Config
8x1
Program Config
2+6x1
Program Config
2x2+4x1
Program Config
3x2+2x1
Program Config
4x2
Program Config
4+4x1
Program Config
4+2+2x1
Program Config
4+2x2
Program Config
4+4
Figure 3-4 Program Config menu
Selecting a Program Config assigns all metadata values that best fit the most common
use of that configuration. Although the metadata values can be modified, it is unlikely
the user will need to do so. See Section 3.2.4 - Metadata Params for a discussion of the
values that may need to be changed.
Notational Conventions
The + symbol separates programs within a configuration. For example, 5.1 + 2 represents
one 5.1-channel and one stereo program. The x symbol shows the number of a given
channel format within that configuration. For example, 4 x 2 represents four two-channel
programs. One configuration has three different formats: 4 + 2 + 2 x 1 is one four-channel,
one two-channel, and two mono programs.
Encoding Considerations
It is important to distinguish between configurations with the same number of channels
but different program formats, such as 8 x 1 and 4 x 2. Although both configurations
encode eight channels, 8 x 1 uses eight metadata streams while 4 x 2 uses two. Increasing
the number of programs with independent metadata streams decreases the number of
encode/decode generations possible without audible degradation.
3-7
Dolby E Multichannel Distribution System User Manual
DP571 Dolby E Encoder
Table 3-4 DP571 Program Configurations
Program
Config
Program and Channel Explanation
5.1 + 2 x 1
One 5.1-channel and two mono programs. May be used for a
5.1-channel and two mono SAPs.
5.1 + 2
One 5.1-channel and one stereo program. One of the most
common configs. Two channel could be stereo, Dolby Surround
(Lt/Rt), or even stereo SAP.
4x1
Four mono programs
2+2x1
One stereo and two mono programs
2+2
Two stereo programs
4
One four-channel program (LCRS)
6x1
Six mono programs
2+4x1
One stereo and four mono programs
2x2+2x1
Two stereo and two mono programs
3x2
Three stereo programs
4+2x1
One four-channel and two mono programs
4+2
One four-channel program and one two-channel program (i.e.,
L, C, R, S and Lt/Rt for archiving Dolby Surround soundtracks)
5.1
One 5.1-channel program
8x1
Eight mono programs
2+6x1
One stereo and six mono programs
2x2+4x1
Two stereo and four mono programs
3x2+2x1
Three stereo and two mono programs
4x2
Four stereo programs
4+4x1
One four-channel and four mono programs
4+2+2x1
One four-channel, one stereo, and two mono programs
4+2x2
One four-channel and two stereo programs
4+4
Two four-channel programs
3-8
Dolby E Multichannel Distribution System User Manual
3.2.2
Operating Mode
Enter
Operating Mode
Time Code Input
Enter
DP571 Dolby E Encoder
Esc
Operating Mode
Metadata Revert
Enter
Esc
Operating Mode
Metadata Source
Enter
Esc
DP571 Unit Setup
Operating Mode
Operating Mode
AC-3 Metadata
Enter
Esc
Esc
Operating Mode
48kHz Pull Down
Enter
Esc
Operating Mode
Frame Rate
Enter
Esc
Operating Mode
Bit Depth
Enter
Esc
Time Code Input
LTC
Metadata Revert
Last Used
Metadata Source
Internal
AC-3 Metadata
Disable
48kHz Pull Down
Disable
Frame Rate
29.97 fps
Bit Depth
20-bit
Time Code Input
VITC
Metadata Revert
Adaptive
Metadata Source
Ext Override
AC-3 Metadata
Enable
48kHz Pull Down
Enable
Frame Rate
25 fps
Bit Depth
16-bit
Metadata Revert
Stop Encoding
Metadata Source
External
Metadata Revert
Preset
Figure 3-5 Operating Mode menu
Time Code Input
This parameter controls where the DP571 derives its time code information.
LTC:
LTC In connector supplies time code.
VITC:
Vertical Interval Time Code is derived from the Video Ref In
connector.
Metadata Revert
This parameter determines what happens if the external metadata source is interrupted.
These settings are only active if the Metadata Source is set to External or Ext Override.
Stop Encoding: Stops encoding and displays error status on front-panel Error LED.
Most likely useful only in postproduction.
Last Used:
Continues encoding using the last values set by the external source.
Preset:
If any metadata parameters are missing, the Program Config selected
in Metadata Params: Reversion Preset is used but no Dolby Digital
metadata is included in the Dolby E bitstream. See Section 3.2.4 Metadata Params.
Adaptive:
Behaves like Last Used if the metadata disappears completely.
Behaves like Preset if any metadata parameters are missing.
3-9
Dolby E Multichannel Distribution System User Manual
DP571 Dolby E Encoder
Metadata Source
Internal:
Assigns factory default metadata values based on each Program
within a Program Config; these values can still be modified
(see Section 3.2.4 - Metadata Params).
Ext Override: Allows local modification of the external source’s metadata values.
External:
Uses the external source’s Metadata without permitting local modification.
AC-3 Metadata
Disable:
Does not include Dolby Digital metadata in the encoded Dolby E stream.
Useful only if the decoded audio will never be Dolby Digital encoded.
Enable:
This is the default setting that includes metadata in the Dolby E stream.
48kHz Pull Down
Disable:
Default value appropriate for most common VTRs.
Enable:
Allows a DP571 encoder to be used with a 30 Hz VTR operating at
29.97 Hz. The < in the display below reflects that 48 kHz Pull Down
is enabled.
Dolby E
5.1 + 2
<
20bit
Frame Rate
Version 1.05 and later allows selection between two frame rates: 29.97 fps (NTSC) and
25 fps (PAL). Versions prior to 1.05 offer only 29.97 fps.
The Vref input rate must match the selected frame rate. For example, if the incoming
Vref signal is 29.97 Hz/NTSC/black burst, the frame rate must be 29.97 fps, otherwise
the Vref LED turns from green to yellow and encoding is disrupted.
The DP572 does not have a frame rate setting. The Vref input rate must match the frame
rate of the incoming encoded stream to be properly decoded. For example, a DP572 that
receives a 29.97 Hz Vref input will only decode a Dolby E stream encoded at 29.97 fps,
otherwise the Vref LED turns from green to yellow and decoding is disrupted.
29.97 fps:
Default value for Dolby E output used with NTSC equipment.
25 fps:
For Dolby E output used with PAL equipment.
3-10
Dolby E Multichannel Distribution System User Manual
DP571 Dolby E Encoder
Bit Depth
Version 1.05 and later of the DP571/572 can encode/decode both 16- and 20-bit
Dolby E bitstreams. Versions prior to 1.05 offer only 20-bit operation and future
versions will offer 24-bit operation. The 16-bit feature allows Dolby E to be used
with 16-bit recording devices.
The DP572 automatically responds to the encoded input signal’s bit depth and inaudibly
switches to decode the correct Dolby E stream. The bit depth of the current input stream
is denoted by the Input Data LEDs.
Note: This only affects the space the Dolby E bitstream occupies in the main AES
output and not the resolution of the encoded or decoded PCM audio.
A16-bit/48 kHz AES channel has a data rate of 1.5 Mbps, which is 400 kbps less than
a 20-bit/48 kHz channel. To compensate for this lower data rate and maintain the highest
audio quality over the maximum number of encode/decode generations, only six audio
channels can be encoded in 16-bit mode. As the decoder automatically switches from
16- to 20-bit decoding in response to the input stream, it seamlessly enables decoding
the two additional channels.
Selecting 16-bit mode is possible only if the current Program Config uses no more than
six channels. For example, while the 5.1 + 2 Program Config is selected, 16-bit mode
is not visible and cannot be selected. Change the Program Config to anything with six
channels or less and 16-bit mode can be selected. When 16-bit mode is selected, Program
Configs with more than six channels are not available nor are they displayed in the
Program Config menu.
Current postproduction practice stores Dolby E in the 20-bit format for both High
Definition (HD) and Standard Definition (SD) programming. This allows storing a 5.1channel mix along with a two-channel foreign language version of the same program on
one AES pair of channels on a VTR (usually channels 3 and 4). Channels 1 and 2 normally
carry a Dolby Surround or stereo version of the same program. This convention makes
the tape useful when the multichannel version is not required or cannot be decoded.
When recording Dolby E onto a digital VTR, certain parameters must be adjusted to
identify the signal as data instead of audio. Both the Sony HDCAM and Panasonic HDD5 have menu settings that switch the audio tracks to DATA MODE. The Sony Digital
Betacam is automatically in DATA MODE, but may require adjustment to the following
parameters to optimize performance: Edit Mode (butt-splice only), Crossfade (Off or 0
ms), and Error Correct (Correct, not Conceal).
Note: If this tape was played back through a plant capable of passing only 16-bit audio,
the Dolby E track would be truncated and the tape rendered useless.
20-bit: Default value allows Dolby E encoding of up to eight channels into a
1.9 Mbps AES pair.
16-bit: Allows Dolby E encoding of up to six channels into a 1.5 Mbps AES pair.
3-11
Dolby E Multichannel Distribution System User Manual
3.2.3
DP571 Dolby E Encoder
Presets
Enter
DP571 Unit Setup
Presets
Presets
Save Preset
Enter
Up/Down arrow keys
select presets 1-8.
Presets
Recall Preset
Enter
Esc
Recall Preset
01 Preset 1
Save Preset
1
Enter
Left/right arrow keys
move to next letter in
preset name.
Up/Down arrow
keys select letters
and numbers.
Esc
Esc
Arrow keys select presets 1-8.
Names assigned in Save Preset
appear to the right of the number.
Enter
Esc
Top level
Status Menu
Enter Name
Preset 1
Enter
Enter
Save Settings?
Esc ENTER=Yes ESC=No
Figure 3-6 Presets menu
A Preset represents all settings and values in the DP571. Presets are useful when an encoding task requires manual parameter setting beyond selecting a Program Config. Rather
than repeating the steps for each encoding session, save the proper settings as a named
Preset that can be recalled when needed.
This menu controls saving, naming, and recalling the DP571’s eight presets. Presets have
default names PRESET N where N is between 1 and 8. In the Enter Name menu, the
← → keys move to the previous/next letter in the name and the ↓ ↑ keys change to the
next/previous alphanumeric character. Each named preset retains a numerical component
to its name that can be seen when recalling the preset (i.e., 01 SampleName). Names can
have a maximum of 12 characters.
3-12
Dolby E Multichannel Distribution System User Manual
3.2.4
DP571 Dolby E Encoder
Metadata Params
The Metadata Params affect Dolby Digital decoding, not Dolby E encoding or decoding.
Enter Metadata Params Esc
Program 1
Program 1
Channel Mode
Program 1
Bitstream Mode
Enter
Esc
Enter
Esc
Program 1
Center Dwnmx Lev
Enter
Esc
Bitstream Mode
Main Complete
Bitstream Mode
Assc Voice Over
Channel Mode
2/0 Stereo
Channel Mode
1/0 Mono
Center Dwnmx Lev
0.707 (-3.0 dB)
Bitstream Mode
Assc Commentary
Bitstream Mode
Assc Emergency
Channel Mode
2/2
Channel Mode
3/2
Center Dwnmx Lev
0.596 (-4.5 dB)
Bitstream Mode
Assc Dialogue
Bitstream Mode
Assc Hear Imp
Channel Mode
3/1
Channel Mode
2/1
Bitstream Mode
Main M&E
Bitstream Mode
Assc Visual Imp
Channel Mode
3/0
Enter
Enter
Esc
LFE Channel
Disable
LFE Channel
Enable
Enter
Esc
Dolby Srnd Mode
Not Dolby Srnd
Dolby Srnd Mode
Not Indicated
Enter
Esc
DC Filter
Disable
DC Filter
Enable
Enter
Esc
RF Overmd Protect
Disable
RF Overmd Protect
Enable
Esc
Lowpass Filter
Enable
Srnd Phase Shift
Disable
Esc
Enter
Range: 80 - 111 dB
Program 1
Original Bitstrm
Original Bitstrm
Yes
Program 1
Room Type
Program 1
Copyright
Enter
Esc
Original Bitstrm
No
Enter
Esc
Copyright
Yes
Copyright
No
Esc
Room Type
Not Indicated
Room Type
Large
Program 1
RF Mode Pro
Enter
Program 1
Line Mode Pro
Esc
Esc
Mixing Level
85 dB
Audio Prod Info
Yes
Range: -1 to -31 dB
Enter
Srnd 3dB Atten
Disable
Program 1
Mixing Level
Esc
Audio Prod Info
No
Esc
Srnd 3dB Atten
Enable
Program 1
Audio Prod Info
Dialogue Level
-27 dB
Lowpass Filter
Disable
Program 1
Srnd 3dB Atten
Enter
Esc
Srnd Phase Shift
Enable
Program 1
Dialogue Level
Enter
LFE Lowpass Filt
Disable
Program 1
Srnd Phase Shift
Program 1
RF Overmd Protect
Enter
Enter
Esc
LFE Lowpass Filt
Enable
Srnd Dwnmx Lev
0 (-999 dB)
Program 1
Lowpass Filter
Program 1
LFE Lowpass Filt
Program 1
DC Filter
Esc
Srnd Dwnmx Lev
0.707 (-3.0 dB)
Srnd Dwnmx Lev
0.500 (-6.0 dB)
Dolby Srnd Mode
Dolby Srnd
Enter
Program 1
Srnd Dwnmx Lev
Program 1
Dolby Srnd Mode
Program 1
LFE Channel
Center Dwnmx Lev
0.500 (-6.0 dB)
Enter
Esc
RF Mode Pro
Film Standard
RF Mode Pro
None
Line Mode Pro
Film Standard
Line Mode Pro
None
RF Mode Pro
Speech
RF Mode Pro
Music Light
Line Mode Pro
Speech
Line Mode Pro
Music Light
RF Mode Pro
Music Standard
RF Mode Pro
Film Light
Line Mode Pro
Music Standard
Line Mode Pro
Film Light
Figure 3-7 Metadata Params menu
3-13
Room Type
Small
Dolby E Multichannel Distribution System User Manual
DP571 Dolby E Encoder
Reversion Preset
Metadata Params
Program 1-N
Metadata Params
Reversion Preset
Enter
Esc
Reversion Preset
Program Config
Enter
Esc
See the Program Config section for possible settings.
Figure 3-8 Reversion Preset menu
Reversion Preset specifies a Program Config to use in case an external metadata source is
interrupted. See Metadata Revert on page 9 for more information on this feature.
Channel Mode
1/0 Mono: Single front channel, no surround channels. For a two-channel system, the
signal is reproduced equally from both channels attenuated 3 dB. For a
5.1-channel system, the signal is reproduced from the center channel
(L, R, LS, RS channels are not used).
2/0 Stereo: Left and right channels, no center or surround channels. For a two-channel
system, the signal is reproduced equally from the L, R channels. For a 5.1channel system, the signal can either be reproduced from only the L, R
channels or, optionally, from L, C, R, S (see Dolby Srnd Mode).
3/0:
Left, center, and right channels, no surround channels. For a two-channel
system, the L, R signal is reproduced equally from the L, R channels; the
center channel is attenuated 3 dB and sent to the L, R channels. For a 5.1channel system, the signal is reproduced by the L, C, R channels.
2/1:
Left, right, and surround channels. For a two-channel system, the L, R signal
is reproduced equally from the L, R channels; the surround channel is
attenuated 3 dB and sent to the L, R channels. For a 5.1-channel system, the
signal is reproduced by the L, R, S channels. This is an extremely uncommon format.
3/1:
Left, center, right, and surround channels. For a two-channel system, the
L, R signal is reproduced equally from the L, R channels; the center and
surround channels are attenuated 3 dB and sent to the L, R channels. For
a 5.1-channel system, the signal is reproduced by the L, C, R, S channels.
2/2:
Left, right, left surround, and right surround channels. For a two-channel
system, the L, R signal is reproduced equally from L, R channels; the Ls, Rs
channels are attenuated 3 dB and sent to the L, R channels, respectively.
For a 5.1-channel system, the signal is reproduced by the L, R, Ls, Rs
channels. This format is sometimes called quad.
3/2:
Left, center, right, left surround, and right surround channels. For a twochannel system, the L, R signal is reproduced equally from the L, R
channels. The center channel is attenuated 3 dB and sent to the L, R channels.
The Ls, Rs channels are attenuated 3 dB and sent to the L, R channels,
respectively. For a 5.1-channel system, the signal is reproduced by the
L, C, R, Ls, Rs channels.
3-14
Dolby E Multichannel Distribution System User Manual
DP571 Dolby E Encoder
Dolby Srnd Mode
Dolby Srnd:
Indicates to the decoder that a two-channel signal is a Dolby Surround
(Lt/Rt) program. Can activate Dolby Pro Logic decoding in a 5.1channel Dolby Digital decoder.
Not Dolby Srnd: Indicates to the decoder that a two-channel signal is not a Dolby
Surround Pro Logic (Lt/Rt) program.
Not Indicated:
Indicates to the decoder that a two-channel signal may or may not be
a Dolby Surround (Lt/Rt) program.
Dialogue Level
Adjusts the dialnorm metadata parameter between -31 (decoder applies no attenuation)
to -1 (30 dB attenuation).
Line Mode Pro
Line Mode Pro(file) sets the dynrng metadata parameter to one of five presets.
None:
No dynamic range compression is applied unless downmixing
could cause overload, in which case protection dynrng is automatically applied.
Speech:
Appropriate for programs with predominantly dialogue.
Music Light:
Applies light compression to music that is already compressed and
does not require excessive dynamic range restriction.
Music Standard: Applies more compression to music that is not compressed and
requires dynamic range restriction.
Film Light:
Applies light compression to a subjectively quiet film that does not
require excessive dynamic range restriction.
Film Standard:
Applies more compression to a subjectively loud film that requires
dynamic range restriction.
RF Mode Pro
RF Mode Pro(file) sets the compr metadata parameter to presets with the same names
as Line Mode Pro, but each setting is 11 dB more sensitive to avoid overloading the RF
input of a television.
3-15
Dolby E Multichannel Distribution System User Manual
3.2.5
DP571 Dolby E Encoder
System Settings
Enter
DP571 Unit Setup
System Settings
System Settings
Remote Baud Rate
Enter
Esc
System Settings
Unit Address
Enter
Esc
System Settings
Unit Name
Enter
Esc
Unit Name
Dolby E Encoder
Unit Address
8280
Remote Baud Rate
9.6 kbps
Esc
Remote Baud Rate
38.4 kbps
Remote Baud Rate
19.2 kbps
Figure 3-9 System Settings menu
Remote control functions are not yet available for the initial Dolby E product release,
so this menu is useful only during firmware upgrades (see the next section).
3.2.6
Firmware Upgrade
DP571 Unit Setup
Firmware Upgrade
Enter
Esc
Firmware Upgrade
ENTER=Yes ESC=No
Figure 3-10 Firmware Upgrade menu
The firmware in the DP571 can be upgraded via the Remote Serial port. See the documentation that accompanies the upgrade kit.
3.3
DP571 Status Mode Menu
Access the Status mode menus by pressing Shift + Setup. These menus simply display
the device’s current status and are not used to set values. Use the Setup mode menus to
set new values.
Dolby E
5.1+2
20bit
Ext Metadata In
ENTER to View
Video Ref
29.97 fps
Timecode LTC
00:00:00:00 fps
Error Stats
ENTER to View
PCM Delay
No Input
Figure 3-11 DP571 status menus
3-16
Metadata
Internal
L
Firmware Version
1.00
Dolby E Multichannel Distribution System User Manual
Chapter 4
DP572 Dolby E Decoder
4.1
Hardware Reference
This section discusses the DP572 hardware connectors. Refer to the following diagrams
while reading this chapter:
•
Figure 4-1 – block diagram of the DP572
•
Figure 4-2 – DP572 front and rear panels
Time code data
LTC
TC Generator
Metadata
SYNC
Status
LCD Interface
Front Panel
Interface
Status Information
Metadata
with
Metering
Control
Microcontroller Commands
Dolby E LTC Out
Video
Sync
Ref Video In
VSYNC
SRC
AES TX
Remote Serial (rear)
Channel 1-2
DSP1
SRC
Remote Serial (front)
Ethernet
Dolby E
bitstream
Metadata and Control
AES RX
AES TX
PCM
Demultiplex
DSP2
Channel 3-4
SRC
AES TX
Channel 5-6
Main Input
SRC
AES TX
auxiliary
Channel 7-8
AES RX
AES TX
PCM Delay
Input
PCM Delay
Output
Stereo
DAC
Figure 4-1 DP572 block diagram
4-1
Headphone
Output
4-2
Metadata
Remote
Auxiliary
Status
Model DP572
10BASE-T
Dolby E Decoder
PCM
Dolby E
5.1+2
Dly
Out
In
Main In
20bit
Video Ref
Shift
Contrast
Delete
Enter
Insert
Esc
Setup
Status
LTC Out
Model DP572
Dolby E Decoder
Dolby Laboratories Inc.
San Francisco and U.K.
Made in U.S.A.
S/N XXXXX
Ch 1/2
PCM
24 bit
20 bit
16 bit
Input Data
Dolby and the double-D symbol
are trademarks of Dolby Laboratories Inc.
Remote
Other
6x1
8x1
3x2
Error
5
1
Figure 4-2 DP572 front and rear panels
7
3
Remote
CAUTION
To reduce the risk of
fire replace only with
same type and rating
250V slow-blow fuse
100-240 Vac
24VA 50-60Hz
FUSE
T1A
WARNING: Check fuse rating before applying power.
8
4
WARNING: No user serviceable parts inside. Refer all service to qualified personnel.
6
2
Output Channel Activity
Ch 7/8
Remote V Ref
Fault
Main PCM In
Digital
Ch 5/6
Ch 3/4
Outputs
4x2
5.1+2 x 1
5.1 + 2
5.1
Dolby E Program Config
Dolby E Multichannel Distribution System User Manual
DP572 Dolby E Decoder
Dolby E Multichannel Distribution System User Manual
4.1.1
DP572 Dolby E Decoder
Main In
A Dolby E encoded signal is applied to Main In, sent to an AES3 receiver, then passed
to the DSP subsystem for decoding. A PCM signal can also be input to Main In and
passed directly to Digital Outputs 1/2. The DP572 automatically detects whether the
Main In signal is Dolby E or PCM.
4.1.2
Video Reference
An analog composite video reference signal is required for Dolby E decoding. Versions
1.05 and later support two frame rates: 29.97 Hz (NTSC) and 25 Hz (PAL).
If the video reference signal is not present or invalid, the:
4.1.3
•
DP572 will stop decoding the Dolby E bitstream;
•
PCM outputs on the decoder will be muted;
•
VRef LED will be red (Vref not present) or yellow (Vref unequal to frame rate
of Dolby E Main Input).
PCM Input
A separate PCM signal can be applied to the PCM Input and transported in parallel with
the Main In signal. A delay equal to the main channel latency is added to the PCM signal.
4.1.4
Remote
Future versions of the DP572 will permit remote control through the front- (RS-232)
or rear-panel (RS-485) remote ports.
4.1.5
Auxiliary
The RS-485 auxiliary port will be implemented in future versions.
4.1.6
10BASE-T
This port will be implemented in future versions.
4.1.7
Metadata
Dolby Digital metadata is extracted from the Dolby E bitstream and sent out the metadata
port. This port can be connected to the DP569 Dolby Digital Multichannel Encoder
(software must be version 1.21 or later).
4-3
Dolby E Multichannel Distribution System User Manual
4.1.8
DP572 Dolby E Decoder
Status
General Purpose Input/Output (GPI/O) signals for the DP572 are available from the
Status port, a female DB-9 connector. The input and output signals are 0 – 5 V TTL.
Table 4-1 defines the pin configuration.
Table 4-1 DP572 Status Port Pin Functions
Pin
Direction
Connection
Explanation
1
Output
Dolby E Detect
1: Dolby E;
0: PCM or none
2
Output
Reference Video Valid
1: Valid;
0: Ref video error
3
Output
Dolby E Decoding Valid
1: Valid;
0: Decoding error
4
Output
System Operational
1: Functional; 0: Failed
5
Output
Fault
1: Functional; 0: Hardware fault
6
Output
Reserved
7
Input
PCM channel routing
Voiceover and Switched mode
8
Input
PCM channel routing
Voiceover and Switched mode
9
N/A
Ground
Using the Status Port to Select Voiceover and Switched Modes
The PCM Input channel routing can be changed via the Status port between Voiceover
and Switched Out modes, which are generally used when Dolby E is part of a distribution
system without a VTR (i.e., a network feed to an affiliate).
•
Voiceover mode mixes the PCM input over the main program audio.
•
Switched Out mode replaces the main program audio with the PCM input.
These modes can be controlled from the front panel, serial remote, or Status port. See
“Output Routing” on page 8. for a complete explanation of other PCM Chan Config
Output Routing modes not accessible to change via the Status port.
4-4
Dolby E Multichannel Distribution System User Manual
DP572 Dolby E Decoder
The state of the pins is normally high (internal pull up), and they detect a high-to-low
transition. A held contact closure between pins 7 and 9 (ground) or pins 8 and 9 is
required to activate a function. A low-to-high transition (i.e., a switch release) restores
the External Standby setting. Table 4-2 shows the function of the two GPI pins on
the DP572.
Table 4-2 Status port output routing mode selection
4.1.9
Ctrl in pin 8
Ctrl in pin 7
PCM Chan Config
Output Routing Mode
High
High
External Standby
High
Low
Voiceover
Low
High
Switched Out
Low
Low
Reserved
Digital Outputs
A maximum of eight channels of decoded audio are supplied on the four AES3 outputs.
A second electrically isolated output is supplied for each channel pair.
Note: The digital outputs are electrically separate, not passive loop-through connections,
so there is no need to terminate an unused output.
4.1.10
PCM Delay Output
Encoding delay is added to the PCM signal which is then transmitted from the PCM
Delay Out connector. The DSP subsystem calculates the delay equivalent to the main
channel latency and applies it to the PCM Delay Out. If PCM bypass mode is enabled,
the delay matches that of the bypass channel.
4.1.11
LTC Output
After de-multiplexing timecode information from the Dolby E stream, the DP572
provides a standard SMPTE LTC signal.
4-5
Dolby E Multichannel Distribution System User Manual
4.2
DP572 Dolby E Decoder
DP572 Setup Mode Menu Reference
This is the top level of the DP572 menu hierarchy for editable parameters. Each menu
is discussed in its own section and displayed with all submenus and values.
DP572 Unit Setup
Operating Mode
DP572 Unit Setup
PCM Chan Config
DP572 Unit Setup
Headphone Prog
DP572 Unit Setup
Headphone Map
DP572 Unit Setup
System Settings
DP572 Unit Setup
Firmware Upgrade
Figure 4-3 DP572 Unit Setup menu
Conventions
In the menu diagrams, the arrow keys select among menus at the same hierarchical level
and settings within a menu category. Although selection between menus and settings is
indicated in the diagrams by horizontal and vertical arrows, respectively, this is a graphical convention only. The ↓ → keys both go to the next menu or setting; the ↑ ← keys
both return to the previous menu or setting. A double-headed arrow in the diagrams indicates that an arrow key can select between the two settings or menus.
The Esc and Enter keys ascend and descend, respectively, one menu level. They are
labeled in the menu diagrams and appear as single-headed arrows; down for Enter and
up for Esc.
4-6
Dolby E Multichannel Distribution System User Manual
4.2.1
DP572 Dolby E Decoder
Operating Mode
Enter
Operating Mode
Program Play
Enter
Esc
Operating Mode
48kHz Pull Down
Enter
Esc
DP572 Unit Setup
Operating Mode
Operating Mode
PCM Bypass
Enter
Esc
Esc
Operating Mode
Bypass Metadata
Enter
Esc
Operating Mode
Bypass Latency
Enter
Esc
Program Play
Disable
48kHz Pull Down
Disable
PCM Bypass
Disable
Bypass Metadata
Disable
Bypass Latency
1 Frame
Program Play
Enable
48kHz Pull Down
Enable
PCM Bypass
Enable
Bypass Metadata
Enable
Bypass Latency
Minimal
Figure 4-4 Operating Mode menu
Program Play
Enable:
Allows the input to Main In to vary from the nominal 48 kHz sample rate.
Permits the decoder to operate with a VTR in Program Play mode. As the
sample rate varies from 48 kHz, the decoding latency is no longer exactly
one video frame. The P in the display below reflects that Program Play is
enabled.
Dolby E
5.1 + 2
Disable:
P
20bit
The sample rate of the Main In input must be 48 kHz for the DP572 to decode.
48 kHz Pull Down
See 48kHz Pull Down on page 3-10.
PCM Bypass
Enable:
Allows smooth transitions between decoded Dolby E and PCM audio.
Disable: Audio outputs are muted until a valid Dolby E stream is received at the
Main In input. This is useful when editing on a VTR while decoding with
the DP572.
Bypass Metadata
This feature is only relevant if PCM Bypass mode is enabled.
Disable:
While the DP572 receives PCM input, no metadata is output.
Enable:
While the DP572 receives PCM input, a default set of metadata parameters
more appropriate for two-channel audio is sent instead of the Dolby E
stream’s metadata.
4-7
Dolby E Multichannel Distribution System User Manual
DP572 Dolby E Decoder
Bypass Latency
This feature is only relevant if PCM Bypass mode is enabled.
1 Frame: Maintains a one-frame delay.
Minimal: The PCM Bypass audio undergoes the minimum propagation delay from
Main In to PCM Out.
4.2.2
PCM Chan Config
Enter
PCM Chan Config
Output Routing
Enter
Esc
DP572 Unit Setup
PCM Chan Config
PCM Chan Config
Voiceover Mode
Enter
Esc
Voiceover Mode
Mono
Output Routing
External Ctrl
Esc
PCM Chan Config
Voiceover Atten
PCM Chan Config
Delay SRC
Enter
Enter
Esc
Voiceover Atten
-10 dB
Esc
Delay SRC
Normal
Range: -6 to -31 dB
Voiceover Mode
Stereo
Output Routing
Switched Out
Delay SRC
Bypass
Output Routing
Voiceover
Output Routing
Delay Out
Figure 4-5 PCM Chan Config menu
Output Routing
Switched Out: Replaces the Program 1 audio with the PCM input. The PCM Dly
Output is muted. Switching is accomplished with a smooth crossfade.
Main In can be PCM or Dolby E.
Voiceover:
Mixes the Program 1 audio with the PCM input. The PCM Dly Output
is muted. Main In must be Dolby E for Voiceover to function properly.
Delay Out:
Matches the decoding latency of the Main In signal path. This is used
when the decoder is connected to a VTR to synchronize Dolby E encoded audio with non-encoded PCM audio. This is the default setting.
External Ctrl: Puts the DP572 in a standby state waiting for commands from the
Status port.
4-8
Dolby E Multichannel Distribution System User Manual
DP572 Dolby E Decoder
Voiceover Mode
Selects Mono or Stereo for Voiceover PCM input. Mono adds PCM Input Channels 1
and 2 and attenuates 6 dB.
Note: Voiceover and Switched Out modes can be selected via the Status port.
See Section 4.1.8 - Status.
Voiceover Atten
Applies 0 to -31 dB attenuation to the main Dolby E program. At 0 dB attenuation,
overload can occur if the main Dolby E program and Voiceover audio both reach
0 dBFS.
Delay SRC
The Delay Sample Rate Converter setting is only relevant if the Output Routing mode
is Delay Out.
Bypass:
Does not send the PCM input through a sample rate converter.
Normal: Passes the PCM input through a sample rate converter.
4.2.3
Headphone Prog
Enter
Headphone Prog
Program 1
DP572 Unit Setup
Headphone Prog
Esc
Headphone Prog
Program 2
Headphone Prog
PCM Delay
Range: Program 1 to Program N
where N = number of programs
in Program Config
Figure 4-6 Headphone Prog menu
The front panel of the DP572 Dolby E decoder includes a stereo headphone output from
a ¼-inch female connector. This menu selects the headphone signal source from the four
pairs of rear-panel channel outputs: 1/2, 3/4, 5/6, 7/8, and PCM Delay. The selectable
pairs depend on the active Program Config. For example, channel pair 7/8 can not be
monitored in a format with only six channels. Change the headphone volume by pressing
Shift + Enter (the headphone icon is below the Enter key) and using the arrow keys.
Program 1–N
Selects the Program within the Program Config to monitor through the headphone output.
The Headphone Map menu (see below) contains the allowable channel-to-headphone
mappings for that Program.
4-9
Dolby E Multichannel Distribution System User Manual
DP572 Dolby E Decoder
PCM Delay
Selects the PCM Input channel for headphone monitoring.
4.2.4
Headphone Map
Enter
Headphone Map
L=L R=R
DP572 Unit Setup
Headphone Map
Headphone Map
L=Ls R=Rs
Esc
Headphone Map
L=LFE R=LFE
Headphone Map
L=C R=C
The mappings above are for a 5.1-channel configuration
Mappings for a four-channel configuration are: L=L R=R, L=C R=C, L=S R=S
Mapping for a two-channel configuration is:
L=L R=R
Mapping for a single-channel configuration is: L=C R=C
Figure 4-7 Headphone Map menu
This menu provides the allowable channel-to-headphone mappings based on the Program
selected in the Headphone Prog menu.
4.2.5
System Settings
Enter
System Settings
Unit Address
Enter
Esc
Unit Address
8280
DP572 Unit Setup
System Settings
System Settings
Unit Name
Enter
Esc
Unit Name
Dolby E Encoder
Esc
System Settings
Remote Baud Rate
Enter
Esc
Remote Baud Rate
9.6 kbps
Remote Baud Rate
38.4 kbps
Remote Baud Rate
19.2 kbps
Figure 4-8 System Settings menu
Remote control functions are not yet available for the initial Dolby E product release,
so this menu is useful only during firmware upgrades (see the next section).
4-10
Dolby E Multichannel Distribution System User Manual
4.2.6
DP572 Dolby E Decoder
Firmware Upgrade
DP572 Unit Setup
Firmware Upgrade
Enter
Esc
Firmware Upgrade
ENTER=Yes ESC=No
Figure 4-9 Firmware Upgrade menu
The firmware in the DP572 can be upgraded via the Remote Serial port. See the documentation that accompanies the upgrade kit.
4.3
DP572 Status Mode Menu
Access the Status mode menus by pressing Shift + Setup. These menus simply display
the device’s current status and are not used to set values. Use the Setup mode menus to
set new values.
PCM Main
48 kHz
Video Ref
29.97 fps
Frame Rate In
29.97 fps
PCM Channel
No Input
D
Timecode In
00:00:00:00 fps
Metadata In
ENTER to View
Error Stats
ENTER to View
Firmware Version
1.00
Figure 4-10 DP572 status menus
4-11
Dolby E Multichannel Distribution System User Manual
Chapter 5
System Specifications
Audio Encoding Method
Dolby E
Frequency Response
20 Hz – 20 kHz ±0.25 dB
Distortion
< 0.01% at 1 kHz; < 0.02%, 20 Hz – 20 kHz
Dynamic Range
> 110 dB
Sampling Rate
48 kHz
Video Frame Rate
29.97 Hz (NTSC); 25 Hz (PAL)
Encoding Delay
1 video frame (fixed)
Output Data Width
20-bit (8 channels); 16-bit (6 channels)
Dolby E Configurations
User Selectable: 5.1/5.1+2/5.1+1+1/4x2/3x2/8x1/6x1/Other
Dolby E Concatenations
10 encode/decode concatenations (minimum)
PCM Delay
Same as Dolby E encoding delay (1 video frame)
Digital Audio I/O
Four BNC female connectors, AES-3ID-1995/SMPTE 276M
Dolby E I/O
Two BNC female connectors, AES-3ID-1995/SMPTE 276M
PCM Delay I/O
Two BNC female connectors, AES-3ID-1995/SMPTE 276M
LTC I/O
BNC female connector
Remote Port
RS-232, 8-pin female mini DIN on the front panel
RS-485, 9-pin female D on the rear panel
Status Port
TTL levels, 9-pin female D on the rear panel
Auxiliary Port
RS-485, 9-pin female D on the rear panel
10BASET Port
RJ-45 female jack connector on the rear panel
Dimensions
1 rack unit, 1.75 x 19 x 12.75 inches (44 x 483 x 324 mm)
Size:
Weight: 6.0 lb (2.7 kg)
5-1