1
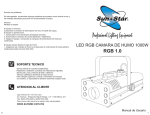
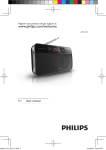
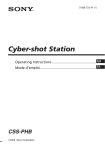
DA1102_05_Eng
2007.9.10
2:11 PM
Portable DAB Radio
Register your product and get support at
www.philips.com/welcome
User manual
Page 1
DA1102
DA1102_05_Eng
2007.9.10
2:11 PM
Page 2
CAUTION
Use of controls or adjustments or performance of procedures other than herein
may result in unsafe operation.
The type plate is located on the rear of the set.
2
DA1102_05_Eng
2007.9.10
2:11 PM
1
Page 3
1
DAB RADIO DA1102
2
7
8
3
4
5
9
0
6
3
DA1102_05_Eng
2007.9.10
2:11 PM
Page 4
2
1
2
3
4
DA1102_05_Eng
2007.9.10
2:11 PM
Page 5
Contents
English
Controls ––––––––––––––––––––––––––––––––––––––––––––––––––––– 6
General Information
Safety instructions ––––––––––––––––––––––––––––––––––––––––––– 7
Environmental information –––––––––––––––––––––––––––––––––––– 7
Hearing safety ––––––––––––––––––––––––––––––––––––––––––––– 7-8
About Digital Audio Broadcasting (DAB) ––––––––––––––––––––––––––9
Getting started
Power supply –––––––––––––––––––––––––––––––––––––––––––––– 10
Transfer –––––––––––––––––––––––––––––––––––––––––––––––––– 10
Headphones ––––––––––––––––––––––––––––––––––––––––––––––– 11
Adjusting the volume –––––––––––––––––––––––––––––––––––––––– 11
HOLD: Locking buttons –––––––––––––––––––––––––––––––––––––––11
DAB radio
Radio reception ––––––––––––––––––––––––––––––––––––––––––––
Switching off, Tuning/retuning –––––––––––––––––––––––––––––––––
Selecting a station ––––––––––––––––––––––––––––––––––––––––––
Saving & recalling presets –––––––––––––––––––––––––––––––––––––
Deleting a preset––––––––––––––––––––––––––––––––––––––––––––
Viewing the service info (DAB only) ––––––––––––––––––––––––––––
12
13
14
14
15
15
Music mode
Playing stored music ––––––––––––––––––––––––––––––––––––––––– 16
Setting play mode ––––––––––––––––––––––––––––––––––––––––––– 16
Recordings
Make recordings –––––––––––––––––––––––––––––––––––––––––––– 17
Play back recordings –––––––––––––––––––––––––––––––––––––––– 17
Upload recordings to PC ––––––––––––––––––––––––––––––––––––– 17
Delete recordings –––––––––––––––––––––––––––––––––––––––––– 17
Settings ––––––––––––––––––––––––––––––––––––––––––––––––––––– 18
Technical Specifications –––––––––––––––––––––––––––––––––––– 19
Troubleshooting –––––––––––––––––––––––––––––––––––––––––––– 20
5
DA1102_05_Eng
2007.9.10
2:11 PM
Page 6
Controls (see Figure 1)
English
1 p
5 INFO (for DAB only)
–
–
3.5mm headphone socket.
2 Display
–
shows menu, options, tack information
and station information.
–
–
adjusts slider to select lock function on/off.
7 MENU
–
enters the main menu or returns to
searches and stores DAB stations (Local
Scan/Full Scan/Manu Tune).
–
enables access to advanced setup
press and hold to record voices in recording mode.
8 PRESET
3 REC/SCAN
–
displays station information in seven types.
6 HOLD
previous menu.
options.
4 1/2/3/4
–
–
navigation controls (left, right, up, down)
for scrolling through the option lists.
1/2
9 MIC
scrolls radio stations.
–
–
–
saves 20 stations for quick access.
Microphone.
0
USB jack.
3/4
–
increases / decreases the volume.
2;/B
–
confirms selection.
–
starts playback.
–
press and hold to switch on/off the set.
Supplied accessories
1 x USB cable
2 x AAA batteries
1 x headphones
This set complies with the radio interference requirements of the European Union.
PHILIPS reserves the right to make design and specification changes for product
improvement without prior notice.
6
DA1102_05_Eng
2007.9.10
2:11 PM
Page 7
General information
English
Safety instructions (see Figure 3)
• Do not expose the unit or batteries to humidity, rain, sand or excessive heat (caused
by heating equipment or direct sunlight).
• You can clean the radio with a soft, slightly dampened, lint-free cloth. Do not use any
cleaning agents as they may have a corrosive effect.
• Active mobile phones in the vicinity of the radio may cause malfunctions.
• Avoid dropping the radio as this may cause damage.
• Apparatus shall not be exposed to dripping or splashing.
Environmental information
• All redundant packing material has been omitted.We have done our utmost to make
the packaging easily separable into two mono materials: cardboard and polyethylene.
• Your set consists of materials which can be recycled if disassembled by a specialized
company. Please observe the local regulations regarding the disposal of packingmaterials,
exhausted batteries and old equipment.
Hearing Safety
Listen at a moderate volume:
• Using headphones at a high volume can impair your hearing. This product can produce
sounds in decibel ranges that may cause hearing loss for a normal person, even for
exposure less than a minute. The higher decibel ranges are offered for those that may
have already experienced some hearing loss.
• Sound can be deceiving. Over time your hearing “comfort level” adapts to higher volumes of sound. So after prolonged listening, what sounds “normal” can actually be loud
and harmful to your hearing. To guard against this, set your volume to a safe level
before your hearing adapts and leave it there.
7
DA1102_05_Eng
2007.9.10
2:11 PM
Page 8
General information
To establish a safe volume level:
English
• Set your volume control at a low setting.
• Slowly increase the sound until you can hear it comfortably and clearly, without distortion.
Listen for reasonable periods of time:
• Prolonged exposure to sound, even at normally “safe” levels, can also cause hearing loss.
• Be sure to use your equipment reasonably and take appropriate breaks.
Be sure to observe the following guidelines when using your headphones:
•
•
•
•
Listen at reasonable volumes for reasonable periods of time.
Be careful not to adjust the volume as your hearing adapts.
Do not turn up the volume so high that you can't hear what's around you.
You should use caution or temporarily discontinue use in potentially hazardous situations.
• Do not use headphones while operating a motorized vehicle, cycling, skateboarding, etc.;
it may create a traffic hazard and is illegal in many areas
Disposal of your old product
Your product is designed and manufactured with high quality materials
and components, which can be recycled and reused.
When this crossed-out wheeled bin symbol is attached to a product it
means the product is covered by the European Directive 2002/96/EC
Please inform yourself about the local separate collection system for electrical and electronic products. Please act according to your local rules and do not dispose of your old
products with your normal household waste.The correct disposal of your old product
will help prevent potential negative consequences for the environment and human
health.
8
DA1102_05_Eng
2007.9.10
2:11 PM
Page 9
General information
English
About Digital Audio Broadcasting (DAB)
DAB digital radio is a new way of broadcasting radio via a network of terrestrial
transmitters. It provides listeners with more choice and information delivered in crystal
clear, crackle-free sound quality.
–
–
The technology allows the receiver to lock on to the strongest signal it can find.
With DAB digital stations there are no frequencies to remember, and sets are tuned
by station name, so there's no retuning on the move.
What is a multiplex?
Digital radio operation is made up of a single block of frequencies called a multiplex. Each
multiplex works within a frequency spectrum, such as Band III for DAB broadcasts.
Helpful Hints:
– You will receive only those stations within your transmission area.
DAB BROADCASTERS AND DLS
Each DAB broadcaster (or multiplex operator) also provides text and audio data services.
Some programmes are supported by Dynamic Label Segments (DLS).This is data which you
can read as scrolling text on your DAB radio display. Some stations transmit the latest news,
travel, and weather, what's on now and next, website addresses and phone numbers.
For more information on digital radio coverage and services, please visit: www.drdb.org.
9
DA1102_05_Eng
2007.9.10
2:11 PM
Page 10
Getting started
English
POWER SUPPLY
Inserting batteries (see Figure 2)
• Open the battery door and insert 2 x AAA batteries with the correct polarity as indicated.
Battery power level indication
Full
Two-thirds full
Half full
Low
Empty
Batteries contain chemical substances, so they should be disposed of properly.
Please ensure that used batteries are disposed of in accordance with local/national
legislation. Do not short circuit. Do not dispose of in a fire.
POWER ON/OFF
Press and hold 2;/B to switch on/off the set.
TRANSFER
Your player appears as a USB mass storage device on your computer.You can manage files
and transfer music to your player during USB connection.
1
Use the supplied USB cable to connect your player to a computer.
2
Click and highlight one or more songs to transfer between your player and your computer.
3
Use drag and drop actions to complete your transfer.
Disconnect your player safely
Exit any active application working with your player. Remove your player safely by clicking
in the task tray in your PC.
10
DA1102_05_Eng
2007.9.10
2:11 PM
Page 11
English
Getting started
Helpful Hints :
– Simply discconect the player when the animation
transfer is complete.
stops which means the
HEADPHONES
• Connect the supplied headphones to the
p socket of the player.
• The headphone cable also serves as an aerial.To get optimal
signal reception, avoid coiling the headphone cord.
Adjusting the volume
• In play mode, press 3/4 to adjust the volume.
HOLD: Locking buttons
You can lock the buttons of the set by switching the slider to LOCK.With Lock activated,
you can avoid accidental action of other functions, and help save
battery power (accidental switching on).
1 Adjust the HOLD slider to LOCK to activate.
➜ The lock icon is shown.
2 To deactivate, switch the HOLD slider to UNLOCK.
➜ All buttons are unlocked.The unlock icon is shown.
Helpful Hints :
– In HOLD mode, all buttons except 3/4 are locked.
11
DA1102_05_Eng
2007.9.10
2:11 PM
Page 12
DAB Radio
English
RADIO RECEPTION
With this DAB pocket radio, you can tune to DAB radio stations.The headphone cable also serves as an aerial.
1 Connect the supplied headphones to the
p socket of the player.
2 Press and hold 2;/B to switch on the set.
➜ Display shows the main menu.
3 Press 1/2 to select the DAB radio mode, and then press
2;/B.
➜ The last detected station plays and the list of available stations is stored.
Helpful Hints :
–
If the tuning fails, the display shows No Available
Station.You can press REC/SCAN to select Local
Scan, Full Scan or Manu Tune (see Tuning/retuning).
TO SWITCH OFF THE RADIO
• Press MENU to select another mode.
• Press and hold 2;/B for 3 seconds.
➜ Display shows Bye ....
➜ The display backlight goes out.
Helpful Hints :
– Activate the HOLD function to save battery power and to prevent switching on the set
accidentally.
12
DA1102_05_Eng
2007.9.10
2:11 PM
Page 13
DAB Radio
English
TUNING/ RETUNING
In DAB mode
1
2
3
Press REC/SCAN.
Press 3/4 to select a desired tuning option (Local
Scan/Full Scan/Manu Tune).
Press 2 or 2;/B to confirm.
Autoscan
Local scan – scans all the local frequencies.
Full scan – scans the full range of DAB frequencies.
➜ Display shows Scanning and the scanning
progress bar.
➜ The number of detected radio stations appears.
Manual tune
1
2
Press 3/4 once or more until you stop in the desired frequency.
Press 2;/B to confirm.
13
DA1102_05_Eng
2007.9.10
2:11 PM
Page 14
DAB Radio
English
SELECTING A STATION
In DAB mode
After your radio has been tuned, you can select a station
using the navigation control.
1 Press 1/2 repeatedly until your desired station name is
displayed.
➜ After successful tuning, the display shows the selected station name, battery level, and signal reception strength.
SAVING & RECALLING PRESETS
With stations saved as presets, you can quickly access your
desired station after the radio is switched on.
Saving a preset
1 During playing a station, press and hold PRESET.
➜ Display shows: Add preset < X > (X denotes a preset
station number).
2 Press 1/ 2 to select a desired preset number.
3 Press 2;/B to confirm.
➜ The station is successfully saved.
Helpful Hints :
–
You can save up to 20 preset radio stations.
RECALLING A PRESET
1 Press PRESET.
➜ Display shows: current preset number, current station name, battery level, signal
reception strength, and DAB service information.
2 Press 1/ 2 once or more to find your desired preset.
➜ Your desired preset radio station plays.
14
DA1102_05_Eng
2007.9.10
2:11 PM
Page 15
DAB Radio
English
DELETING A PRESET
1
2
Press PRESET to enter the Preset radio station mode.
Press 1/ 2 once or more to select your desired preset
number.
3 Press and hold PRESET.
➜ Display shows: Delete preset < X > (X denotes a preset
station number).
4 Press 2;/B to confirm.
➜ The station is successfully deleted.
VIEWING THE SERVICE INFO (DAB ONLY)
You can view the DAB service info in the following 7 information types.
•
To scroll through the information options, press INFO
repeatedly until your desired option appears.
1
DLS
Dynamic Label Segments.
2
Signal error
Displays signal errors.
3
Bitrate mode
Displays the transmission rate of broadcasting
data in bits per second.
4
Channel & frequency Displays the channel and frequency of your current service.
Displays the scrolling broadcasting text (default setting).
5
Clock
Shows the time of the current multiplex.
6
Multiplex name
Specifies the multiplex of the current service.
(A multiplex is a group of stations broadcast by a multiplex operator.)
7
Program type
Describes content type.
15
DA1102_05_Eng
2007.9.10
2:11 PM
Page 16
Music mode
English
PLAYING STORED MUSIC
You can transfer music to the player from your PC (see
TRANSFER). After successul transfer, you can enjoy the
stored music.
1 In power-on mode, press MENU to enter the main menu.
2 Press 1/ 2 once or more to select the Music icon.
3 Press 2;/B to confirm.
➜ Display shows the categories of your music library:
Play All, Artists, Albums, Playlists.
Play All: plays all tracks.
Artists: collection of albums sorted by artist name in
alphanumeric order.
Albums: collection of albums sorted by album name in
alphanumeric order.
Playlists: collection of your favorite tracks sorted by the name
of the playlists in alphanumeric order.
4 Press 3/4 to select your option.
5 Press 2 or 2;/B to start playback.
➜ The playback screen appears.
6 To pause playback, press 2;/B.To resume playback, press the
button again.
SETTING PLAY MODE
1
2
3
4
5
16
Press MENU and select the settings
icon.
Press 2;/B to enter the settings menu.
Press 3/4 to select Play Mode.
Press 1/ 2 to select
Shuffle/Repeat/Repeat All/OFF.
Press 2;/B to confirm.
Icon
Meaning
Play all songs randomly
Play one song repeatedly
Play all songs repeatedly
OFF
Normal playback
DA1102_05_Eng
2007.9.10
2:11 PM
Page 17
Recordings
1
2
3
4
5
6
English
MAKE RECORDINGS
In power-on mode, press MENU to enter the main menu.
Press 1/ 2 once or more to select the recording mode.
Press 2;/B to enter the recording mode.
Press and hold REC/SCAN to start voice recording,
To pause recording, press 2;/B. To resume recoding, press the button again.
To save the recording, press and hold REC/SCAN again.
PLAY BACK RECORDINGS
In the recording mode, press 3/4 once or more to select Play All or the desired
recording file.
2 Press 2 or 2;/B to start the playback.
➜ The playback screen appears.
1
UPLOAD RECORDINGS TO THE COMPUTER
1 Connect your player to your computer.
2 Open the disc folder (your player).
➜ You will find a RECORD folder.This folder contains the recordings.
3 Copy and paste the recordings to any desired location on your computer.
DELETE RECORDINGS
Recordings can only be deleted on the computer.
1 Connect your player to your computer.
2 Open the disc folder (your player).
3 Double click the RECORD folder.
4 Select the files you want to delete and press Delete on your computer keyboard.
17
DA1102_05_Eng
2007.9.10
2:11 PM
Page 18
Settings
English
You can set your preferences in your player to suit your needs.
1 Press MENU and select the settings icon.
2 Press 2;/B to enter the settings menu.
3 Press 3/4 to select your desired option.
4 Press 1/ 2 to select your desired settings.
5 Press MENU to exit.
Settings
EQ
Play Mode
Contrast
Backlight
Free Cap
Version
Options
ROCK/JAZZ/CLASSIC/POP/OFF
Shuffle/Repeat/Repeat All/OFF
00/10/20/30/40
ON/5s Off/10s Off/15s Off/20s Off
Free capacity of the memory
Version information
The making of unauthorized copies of copy-protected
material, including computer programmes, files, broadcasts and sound recordings, may be an infringement of
copyrights and constitute a criminal offence.This equipment should not be used for such purposes.
18
DA1102_05_Eng
2007.9.10
2:11 PM
Page 19
TECHNICAL SPECIFICATIONS
General
Stereo digital radio (stereo output possible with auxiliary speaker) with full Band III reception capability.
Fully compliant with ETS300 401 and capable of
decoding all DAB transmission modes 1-4.
Power supply
2 x AAA alkaline.
Compression format
MP3 (8-320 kbps and VBR) /WMA (5-384 kbps)
Audio capturing
Built-in microphone
Storage media
1 GB* Flash memory
Approvals
CE marked. Compliant with the EMC and Low
Voltage Directives (89/336/EEC and 73/23/EEC)
Dimensions
59 mm x 95 mm x 17.5 mm
Weight
64g
Battery playtime
up to 10 hours**
* Full memory capacity may not be available as some memory
will be reserved for the player.
**Battery life varies by use and settings.
19
English
Technical specifications
DA1102_05_Eng
2007.9.10
2:11 PM
Page 20
Troubleshooting
English
Warning: Under no circumstance should you try to repair the set
yourself as this will invalidate the guarantee. If a fault occurs, first check the
points listed before taking the unit to repair. If you are unable to solve a problem by following these hints, consult your dealer or service centre.
The radio has no power
•
Check that your batteries are not drained, that they are inserted
correctly, that the contact pins are clean.
The indication "No station available" is displayed
•
•
You may have moved to a new area which is blocking the range of the transmitter.
Autoscan your radio and refresh the list of stations in service (see chapter Tuning/
retuning, local scan/full scan).
The station is out of service. In the DAB mode, search for a new station in the station list (see chapter Selecting a station).
The indication "Station off air" is displayed
•
The station is out of service.The radio will wait until the service resumes.You can
also tune to a new station.
No sound is heard
•
•
•
•
Check that the headphones is connected and you allow the headphone cord to hang
freely.
Check that the volume level is not too low.
Adjust the position of the radio to obtain better signal reception.
The station is currently out of service.Wait until the service resumes, or tune to a
new station.
No response to buttons or the set ‘hangs’
•
•
20
Electrostatic discharge. Remove batteries for 1 minute, replace batteries then switch
on again.
LOCK activated. Adjust the HOLD slider to UNLOCK.
DA1102_05_Eng
2007.9.10
2:11 PM
Page 21
Need help?
Online
Go to www.philips.com/support
C Royal Philips Electronics N.V. 2007
Meet Philips at the Internet
http://ww.philips.com
Printed in China
PDCC-2007