1
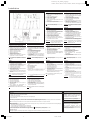
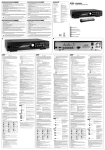
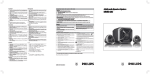
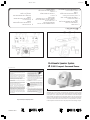
A2.5new.p65 1 4) SURROUND IN (BLACK COLOR) To connect the SURROUND IN cable for the 3) ROTARY SURROUND VOLUME CONTROL To adjust the surround volume higher or lower 2) ROTARY VOLUME CONTROL To adjust the volume higher or lower 1) POWER ON/OFF To switch ON or OFF power The green LED indicates that the power is On A 2.5/MMS205 1/31/01, 10:15 AM 7) FRONT OUT To connect both front left and right satellite speakers 6) POWER IN To connect the AC/AC adapter The design of the satellites offers wall mounting as an option. 5) LINE IN (GREEN COLOR) To connect the LINE IN cable for the front speakers from OUT 1 at the soundcard/ sound source surround speakers from OUT 2 at the soundcard/ sound force 9) SURROUND OUT LEFT To connect the surround left satellite speaker 8) SURROUND OUT RIGHT To connect the surround right satellite speaker ~ EXPLANATION ~ Multimedia Speaker System A 2.500 Compact Surround Power For US/Canada only IMPORTANT SAFETY INSTRUCTIONS - Read before operating equipment This product was designed and manufactured to meet strict quality and safety standards. There are, however, some installation and operation precautions which you should be particularly aware of. 1. Read these instructions - All the safety and operating instructions should be read before the appliance is operated. 2. Keep these instructions - The safety and operating instructions should be retained for future reference. 9. Do not defeat the safety purpose of the polarized or grounding-type plug. A polarized plug has two blades with one wider than the other. A AC grounding type plug has two blades Polarized Plug and a third grounding prong. The wide blade or the third prong are provided for your safety. When the provided plug does not fit into your outler, consult an electrician for replacement of the obsolete outlet. 3. Heed all warnings - All warnings on the appliance and in the operating instructions should be adhered to. 10. Protect the power cord from being walked on or pinched particulary at plugs, convenience receptacles, and the point where they exit from the apparatus. 4. Follow all instructions - All operating and use instructions should be followed. 11. Only use attachments/accessories specified by the manufacturer. 5. Do not use this apparatus near water - for example, near a bathtub, washbowl, kitchen sink, laundry tub, in a wet basement or near a swimming pool, etc. 12. 6. Clean only with a damp cloth. The appliance should be cleaned only as recommended by the manufacturer. 7. Install in accordance with the manufacturers Instructions. Do not block any of the ventilation openings. For example, the appliance should not be situated on a bed, sofa, rug, or similar surface or placed in a built-in installation, such as a bookcase or cabinet that may impede the flow of air through the ventilation openings. 8. Do not Install near any heat sources such as radiators, heat registers, stoves, or other apparatus (including amplifiers) that produce heat. Use only with a cart, stand, tripod, bracket, or table specified by the manufacturer, or sold with the apparatus. When a cart is used, use caution when moving the cart/ apparatus combination to avoid injury from tip-over. 13. Unplug this apparatus during lightning storms or when unused for long periods of time. 14. Refer all servicing to qualified service personnel. Servicing is required when the apparatus has been damaged in any way, such as power-supply cord or plug is damaged, liquid has been spilled or objects have fallen into the apparatus, the apparatus has been exposed to rain or moisture, does not operate normally, or has been dropped. http://www.pcstuff.philips.com 4399 294 48731 EL 4562-E004: 99/3 The A 2.500 Compact Surround Power consists of 4 satellites, a subwoofer and a remote control .To experience the excitement of surround sound from this speaker set, it is preferred to have sound cards which provide 3D decoded audio outputs. If your computer only has a stereo soundcard, the A 2.500 Compact Surround Power will operate as a stereo speaker system. The front and surround satellites on one side will be one stereo channel and the front and surround satellites on the other side will be the other stereo channel. It is also possible to drive the A 2.500 Compact Surround Power from a DVD player that has two analogue outputs. Translate for the following languages: Swedish, Finnish, Polish, Chinese, Turkish, Russian, Norwegian, Danish. Installation English: Français 1. Connect the LINE IN cable (green) from OUT 1 at the soundcard 2. Connect the SURROUND IN cable (black) from OUT 2 at the soundcard 3. Connect front speakers (one plug) 4. Connect surround right speaker 5. Connect surround left speaker 6. Connect the power supply 7. Switch on the system using the power button on the remote control 8. Tune the system using the soundcard/ sound source and the controls on the remote control 1 Connectez le câble dentrée de ligne Line In (vert) de Out 1 à la carte son 2 Connectez le câble Surround In (noir) de Out 2 à la carte son (uniquement dans le cas où vous disposez dune carte son à 4 voies) 3 Connectez les haut-parleurs avant (unefiche) 4 Connectez le haut-parleur Surround droit 5 Connectez le haut-parleur Surround gauche 6 Connectez lalimentation 7 Mettez lappareil sous tension au moyen du bouton dalimentation sur la télécommande 8 Procédez à laccord en vous servant de la carte son/ source audio et des commandes sur la télécommande Note: Do not insert the power plug into the AC outlet until all connections are made! Remarque : Nintroduisez pas la fiche dans la prise CA tant que tous les branchements ne sont pas effectués Español Deutsch 1 Conecte el cable Line In (verde) desde la s a l i d a Out 1 de la tarjeta de sonido 2 Conecte el cable Surround In (negro) desde la salida Out 2 de la tarjeta de sonido (aplicable sólo si la tarjeta de sonido es de 4 canales) 3 Conecte los altavoces frontales (un conector) 4 Conecte el altavoz envolvente derecho 5 Conecte el altavoz envolvente izquierdo 6 Conecte el suministro de alimentación 7 Encienda el sistema desde el mando a distancia 8 Afine el sistema ajustando la tarjeta o fuente de sonido y los controles del mando a distancia 1 Das Line In-Kabel (grün) an Ausgang Out 1d e r Soundkarte anschließen. 2 Das Surround In-Kabel (schwarz) an Ausgang Out 2 der Soundkarte anschließen. (nur zutreffend bei einer vierkanaligen Soundkarte) 3 Die Frontlautsprecher anschließen (ein Stecker) 4 Den rechten Surround-Lautsprecher anschließen. 5 Den linken Surround-Lautsprecher anschließen. 6 Das Netzteil anschließen. 7 Das System mit Hilfe der Taste Power auf der Fernbedienung einschalten. 8 Das System mit Hilfe der Soundkarte/Klangquelle und der Bedienelemente auf der Fernbedienung einstellen. Observación: No inserte el conector de alimentación en la toma de corriente mientras no haya completado todas las conexiones Hinweis: Den Netzstecker nicht an eine Steckdose anschließen, bevor alle Verbindungen hergestellt worden sind. Italiano Nederlands Svenska: Suomi: 1 Collegare il cavo Line In (verde) proveniente dalluscita Out 1 della scheda audio 2 Collegare il cavo Surround In (nero) proveniente dalluscita Out 2 della scheda audio (vale soltanto se è disponibile una scheda audio a 4 canali) 3 Collegare le casse acustiche anteriori (una spina) 4 Collegare la cassa Surround destra 5 Collegare la cassa Surround sinistra 6 Collegare allalimentazione 7 Accendere il sistema con il pulsante di alimentazione sul telecomando 8 Sintonizzare il sistema utilizzando la scheda audio/ sorgente audio e i comandi sul telecomando 1 Sluit de Line In-kabel (groen) op Out 1 van de geluidskaart aan 2 Sluit de Surround In-kabel (zwart) op Out 2 van de geluidskaart aan (dit geldt alleen voor een 4-kanaals geluidskaart) 3 Sluit de front-luidsprekers aan (1 steker) 4 Sluit de rechter surround-luidspreker aan 5 Sluit de linker surround-luidspreker aan 6 Sluit het voedingsapparaat aan 7 Schakel het systeem in met de aan/uit-toets op de afstandsbediening 8 Stel het systeem af met behulp van de geluidskaart / geluidsbron en de toetsen op de afstandsbediening 1. Anslut LINE IN-kabeln (grön) från OUT 1 på ljudkortet 2. Anslut S URROUND IN-kabeln (svart) från OUT 2 på ljudkortet 3. Anslut de främre högtalarna (en (1) kontakt) 4. Anslut högra surround-högtalaren 5. Anslut vänstra surround-högtalaren 6. Anslut nätkontakten till nätuttaget 7. Slå på systemet med till-/frånknappen på fjärrkontrollen 8. Ställ in systemet med hjälp av ljudkortet / ljudkällan och knapparna på fjärrkontrollen. 1. Kytke äänikortin OUT 1 -liitännästä tuleva LINE IN -johto (vihreä). 2. Kytke äänikortin OUT 2 -liitännästä tuleva SURROUND IN -johto (musta). 3. Kytke etukaiuttimet (yksi pistoke). 4. Kytke oikeanpuoleinen surround-kaiutin. 5. Kytke vasemmanpuoleinen surround-kaiutin. 6. Yhdistä pistotulppa pistorasiaan. 7. Kytke järjestelmään virta kauko-ohjaimen virtapainikkeella. 8. Viritä järjestelmä äänikortin/äänilähteen sekä kaukoohjaimen säätimien avulla. Nota: Non inserire la spina di alimentazione nella presa di corrente fino a che i collegamenti non sono stati tutti ultimati! Opmerking: Steek de netsteker pas in het stopcontact als alle aansluitingen gedaan zijn! Obs: Anslut inte nätkontakten till nätuttaget förrän alla anslutningar har gjorts! Huom: Älä yhdistä pistotulppaa pistorasiaan, ennen kuin kaikki kytkennät ovat valmiit! Türkçe: Ðóññêèé: 1. LINE IN kablosunu (yeþil) ses kartý üzerindeki OUT 1 yuvasýna takýnýz 2. SURROUND I N kablosunu (siyah) ses kartý üzerindeki O UT 2 yuvasýna takýnýz 3. Ön hoparlörleri takýnýz (bir fiþ) 4. Surround sað hoparlörü takýnýz 5. Surround sol hoparlörü takýnýz 6. Güç kaynaðýný takýnýz 7. Uzaktan kumanda üzerindeki açma-kapama düðmesini kullanarak sistemi açýnýz 8. Ses kartý / ses kaynaðý ve uzaktan kumada üzerindeki kontrolleri kullanarak sistemin sesini açýnýz 1. Ïîäñîåäèíèòå êàáåëü LINE IN (çåëåíûé), èäóùèé îò âûõîäà OUT 1 çâóêîâîé êàðòû. 2. Ïîäñîåäèíèòå êàáåëü SURROUND IN (÷åðíûé), èäóùèé îò âûõîäà OUT 2 çâóêîâîé êàðòû. 3. Ïîäñîåäèíèòå ïåðåäíèå àêóñòè÷åñêèå êîëîíêè (îäèí øòåêåð). 4. Ïîäñîåäèíèòå ïðàâóþ àêóñòè÷åñêóþ êîëîíêó çâóêîâîãî îêðóæåíèÿ. 5. Ïîäñîåäèíèòå ëåâóþ àêóñòè÷åñêóþ êîëîíêó çâóêîâîãî îêðóæåíèÿ. 6. Ïîäêëþ÷èòå èñòî÷íèê ïèòàíèÿ. 7. Âêëþ÷èòå ñèñòåìó, íàæàâ êíîïêó âêëþ÷åíèÿ ïèòàíèÿ íà ïóëüòå äèñòàíöèîííîãî óïðàâëåíèÿ. 8. Íàñòðîéòå ñèñòåìó, èñïîëüçóÿ çâóêîâóþ êàðòó, èñòî÷íèê çâóêà è óïðàâëÿþùèå êíîïêè íà ïóëüòå äèñòàíöèîííîãî óïðàâëåíèÿ. Polski: 1. Podùàcz przewód LINE IN (wejúcie sygnaùu) (zielony) z gniazda OUT 1 na karcie dêwiekowæj 2. Podùàcz przewód SURROUND IN (gùoúniki otaczajàce) z gniazda OUT 2 na karcie dêwiekowæj 3. Podùàcz gùoúniki czoùowe (pojedynczy wtyk) 4. Podùàcz prawy gùoúniki otaczajàcy 5. Podùàcz lewy gùoúniki otaczajàcy 6. Podùàcz zasilanie sieciowe 7. Wùàcz system uýywajàc przycisku wùàczania zasilania na pilocie zdalnego sterowania 8. Wyreguluj system uýywajàc organów sterowania karty dêwiækowej/êródùa dêwiæku oraz pilota zdalnego sterowania 1. 2. 3. 4. 5. 6. 7. 8. ! Uwaga : Nie wùàczaj wtyczki zasilania do gniazda sieciowego przed dokonaniem wszystkich poùàczeñ! Dansk: Norsk: 1. 2. 3. 4. 5. 6. 7. Tilslut LINE IN kablet (grønt) fra OUT 1 på lydkortet Tilslut SURROUND IN kablet (sort) fra OUT 2 på lydkortet Tilslut front højttalerne (ét stik) Tilslut surround højre højttaler Tilslut surround venstre højttaler Tilslut strømforsyning Tænd for anlægget med til/fra knappen på fjernbetjeningen 8. Indstil anlægget med lydkort/lydkilde og betjeningselementerne på fjernbetjeningen 1. 2. 3. 4. 5. 6. 7. 8. NB: Sæt ikke stikket i kontakten til elnettet, før alt er tilsluttet! Merk: Ikke sett støpselet i en stikkontakt før alle tilkoplingene er gjort! Not: Bütün baðlantýlarý yapmadan elektrik fiþini AC çýkýþýna takmayýnýz! Ïðèìå÷àíèå: Íå ïîäñîåäèíÿéòå âèëêó ñåòåâîãî øíóðà ê ðîçåòêå ñåòè ïåðåìåííîãî òîêà íå âûïîëíåíû âñå? íåîáõîäèìû? ñîåäèíåíèÿ! Kople LINE IN-kabelen (grønn) til OUT 1 på lydkortet Kople SURROUND IN-kabelen (svart) til OUT 2 på lydkortet Kople til fronthøyttalerne (ett støpsel) Kople til den høyre surround-høyttaleren Kople til den venstre surround-høyttaleren Kople til strømtilførselen Slå på systemet med av/på-knappen på fjernkontrollen Finjuster systemet ved hjelp av lydkortet/lydkilden og tastene på fjernkontrollen Important notes for users in the U.K. Norge Mains plug This apparatus is fitted with an approved 13 Amp plug. To change a fuse in this type of plug proceed as follows: Typeskilt finnes på apparatens underside. Observer: Nettbryteren er sekundert innkoplet. Den innebygde netdelen er derfor ikke frakoplet nettet så lenge apparatet er tilsluttet nettkontakten. 1 Remove fuse cover and fuse. 2 Fix new fuse which should be a BS1362 5 Amp, A.S.T.A. or BSI approved type. 3 Refit the fuse cover. If the fitted plug is not suitable for your socket outlets, it should be cut off and an appropriate plug fitted in its place. If the mains plug contains a fuse, this should have a value of 5 Amp. If a plug without a fuse is used, the fuse at the distribution board should not be greater than 5 Amp. Note: The severed plug must be disposed of to avoid a possible shock hazard should it be inserted into a 13 Amp socket elsewhere. How to connect a plug The wires in the mains lead are coloured with the following code: blue = neutral (N), brown = live (L). As these colours may not correspond with the colour markings identifying the terminals in your plug, proceed as follows: Connect the blue wire to the terminal marked N or coloured black. Connect the brown wire to the terminal marked L or coloured red. Do not connect either wire to the earth terminal in the plug, marked E (or ) or coloured green (or green and yellow). Before replacing the plug cover, make certain that the cord grip is clamped over the sheath of the lead - not simply over the two wires. Copyright in the U.K. Recording and playback of material may require consent. See Copyright Act 1956 and The Performer's Protection Acts 1958 to 1972. A2.5new.p65 2 1/31/01, 10:15 AM For å redusere faren for brann eller elektrisk støt, skal apparatet ikke utsettes for regn eller fuktighet. Deutschland Hiermit wird bescheinigt, daß dieses Gerät in Übereinstimmung mit den Bestimmungen der Amtsblattverfügung 1046/1984 funkentstört ist. Der Deutschen Bundespost wurde das Inverkehrbringen dieses Gerätes angezeigt und die Berechtigung zur Überprüfung der Serie auf Einhaltung der Bestimmungen eingeräumt.