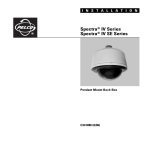
1
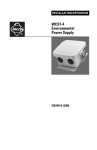
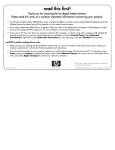
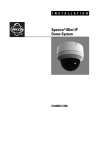
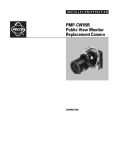
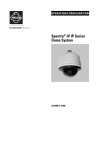
O P E R AT I O N / C O N F I G U R AT I O N
Endura® EW5001
Single Radio
Wireless Device
C2684M (2/08)
2
C2684M (2/08)
Contents
Welcome . . . . . . . . . . . . . . . . . . . . . . . . . . . . . . . . . . . . . . . . . . . . . . . . . . . . . . . . . . . . . . . . . . . . . . . . . . . . . . . . . . . . . . . . . . . . . . . . . . . . . . . . . . . . 4
Accessing the EW5001 . . . . . . . . . . . . . . . . . . . . . . . . . . . . . . . . . . . . . . . . . . . . . . . . . . . . . . . . . . . . . . . . . . . . . . . . . . . . . . . . . . . . . . . . . . . . . . . . . 4
Using an Endura Workstation . . . . . . . . . . . . . . . . . . . . . . . . . . . . . . . . . . . . . . . . . . . . . . . . . . . . . . . . . . . . . . . . . . . . . . . . . . . . . . . . . . . . . . . 4
Logging On . . . . . . . . . . . . . . . . . . . . . . . . . . . . . . . . . . . . . . . . . . . . . . . . . . . . . . . . . . . . . . . . . . . . . . . . . . . . . . . . . . . . . . . . . . . . . . . . . 4
Setup Window . . . . . . . . . . . . . . . . . . . . . . . . . . . . . . . . . . . . . . . . . . . . . . . . . . . . . . . . . . . . . . . . . . . . . . . . . . . . . . . . . . . . . . . . . . . . . . 4
Using a Web Browser . . . . . . . . . . . . . . . . . . . . . . . . . . . . . . . . . . . . . . . . . . . . . . . . . . . . . . . . . . . . . . . . . . . . . . . . . . . . . . . . . . . . . . . . . . . . . 6
Navigation Tools . . . . . . . . . . . . . . . . . . . . . . . . . . . . . . . . . . . . . . . . . . . . . . . . . . . . . . . . . . . . . . . . . . . . . . . . . . . . . . . . . . . . . . . . . . . . . . . . . . . . . . 7
Changing the Timeout Setting . . . . . . . . . . . . . . . . . . . . . . . . . . . . . . . . . . . . . . . . . . . . . . . . . . . . . . . . . . . . . . . . . . . . . . . . . . . . . . . . . . . . . . . 8
Changing the Password . . . . . . . . . . . . . . . . . . . . . . . . . . . . . . . . . . . . . . . . . . . . . . . . . . . . . . . . . . . . . . . . . . . . . . . . . . . . . . . . . . . . . . . . . . . . 8
Accessing the Online Help . . . . . . . . . . . . . . . . . . . . . . . . . . . . . . . . . . . . . . . . . . . . . . . . . . . . . . . . . . . . . . . . . . . . . . . . . . . . . . . . . . . . . . . . . . 8
Logging Off . . . . . . . . . . . . . . . . . . . . . . . . . . . . . . . . . . . . . . . . . . . . . . . . . . . . . . . . . . . . . . . . . . . . . . . . . . . . . . . . . . . . . . . . . . . . . . . . . . . . . . 8
Calling Up Another Device . . . . . . . . . . . . . . . . . . . . . . . . . . . . . . . . . . . . . . . . . . . . . . . . . . . . . . . . . . . . . . . . . . . . . . . . . . . . . . . . . . . . . . . . . . 8
Canceling Settings . . . . . . . . . . . . . . . . . . . . . . . . . . . . . . . . . . . . . . . . . . . . . . . . . . . . . . . . . . . . . . . . . . . . . . . . . . . . . . . . . . . . . . . . . . . . . . . . 8
Testing or Saving Settings . . . . . . . . . . . . . . . . . . . . . . . . . . . . . . . . . . . . . . . . . . . . . . . . . . . . . . . . . . . . . . . . . . . . . . . . . . . . . . . . . . . . . . . . . . 8
Testing the Settings . . . . . . . . . . . . . . . . . . . . . . . . . . . . . . . . . . . . . . . . . . . . . . . . . . . . . . . . . . . . . . . . . . . . . . . . . . . . . . . . . . . . . . . . . . 8
Saving the Settings . . . . . . . . . . . . . . . . . . . . . . . . . . . . . . . . . . . . . . . . . . . . . . . . . . . . . . . . . . . . . . . . . . . . . . . . . . . . . . . . . . . . . . . . . . . 9
Restoring Defaults . . . . . . . . . . . . . . . . . . . . . . . . . . . . . . . . . . . . . . . . . . . . . . . . . . . . . . . . . . . . . . . . . . . . . . . . . . . . . . . . . . . . . . . . . . . . . . . . 9
Accessing Pelco’s Web Site . . . . . . . . . . . . . . . . . . . . . . . . . . . . . . . . . . . . . . . . . . . . . . . . . . . . . . . . . . . . . . . . . . . . . . . . . . . . . . . . . . . . . . . . 9
Network Settings Tab . . . . . . . . . . . . . . . . . . . . . . . . . . . . . . . . . . . . . . . . . . . . . . . . . . . . . . . . . . . . . . . . . . . . . . . . . . . . . . . . . . . . . . . . . . . . . . . . . 10
Changing the Unit Mode . . . . . . . . . . . . . . . . . . . . . . . . . . . . . . . . . . . . . . . . . . . . . . . . . . . . . . . . . . . . . . . . . . . . . . . . . . . . . . . . . . . . . . . . . . 10
Changing the Host Name . . . . . . . . . . . . . . . . . . . . . . . . . . . . . . . . . . . . . . . . . . . . . . . . . . . . . . . . . . . . . . . . . . . . . . . . . . . . . . . . . . . . . . . . . . 11
Changing the Network Settings . . . . . . . . . . . . . . . . . . . . . . . . . . . . . . . . . . . . . . . . . . . . . . . . . . . . . . . . . . . . . . . . . . . . . . . . . . . . . . . . . . . . 11
Manually Setting the IP Address . . . . . . . . . . . . . . . . . . . . . . . . . . . . . . . . . . . . . . . . . . . . . . . . . . . . . . . . . . . . . . . . . . . . . . . . . . . . . . . 11
Access Point or Wireless Bridge Tab . . . . . . . . . . . . . . . . . . . . . . . . . . . . . . . . . . . . . . . . . . . . . . . . . . . . . . . . . . . . . . . . . . . . . . . . . . . . . . . . . . . . . 12
Access Point . . . . . . . . . . . . . . . . . . . . . . . . . . . . . . . . . . . . . . . . . . . . . . . . . . . . . . . . . . . . . . . . . . . . . . . . . . . . . . . . . . . . . . . . . . . . . . . . . . . . 12
Changing the SSID . . . . . . . . . . . . . . . . . . . . . . . . . . . . . . . . . . . . . . . . . . . . . . . . . . . . . . . . . . . . . . . . . . . . . . . . . . . . . . . . . . . . . . . . . . 12
Changing the Encryption Passphrase . . . . . . . . . . . . . . . . . . . . . . . . . . . . . . . . . . . . . . . . . . . . . . . . . . . . . . . . . . . . . . . . . . . . . . . . . . . . 13
Changing the Encryption Type . . . . . . . . . . . . . . . . . . . . . . . . . . . . . . . . . . . . . . . . . . . . . . . . . . . . . . . . . . . . . . . . . . . . . . . . . . . . . . . . . 13
Changing the Channel . . . . . . . . . . . . . . . . . . . . . . . . . . . . . . . . . . . . . . . . . . . . . . . . . . . . . . . . . . . . . . . . . . . . . . . . . . . . . . . . . . . . . . . . 14
Statistics and Diagnostics . . . . . . . . . . . . . . . . . . . . . . . . . . . . . . . . . . . . . . . . . . . . . . . . . . . . . . . . . . . . . . . . . . . . . . . . . . . . . . . . . . . . 14
Wireless Bridge . . . . . . . . . . . . . . . . . . . . . . . . . . . . . . . . . . . . . . . . . . . . . . . . . . . . . . . . . . . . . . . . . . . . . . . . . . . . . . . . . . . . . . . . . . . . . . . . . 15
Changing the Connection Speed . . . . . . . . . . . . . . . . . . . . . . . . . . . . . . . . . . . . . . . . . . . . . . . . . . . . . . . . . . . . . . . . . . . . . . . . . . . . . . . 15
Changing the Bridge Connection Settings . . . . . . . . . . . . . . . . . . . . . . . . . . . . . . . . . . . . . . . . . . . . . . . . . . . . . . . . . . . . . . . . . . . . . . . . 16
Device Log Tab . . . . . . . . . . . . . . . . . . . . . . . . . . . . . . . . . . . . . . . . . . . . . . . . . . . . . . . . . . . . . . . . . . . . . . . . . . . . . . . . . . . . . . . . . . . . . . . . . . . . . . 17
Troubleshooting . . . . . . . . . . . . . . . . . . . . . . . . . . . . . . . . . . . . . . . . . . . . . . . . . . . . . . . . . . . . . . . . . . . . . . . . . . . . . . . . . . . . . . . . . . . . . . . . . . . . . 18
C2684M (2/08)
3
Welcome
The Endura® EW5001 is a high performance, single radio wireless unit that can be configured as either an access point or a bridge. There are
various network and device settings that can be applied depending on the application.
Refer to the installation manual shipped with your EW5001 for more information on application scenarios.
Accessing the EW5001
The EW5001 single radio wireless unit can be accessed and configured using either a standard Web browser (for example, Microsoft® Internet
Explorer®) or an Endura workstation.
USING AN ENDURA WORKSTATION
For detailed instructions on configuring devices using WS5000 Advanced System Software, refer to Configuring Devices in the operation manual
shipped with the Endura workstation.
LOGGING ON
Before starting, ensure that the computer on which the software is installed is configured to work on an Endura network. For information on
network requirements, consult the Endura Network Design Guide.
To start the application, double-click the Endura icon on the desktop. The Login dialog box appears. To log on, do the following:
1. Type your Endura user name.
2. Type your password.
3. Click OK.
NOTES:
•
The default user name is admin. The default
password is also admin.
•
User names and passwords are case-sensitive.
Figure 1. WS5000 Login Dialog Box
After you log on, the main window appears and the devices on your network start to load. Depending on the size of your network, the process
may take a few minutes. Check the lower-left corner of the application window to see the status of the device-loading process.
SETUP WINDOW
To access the EW5001 from the WS5000, do the following:
1. From the main window, click the Setup button
on the toolbar to open the Setup window.
2. In the Setup window, click the Devices tab.
3. Select Wireless from the Device Type list.
The left-hand pane displays all devices on the network. The right-hand pane displays settings for the device currently selected from the tree
on the left.
You may only make changes to devices when they are online. If a device is not currently online, its icon appears with a red slash mark
across it and the text in the right-hand panel is unavailable, indicating that you cannot make changes.
4. Select a device to configure by left-clicking it. Depending on which device you select from the left-hand pane, a different group of settings
appears in the right-hand pane.
4
C2684M (2/08)
Figure 2. WS5000 Setup Window
5. Click the Configure button. The Web browser opens in a new window displaying a login dialog box for the device you selected.
6. Type admin (all lowercase) in the User ID and Password boxes (admin is the default value for these boxes).
Figure 3. EW5001 Login Dialog Box
7. Click the Log In button.
C2684M (2/08)
5
USING A WEB BROWSER
The following are the minimum system requirements for the EW5001:
•
PC (Pentium® 4 microprocessor, 1.6 GHz) with Windows® 98, Windows 2000, or Windows XP (or higher), or Mac® OS X 10.3.9 (or higher)
•
RAM: 512 Mbyte
•
Ethernet Card: 100 Mbit
•
Microsoft Internet Explorer 6.0 (or higher) or Firefox® 1.5 (or higher) with JavaScript™ enabled
•
Screen resolution of 1024 x 768 pixels or higher, 16- or 32-bit pixel color resolution
To access the EW5001 using a Web browser, do the following:
1. Open the Web browser.
2. Type the IP address of the EW5001 in the Address box of the browser. A login dialog box opens.
3. Type admin (all lowercase) in the User ID and Password boxes (admin is the default for both of these settings). Refer to Figure 3 on page 5.
4. Click the Log In button.
6
C2684M (2/08)
Navigation Tools
The navigation tools located at the top right of the window and the bottom of the window are always accessible, regardless of which tab is open
at a particular time.
Figure 4. Navigation Tools
Navigation Bar
• Change Timeout: Use this button to change the fail-safe timeout setting.
• Change Password: Use this button to change the default password.
• Help: Use this link to open a Help document that includes operation instructions for many of the device’s configurations and functions.
• Log Out: Use this link to log off from the device.
Search Box: Use the “Call up another device” box to connect to a different device by typing in the IP address of the device to which you
want to connect.
Cancel: Use this button to cancel settings that you are testing.
Test Settings/Save Settings: Use this button to test the changes you have made to the settings. Once the settings have been tested,
use this button to save the changed settings.
Pelco Hyperlink: Use this link to open the Pelco Web site in a new window.
Restore Defaults: Use this button to restore all of the device’s factory defaults.
C2684M (2/08)
7
CHANGING THE TIMEOUT SETTING
The EW5001 has a built-in, fail-safe timeout setting. The default timeout setting is 10 minutes. When you make changes to other settings on the
device and click the Test Settings button, a confirmation message and a timer appear on the page. This timer reflects the current timeout setting.
If the settings are not saved before the timer expires, the system will automatically revert back to the last saved settings.
To change the timeout setting, do the following:
1. Click the Change Timeout button in the navigation bar. The Fail-Safe Timeout Settings dialog box appears.
2. Open the Select New Timeout Value drop-down box by clicking the down arrow, and then select a timeout value.
3. Click the Save button to activate the new timeout setting.
CHANGING THE PASSWORD
To keep your system secure, be sure to change the default password. Record your new password in a secure location.
To change the password, do the following:
1. Click the Change Password button in the navigation bar. The Change Password dialog box appears.
2. Click in the first text box and type your new password. Repeat this step in the second text box.
3. Click the Save button to activate the new password.
ACCESSING THE ONLINE HELP
The online Help documents the basic instructions for configuring the EW5001. Click the Help hyperlink in the navigation bar to access these
instructions.
LOGGING OFF
To log off, click the Log Out button in the navigation bar. A login dialog box appears.
WARNING: Save your changes before logging off. Any unsaved changes will be lost after logoff.
CALLING UP ANOTHER DEVICE
Just below the navigation bar is a text box. This box allows you to switch from the EW5001 to another device.
To call up another device, click in the empty text box, and then type the IP address of the device to which you want to connect. Click the Go
button. The window refreshes and a login dialog box appears for the new device.
CANCELING SETTINGS
Click the Cancel button to override the timeout and restore the last saved settings.
TESTING OR SAVING SETTINGS
TESTING THE SETTINGS
1. To apply changes to the device settings, make the changes and click the Test Settings button.
2. A message appears that reads, “Please wait while the new configuration is set.”
3. The window automatically refreshes, and the changed settings are displayed. The Test Settings button is now the Save Settings button.
4. A confirmation message and timer appear near the top of the page.
If the settings are not saved before the timeout expires, the system will automatically revert back to the last saved settings.
8
C2684M (2/08)
SAVING THE SETTINGS
1. After testing the changed settings, the Save Settings button appears in place of the Test Settings button.
2. If the settings are correct, click the Save Settings button to apply changes.
3. If the changes are not correct, click the Cancel button to revert to the last saved settings.
RESTORING DEFAULTS
1. To restore Pelco’s original defaults to all settings on all tabs, click the Restore Defaults button. A dialog box appears.
NOTE: Restoring the device to the factory default settings will result in a loss of any configurations, including wireless and network
settings, that were previously applied.
2. Click the OK button to continue restoring defaults.
3. The window refreshes, and the default settings appear.
ACCESSING PELCO’S WEB SITE
For your convenience, there is a hyperlink to the Pelco Web site in the bottom left of the window. Click the Pelco link to open www.pelco.com in
a new window.
C2684M (2/08)
9
Network Settings Tab
Use the Network Settings tab to manage network settings such as changing the unit mode and host name, turning on/off the Dynamic Host
Configuration Protocol (DHCP), or setting a static IP address.
Figure 5. Network Settings Tab
CHANGING THE UNIT MODE
The unit mode you select should be based on the configuration determined during installation. Refer to Application Scenarios in the installation
manual shipped with the EW5001 for more information.
To change the unit mode, do the following:
1. Open the Unit Mode drop-down box by clicking the down arrow.
2. Select a unit mode from the drop-down box.
3. The selected unit mode is now displayed in the Unit Mode box, as well as on the second tab.
10
C2684M (2/08)
CHANGING THE HOST NAME
The default name for the device is EW5000. To change the host name, do the following:
1. Click the Host Name box and highlight the text.
2. Type a user-friendly name into the Host Name box (maximum 16 characters). A user-friendly name makes it easier to recognize the device
on the network.
CHANGING THE NETWORK SETTINGS
The network automatically assigns an IP address to the EW5001. The following scenarios are how a DHCP or static network assigns IP settings:
•
DHCP Network: If the EW5001 is connected to a DHCP network, the server will automatically assign an IP address to the device.
NOTE: DHCP is the default setting for the EW5001.
•
Static IP Network: If the EW5001 is connected to a static IP network, your network administrator will assign an IP address to the device.
NOTES:
•
•
Contact your network administrator to avoid any network conflicts before setting/changing the IP address of the device.
If you do not know the IP address of the EW5001, return to the WS5000 Setup window (refer to Figure 2 on page 5). Select the device
by left-clicking it. Click the Properties button. A window opens listing information about the device, including the IP address.
MANUALLY SETTING THE IP ADDRESS
1. Go to DHCP and select Off to turn off the Dynamic Host Configuration Protocol.
2. Change the following network settings as required:
•
•
•
•
C2684M (2/08)
IP Address: Address of the device connected to the network.
Subnet Mask: Determines the network segment the IP protocol uses.
Gateway: Associated with both a router and a switch. The router determines where packets are sent, and the switch provides the
path for the packet in and out of the gateway.
DNS Server: The address of the dedicated server that translates the names for Web sites and hostnames into numeric IP addresses.
11
Access Point or Wireless Bridge Tab
Depending on the selected unit mode, the label on the second tab will either read Access Point or Wireless Bridge.
Use the Access Point tab or the Wireless Bridge tab to change the service set identifier (SSID), manage encryption settings, and modify the
channel. In addition, the bridge connection settings and connection speed are available from the Wireless Bridge tab.
Diagnostic and system information is also provided on the Access Point/Wireless Bridge tab.
Figure 6. Access Point Tab
ACCESS POINT
CHANGING THE SSID
The SSID is the identifiable name of the network. The default SSID is Pelco_Wireless. If two Pelco networks are using the same channel, each
network needs to have a different SSID.
To change the SSID, do the following:
1. Click the SSID box and highlight the text.
2. Type a user-friendly network name into the SSID box, using no more than 32 characters.
12
C2684M (2/08)
CHANGING THE ENCRYPTION PASSPHRASE
The encryption passphrase allows devices to securely communicate over the network by enabling encryption. To safeguard the network against
Pelco devices that are part of another network, change the passphrase.
To specify a new encryption passphrase, select Custom and type your personalized passphrase in the empty text box. The passphrase can be any
combination of alphanumeric characters. The passphrase must contain at least 8 characters and no more than 63 characters.
To avoid breaking communication to devices already connected to the EW5001, the encryption passphrase needs to be changed for each device
separately. To change the passphrase, do the following:
1. Using a Web browser, open each of the devices (EW5301T wireless video encoders or EW5002 wireless access point/bridge) connected
to the EW5001. Refer toUsing a Web Browser on page 6.
2. Change the timeout settings of all devices, including the EW5001, to allow enough time to change the passphrase for each device. Refer to
Changing the Timeout Setting on page 8.
3. Using the Web browser, set the new passphrase for the first EW5301T or EW5002.
a.
Click in the Encryption Passphrase box, and then type the passphrase. Be sure to use more than 8 characters and fewer than
63 characters.
b.
Click the Test Settings button.
c.
Repeat these steps for all of the other connected devices.
4. After changing the encryption passphrase for all of the connected devices, change the passphrase for the EW5001; click the Test Settings
button.
5. To avoid exceeding the fail-safe timeout settings, go back to each of the connected devices in the same order in which you changed the
passphrase in step 3; click the Save Settings button for each device.
6. Click the Save Settings button for the EW5001.
CHANGING THE ENCRYPTION TYPE
The available encryption type settings are Pelco, WPA-PSK, and Disabled. The default encryption type is Pelco.
WARNING: Selecting Disabled may put your network security at risk. Disabling encryption is not recommended.
To avoid breaking communication to devices already connected to the EW5001, the encryption type needs to be changed for each device
separately. To change the encryption type, do the following:
1. Using a Web browser, open each of the devices (EW5301T wireless video encoders or EW5002 wireless access point/bridge) connected
to the EW5001. Refer toUsing a Web Browser on page 6.
2. Change the timeout settings of all devices, including the EW5001, to allow enough time to change the encryption type for each device.
Refer toChanging the Timeout Setting on page 8.
3. Using the Web browser, set the new encryption type for the first EW5301T or EW5002.
a.
Open the Encryption Type drop-down box by clicking the down arrow.
b.
Select an encryption type from the drop-down box.
c.
Click the Test Settings button.
d.
Repeat these steps for all of the other connected devices.
4. After changing the encryption type for all of the connected devices, change the encryption type for the EW5001; click the Test Settings
button.
5. To avoid exceeding the fail-safe timeout settings, go back to each of the connected devices in the same order in which you changed the
passphrase in step 3; click the Save Settings button for each device.
6. Click the Save Settings button for the EW5001.
C2684M (2/08)
13
CHANGING THE CHANNEL
If your network is experiencing excessive interference, the channel should be changed. When changing the channel, remember that all wireless
devices on the network must be set to the same channel.
To change the channel, do the following:
1. Open the Channel drop-down box by clicking the down arrow.
2. Select a channel from the drop-down box.
STATISTICS AND DIAGNOSTICS
The information in this section is for reference only, and will typically be used by Pelco Product Support in the event of video quality issues. This
section provides information about the location of the device on the network, how the network connections are functioning, and which devices are
connected.
To view all of the information available, open the drop-down boxes for Network Information, Wireless Statistics, System Information, and
Currently Connected Devices by clicking the down arrow beside each item.
Network Information
The Network Information section is a reflection of the settings assigned on the Network Settings tab. Refer to Network Settings Tab on page 10
for more information on these settings.
Wireless Statistics and System Information
The information in these sections will be useful to Pelco Product Support for troubleshooting purposes. In the event of a video quality issue, have
this information available when contacting Pelco for support.
Currently Connected Devices
This section provides the MAC address, speed, and RSSI for each of the devices connected to the EW5001.
14
C2684M (2/08)
WIRELESS BRIDGE
If the device is set to act as a bridge or backhaul, this information will appear on the second tab. The Wireless Bridge tab has all of the same
settings that are available on the Access Point tab, as well as the bridge connection settings and connection speed.
Figure 7. Wireless Bridge Tab
CHANGING THE CONNECTION SPEED
Before setting the connection speed, several factors must be considered including the distance between network components, clarity of the path
between components, and the number of video encoders in a cluster. If the connection quality is compromised, you may need to lower the
connection speed to compensate for these situations.
To change the connection speed, open the Connection Speed drop-down box by clicking the down arrow, and then select a connection speed
from the list.
The default Auto setting allows devices to connect at the highest speed available for each.
C2684M (2/08)
15
CHANGING THE BRIDGE CONNECTION SETTINGS
This setting manages how the bridge or backhaul component will connect to the appropriate device. The available settings allow the bridge or
backhaul to connect to another device automatically or manually by entering a valid media access control (MAC) address.
1. Select the Auto or Manual setting for the Bridge Discovery Mode. Auto is the default setting.
2. If the Bridge Discovery Mode is set to Auto, make sure that both devices are set to the same channel. Auto discovery will not function if the
devices are set to different channels.
3. If the Bridge Discovery Mode is set to Manual, click in the Peer Bridge MAC Address box.
4. Type the MAC address of the device to which the bridge will connect.
16
C2684M (2/08)
Device Log Tab
This information is a 24-hour record of activity on the EW5001. If your system is experiencing problems, you may need to reference this
information to help determine the cause.
C2684M (2/08)
17
Troubleshooting
If the following instructions fail to solve your problem, contact Pelco Product Support at 1-800-289-9100 or 1-559-292-1981 for assistance.
Access the properties windows for the EW5001 single radio wireless device on the WS5000 Endura workstation (refer to the WS5000 Operation
manual). Then note the following before calling Pelco:
•
Unit serial number: Located on the Properties window and on the product label.
•
Unit firmware version: Located on the Advanced Properties window, listed for the Wireless Device.
NOTE: Do not try to repair the unit yourself. Opening it immediately voids any warranty. Leave maintenance and repairs to qualified technical
personnel. Exchange the defective unit and return it for repair.
Table A. Troubleshooting the EW5001
Problem
Cannot log on to the device.
Possible Causes
Password is incorrect.
Settings time out.
Timeout value is set too low.
High number of dropped
packet errors.
Faulty connection between
devices.
Connection speed is too high.
No video is displayed or video
quality is poor.
18
Settings were changed
incorrectly.
Unit mode is set incorrectly.
Other devices on the same
channel are causing
interference.
Video encoders within a
cluster are set incorrectly.
Suggested Remedy
Contact your network administrator or Endura certified
technician.
Increase the timeout value to allow more time to test and save
settings. Refer to Changing the Timeout Setting on page 8.
Lower the connection speed.
Restore the settings that worked previously.
Set the unit mode to reflect the correct application scenario.
Contact your network administrator for more information.
Change the channel for the device. Refer to Changing the
Channel on page 14.
If the connection speed is set to Auto for one video encoder, the
connection speed for all other video encoders in that cluster
need to be set to Auto as well.
C2684M (2/08)
PRODUCT WARRANTY AND RETURN INFORMATION
WARRANTY
Pelco will repair or replace, without charge, any merchandise proved defective in
material or workmanship for a period of one year after the date of shipment.
Exceptions to this warranty are as noted below:
• Five years on fiber optic products and TW3000 Series unshielded twisted pair
(UTP) transmission products.
• Three years on Spectra® IV products.
• Three years on Genex® Series products (multiplexers, server, and keyboard).
• Three years on DX Series digital video recorders, DVR5100 Series digital video
recorders, DigitalSENTRY® Series hardware products, DVX Series digital video
recorders, NVR300 Series network video recorders, and Endura ® Series
distributed network-based video products.
• Three years on Camclosure® and Pelco-branded fixed camera models, except
the CC3701H-2, CC3701H-2X, CC3751H-2, CC3651H-2X, MC3651H-2, and
MC3651H-2X camera models, which have a five-year warranty.
• Three years on PMCL200/300/400 Series LCD monitors.
• Two years on standard motorized or fixed focal length lenses.
• Two years on Legacy®, CM6700/CM6800/CM9700 Series matrix, and DF5/DF8
Series fixed dome products.
• Two years on Spectra III™, Spectra Mini, Esprit®, ExSite®, and PS20 scanners,
including when used in continuous motion applications.
• Two years on Esprit and WW5700 Series window wiper (excluding wiper
blades).
• Two years (except lamp and color wheel) on Digital Light Processing (DLP®)
displays. The lamp and color wheel will be covered for a period of 90 days. The
air filter is not covered under warranty.
• Two years on Intelli-M® eIDC controllers.
• One year (except video heads) on video cassette recorders (VCRs). Video heads
will be covered for a period of six months.
• Six months on all pan and tilts, scanners, or preset lenses used in continuous
motion applications (preset scan, tour, and auto scan modes).
Pelco will warrant all replacement parts and repairs for 90 days from the date of
Pelco shipment. All goods requiring warranty repair shall be sent freight prepaid
to a Pelco designated location. Repairs made necessary by reason of misuse,
alteration, normal wear, or accident are not covered under this warranty.
Pelco assumes no risk and shall be subject to no liability for damages or loss
resulting from the specific use or application made of the Products. Pelco’s liability
for any claim, whether based on breach of contract, negligence, infringement of
any rights of any party or product liability, relating to the Products shall not exceed
the price paid by the Dealer to Pelco for such Products. In no event will Pelco be
liable for any special, incidental, or consequential damages (including loss of use,
loss of profit, and claims of third parties) however caused, whether by the
negligence of Pelco or otherwise.
The above warranty provides the Dealer with specific legal rights. The Dealer may
also have additional rights, which are subject to variation from state to state.
If a warranty repair is required, the Dealer must contact Pelco at (800) 289-9100 or
(559) 292-1981 to obtain a Repair Authorization number (RA), and provide the
following information:
1. Model and serial number
2. Date of shipment, P.O. number, sales order number, or Pelco invoice number
3. Details of the defect or problem
If there is a dispute regarding the warranty of a product that does not fall under
the warranty conditions stated above, please include a written explanation with
the product when returned.
Method of return shipment shall be the same or equal to the method by which the
item was received by Pelco.
RETURNS
To expedite parts returned for repair or credit, please call Pelco at (800) 289-9100
or (559) 292-1981 to obtain an authorization number (CA number if returned for
credit, and RA number if returned for repair) and designated return location.
All merchandise returned for credit may be subject to a 20 percent restocking and
refurbishing charge.
Goods returned for repair or credit should be clearly identified with the assigned
CA or RA number and freight should be prepaid.
1-8-08
The materials used in the manufacture of this document and its components are compliant to the requirements of Directive 2002/95/EC.
This equipment contains electrical or electronic components that must be recycled properly to comply with Directive 2002/96/EC of the European Union
regarding the disposal of waste electrical and electronic equipment (WEEE). Contact your local dealer for procedures for recycling this equipment.
REVISION HISTORY
Manual #
Date
C2684M
2/08
Comments
Original version.
Pelco, the Pelco logo, Camclosure, DigitalSENTRY, Endura, Esprit, ExSite, Genex, Intelli-M, Legacy, and Spectra are registered trademarks of Pelco, Inc.
Spectra III is a trademark of Pelco.
DLP is a registered trademark of Texas Instruments Incorporated.
Pentium is a registered trademark of Intel Corporation.
Microsoft, Windows, and Internet Explorer are registered trademarks of Microsoft Corporation.
Mac is a registered trademark of Apple Inc.
Firefox is a registered trademark of the Mozilla Foundation.
Javascript is a trademark of Sun Microsystems.
© Copyright 2008, Pelco, Inc. All rights reserved.
Worldwide Headquarters
3500 Pelco Way
Clovis, California 93612 USA
USA & Canada
Tel: 800/289-9100
Fax: 800/289-9150
International
Tel: 1-559/292-1981
Fax: 1-559/348-1120
www.pelco.com
ISO9001
Australia
| Finland | France | Germany | Italy | Macau | The Netherlands | Russia | Singapore
| Spain | Sweden | United Arab Emirates | United Kingdom | United States
South Africa