1
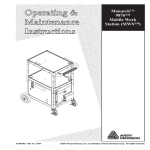
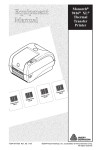
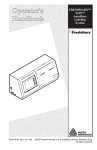
6094 TM Four Station Charger Operating Instructions TC6094OI Rev. BA 4/02 ©2002 Paxar Corporation. All rights reserved. Each product and program carries a respective written warranty, the only warranty on which the customer can rely. Monarch reserves the right to make changes in the product and the programs and their availability at any time and without notice. Although Monarch has made every effort to provide complete and accurate information in this manual, Monarch shall not be liable for any omissions or inaccuracies. Any update will be incorporated in a later edition of this manual. WARNING This equipment can interfere with radio communication if not installed and used in accordance with the instruction manual. It has been tested and found to comply with the limits for a Class A computing device pursuant to FCC Rules, Part 15, Subpart B, which provide reasonable protection against such interference when operated in a commercial environment. Operation in a residential area is likely to cause interference which the user must correct at their own expense. CANADIAN D.O.C. WARNING This digital apparatus does not exceed the Class A limits for radio noise emissions from digital apparatus set out in the Radio Interference Regulations of the Canadian Department of Communications. Le présent appareil numérique n’émet pas de bruits radioélectriques dépassant les limites applicables aux appareils numériques de la classe A prescrites dans le Réglement sur le brouillage radioélectrique édicte par le ministère des Communications du Canada. Trademarks Monarch and PATHFINDER are registered trademarks of Monarch Marking Systems, Inc. Paxar is a trademark of Paxar Corporation. 6094 is a trademark of Monarch Marking Systems, Inc. IMPORTANT SAFETY INSTRUCTIONS Save These Instructions This manual contains important safety and operating instructions for the 6094 charger. Before using the 6094 charger, please read all instructions and caution markings on: ✓ the charger. ✓ the battery handle. ✓ the printer. WARNING The 6094 charger is for charging PATHFINDER® battery handles only. Other types of battery handles may burst causing personal injury and damage. General Safety Precautions 1. Do not expose the charger to rain or snow. 2. When disconnecting the power cord, pull on the plug, not the cord. Do not operate the charger with a damaged plug or cord ----replace the power cord immediately if damaged. i 6094 Operating Instructions 3. Do not use an extension cord unless absolutely necessary. If an extension cord is used, make sure ✓ the wire is 18 gauge or larger. ✓ the pins on the plug of the extension cord are the same number, size, and shape as those of the plug on the charger. ✓ the extension cord is properly wired and in good electrical condition. 4. Do not operate the charger if it is damaged. Call Monarch Service. 5. Do not disassemble the charger. Incorrect reassembly may result in risk of electric shock or fire. Contact Monarch Service when service or repair is required. 6. To reduce risk of electric shock, unplug charger from outlet before doing any maintenance or cleaning. Turning the power off does not reduce this risk. 7. The plug for the charger is equipped with a grounding pin. The outlet for installation must be installed and grounded in accordance with all local codes and ordinances. ii Table of Contents 1. Overview................................................................................1 Charging Time ................................................................ 1 Convenience Features ................................................... 2 2. Installing the Charger ......................................................... 3 Setting the Power Supply ............................................... 3 Wall Mount Installation ................................................... 5 Power On Test ............................................................... 6 3. Charging Handles ............................................................... 7 4. Troubleshooting .................................................................. 9 Problems and Solutions ................................................. 9 Replacing Fuses........................................................... 11 Specifications ............................................................... 12 iii 6094 Operating Instructions iv 1. Overview The 6094 charger is a "fast charge" accessory for charging and storing PATHFINDER battery handles. There are four charging stations on the charger. Each station charges independently, which means you can attach battery handles at anytime. Charging Time Charging time varies depending upon the capacity rating of the battery handle and its usage. Most battery handles will recharge in less than 2 hours. NOTE: Battery handles with a higher capacity rating will take longer to charge. With the 6094, you cannot damage the battery handles by overcharging. The 6094 automatically reduces power to a "trickle" charge to maintain the charge of the battery handle until it is removed. 1 6094 Operating Instructions Convenience Features Additional features are: • switchable power supply which lets you select 100, 120, 220, or 240 VAC for your operating area. • charging status indicator light for each charging station. • replaceable fuses. Familiarize yourself with the different parts of the 6094 charger. Power Light Status Indicator Fuse Box Power Switch 2 Charging Station 2. Installing the Charger The charger may be mounted to the wall or set on a sturdy table. Before installing the charger ✓ set the power supply for the voltage in your area. ✓ select a location for wall mounting or table top use. ✓ perform the power on test. Setting the Power Supply When you first receive the charger, the power supply is factory pre-set: • 6094-01 is 120 VAC with 1A fuses. • 6094-02 is 220/240 VAC with .5A fuses. • 6094-03 is 100 VAC with 1A fuses. To reset the power supply for 100, 120, 220, or 240 VAC: 1. Turn the power OFF. 2. Unplug the power cord. 3. Use the tip of a screwdriver or pen to open the fuse box as shown. The fuse box is located on the left side of the charger beside the power switch. Fuse Box 3 6094 Operating Instructions 4. Carefully pull the fuse box straight out. Fuses are attached, so be careful not to drop or jolt the fuses. CAUTION Make sure you are using the correct fuses for the voltage you select. 5. Using a screwdriver, pull the power selector straight out. Power Selector 6. Rotate the power selector to the setting required. 7. Push the power selector all the way into the slot. Make sure the selected number is facing you. 8. Change all fuses to the correct fuses for the voltage selected. See "Replacing Fuses" in Chapter 4. 9. Replace the fuse box, pushing until it snaps closed. 4 2. Installing the Charger Wall Mount Installation To install the charger, you will need hardware appropriate for • the wall surface. • the weight of the charger with 4 handles (approximately 9.8 lb/4.4 kg). • screws no larger than No. 10 wood screw. 1. Select a location within 6 feet of an electrical outlet. Use the bracket of the charger to mark the holes where the unit is to hang. Bracket 2. Attach the necessary hardware to the wall. 3. Place the bracket of the charger over the hardware and let it slide down. 4. Plug the female end of the power cord into the charger and the male end into the wall outlet. 5 6094 Operating Instructions Power On Test Whenever you turn the power on, the charger will go through a self-test cycle which takes a few seconds. During this test, you’ll see the status indicators flash in the following sequence: 1. GREEN power light is on. 2. Each station, starting with station one, flashes GREEN to RED. 3. All four stations flash GREEN. 4. All four stations flash RED. 5. Green power light remains on and all station indicators turn off for several seconds. Any station that has a handle connected will show a slow flashing green light. If the lights form a pattern different than described above, the charger is malfunctioning. Turn the power off and check the "Troubleshooting" section in Chapter 4, or call Monarch Service. 6 3. Charging Handles To begin charging... 1. Check the power light to make sure the power is on. Power Light Power Switch Status Indicator Charging Station 2. Slide the battery handle completely into the charging station. 7 6094 Operating Instructions The status indicator will slowly flash green to indicate the battery handle is properly installed. During the charging cycle, the status indicator will change. Use the color of the status indicator and whether it is solid, flashing slowly, or flashing quickly to determine the meaning of the indicator. 8 Status Indicator Solid Slow Flashing Quick Flashing Green Fully Charged Trickle Charging Fast Charging Red N/A Charging Problem or Defective Battery Handle Defective Battery Handle Green/Red N/A N/A Charger Problem 4. Troubleshooting This chapter includes common problems which may occur and instructions for replacing the fuses. Problems and Solutions This section helps you correct some problems that may occur. If you cannot fix a problem, please contact Monarch Service. U.S. Customers call TOLL FREE 1-800-231-7700 International Customers contact your Pitney Bowes or Monarch Marking Systems representative. Problem Corrective Action Power indicator does not light up. Make sure the charger is plugged in. Make sure the power switch is ON. Make sure the cord is completely connected to the charger receptacle. Check the electrical outlet for power. Check the fuses and replace if necessary. Contact Monarch Service. 9 6094 Operating Instructions Problem Corrective Action Status indicator does not light up when a battery handle is attached. Check the power light to see if the power switch is ON. Push the battery handle completely into the charging station for a good connection. Check the fuses and replace if necessary. Try a known good battery handle to see if the problem is in the battery handle. Battery handle will not charge. Check the status indicator for charging status. Check the fuses and replace if necessary. Try a known good battery handle to see if the problem is in the battery handle. If the charger is hot, disconnect the power cord and call Monarch Service. Charger is warm. Normal. However, if the charger feels hot, disconnect and call Monarch Service. A status indicator is quickly flashing red and the rest of the indicators have no light. There is a short in the battery handle in the charging station with the quickly flashing red light. Remove the defective battery and turn the charger off then back on. All status indicators quickly flash green/red. Turn the power off then on. 10 4. Troubleshooting Replacing Fuses If the fuses need replacing, you’ll need: • 1A fuses for 120V and 100V. ...or... • .5A fuses for 220 and 240V. When the charger is facing you, the fuse box is located on the left side of the charger beside the power switch. 1. Turn the power OFF and unplug the power cord. 2. Use the tip of a screwdriver or pen to open the fuse box. 3. Carefully pull the fuse box straight out. Fuses are attached, so be careful not to drop or jolt the fuses. 4. Check to see if the fuse(s) are blackened, or if the thin metal wire inside is broken. 5. Remove the old fuse(s) by pulling them from the casing as shown. 6. Insert the new fuse(s) into the casing. 7. Replace the fuse box, pushing until it snaps closed. 11 6094 Operating Instructions Specifications Dimensions: Height Width Depth Weight (with cord) 5.67 inches (14.4 cm) 9.21 inches (23.4 cm) 3.94 inches (10 cm) 7 lb (3.2 kg) Power: Internal switchable power supply (100, 120, 220, 240 VAC/ 50 Hz. nominal) Replaceable dual fusing 1A fuses (Monarch part #PB02282108) for 100 and 120 VAC models .5A fuses (Monarch part #PB02282107) for 220/240 VAC model High output current - 500 mA (+/- 10%) per charging station Low output current - 50 mA (+/- 10%) per charging station Operating and Storage Temperatures: 40° - 110°F (4° - 43°C) Humidity: 5% - 90% non-condensing 12 For supplies, service or assistance call: TOLL FREE: 1-800-543-6650 (In the U.S.A.) 1-800-263-4650 (In Canada) www.paxar.com Published by the Technical Communications Department. Printed in U.S.A.