1
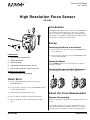
I n s tr u c t i o n S he e t
®
012-10237A
High Resolution Force Sensor
PS-2189
Introduction
2
3
4
1
The High Resolution Force Sensor connects to a PASPORT interface or datalogger and records force in the range of −50 N to
+50 N at a rate of up to 1000 samples per second. High resolution, dynamic over-sampling, and a low drift rate make the sensor
well suited for measuring very small changes
Set-up
Connecting the Sensor to an Interface
1.
Connect the sensor’s plug to any port of a PASPORT interface or datalogger.
2.
If you are using a computer, connect the PASPORT interface
to it and start DataStudio.
5
Included Parts
1. High Resolution Force Sensor
2. Bumper attachment
Zeroing the Sensor
3. Hook attachment
Press the ZERO button on the sensor. The sensor’s output is
adjusted to read zero.
4. Cart/Bracket thumbscrew (M5 × 45 mm)
5. Rod clamp thumbscrew (1/4-20 × 0.75 inch)
Connecting Bumper and Hook Attachments
Additional Part Required
Screw the bumper or hook into the sensor as illustrated.
•
PASPORT interface or datalogger
Quick Start
1.
Connect the High Resolution Force Sensor to your
PASPORT interface.
2.
If you are using a computer, connect the PASPORT interface
to it and start DataStudio.
3.
Screw the hook attachment into the sensor.
4.
Press or click the start button to begin recording data.
5.
Push or pull the hook. The sensor measures the applied
force.
About the Force Measurement
Dynamic Over-sampling
To increase the degree of dynamic over-sampling, lower the sample rate.
Over-sampling reduces noise, produces smoother data, and
improves the measurement resolution. This effect is especially
noticeable when very small force changes are measured. The
800-772-8700
www.pasco.com
H ig h R e s o lu t i o n F o r c e S e n s o r
degree of over-sampling depends on the sample rate. Maximum
over-sampling occurs at sample rates of 20 Hz and slower.
PS- 2 1 8 9
Specifications
Sample Rate
Range
±50 N
By default, the sensor collects 10 samples per second. It can collect data as fast as 1000 samples per second and as slow as one
sample every four hours. Change the sample rate in DataStudio
or on your datalogger.
Resolution
0.002 N
Maximum Sample Rate
1000 samples/s
Inverted Output
By default, the sensor registers pushing as a positive force and
pulling as a negative force. To register pulling as positive and
pushing as negative, select the Force (Inverted) measurement in
DataStudio or on your datalogger.
Technical Support
For assistance with any PASCO product, contact PASCO at:
Address: PASCO scientific
10101 Foothills Blvd.
Roseville, CA 95747-7100
Phone:
916-786-3800 (worldwide)
800-772-8700 (U.S.)
Fax:
(916) 786-7565
Mounting the Sensor on a Rod
Web:
www.pasco.com
Slide the sensor onto a rod and secure it with the thumbscrew as
illustrated.
Email:
[email protected]
Sensor Mounting
For more information about the High Resolution Force Sensor
and the most up-to-date version of this Instruction Sheet, visit:
www.pasco.com/go?PS-2189
Mounting the Sensor on a PASCO Cart
1.
Insert the included Cart/Bracket thumbscrew through the
hole in the senor labeled Cart.
2.
Screw the thumbscrew into the threaded hole on the top of
the cart.
Limited Warranty For a description of the product warranty, see the
PASCO catalog.
Copyright The PASCO scientific 012-10237A High Resolution Force
Sensor Instruction Sheet is copyrighted with all rights reserved. Permission is granted to non-profit educational institutions for reproduction of any
part of this manual, providing the reproductions are used only in their laboratories and classrooms, and are not sold for profit. Reproduction under
any other circumstances, without the written consent of PASCO scientific,
is prohibited.
Trademarks PASCO, PASCO scientific, and PASPORT are trademarks
or registered trademarks of PASCO scientific, in the United States and/or
in other countries. All other brands, products, or service names are or may
be trademarks or service marks of, and are used to identify, products or
services of, their respective owners. For more information visit
www.pasco.com/legal.
Mounting the Sensor on an IDS Bracket
1.
Insert the included Cart/Bracket thumbscrew through the
hole in the IDS Force Accessory Bracket (PASCO part
CI-6545).
2.
Screw the thumbscrew into the hole in the sensor labeled
IDS Bracket.
2
®
![DSK-RU取扱説明書[PDF:284.3KB]](http://vs1.manualzilla.com/store/data/006719731_2-462af4c07af156ead6efd2bff0fcf412-150x150.png)