1
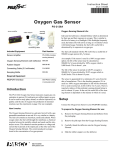
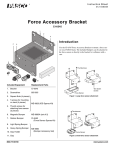
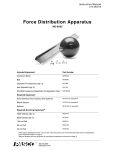
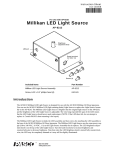
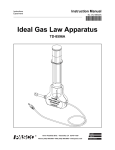
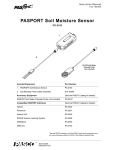
I n s tr u c t i o n S he e t
0 1 2 - 1 0 2 8 7B
Ethanol Sensor
PS-2194
Introduction
1
2
The Ethanol Sensor measures the concentration of ethanol in a
gas or indirectly in a liquid. The sensor’s probe contains a material whose resistance decreases in the presence of ethanol. The
sensor translates this resistance into an ethanol concentration
measurement, which is recorded and displayed by the connected
computer or datalogger. The Ethanol Sensor is well-suited for
continuous recording and discrete measurements.
Precautions
•
Do not expose the probe to gas containing more than 3%
ethanol, including the gas above alcoholic beverages.
Higher ethanol concentrations will deplete the sensing element. Note that the gas above a liquid contains about the
same concentration of ethanol as the liquid itself.
•
Ensure that the membrane is installed and intact before
using the probe. The membrane prevents the sensing element
from getting wet. If the sensing element accidentally gets
wet, rinse and dry it quickly. Note that the probe may be
degraded or destroyed.
•
Do not immerse the probe. The membrane (if it is in good
condition) will protect the probe in case of accidental immersion. However, the probe is designed for use in gas only.
Included Parts
1. Amplifier
2. Probe
3. PTFE tape for membrane replacement (not pictured)
Additional Part Required
•
PASPORT interface or datalogger
Related Parts
•
Replacement probe (PASCO part 003-10338)
•
Additional PTFE tape (720-062)
Quick Start
1.
Connect the amplifier to your PASPORT interface.
2.
Connect the probe to the amplifier.
3.
If you are using a computer, connect the PASPORT interface
to it and start DataStudio.
4.
Ensure that the membrane is installed and intact. There
should be no tears or discoloration.
5.
Place the end of the probe in the gas above a solution containing less than 3% ethanol.
Connecting the Parts
1.
Plug the amplifier’s PASPORT connector into any port of a
PASPORT interface or datalogger.
2.
Connect the probe to the amplifier.
probe
6.
Press or click the start button to begin recording data.
The probe stabilizes after about 10 minutes of warm up time.
®
to PASPORT
interface
Connecting the probe and interface
3.
If you are using a computer, connect the PASPORT interface
to it and start DataStudio.
E th a n o l S e n s o r
PS- 2 1 94
Warm-up
Membrane Replacement
The probe contains a heating element. After connecting the sensor to a powered PASPORT interface, wait about 10 minutes for
the sensor’s temperature to stabilize.
Change the membrane when it is torn or discolored.
1.
Pull the retaining ring off the end of the probe.
If the temperature of the gas surrounding the probe changes, the
probe will need some time to stabilize again.
2.
Remove the and discard the old membrane.
3.
Cut a 25 mm square of new membrane material.
4.
Place the new membrane over the end of the probe.
5.
Push the retaining ring onto the end of the probe over the
membrane.
6.
Optionally, use a sharp knife to trim off excess membrane
from around the retaining ring.
The sensitivity of probe changes with temperature. Make measurements at a constant temperature after the probe temperature
has stabilized.
Collecting Data
1.
Ensure that the membrane is installed and intact. There
should be no tears or discoloration.
2.
Place the end of the probe just above a solution, or in a gas,
containing less than 3% ethanol.
3.
Press or click the start button to begin recording data.
retaining
ring
Calibration
For accurate measurements, first calibrate the sensor. You will
need a solution of 1% ethanol in water. The solution should be at
the same temperature as the solutions to be measured.
Calibration data is stored in the sensor’s memory and persists
until the sensor is calibrated again, even if the sensor is
unplugged from the interface.
old
membrane
new
membrane
excess
membrane
Membrane replacement
1.
Connect the sensor to an interface as described above.
2.
Place the probe above the 1% ethanol solution.
3.
Observe the ethanol concentration reading in software or on
the datalogger.
4.
Wait until the reading stabilizes.
5.
Press and hold the 1% CAL button on the sensor for 4 s.
Temperature and humidity: The sensor’s temperature is
determined by both its internal heater and the temperature of its
surroundings. Allow the probe time to reach a stable temperature
after you plug it in or after the temperature of its surroundings
changes. Keep temperature and humidity constant during calibration and measurement.
Immediately after a successful calibration, the sensor’s output
reads 1%, and the button is illuminated.
Air flow: Air flow around or into the probe affects its temperature. Minimize airflow during calibration and measurement.
About the Membrane
Other gases: In addition to ethanol gas, the sensor responds
to hydrogen, isobutane, carbon monoxide, and methane.
Factors that Affect the
Measurement
A roll of membrane material is included with the sensor. The
material is PTFE thread sealing tape, about 25 mm wide, typically used by plumbers. The membrane protects the sensing element from liquid, but is permeable to ethanol gas.
2
®
E th a n o l S e n s o r
Sensor Response versus
Temperature
The graph below shows how changing temperature affects the
sensor. The probe was placed in the gas above a 1% ethanol solution and calibrated. The temperature was then varied between
5° C and 45° C. Though the actual ethanol concentration of the
solution remained constant, the sensor’s reading deviated from
1% at temperatures above and below the calibration temperature.
These data illustrate the importance of keeping the temperature
constant during calibration and measurement.
The relationship between temperature and sensor response varies
from probe to probe. To create a similar plot for your specific
probe, follow these steps.
1.
Place the probe and a temperature sensor just above a 1%
ethanol solution. Keep the temperature sensor about 1 cm
away from the heating element at the end of the ethanol
probe. Seal the container to keep the gas in.
PS-2194
Sample Experiment
1.
Place a mixture of luke warm water (about 42° C), sugar, and
baker’s yeast in a container.
2.
Place the end of the probe just above the liquid.
3.
Start data recording.
4.
Observe the reading for about 45 minutes as the ethanol concentration increases.
IMPORTANT: Remove the probe from the gas before the concentration
exceeds 3%.
Repeat these steps at different temperatures and with different
amounts and types of yeast and sugar. Note how these factors
affect the rate of ethanol formation.
Specifications
2.
Calibrate the ethanol sensor at room temperature.
Accuracy
20% of reading
3.
Place the container in a cold water bath. Wait for the temperature inside the container to equilibrate with the water bath.
Range
0% to 3% ethanol in gas
4.
Start data recording.
5.
Use a hot plate to slowly increase the temperature of the
water bath.
Technical Support
For assistance with any PASCO product, contact PASCO at:
Address: PASCO scientific
10101 Foothills Blvd.
Roseville, CA 95747-7100
Phone:
916-786-3800 (worldwide)
800-772-8700 (U.S.)
Fax:
916-786-7565
Web:
www.pasco.com
Email:
[email protected]
For more information about the Ethanol Sensor and the latest
revision of this Instruction Sheet, visit:
www.pasco.com/go?PS-2194
Sensor response vs. temperature, the actual ethanol concentration
is constant
®
Limited Warranty For a description of the product warranty, see the
PASCO catalog. Copyright The PASCO scientific 012-10287B Ethanol Sensor Instruction Sheet is copyrighted with all rights reserved. Permission is granted to non-profit educational institutions for reproduction of
any part of this manual, providing the reproductions are used only in their
laboratories and classrooms, and are not sold for profit. Reproduction
under any other circumstances, without the written consent of PASCO scientific, is prohibited. Trademarks PASCO, PASCO scientific, and
PASPORT are trademarks or registered trademarks of PASCO scientific,
in the United States and/or in other countries. All other brands, products,
or service names are or may be trademarks or service marks of, and are
used to identify, products or services of, their respective owners. For more
information visit www.pasco.com/legal.
3