1
Wireless Function Edition
(PT-LB50NTE/PT-LB55NTE/PT-LB60NTE)
(PT-LB50NTU/PT-LB60NTU)
The projectors illustrated as examples are PT-LB50NTE.
TQBH0168-1 (E/U)
M0306-1036
Contents (Wireless Function Edition)
Notes on Using Wireless
Connection ……………………… 4
What you can do with Wireless
Manager mobile edition 3.0 …… 6
Check your computer ………… 8
Software Installation …………… 9
Contents on Provided CD-ROM ……… 10
Wireless Manager ME 3.0 …………… 10
DirectX 9.0c …………………………… 11
System requirements …………………… 9
Installation free Wireless Manager
ME 3.0 set up …………………… 12
Connect…………………………… 13
Connecting through the access point …
Other operations for connection ……
Operations when password entry is
required for connection ………………
Adding and deleting connections ……
Searching by projector’s ID …………
Canceling the connection ……………
19
20
Various projection methods … 23
4-screen multi style ……………………
4-screen index style ……………………
16-screen index style …………………
Multiple Source Live Mode ……………
Multiple Source Multi Live Mode ……
27
28
30
31
33
Useful Functions ……………… 35
Motion streaming mode ………………
Shutter function …………………………
Pointer function …………………………
Functions used with each projection
method ……………………………………
38
40
40
Select Access Port window ……………
Easy Wireless Set Up …………………
Connection error messages …………
Connect without easy wireless set up…
When logging on without administrator
authority ………………………………
Description of the launcher ……………
Live mode …………………………………
Multi live mode …………………………
Switching from one style to another …
Selective area transmission …………
Secondary display transmission ……
Secondary viewer………………………
One shot function ………………………
13
14
16
17
17
23
25
26
26
35
36
37
37
2
20
20
21
22
40
Contents (Wireless Function Edition) (cont.)
Setting options ………………… 42
Key setting……………………………… 43
Other …………………………………… 44
Version information …………………… 44
Setting option window ………………… 42
Transmission …………………………… 42
Network setting of the projector … 45
Verifying settings ………………………
Returning to the Initial Settings ………
[User] settings …………………………
IP address settings ……………………
Wireless settings ………………………
Default settings of [USER1]-[USER3] …
48
48
49
49
50
52
Using WebBrowser …………… 53
Projector control window ………………
Monitor information window …………
Password changing window …………
Network setting window ………………
57
58
58
59
Displaying the Wireless Menu ………
Changing the network number ………
Changing the projector name …………
Password setting ………………………
45
46
46
47
Before using the WEB control ……… 53
Accessing from the Web browser …… 56
Software Uninstall ……………… 60
Wireless Manager ME 3.0 ……………… 60
Glossary ………………………… 61
Frequently Asked Questions … 63
Please note the following.
• Panasonic cannot be held liable for any direct or indirect damages resulting from
the use or malfunction of this projector.
• Panasonic cannot be held liable for damages arising from data corruption or loss
as a result of using this projector.
3
Notes on Using Wireless Connection
Wireless connection function of the projector uses radio waves in the 2.4 GHz band.
A radio station license is not required, but be sure to read and fully understand the
following items before use.
Do not use near other wireless equipment.
The following equipment may use radio waves in the same band as the projector.
When the projector is used near these devices, radio wave interference may make
communication impossible, or the communication speed may become slower.
• Microwave ovens, etc.
• Industrial, chemical and medical equipment, etc.
• In-plant radio stations for identifying moving objects such as those used in factory
manufacturing lines, etc.
• Designated low-power radio stations
If at all possible, avoid the use of cellular phones, TV sets or
radios near the projector.
Cellular phones, TV sets, radios and similar devices use different radio bands from
the projector, so there is no effect on wireless communication or the transmission and
reception of these devices. However, radio waves from the projector may produce audio
or video noise.
Wireless communication radio waves cannot penetrate steel
reinforcements, metal, concrete, etc.
Communication is possible through walls and floors made from materials such as
wood and glass (except glass containing wire mesh), but not through walls and
floors made from steel reinforcements, metal, concrete, etc.
4
Notes on Using Wireless Connection (cont.)
Using the projector outside the country
It is forbidden to take the projector outside the country or region where you
purchased it, so use it only in the said country or region. Also, note that depending
on countries or regions there are restrictions on the channels and frequencies at
which you can use the wireless LAN.
Channels that can be used
The channels (frequency range) that can be used differ according to the country or
region. Refer to the table below.
Country or region
Standard
Japan
ARIB STD-T66
China
SRRC
England, Germany,
France, Spain
Italy, Belgium,
Austria, Sweden,
Norway, Denmark,
Switzerland, Holland,
Finland, Portugal,
Greece, Thailand,
South Korea
Channels used
Frequency band
(Center frequency)
1 - 13
2,412 MHz 2,472 MHz
1 - 11
2,412 MHz 2,464 MHz
ETSI 300.328
Singapore
IDA
Australia,
New Zealand
C-Tick
Malaysia
SIRIM
United States
FCC part 15
Taiwan
DGT
5
What you can do with Wireless Manager mobile edition 3.0
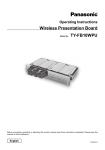
Wireless Transmission
If you install Wireless Manager mobile edition 3.0 (hereafter called “Wireless Manager
ME3.0”), you can connect the projector to a computer via the wireless LAN, and send
moving and still images.
• Easy Wireless Set Up (See page 14)
• When connecting without the administrator authority (See page 17)
• Sending data by wireless transmission while the projector is connected to the
wireless LAN. [When connecting through the wireless access point (hereafter called
“access point” )] (See page 19)
“Glossary” (See page 61)
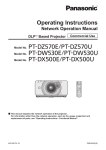
Project with various methods
<Live mode> (See page 25)
Used for normal presentations.
<Multi live mode>
<4-screen multi style> (See page 27)
Used for presentations involving multiple computers.
<4-screen index style> (See page 28)
This style is convenient in cases where you wish to
focus attention on one of four presentations displayed
simultaneously.
<16-screen index style> (See page 30)
This style is convenient in cases where you wish to
display a large number of presentations as a list.
6
What you can do with Wireless Manager mobile edition 3.0 (cont.)
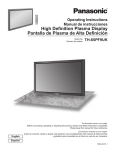
Project with multiple projectors
<Multiple source live mode> (See page 31)
This arrangement can be used when a number of projectors are installed in a large conference
room, or when holding simultaneous presentations in several conference rooms, for example.
<Multiple source multi live mode> (See page 33)
This arrangement can be used when you wish to
simultaneously display multiple presentations using
multiple projectors.
Useful functions
<Selective area transmission> (See page 35)
By using the selective area window,
you can specify the necessary
information alone from the
computer screen, and display it on
the projection screen.
<Secondary display transmission> (See page 36)
You can set the computer screen and the projector screen to the multi-monitor mode,
and use the computer screen as the primary monitor and the projector screen as
the secondary monitor. This is convenient for when holding a presentation using the
projector screen while displaying reference material on the computer screen.
Moving the cursor outside the computer screen with the mouse
7
Check your computer
Necessary environment for computers to be connected
• First, check your computer to see whether or not it has a built-in wireless LAN
function.
LAN : “Glossary” (See page 61)
• Before connecting the projector to the computer, be sure to check the following
settings.
• Operation is not guaranteed for all wireless cards and built-in wireless LAN adapters.
Check 1
Wireless LAN settings
<Computer with a built-in wireless LAN function>
• Is your wireless LAN switched on?
• If your computer has a built-in wireless LAN function, use the built-in wireless LAN.
Do not insert a different wireless LAN card.
<Computer without a built-in wireless LAN function>
• Is your wireless LAN card properly recognized?
• Is the wireless LAN card switched on?
• Install the wireless card driver beforehand. For details on how to install the driver,
refer to the instructions accompanying the wireless card.
• Refer to the following URL for the types of wireless LAN cards that system operation
capabilities are confirmed.
http://panasonic.co.jp/pavc/global/projector/
Check 2
Logon user’s settings
• Have you logged in as the Administrator?
Check 3
Computer’s settings
• When security (firewall) software and utilities for network cards are installed, these
may prevent connection of the projector.
<Windows XP>
• Is Network Bridge enabled?
• Has your firewall been disabled?
• This manual describes how the computer is operated using Windows XP as the
operating system.
8
Software Installation
System requirements
The computer must meet the following requirements in order to use the supplied
software.
OS:
Microsoft Windows 2000 Professional/XP Home Edition/XP
Professional
CPU:
Pentium III or faster or compatible processor (800 MHz or faster
is recommended when using live mode and 1 GHz or faster is
recommended when playing movies.)
RAM:
256 MB or more
Empty hard disk capacity:
60 MB or more
Hardware conditions:
CD or DVD drive (for software installation and viewing the user’s
manual)
An 802.11 b/g built-in wireless LAN system or an 802.11 b/g wireless
LAN card must be installed and running properly.
However, some 802.11 b/g wireless LAN may not allow connection to
802.11 g projectors.
Web browser: Internet Explorer 6.0 or newer
Netscape Communicator 7.0 or newer
DirectX:
Environment required for running DirectX 8.1b or newer
Note that operation is not guaranteed when used with system environments other than
the above or on homemade computers.
Operation is not guaranteed for all computers
that meet the above conditions.
9
Software Installation (cont.)
Contents on Provided CD-ROM
When inserting the provided CD-ROM into the computer, the installer starts up
automatically and the following screen appears.
• Shut down all software currently active on Windows. Otherwise, installation may not
be possible.
• Administrator authority is required for installation.
• If the installer does not start up automatically, double-click [EasyInstall] → [Easy_
Inst.exe] in the CD-ROM.
• If Wireless Manager ME 1.0 or 2.0 has been installed, uninstall it by following the
instructions on the screen.
Wireless Manager ME 3.0
This software is used to send screen images from a computer to the projector via a
wireless LAN.
1
Click [Wireless Manager ME 3.0].
Follow the instructions on the screen and install the software.
10
Software Installation (cont.)
DirectX 9.0c
This CD-ROM includes DirectX 9.0c. To transfer moving picture using the projector,
your computer must have DirectX 8.1b or newer.
• Once installed, the DirectX 9.0c Runtime cannot be uninstalled.
• DirectX 9.0c is already installed in Windows XP SP 2, so there is no need to install
it again. (How to check the version of installed DirectX : Click [start]→[Run], input
[dxdiag], and click [OK]. [DirectX Diagnostic Tool] dialogue box appears, then you can
confirm the [DirectX version] in [System Information] of [System] tab.)
• In rare cases, installing DirectX 9.0c may prevent your computer from starting up
properly. Before installing, be sure to verify with the customer support office of the
manufacturer that the video card of your computer is compatible with DirectX 9.0c.
• No guarantees are made for the operation of Wireless Manager ME 3.0 with a version
newer than DirectX 9.0c.
1
Click [DirectX 9.0c] on page 10.
2
Place a check in the [I accept the
agreement] checkbox and click
[Next].
The License Agreement for DirectX appears.
The DirectX Runtime component install window
appears.
3
Click [Next].
4
Click [Finish] when the window to
the right appears.
• The DirectX component install progress bar
appears.
• Do not perform any other operations until
installation is complete.
11
Installation free Wireless Manager ME 3.0 set up
You can use Wireless Manager ME 3.0 without installing it in the computer.
If you copy Wireless Manager ME 3.0 to a removable medium, such as an SD card,
you can use Wireless Manager ME 3.0 without installing it in any computer that permits
you to access this removal medium.
1
2
3
Insert provided CD-ROM into the CD-ROM drive.
Setup screen appears.
Click [Installation Free Set Up].
[Direct CD-ROM Startup] and [Other Media Source Startup, Make Copy Here]
appear on the window.
A
When using Wireless Manager ME 3.0 without
copying the program: Click [Direct CD-ROM
Startup].
Wireless Manager ME 3.0 starts up, and the “Select Access Port” window
appears.
Operation is the same as when operating after installing CD-ROM.
B
When copying Wireless Manager ME 3.0 : Click
[Other Media Source Startup, Make Copy Here].
A window opens to select the destination to save.
<If you chose B in step 3, follow steps 4-5.>
4
Select the destination to save, and click [OK].
5
Double-click the Wireless Manager ME 3.0 icon (WM.
exe) in the destination to save chosen in step 4.
CD-ROM data is copied to the destination.
After the copy ends, click [End] of the setup screen.
Wireless Manager ME 3.0 starts up.
Operation is the same as when operating after installing CD-ROM.
If selecting removable medium as the destination to save, ensure that the
removable medium is recognized by the computer to which you wish to
connect the projector.
Some removable mediums start the program automatically.
• When using without installing, following functions are not available.
• Selective area transmission (See page 35)
• Secondary display transmission (See page 36)
• Motion streaming mode (See page 38)
• Producing audio along with video at live mode
• Operation is slower compared to when the computer is used with Wireless
Manager ME 3.0 installed.
12
Connect
Select Access Port window
Click [ ] on the desktop,
or select [Start] → [All Programs] → [Panasonic Wireless
Display] → [Wireless Manager mobile edition 3.0].
Wireless Manager ME 3.0 starts up, and the “Select Access Port” window appears.
Network
When you specify the network number
(See page 46) set on the projector from
one of [1], [2], [3], [4], and [U (USER)] 1,
projectors that are presently switched
on in the selected network number are
displayed in [Projector Name]. The initial
value for both the computer and the
projector is [1] 2.
1-2 (See page 15)
ID (See page 21)
Display projector’s ID
Mode (See page 25)
Display projector’s mode or style
[
] appears when password entry
is needed for connection. (See page
20)
The status of this projector
The number of people connected to
this projector.
Access Devices
When only one projector is connected,
select [ ]. When multiple projectors are
connected, select [ ].
Available mode and functions
Among [Live mode], [Multi live mode],
[One shot], and [Motion streaming],
unavailable one is displayed with [ ].
Connectability
When you click [Connectability], the
projector name and ID are displayed at
top left of the projector screen. If the
projector name and ID are displayed
correctly, the message “Projector is
available.” will appear on the computer
screen.
Designate (See page 20)
Designate projectors to be connected when
is set to [U].
ID Search (See page 21)
When you click [ID Search], a search for
the projector of the specified ID is carried
out from among the projectors that are
presently switched on, from all channels
other than [U].
How to connect
• Easy Wireless Set Up (See page 14)
• When connecting without the administrator authority (See page 17)
• Sending data by wireless transmission while the projector is connected to the
wireless LAN (When connecting through the access point) (See page 19)
13
Connect (cont.)
Easy Wireless Set Up
If the computer has built-in wireless LAN or has a wireless LAN card installed, the
necessary settings will be made automatically when Wireless Manager ME 3.0 is
started.
1
2
3
4
Turn on the projector.
Press the [WIRELESS] button on the remote control.
Input signal is switched to Wireless on the projector.
([INPUT SELECT] button on the remote control or [INPUT] button on the
projector are also available to switch input signals.)
Turn on the computer.
Click [ ] on the desktop,
or select [Start] → [All Programs] → [Panasonic Wireless
Display] → [Wireless Manager mobile edition 3.0].
Wireless Manager ME 3.0 starts up, and the “Select Access Port” window
appears.
5
Select the network number of the desired projector
from [Network].
Projectors powered on in the chosen network group are listed.
6
Select the desired projectors, and click [OK].
The launcher shown below appears and the connection with the projector is
established. (“Description of the launcher” →See page 23)
The launcher always appears on the computer screen, and can be used to
perform various operations.
The launcher appears only on the computer screen and is not projected by the
projector.
14
Connect (cont.)
• Wireless connection cannot be made between the projector and the computer. (See
page 63)
• Automatic connection setting (See page 44)
1
• When a user logs on a computer without the administrator authority, selectable
network number is only [U].
• Depending on the computer and wireless LAN card used, easy wireless set up
may not be possible. If this is the case, the [Network] setting of “Select Access
Port” window will be switched to [U] automatically. For details of the connection
procedure, first close Wireless Manager ME 3.0, and then refer to pages 17-19.
2
• The initial network number for both the projector and Wireless Manager ME 3.0 is
[1]. These numbers must match for the connection.
To check the network number, refer to the wireless menu of the projector.
• When importance is placed on security, select the network number [2]-[4], because
WEP (wireless communication encryption) is set on these network numbers.
• Important video/audio data is protected because AES encryption processing takes
place in advance for all network numbers, even if [ENCRYPTION] is set to [NONE].
“Glossary” (See page 62)
• Other network adapters may not be usable under easy wireless set up
connections.
• Connections to other networks connected through the wireless LAN card are
broken during easy wireless set up connections.
15
Connect (cont.)
Connection error messages
One of the following windows may appear when a wireless connection cannot be
made.
When a setting error for the wireless LAN card has been detected (See page 63)
• Is the wireless LAN card effective?
• Is your wireless LAN card properly recognized?
• Some wireless cards may allow easy wireless set up
connections to function if drivers are updated.
When the Network Bridge setting has been detected (See page 64)
If you do not expect ever to use Network Bridge and see
no need for it, delete it from your system.
When Windows Firewall has been detected (See page 65)
• Has your firewall in Windows XP been disabled?
• Is Wireless Manager ME 3.0 registered in
[Exceptions] ([Control Panel] → [Security Center] →
[Windows firewall]) with the Windows XP SP 2?
When another firewall has been detected (See page 66)
Are any firewall-containing applications installed?
When the user does not have the administrator authority (Next page)
If you have logged onto a computer as a [GUEST]
or a restricted user who does not have administrator
authority, you can not perform easy wireless set up
(Network No. [1] – [4]). If you must perform easy
wireless set up without administrator authority,
designate [U] as the network number.
When a change in the settings made by the utility has been detected
The wireless LAN utility used by the computer may have
changed the wireless settings. Close the utility, and then
make the connection again using easy wireless set up
connection.
16
Connect (cont.)
Connect without easy wireless set up
When logging on without administrator authority
Before starting Wireless Manager ME3.0, it is necessary to carry out “Computer
settings” ( on this page) under the administrator authority in advance.
Next, logon as a restricted user or [GUEST], and start Wireless Manager ME 3.0.
Confirm to your system administrator before changing any settings.
Following settings are examples of when using a default setting projector.
Projector settings
1
2
3
“Glossary” (See pages 61-62)
Turn on the projector and press the [WIRELESS]
button on the remote control.
Select [USER 1]- [USER 3] from [NETWORK] at the
wireless menu and press the [ENTER] button.
Set the details of network and select [OK].
As for network setting items, see pages 49-52.
Confirm to your system administrator before changing any settings.
<Example>
OFF
DHCP
192.168.10.100
IP ADDRESS
255.255.255.0
SUBNETMASK
Panasonic Projector
SSID
MODE
AD HOC
AUTHENTICATION OPEN (Some computers may require connection by [SHARED ] authentication.)
NONE…When not performing encryption
ENCRYPTION
WEP…When performing encryption
ENCRYPTION KEY When [ENCRYPTION] setting is [WEP ]:
SETTING
DEFAULT KEY : Set 1 – 4 numerals for the default key.
KEY 1 – 4
: Set these to match the WEP key registered
in [DEFAULT KEY].
Computer settings
4
Turn on the computer and log on with the administrator
authority.
Click [Start] → [Control Panel] → [Network and Internet Connections] →
[Network Connections], right click [Wireless Network Connections], and click
[Properties], then [Wireless Network Connection Properties] window appears.
5
Select [Internet Protocol (TCP/IP )] on [General] tab,
and click [Properties].
[Internet Protocol (TCP/IP) Properties] window appears.
17
Connect (cont.)
6
Select [Use the following IP address] on [General] tab,
enter the IP address and Subnetmask, and click [OK].
7
Click [Add] of [Preferred networks] on [Wireless
Networks] tab in [Wireless Network Connection
Properties] window.
Make the IP addresses of the upper three of the four break points the same
value as that of the projector, and change the value of the last break point
alone.
Make the Subnetmask as the same value as that of the projector.
[Wireless network properties] window appears.
8
Make the SSID, network authentication, data
encryption and communication mode settings the
same as those of step 3, and click [OK].
9
Click [OK] in [Wireless Network Connection Properties]
window.
The connection with the projector is established.
10
Click [Start]→[Log Off] and log off from the computer.
Computer operation
11
Log on with the user who operates Wireless Manager
ME 3.0.
12
Start Wireless Manager ME 3.0, and select [U] from
[Network] of “Select Access Port” window.
If the projector is not displayed, click [Designate] followed by [ADD], then enter
the IP address set in the projector using the “Access Port Registration” window,
and click [REGISTER]. (See page 20)
13
Select the desired projector, and click [OK].
The launcher appears and the connection with the projector is established.
(“Description of the launcher” →See page 23)
18
Connect (cont.)
Connecting through the access point
You can make the setting for infrastructure mode (connection through the access
point); however, confirm to your system administrator on network settings before
changing any settings.
“Glossary” (See page 62)
Projector settings
1
Turn on the projector and press the [WIRELESS]
button on the remote control.
2
Select [USER 1]- [USER 3] from [NETWORK] at the
wireless menu and press the [ENTER] button.
3
Set the details of network and select [OK].
As for network setting items, see pages 49-52.
Confirm to your system administrator on network settings before changing any
settings.
Computer settings
4
Turn on the computer.
5
Make the network setting according to your system
administrator.
6
7
Connect to your access point.
Start Wireless Manager ME 3.0, and select [U] from
[Network] of “Select Access Port” window.
If the projector is not displayed, click [Designate] followed by [ADD], then enter
the IP address set in the projector using the “Access Port Registration” window,
and click [REGISTER]. (See page 20)
8
Select the desired projector, and click [OK].
The launcher appears and the connection with the projector is established.
(“Description of the launcher” →See page 23)
19
Connect (cont.)
Other operations for connection
Operations when password entry is required for connection
When a projector with the [ ] mark is selected, the window
shown to the right appears. Enter the password and click [OK].
(See page 47)
• Click [CANCEL] at the password entry window to return to launcher (See page 23).
• When an incorrect password is entered, an error message appears. Click [OK] to
return to the password entry window and enter the correct password again.
Adding and deleting connections
When [Network] is set to [U] and the desired projector is not displayed at the “Select
Access port” window, connections can be added and deleted by the following
operations.
Adding a connection
1
Click [Designate] at the
“Select Access Port”
window.
The window shown to the right appears.
2
Click [ADD] and enter the IP address
(including its periods) of the
connection to be added, and then
click [REGISTER].
“Glossary” (See page 61)
The newly registered connection is added to the
connection list in the window shown in step 1.
Deleting a connection
Select the connection to be deleted at the window shown in step 1 and click
[DELETE].
20
Connect (cont.)
Searching by projector’s ID
Even if there are two or more projectors with the same name, an ID ([Proj] + 4-digit
number) is assigned to each projector to enable the projectors to be identified. When
you click [ID Search], a search for the projector of the specified ID is carried out from
among the projectors that are presently switched on, from all channels other than [U].
It is necessary to know ID in advance. When input selection is switched to WIRELESS
on a projector, the ID appears on the upper right of the projection screen for
approximately 5 seconds. If you write down the ID displayed on the “Select Access
Port” window in advance, you can search a projector by the ID from next time.
1
Click [
] on the launcher.
The “Select Access Port” window appears.
2
Click [ID Search].
3
Enter four figures of desired projector’s ID, and click
[Search].
4
When the projector of the applicable ID is found, the
computer will be connected to that projector, and the
status display of the launcher will turn green.
[Projector ID Search] window appears.
Start Searching.
If appropriate ID is not found, an error message appears.
21
Connect (cont.)
Canceling the connection
1
2
Click [
] on the launcher.
The following window appears.
Click [Yes].
The computer returns to the original network settings when the connection is
ended.
However, note that some time may be needed to return to the original network
settings.
When the launcher is minimized, right click [
up menu and click [End].
22
] on the notification area to display pop
Various projection methods
Description of the launcher
The launcher always appears on the computer screen, and can be used to perform
various operations.
• Two types of launchers are available in the launcher display mode, the “simple
launcher” and the “full launcher”. By default, the “simple launcher” is displayed. The
launcher display mode can be toggled by clicking / on the right side of the launcher
window.
The display mode that the system was in when Wireless Manager ME 3.0 was exited
is activated the next time the program is started.
• Two launcher button sizes are allowed, the [Small button] and the [Large button]. This
is controlled in [Launcher size setting] in “Option” window. (See page 44)
• Right-click [ ] on the notification area to display the menu.
Cancel connection
Simple launcher
Mute
Full launcher
Place in notification area
Volume
control
Status indication
Status : Indicate the connecting status.
Connected computers’ names, IDs,
and their status are displayed in the
pop up window when the cursor is
on [ ] of the launcher.
When connected to one projector
(Green, lit):
Transmission possible
(Blue, blinking):
Own computer currently transmitting
(in the live mode or motion streaming mode)
(Yellow, lit):
Other user currently transmitting
(Red, lit):
Communication impossible
(Black, lit):
When the projector has not been selected
When connected to multiple projectors
(Green, lit):
All transmission possible
(Blue, blinking):
Currently transmitting
(Yellow, blinking): Communication impossible for more than one unit
(Red, lit):
All communication impossible
(Black, lit):
When the projector has not been selected
23
Various projection methods (cont.)
Full launcher
Projection mode select buttons
Live Mode:
Multi Live Mode:
Displays the computer screen over the entire
projection screen.
(See page 25)
Display the screens of multiple computers on the
divided projection screen. In 16-screen index style,
[ ] changes to [ ]. (See page 26)
Function buttons
Selective area transmission:
By using the selective area window, you can specify
the necessary information alone from the computer
screen, and display it on the projection screen.
(See page 35)
Secondary display transmission:
You can set the computer screen and the projector
screen to the multi-monitor mode, and use the
computer screen as the primary monitor and the
projector screen as the secondary monitor. (See
page 36)
One Shot function:
The screen displayed when you click the mouse is
projected as a still image. (See page 37)
Motion streaming mode: Projects a moving picture over the entire projection
screen. (See page 38)
Shutter function:
Blanks the screen for a moment. (See page 40)
WEB control:
Control a projector through the WEB browser of a
computer. (See page 53)
Select Access Port:
Displays the “Select Access Port” window.
(See page 13)
Option:
Displays the “Option” window. (See page 42)
Pointer function:
You can change the shape of the pointer appearing
on the projection screen. (See page 40)
24
Various projection methods (cont.)
Live mode
Connect a computer to a projector, and display the computer screen over the entire
projection screen.
1
Press the [MULTI-LIVE SELECT] button on the remote
control to turn the projection screen into a full
screen display (the status when no index window is
displayed).
If you press the [MULTI-LIVE SELECT] button once or twice when index
windows are displayed on the projection screen, the screen will switch over to
a full screen display.
2
3
Check the status indication on the launcher to make
sure that transmission is possible (check that the
green lamp is lit).
Click [
] on the launcher.
The current computer screen is transmitted to the selected projector. In the live
mode the projector is occupied by a single computer, so operations from other
computers are not possible.
Picture quality or other options can be set on the “Option” window by clicking
[ ] on the launcher.
• For presentations in live mode, the [PAGE ▲▼] buttons on the remote control will
function in the same way as the computer’s Page Up and Page Down keys. (When
using “Presenter View” of “PowerPoint”, the [PAGE ▲▼] buttons of the remote
control correspond to Back space key and Space key.) This means that if you
run a computer application that supports the Page Up and Page Down keys, the
presentation screen can be changed using the remote control.
• Movie play is slowed if [High Definition] is selected in the “Option” window.
• Some portions of images are not projected under some applications (MS Office
Assistant, IME Bar, animation and locus of the mouse cursor, and others).
• If the connection error occurs during projection, the message ‘Stop “Live mode”’ will
appear, then restart projection by clicking launcher buttons.
Quitting live mode
Click [
] on the launcher again.
25
Various projection methods (cont.)
Multi live mode
Switching from one style to another
Multi live mode has “4-screen multi style”, “4-screen index style” and “16-screen index
style”.
Styles are switched by the projector or the remote control.
How to switch styles
Either press the [MULTI-LIVE SELECT] button on the remote control or select
[OPTION] → [DETAILED SETUP] → [INDEX WINDOW] on the projector’s main
menu and press the [ENTER] button.
[MULTI-LIVE
SELECT]
button
• 4-screen multi style
Set the projector to a full screen
display. Assign an area of one
quarter of the projector screen to
each of up to four computers, and
project images on the projector
screen.
• 4-screen index style
Display the indexes (small screens)
of up to four computer screens,
and make one of these screens
an enlarged display. You can also
temporarily switch over to a full
screen display.
[MULTI-LIVE SELECT]
button
[MULTI-LIVE SELECT]
button
• 16-screen index style
Display the indexes of up to 16
computer screens. You can also
temporarily switch over one of
these screens to a full screen
display.
• When the projector starts up, it resumes in the current style the last time the projector
was turned off.
• When transferring to the live mode, first select the 4-screen multi style, and then
click [ ] on the computer. Please note the connections to the second and higher
numbered computers will be nullified.
• If you switch over to a 4-screen multi style when five or more computers are
connected in a 16-screen index style, the connections to the fifth and higher
numbered computers will be nullified.
26
Various projection methods (cont.)
4-screen multi style
Connect up to four computers to one projector, and then divide the projector screen
into four parts, and simultaneously display the screens for the four computers on the
projector screen.
1
Press the [MULTI-LIVE SELECT] button on the remote
control to turn the projection screen into a full screen
display (the status when no index window is displayed).
If you press the [MULTI-LIVE SELECT] button once or twice when index
windows are displayed on the projection screen, the screen will switch over to
a full screen display.
2
3
4
Check the status indication on the launcher to make
sure that transmission is possible (check that the
green lamp is lit).
Click [
] on the launcher.
The window shown to the right appears.
Select and click the projection position.
The computer image is transmitted to the selected quarter
of the projection screen.
Switching to a different position
Select and click a different projection position in
step 4 above.
Enlarged display
If [ ] is clicked with a computer, projector screens
temporarily change to full screen display. To return
to the original display, click [ ] with the computer
that click [ ] and select original projection positions
with each computer.
Quitting 4-screen multi style
Select and click the checked position in step 4
above.
• In the 4-screen multi style, the computer screens from all the computers connected to
the projector can be transmitted to the projector. (If an image from another computer
has been sent to the image position where an image is already displayed, the existing
image is replaced by the new image.)
• If the connection error occurs during projection, the message ‘Stop “Live mode”’ will
appear, then restart projection by clicking launcher buttons.
• Picture quality or other options can be set on the “Option” window by clicking [ ] on
the launcher.
27
Various projection methods (cont.)
4-screen index style
When the projector is set to “4-screen index style”, connect up to four computers to
one projector, and then simultaneously display the screens for the four computers on
the index windows and also on a large screen.
1
Press the [MULTI-LIVE SELECT] button of the remote
control to switch the projection screen to “4- screen
index style”. (See page 26)
2
Check the status indication on the launcher to make
sure that transmission is possible (check that the
green lamp is lit).
3
Click [
4
Select and click the projection position.
] on the launcher.
The window shown to the right appears.
The computer image is transmitted to the area of
corresponding window.
28
Various projection methods (cont.)
Enlarged display
• Use the [
] buttons on the remote control to move the
focus (yellow box) to the image to be enlarged, and press
the [ENTER] button. The image is enlarged and displayed
at the top of the projection screen.
• The image display will fill the entire screen if the [ENTER]
button is pressed again.
• To return to the 4-screen index style, press the [ENTER]
button again.
• While an enlarged image is displayed, the [PAGE ▲▼] buttons on the remote
control will function in the same way as the computer’s Page Up and Page Down
keys. (When using “Presenter View” of “PowerPoint”, the [PAGE ▲▼] buttons of the
remote control correspond to Back space key and Space key.) This means that if
you run a computer application that supports the Page Up and Page Down keys, the
presentation screen can be changed using the remote control.
• Picture quality or other options can be set on the “Option” window by clicking [ ] on
the launcher.
• If the connection error occurs during projection, the message ‘Stop “Live mode”’ will
appear, then restart projection by clicking launcher buttons.
Quitting 4-screen index style
Select and click the checked position in step 4 on the previous
page.
In the 4-screen index style, the green status display lamp remains lit.
Other computers can send images only to the windows which are not being used.
29
Various projection methods (cont.)
16-screen index style
When the projector is set to “16-screen index style”, connect up to 16 computers to
one projector, and simultaneously display the screens for the 16 computers on index
windows and also on a large screen.
1
2
3
Press the [MULTI-LIVE SELECT] button of the remote
control to switch the projection screen to “16-screen
index style”. (See page 26)
Check the status indication on the launcher to make
sure that transmission is possible (check that the
green lamp is lit).
Click [
] on the launcher.
The computer images are automatically sent to the empty windows on the 16screen display. Display position is not selectable.
Enlarged display
• Use the [
▲▼] buttons on the remote control to move the focus (yellow box)
to the image to be enlarged and press [ENTER] to expand that image to fill the
display.
• Press [ENTER] again to return to the 16-screen index style.
Toggle between
these with the
[ENTER] button.
• While an enlarged image is displayed, the [PAGE ▲▼] buttons on the remote
control will function in the same way as the computer’s Page Up and Page Down
keys. (When using “Presenter View” of “PowerPoint”, the [PAGE ▲▼] buttons of the
remote control correspond to Back space key and Space key.) This means that if
you run a computer application that supports the Page Up and Page Down keys, the
presentation screen can be changed using the remote control.
• Picture quality or other options can be set on the “Option” window by clicking [ ] on
the launcher.
• If the connection error occurs during projection, the message ‘Stop “Live mode”’ will
appear, then restart projection by clicking launcher buttons.
Quitting 16-screen index style
Click [
] on the launcher again.
30
Various projection methods (cont.)
Multiple Source Live Mode
You can simultaneously project one computer’s screen on up to eight projectors.
1
Press the [MULTI-LIVE SELECT] button on the remote
control to turn the projection screen into a full
screen display (the status when no index window is
displayed).
If you press the [MULTI-LIVE SELECT] button once or twice when index
windows are displayed on the projection screen, the screen will switch over to
a full screen display.
2
Click [
3
Click [
4
Select the network number of the desired projectors
from [Network].
] of the launcher.
The “Select Access Port” window appears.
] of [Access Device].
Projectors powered on in the chosen network group are listed.
5
Select the desired projectors, and click [OK].
Selected projectors are displayed in pink.
If click again, selected items are canceled.
If click [OK], the connection with the projectors is established.
31
Various projection methods (cont.)
6
7
Check the status indication on the launcher to make
sure that transmission is possible (check that the
green lamp is lit).
Click [
] on the launcher.
The projectors selected in step 5 will begin displaying.
• Projectors in the same network are selectable.
• When one of the selected projectors is communicating with another computer, or its
projection screen is not set to full screen display, the images are projected onto the
other selected projectors.
• The greater the number of projectors, the slower the transmission.
• Picture quality or other options can be set on the “Option” window by clicking [ ] on
the launcher.
• Sound cannot be output in the multiple source live mode.
• If the connection error occurs during projection, the message ‘Stop “Live mode”’ will
appear, then restart projection by clicking launcher buttons.
Quitting multiple source live mode
Click [
] on the launcher again.
32
Various projection methods (cont.)
Multiple Source Multi Live Mode
Connect up to four computers to each of up to eight projectors, and project in each
projector by the 4-screen multi style.
1
Press the [MULTI-LIVE SELECT]
button on the remote control
to turn the projection screen
into a full screen display (the
status when no index window is
displayed).
If you press the [MULTI-LIVE SELECT]
button once or twice when index windows are
displayed on the projection screen, the screen
will switch over to a full screen display.
2
Click [
3
Click [
4
] of the launcher.
The “Select Access Port” window appears.
] of [Access Device].
Select the network number of the desired projectors
from [Network].
Projectors powered on in the chosen network group are listed.
5
Select the desired projectors,
and click [OK].
6
Check the status indication on the launcher to make
sure that transmission is possible (check that the
green lamp is lit).
7
Selected projectors are displayed in pink.
If click again, selected items are canceled.
If click [OK], the connection with the
projectors is established.
Click [
] on the launcher.
The window shown to the right appears.
33
Various projection methods (cont.)
8
Select and click the projection position.
The computer image is transmitted to the selected quarter of the projection
screen.
Switching to a different position
Select and click a different projection position in step 8 above.
Enlarged display
If [ ] is clicked with a computer, projector screens temporarily change to full screen
display. To return to the original display, click [ ] with the computer that click [ ]
and select original projection positions with each computer.
Secondary viewer function
If another computer enlarged the display, your screen is out of the projection screen
and displayed in the secondary viewer on your computer. (See pages 36-37)
Quitting multiple source multi live mode
Select and click the checked position in step 8 above.
• Projectors only in the same network are selectable.
• If LB10NT/20NT/30NT or a projector whose projection screen is not set to full screen
display is included among the selected projectors, [ ] will be grayed out, preventing
the projector from being selected.
• The greater the number of projectors, the slower the transmission.
• During the multiple source multi live mode, operation will not take place when either
you press the [MULTI-LIVE SELECT] button on the remote control of the projector, or
select [OPTION] in the main menu of the projector and press [DETAILED SETUP],
[INDEX WINDOW], and [ENTER].
• Picture quality or other options can be set on the “Option” window by clicking [ ] on
the launcher.
• If the connection error occurs during projection, the message ‘Stop “Live mode”’ will
appear, then restart projection by clicking launcher buttons.
34
Useful Functions
Selective area transmission
By using the selective area window, you can specify the necessary information alone
from the computer screen, and display it on the projection screen.
1
Click [
2
Surround the desired part to be sent to the projector
with the selective area window.
3
4
] on the launcher.
Selective area window (green) appears on
computer screen.
You can perform operations in the selective area window with the same
operation for moving or changing the window on the computer screen.
• If clicking [
], the selective area window automatically fit the inside
window’s size.
• If clicking [
], the selective area window changes to its default size.
• If clicking [
], the selective area transmission function ends.
Check the status indication on the launcher to make
sure that transmission is possible (check that the
green lamp is lit).
Click [
], [
], or [
] on the launcher.
The picture in the selective area window is projected.
The picture inside the selective area window is displayed as big as possible with
keeping the original aspect ratio to be fit for the resolution of projection screen.
Quitting selective area transmission
Click [
] on the launcher again, or click [
area window.
35
] on the upper right of the selective
Useful Functions (cont.)
Secondary display transmission
You can set the computer screen and the projector screen to the multi-monitor mode,
and use the computer screen as the primary monitor and the projector screen as the
secondary monitor.
1
2
3
Click [
] on the launcher.
Check the status indication on the launcher to make
sure that transmission is possible (check that the
green lamp is lit).
Click [
] or [
] on the launcher.
The secondary screen on the computer is projected.
• Like the normal multi-monitor function, you can change the relative positions of the
primary monitor (computer screen) and the secondary monitor (projector screen) by
using [Display Properties] (right-click on the desktop of the computer screen).
• It is impossible to send images to the secondary monitor by the selective area
transmission (See page 35).
• The one shot function is not available when the secondary display transmission is
activated.
• If the computer has been set to the multi-monitor mode, the monitor for the display
switch-over function will be displayed as the third monitor in [Display Properties] of
Windows.
Quitting secondary display transmission
Click [
] on the launcher again.
36
Useful Functions (cont.)
Secondary viewer
If you are using secondary display transmission function
and projecting a secondary monitor screen in multiple
source multi live mode, once [ ] is pressed on one of
the computers the full screen display from that computer
will override all the rest and the secondary screens of
the other computers no longer be possible to verify on
the projector screen(s).
In this case, the secondary screen that you were
projecting will appear on your desktop as a secondary
viewer in reduced form.
Also, while using the secondary display transmission in the 4-screen index style and
the 16-screen index style, the secondary viewer appears.
• You can perform operations on the secondary monitor while observing the secondary
viewer on the computer screen, however an image will not appear on the projection
screen(s) until the projection screen(s) goes back to the original projection style.
• When the projector screen(s) return to its original status, the contents of the
secondary viewer are displayed on the projection screen(s), and the secondary
viewer is closed as well.
One shot function
A snapshot of the current computer screen is transmitted to the projector.
1
2
3
4
Cancel all live mode transmission.
Press the [MULTI-LIVE SELECT] button on the remote
control to turn the projection screen into a full screen
display (the status when no index window is displayed).
If you press the [MULTI-LIVE SELECT] button once or twice when index
windows are displayed on the projection screen, the screen will switch over to
a full screen display.
Check the status indication on the launcher to make
sure that transmission is possible (check that the
green lamp is lit).
Click [
] on the launcher.
To project only the required parts of the computer screen as still images, you can use
the one shot function to send the parts which you have selected using the selective
area transmission function.
37
Useful Functions (cont.)
Motion streaming mode
Transmit moving pictures to projection screen. You can display moving images more
efficiently than in the case when displaying the Windows Media Player screen on the
projector.
1
2
3
4
Cancel all live mode transmission.
Press the [MULTI-LIVE SELECT] button on the remote
control to turn the projection screen into a full
screen display (the status when no index window is
displayed).
If you press the [MULTI-LIVE SELECT] button once or twice when index
windows are displayed on the projection screen, the screen will switch over to
a full screen display.
Check the status indication on the launcher to make
sure that transmission is possible (check that the
green lamp is lit).
Click [
] on the launcher.
“Open” window appears.
Seek Bar
This enables jumping to the desired
place during movie play.
Seek bar does not move during movie
play.
Volume
This enables the level of the volume
supplied to the projector to be adjusted.
Exit motion streaming mode
The motion streaming mode is exited.
Continuous play/ON-OFF
Use this to set continuous play to ON or OFF.
Pause
Stop
Play
The movie will be displayed by the projector.
It will not be displayed on the computer screen.
38
Useful Functions (cont.)
5
Select a movie file and click [
].
Transmit moving pictures to projection screen.
Adjust volume or other setting on “Open” window if required.
• This mode cannot be used while any other computer connected over the wireless
network to the projector in use is transmitting a snapshot.
• The allowed formats are those accepted by Windows Media Player, including asf,
wmv, avi and mpeg. However, contents protected by DRM cannot be projected nor
can such DVDs be played.
DRM (Digital Rights Management): Technology for protecting the copyrights of
digital data
• Some frames may be lost or the audio may be disrupted in some computing environments.
• Moving picture is not displayed on the computer screen.
39
Useful Functions (cont.)
Shutter function
Blanks the screen for a moment.
1
Click [
2
Click [
] on the launcher.
The image is turned off.
When sound is output, the sound also goes out.
] again.
The image comes back.
The shutter function is available only in live mode or in multiple source live mode.
Pointer function
You can change the shape of the pointer appearing on the projection screen in live
mode or multiple source live mode to one that can be used for presentation purposes.
Click [
] on the launcher.
Quitting pointer function
Click [
] on the launcher again.
Functions used with each projection method
Selective
Secondary
area
display
Shutter Pointer
[When using LB50NT/LB55NT/LB60NT] transmission transmission
Note
When
Live mode
connected
Multi live mode
to one
projector One shot
Motion streaming mode
When
Multiple Source Live Mode
connected
to multiple Multiple Source Multi Live Mode
projectors One shot
Motion streaming mode
Unavailable
40
Useful Functions (cont.)
[When using LB20NT/LB30NT]
Selective
Secondary
area
display
Shutter Pointer
transmission transmission
Note
When
Live mode
connected
Multi live mode
to one
projector One shot
Motion streaming mode
When
Multiple Source Live Mode
connected
to multiple Multiple Source Multi Live Mode
projectors One shot
Unavailable
Motion streaming mode
[When using LB10NT]
Unavailable
Selective
Secondary
area
display
Shutter Pointer
transmission transmission
Note
When
Live mode
connected
Multi live mode
to one
projector One shot
Motion streaming mode
When
Multiple Source Live Mode
connected
to multiple Multiple Source Multi Live Mode
projectors One shot
Unavailable
Motion streaming mode
Unavailable
Unavailable
= Yes, = No
One shot and motion streaming are available when no live is done.
You can operate them by the launcher, when no live is done and projection screen is
set to be full screen display (the status when no index is displayed).
• Sound can be output only in live mode. (See page 43)
41
Setting options
You can make various settings related to Wireless Manager ME 3.0.
Setting option window
1
Click [
] on the
launcher.
The “Option” window
shown to the right
appears.
2
Click the desired
tab to be set.
3
Click [OK].
Transmission
Picture quality selection
Select the quality of the image transmitted from the computer to the projector.
Selecting [High Definition] imposes the following limits on operation.
• During the motion streaming, operations are performed in the normal mode.
• When a movie is playing in the live mode, it may not be projected smoothly.
Live mode settings
• [Remove image when shutting down Live Mode]
Check this box to clear the projection screen from the projector when live mode
ends.
• [Disable Screen Saver]
This disables the computer screen saver function while Wireless Manager ME 3.0
is operating. Check this box to disable screen saver operation during live mode.
42
Setting options (cont.)
• [Display sender’s name in Multi Live Mode]
The characters (max. 8) which have been entered are displayed at the upper right
of the transmitted screen.
In the 4-screen and 16-screen index style modes, they are also displayed at the
bottom of each image.
(Alphanumerics are not displayed when the check mark has been removed.)
[No name] is set by default.
• [Produce audio along with video at live mode]
You can set this when you want to output audio data from a projector while in live
mode. However, the sound in the motion streaming mode does not reflect this
setting but it is determined by the volume level which was adjusted on the motion
streaming window. (See page 38)
Also, volume setting operated from the launcher or “Open” window is effective
only for wireless connection. When finishing Wireless Manager ME 3.0, Widows’
volume setting becomes active.
Sound can be output only in live mode.
Key setting
You can set shortcut key combinations that let you control the Wireless Manager ME
3.0 functions by computer keyboard operations.
1
Select the mode or
the function to be set
for the shortcut key,
and click it.
2
Select one from [Ctrl],
[Alt], and [Shift].
3
4
Select one alphabet to be used with the key chosen in
step 2.
Click [Setting].
The shortcut key set in step 2-3 appears in the blank space.
If click [Clear], the shortcut settings are canceled.
[Use “Pause” key to stop/continue Live Mode] : Stops live mode and multi live mode.
[Use “PrintScreen” key to execute One Shot] : Transmits the entire computer screen
one time.
In live mode and multi live mode, the shortcut key switches the mode without stopping
live mode.
43
Setting options (cont.)
Other
Launcher size setting
You can select the launcher button size.
Automatic connection setting
You can perform automatic settings for
newly connected projectors.
• If the [Make an automatic connection] box is checked and a projector is registered
as a destination for automatic connection when Wireless Manager ME 3.0 is
started, “Select Access Port” window does not appear and connection is performed
automatically.
• When [Setting] is clicked, “Access Log” window appears and you can select
projector(s) for automatic connections.
Up to 5 projectors may be displayed in the order of most recent connection history.
• When it is desired to remove a projector from the display list, select it and press the
[DELETE] → [OK] button.
Version information
The version information of Wireless Manager ME 3.0 is displayed when [
“Option” window is clicked.
44
] on the
Network setting of the projector
When making a wireless connection between a computer and a projector with settings
other than the default settings, perform the procedure below to display the wireless
menu required when changing the initial settings.
Displaying the Wireless Menu
1
Press the [MENU] button on the projector.
The main menu appears.
PT-LB50NTE
DYNAMIC
PICTURE MODE
PICTURE
CONTRAST
0
-
+
POSITION
BRIGHTNESS
0
-
+
LANGUAGE
SHARPNESS
0
-
+
OPTION
COLOR TEMPERATURE
STANDARD
SECURITY
WIRELESS
SELECT
DAYLIGHT VIEW
OFF
AI
ON
ENTER
EXIT
2
Select [WIRELESS] with the [▲▼] buttons.
The wireless menu appears.
PT-LB50NTE
NAME CHANGE
POSITION
INPUT PASSWORD
LANGUAGE
PASSWORD CHANGE
OPTION
WEB CONTROL
OFF
ON
STATUS
SECURITY
INITIALIZE
WIRELESS
SELECT
1
NETWORK
PICTURE
ENTER
EXIT
Depending on the signals which are input to the projector, it may not be possible to
adjust some of the items and use some of the functions.
In the case of an item that cannot be adjusted or a function that cannot be used, the
corresponding on-screen item will not be displayed, and you will not be able to execute
it even when you press the [ENTER] button.
45
Network setting of the projector (cont.)
Changing the network number
1
2
Select [NETWORK] at the wireless menu.
Select the number to be connected with the [
buttons.
PT-LB50NTE
NAME CHANGE
POSITION
INPUT PASSWORD
LANGUAGE
PASSWORD CHANGE
OPTION
WEB CONTROL
OFF
ON
STATUS
SECURITY
INITIALIZE
WIRELESS
SELECT
USER1
NETWORK
PICTURE
]
ENTER
RETURN
Changing the projector name
You can change the projector name on the network.
It makes easy to recognize projectors in “Select Access Port” window.
1
Select [NAME CHANGE] at the wireless menu and
press the [ENTER] button.
PT-LB50NTE
USER1
NETWORK
PICTURE
NAME CHANGE
POSITION
INPUT PASSWORD
LANGUAGE
PASSWORD CHANGE
OPTION
WEB CONTROL
ON
STATUS
SECURITY
INITIALIZE
WIRELESS
SELECT
OFF
ENTER
RETURN
2
Enter the projector name
using the [
▲▼] buttons.
3
After entering the projector
name, select [OK] and click
[ENTER].
To cancel the change, select [CANCEL] and
press the [ENTER] button.
NAME CHANGE
LB50NT
A
N
a
n
B
O
b
o
C
P
c
p
D
Q
d
q
E
R
e
r
F
S
f
s
G
T
g
t
H
U
h
u
I
V
i
v
J
W
j
w
K
X
k
x
L
Y
l
y
M
Z
m
z
1 2 3 4 5 6 7 8 9 0 SPACE
! " # $ % & ’ * + - / = ? @ / ^
_ ` | ~ ( ) < > [ ] { } , . : ;
OK
SELECT
CANCEL
ENTER
RETURN
46
DELETE
Network setting of the projector (cont.)
Password setting
This setting is used to limit the users that can connect to the projector.
1
Select [INPUT PASSWORD] at the wireless menu.
PT-LB50NTE
USER1
NETWORK
PICTURE
NAME CHANGE
POSITION
INPUT PASSWORD
LANGUAGE
PASSWORD CHANGE
OPTION
WEB CONTROL
OFF
ON
STATUS
SECURITY
INITIALIZE
WIRELESS
SELECT
RETURN
2
Select [ON] with the [
3
Select [PASSWORD CHANGE] at the wireless menu
and press the [ENTER] button.
PT-LB50NTE
USER1
NETWORK
PICTURE
NAME CHANGE
POSITION
INPUT PASSWORD
LANGUAGE
PASSWORD CHANGE
OPTION
WEB CONTROL
ON
ON
STATUS
SECURITY
INITIALIZE
WIRELESS
SELECT
] buttons.
ENTER
RETURN
4
Enter the password using the
[
▲▼] buttons.
5
After entering the password,
select [OK] and click [ENTER].
To cancel the change, select [CANCEL] and
press the [ENTER] button.
PASSWORD CHANGE
******
A
N
a
n
B
O
b
o
C
P
c
p
D
Q
d
q
E
R
e
r
F
S
f
s
G
T
g
t
H
U
h
u
I
V
i
v
J
W
j
w
K
X
k
x
L
Y
l
y
M
Z
m
z
1 2 3 4 5 6 7 8 9 0 SPACE
! " # $ % & ’ * + - / = ? @ / ^
_ ` | ~ ( ) < > [ ] { } , . : ;
OK
SELECT
CANCEL
ENTER
RETURN
47
DELETE
Network setting of the projector (cont.)
Verifying settings
Select [STATUS] at the wireless menu and press the
[ENTER] button.
Your current settings appear.
PT-LB50NTE
NAME CHANGE
POSITION
INPUT PASSWORD
LANGUAGE
PASSWORD CHANGE
OPTION
WEB CONTROL
ON
ON
STATUS
SECURITY
INITIALIZE
WIRELESS
SELECT
USER1
NETWORK
PICTURE
ENTER
RETURN
Returning to the Initial Settings
You can return the changed settings to the initial conditions.
1
Select [INITIALIZE] at the wireless menu and press the
[ENTER] button.
PT-LB50NTE
NAME CHANGE
POSITION
INPUT PASSWORD
LANGUAGE
PASSWORD CHANGE
OPTION
WEB CONTROL
ON
ON
STATUS
SECURITY
INITIALIZE
WIRELESS
SELECT
USER1
NETWORK
PICTURE
ENTER
RETURN
You will be prompted to enter the password if [ON] has been selected as the [INPUT
PASSWORD] setting on the security menu.
2
Select [OK] with the [
]
buttons and press the [ENTER]
button.
INITIALIZE
INITIALIZE
OK
SELECT
CANCEL
ENTER
RETURN
48
Network setting of the projector (cont.)
[User] settings
If you selected one of [USER1] to [USER3] for [NETWORK] in the wireless menu,
you can make detailed network settings. Confirm to your system administrator before
changing any settings.
IP address settings
How to display IP address setting menu
Press [NETWORK]→[USER1]-[USER3]→[ENTER] on
wireless menu.
DETAILED SETUP
USER1
1/3
USER1
NAME CHANGE
OFF
DHCP
SELECT
IP ADDRESS
192.168. 10.100
SUBNETMASK
255.255.255.
GATEWAY
192.168. 10. 1
CANCEL
NEXT
0
CANCEL
DHCP :
ON: If a DHCP server exists in the network to which the projector is
connected, the IP address will automatically be acquired.
OFF: If a DHCP server does not exist in the network to which the projector
is connected, additionally set [IP ADDRESS ], [SUBNETMASK ] and
[GATEWAY ].
“Glossary” (See page 61)
49
Network setting of the projector (cont.)
Wireless settings
Select [NEXT] on the IP address setting screen, then wireless setting menu appears.
Make the settings related to the wireless LAN connection between the projector and
the network.
DETAILED SETUP
USER1
SSID
2/3
Panasonic Projector
AD HOC
MODE
SELECT
ENTER
CANCEL
AUTHENTICATION
OPEN
ENCRYPTION
NONE
RETURN
NEXT
CANCEL
MODE
AD HOC
: Select [AD HOC] or [INFRASTRUCTURE].
: Connect projector and computer directly without access
point.
INFRASTRUCTURE : Connect through access point.
SSID
: If the mode is [INFRASTRUCTURE], enter the SSID
registered at the access point. If the mode is [AD HOC],
enter the same character string as that of SSID set on the
computer to be connected.
AUTHENTICATION : Set the user authentication method used by the network to
be connected.
OPEN
: Select when making a connection using [AD HOC], or when
the access point authentication method is OpenSystem .
SHARED
: Select when making a connection using [AD HOC], or when
the access point authentication method is Shared Key .
WPA-PSK
: Select when the access point authentication method is WPAPSK.
“Glossary” (See page 62)
50
Network setting of the projector (cont.)
ENCRYPTION : Select the encryption method to be used for communication
between the projector and the network.
NONE
: Select when transmit without encryption. It is selectable only when
[AUTHENTICATION] is [OPEN] or [SHARED].
WEP
: Select when ENCRYPTION is WEP.
TKIP
: Select when ENCRYPTION is TKIP.
Selectable when [AUTHENTICATION] is [WPA-PSK].
AES
: Select when ENCRYPTION is AES.
Selectable when [AUTHENTICATION] is [WPA-PSK].
Additionally perform the following setting using the [AUTHENTICATION] setting.
DETAILED SETUP
USER1
3/3
1
DEFAULT KEY
KEY1
********
KEY2
********
KEY3
********
********
KEY4
SELECT
CANCEL
RETURN
OK
CANCEL
When setting [OPEN] or [SHARED] as authentication and setting [WEP] as the
encryption method:
DEFAULT KEY : Set 1 – 4 numerals for the default key.
KEY 1 – 4
: Set these to match the WEP key registered in [DEFAULT KEY].
Either the 64-bit or 128-bit WEP key can be set. For the 64-bit key,
input five alphanumerics (or a 10-digit string for the hexadecimal
format) for the 128-bit key, input 13 alphanumerics (or a 26-digit
string for the hexadecimal format).
When setting [WPA-PSK] as authentication : Set key and select [OK].
Input either 8 to 63 alphanumerics or a 64 digit string in the
hexadecimal format.
“Glossary” (See page 62)
Important video/audio data is protected because AES encryption processing takes
place in advance for all network numbers, even if [ENCRYPTION] is set to [NONE].
“Glossary” (See page 62)
51
Network setting of the projector (cont.)
Default settings of [USER1]-[USER3]
The following is set as [USER1]-[USER3] in the wireless menu before the projector
leaves the factory.
SSID
: Panasonic Projector
DHCP
: OFF
IP ADDRESS
: 192.168.10.100
SUBNETMASK
: 255.255.255.0
GATEWAY
: 192.168.10.1
MODE
: AD HOC
AUTHENTICATION : OPEN
ENCRYPTION
: NONE
52
Using WebBrowser
Control a projector through the WEB browser of a computer. It is called “WEB Control”.
(The example is when using Microsoft Internet Explorer.)
Before using the WEB control
• Connect projector and computer. (See page 14)
• Release the proxy settings of the Web Browser used. (See next page)
• Enable JavaScript. (See page 55)
Projector settings
Set the [WEB CONTROL] of wireless menu [ON].
1
Select [WEB CONTROL] on the wireless menu.
2
Select [ON] or [OFF] with the [
] buttons.
ON : This enables control on the WebBrowser.
OFF : This disables control on the WebBrowser.
PT-LB50NTE
USER1
NETWORK
PICTURE
NAME CHANGE
POSITION
INPUT PASSWORD
LANGUAGE
PASSWORD CHANGE
OPTION
WEB CONTROL
OFF
ON
STATUS
SECURITY
INITIALIZE
WIRELESS
SELECT
RETURN
• When the projector settings have been changed using a WebBrowser, the projector
will not appear on the connection list until the projector network is switched to [USER
1] - [USER 3].
• After the projector network has been switched to [USER 1] - [USER 3], manually
release the proxy settings of the WebBrowser used.
53
Using WebBrowser (cont.)
Computer settings
Proxy server settings
Release the proxy settings of the WebBrowser used.
1
Open “Internet Properties” window.
2
Open [Connections] → [LAN
Settings].
3
If [Use a proxy server for your LAN] has been checked,
remove the check.
If [Use automatic configuration script] has been
checked, remove the check.
4
Click [Start] → [Control Panel] → [Network and Internet Connections] →
[Internet Option].
Click [OK].
54
Using WebBrowser (cont.)
Enabling JavaScript
If JavaScript has been set to disable, enable it.
1
Open “Internet Properties” window.
2
Select [Security] and set the security level to [Default
Level], or select [Custom Level] and check the [Enable]
checkbox under [Active scripting].
Click [Start] → [Control Panel] → [Network and Internet Connections] →
[Internet Option].
55
Using WebBrowser (cont.)
Accessing from the Web browser
1
Click [
] on the launcher.
Or start up the WebBrowser, and enter the IP address
set by the projector.
WebBrowser starts up and the page of “Projector control window” appears.
<Top window>
2
Select the language to be displayed, and if a web
access password has been set, enter that password.
3
Click [ENTER].
“Basic control window” appears. (Next page)
• Password used in this page is for accessing the web control window. (See page 58)
This password is different from the password set in page 47 for accessing a projector.
• If you forget the password, perform [INITIALIZE] using the wireless menu of the
projector, and set a password once again using the “Change Password” window on
the web browser (See page 58).
• The top window may not appear depending on the WebBrowser. In this case start up
WebBrowser again, or press the [Ctrl] + [R] keys for example to update the screen.
• Connection cannot be made while the WebBrowser is set to dial-up network.
Cancel the dial-up network setting.
• It may take some moments for WebBrowser to start up.
56
Using WebBrowser (cont.)
Projector control window
You can make various projector settings.
Click [Projector Control]→[Basic] or [Advanced], when moving from other
pages.
Basic control window
Option control window
Connection with the projector may not be possible immediately after the power is
turned on. In this case wait a bit and then make the connection again.
57
Using WebBrowser (cont.)
Monitor information window
This page indicates the projector status.
Click [Status].
The monitor information is refreshed at fixed intervals, but the current exact information
can be checked by clicking [View] → [Refresh].
Password changing window
Set the password to access to “Projector control window”.
Enter the old password and new password, and click [OK].
You can enter a password up to 16 characters (upper case/lower case) and
symbols.
58
Using WebBrowser (cont.)
Network setting window
You can make detail network settings on projector, when connecting without the
administrator authority or when connecting through an access point (infrastructure
mode).
1
Click [Network setting] on the
menu and click [NEXT].
The setting window appears.
2
Set detail network settings.
3
Click [NEXT].
Settings in this page are the same when
setting [USER 1]-[USER 3] from wireless
menu of the projector. (See page 49)
The settings will be registered.
Making the above settings effective
Select [NETWORK] in the wireless menu of the projector, and use the [
to select the network set in this page and press the [ENTER] button.
] buttons
Important video/audio data is protected because AES encryption processing takes
place in advance for all network numbers, even if [ENCRYPTION] is set to [NONE].
“Glossary” (See page 62)
59
Software Uninstall
Wireless Manager ME 3.0
From the desktop, select [Start] → [All Programs] →
[Panasonic Wireless Display] → [Uninstall Wireless Manager
mobile edition 3.0].
Follow the instructions appearing on the screen and uninstall the software.
60
Glossary
Category
Item
LAN
Access point
TCP/IP
IP address
Common
Setting of
connections
DHCP
Subnetmask
Gateway
Description
Page
Abbreviation for Local Area Network. This
is a network with a relatively narrow range
such as inside a company.
These are stations for relaying
electromagnetic signals between computers
in a wireless LAN. When a computer
is connected to an access point, it can
communicate through the network connected
to the access point.
Abbreviation for Transmission Control
Protocol/Internet Protocol. This is the
standard internet protocol.
This protocol is a set of rules and
agreements governing data communications
between computers.
Internet Protocol (IP) is a protocol
for distributing data, and the address
corresponding to the data distribution
destination is called the IP address. The
same IP address cannot be used within the
same LAN.
Abbreviation for Dynamic Host Configuration
Protocol. This function automatically assigns
IP addresses to the connected equipment.
If a device with the DHCP server function
is present within a LAN, it automatically
assigns IP addresses to the connected
equipment.
This limits the range of the IP addresses
assigned to computers in order to divide the
network into a number of sections during
TCP/IP connection. The value used to
divide the network at this time is called the
subnetmask.
This is a relay point for connecting different
networks.
This refers to the hardware and software
used when connecting a network with a
network that uses a different protocol, etc.
It adjusts the protocol and other differences
between networks to allow connection with
other networks.
8
61
6
17
17/
20/
49
17/
49
17/
49
49
Glossary (cont.)
Category
Item
Description
AD_HOC
This is the mode in which computers
communicate with each other directly, rather
than via access points.
INFRASTRUCTURE This is the mode in which communications
(infrastructure mode) are performed via the access point.
SSID
Open System/
OPEN
Shared Key/
SHARED
Advanced
setting of
connection
WPA-PSK
WEP
TKIP
AES
Abbreviation for Service Set ID. The SSID
identification code must be set to distinguish
equipment included in a wireless LAN that
uses access points from equipment not
included in that LAN.
This may appear as the “ESSID” or the
“network name” for wireless LAN cards
made by some manufacturers.
This is an authentication of wireless signals
employing a public key encryptosystem.
This is a secret key encryptosystem for
wireless signals in which authentication is
performed with a key pre-set in the WEP.
Other terms for this method, in which the
same key is used for both encryption and
decryption, are “shared key encryptosystem”
and “common key encryptosystem”.
This is a standard covering encryption
methods used in wireless LAN. It provides
greater security than WEP, and has functions
such as a user authentication function and also
TKIP (encryption protocol) which automatically
changes the encryption key at fixed intervals.
Abbreviation for Wired Equivalent
Privacy. This is a method for encrypting
communication data. The encryption
key is created and notified only to the
communicating user, so the communication
data cannot be decrypted by a third party.
Abbreviation for Temporal Key Integrity
Protocol.
This encryption protocol provides even
greater security than WEP because
it changes the encryption key at fixed
intervals.
These are the US Government’s nextgeneration standard encryption methods,
the selection work of which is performed
by the National Institute of Standards and
Technology (NIST).
62
Page
17/
50
19/
50
17/
50
17/
50
17/
50
50
17/
51
51
15/
51/
59
Frequently Asked Questions
Check the following points once more before requesting repair.
No wireless connection can be made between my projector and my computer.
• Is Wireless Manager ME 3.0 running?
Wireless Manager ME 3.0 must be started in the computer in order to enable
wireless transmissions of images to the projector.
<When a setting error for the wireless LAN card has been detected>
Is the wireless LAN card effective?
Even if your computer has built-in wireless LAN, the wireless LAN may still be
turned OFF. If so, turn it ON and re-start Wireless Manager ME 3.0. See the
User’s Manual of your computer to learn how to turn the wireless LAN power
ON/OFF.
Is your wireless LAN card properly recognized on the network?
Sometimes, cards are not correctly recognized by the computer. Check
Windows [Device Manager] to make sure your card has been recognized.
If the Network Adapter is indicated with [?] in [Device Manager], wireless LAN
card installation is not complete. See the User’s Manual of your card and reinstall the card driver.
To display [Device Manager]
Click [Start] → [Control Panel] → [Performance and Maintenance] → [System].
This will bring up the [System Properties] dialog box. Click [Device Manager] in
the [Hardware] tab.
Some wireless LAN cards may allow easy wireless set up connections to
function if drivers are updated.
(Consult the manufacturer of your driver about updates.)
63
Frequently Asked Questions (cont.)
No wireless connection can be made between my projector and my computer. (cont.)
<When the Network Bridge setting has been detected>
Is Network Bridge enabled?
Some computers with Windows XP may have Network Bridge (a built-in function
of Windows XP) enabled; this will prevent a wireless connection. The settings in
Network Bridge must be changed in order to make a wireless connection. If you
do not expect ever to use Network Bridge and see no need for it, delete it from
your system.
To verify whether your system has Network Bridge
Choose [Connect to] on the [Start] menu and click [Show all connections]. Verify
that [Network Bridge] is displayed in the [Network Connections] window.
How to change settings in Network Bridge
1. Select [Connect to] on the [Start] menu and click [Show all connections].
2. Right-click [Network Bridge] and click [Properties].
3. Remove the check mark from the [Wireless Network Connection] box in the
[Network Bridge Properties] dialog box (if the box is not checked, proceed to
step 4.)
4. Click [Properties] in [Internet Protocol (TCP/IP)] in the [Network Bridge
Properties] dialog box.
5. Click the [Alternate Configuration] tab in the [Internet protocol (TCP/IP)
properties] dialog box.
6. Check the [User configured] box and set the [IP address] and [Subnet mask]
as follows:
IP address
:
10. 10. 10. 101
Subnet mask :
255.255. 0. 0
(If the above IP address is already in use in the LAN environment,
change it as appropriate in Class A. Confirm to your system administrator
on network settings before changing any settings.)
7. Click [OK] → [Close].
8. Close the [Network Connections] dialog box.
How to delete the network bridge
1. Select [Connect to] on the [Start] menu and click [Show all connections].
2. Right-click [Network Bridge] and click [Delete].
64
Frequently Asked Questions (cont.)
No wireless connection can be made between my projector and my computer. (cont.)
<When Windows Firewall has been detected>
Has your firewall in Windows XP been disabled?
The firewall in Windows XP must be disabled in order to connect to a wireless
network.
How to disable the firewall in Windows XP
1. Click [Start] → [Control Panel] → [Network and Internet Connections] →
[Network Connections].
2. Right-click [Wireless Network Connection] and click [Properties] in the
pulldown menu.
3. Click the [Advanced] tab and set the [Internet Connection Firewall] checkbox
to OFF.
Is Wireless Manager ME 3.0 registered in [Exceptions] ([Control Panel] →
[Security Center] → [Windows firewall]) with the Windows XP SP 2?
Register Wireless Manager ME 3.0 in the Exceptions to Application List of the
firewall.
How to register
1. Click [Start] → [Control Panel].
2. Click [Security Center] → [Windows Firewall] when [Control Panel] window
opens.
3. Click the [Exceptions] tab and then [Add Program…] when the [Windows
Firewall] window opens.
4. Click [Wireless Manager mobile edition 3.0 (WM.exe)] to allow connection
with external devices under [Programs] when the [Add a Program] window
opens.
If [Wireless Manager mobile edition 3.0 (WM.exe)] does not appear on the
list of programs, click [Browse...] and select [WM.exe].
5. Click the [Change scope…] button at the lower left of the window.
When the [Change Scope] window opens, select the desired network as
described below.
6. Select [Any computer (including computers on the internet)].
7. Select the scope and click [OK].
8. Click [OK] in the [Add a Program] window.
9. Click [OK] in the [Windows Firewall] window.
With this, the Wireless Manager ME 3.0 firewall will be deleted.
65
Frequently Asked Questions (cont.)
No wireless connection can be made between my projector and my computer. (cont.)
<When another firewall has been detected>
Are any firewall-containing applications installed?
If any applications which contain firewalls are installed, the installation may hang
up at the [Projector search in progress] display (some firewalls function even when
not started).
If this occurs, firewall settings must be changed in order to allow connection to the
wireless network. See the User’s Manuals for all applications containing firewalls
to perform these settings.
<When the user does not have the administrator authority>
Have you logged in as the Administrator?
If you have logged onto a computer as a [GUEST] or a restricted user who
does not have administrator authority, you can not perform easy wireless set
up (Network No. [1] – [4]). If you must perform easy wireless set up without
administrator authority, designate [U] as the network number.
See page 49 or 51 for instructions in how to set [U] as the network number.
<Network setting error>
When connecting with Network number [U], make sure whether wireless menu
setting of the projector is correct or not. (See page 49)
Wireless connection is lost shortly.
The wireless LAN utility used by the computer may have changed the wireless
settings. Close the utility, and then make the connection again using easy
wireless set up connection.
Connection may be broken receiving influence from wireless environment
around.
When connection is broken, PT-LB50NT/PT-LB55NT/PT-LB60NT automatically
work to reconnect, but when it can not, live is cancelled.
When live is cancelled with PT-LB50NT/PT-LB55NT/PT-LB60NT or connection
is broken with projectors other than PT-LB50NT/PT-LB55NT/PT-LB60NT, start
live from the launcher again.
66
Frequently Asked Questions (cont.)
The connection has been lost in the multi live mode.
• If a computer with a certain version of the Intel Centrino mobile technology
(wireless LAN) is connected to the unit, the multi live mode may be released.
If this is the case, re-establish the connection from the launcher of Wireless
Manager ME 3.0. (See page 23)
The connection cannot be established with IEEE802.11 g.
• Connection is sometimes established under the IEEE802.11 b standard even
when an IEEE802.11 g wireless LAN card or a computer with built-in wireless
LAN that supports the IEEE802.11 g standard is used. This is, therefore, not an
indication of trouble.
The transfer rate is slow.
• The transfer rate may be slower in some operating environments (depending on
such factors as the location, radio signal conditions or distance).
• Avoid placing metal objects or other conductors near the wireless LAN antenna
of a personal computer, otherwise the transfer rate may be slower.
• When WEP is set the image data is converted, so transfer takes time.
Image display is slow or movie/animation is not displayed smoothly.
• Is the computer CPU speed slow? (See page 9)
Live mode depends largely upon the computer CPU performance.
• Adverse effects may be exerted if there is any wireless communication in the
vicinity.
• When [Resolution] is set to [High Definition] in the “Option” window, it may take
longer time to display images.
• The Windows Media Player window should be active.
• Did you start up Microsoft PowerPoint or Windows Media Player before starting
up Wireless Manager ME 3.0?
If so, start up the application only after you have started up Wireless Manager
ME 3.0.
• The speed may drop significantly if the user does not have administrator
authority.
• The speed may be slower when any other applications are running concurrently.
67
Frequently Asked Questions (cont.)
There is a time lag between operations at the computer and results in the projected image.
• Wireless Manager ME 3.0 reads the screen, compresses the data and transmits
it to the projector. In the projector, the received data are extracted and then
projected. Some delays occur in this system, due to the processing time and
factors in the wireless environment. Different computers may also produce
varying lag times.
I can’t hear the computer sound from the projector in the live mode.
• Check whether the check mark has been entered for [Produce audio along
with video at live mode] from [Live Mode Settings] under the [Transmission] tab
selected from Wireless Manager ME 3.0’s “Option” window.
• Did you start up a player (Windows Media Player, Real Player or Quick Time,
etc.) before starting live mode?
If so, start the application only after starting live mode.
Some contents in movies are not displayed.
• Basically, files which can be played on Windows Media Player can be displayed
with this projector. However, contents protected by DRM cannot be projected
nor can such DVDs be played.
DRM (Digital Rights Management): Technology for protecting the copyrights
of digital data
Don’t know to which projector the computer is connected in multiple source live mode or multiple source multi live mode.
• Connected computers’ names, IDs and their status are displayed in the pop up
window when the cursor is on [ ] of the launcher.
68
Frequently Asked Questions (cont.)
Changing the display style
• Either press the [MULTI-LIVE SELECT] button on the remote control or select
[OPTION] → [DETAILED SETUP] → [INDEX WINDOW] on the projector’s main
menu (See page 45) and press the [ENTER] button.
The Wireless Manager ME 3.0 color display is strange and characters are difficult to read.
• Click [Start] → [Control panel] → [Appearance and Themes] → [Display]. Then,
open the [Settings] tab of the [Display Properties] window and set [Color quality]
to [Medium (16 bit)] or higher.
Screen saver is not displayed properly in live mode.
• Some screen savers may not be displayed properly in the live mode.
Disable screen saver function using [Live Mode Settings] in “Option” window of
Wireless Manager ME 3.0. (See page 42)
Making a wireless connection while using the internet
• If you have a wireless LAN environment which allows an internet connection,
placing the projector on that network will allow you to use the internet and the
wireless connection at the same time. (See page 19)
• If you have a wired internet connection (Ethernet), this projector allows wireless
use with simultaneous wired connection to the internet.
The remote control window does not appear.
<When easy wireless set up connection is used>
• When any WebBrowser except Internet Explorer is used, the proxy settings of
the WebBrowser must be manually released.
<When [USER] connection is used>
• Manually release the proxy settings of the WebBrowser used.
69
Trademarks
• Microsoft and its logo as well as Windows, Windows Media, PowerPoint, and DirectX
are either registered trademarks or trademarks of Microsoft Corporation in the United
States and/or other countries.
• Intel and Centrino are registered trademarks or trademarks of Intel Corporation or its
affiliates in the United States and other countries.
• Other company names, product names or other names noted in this manual are
trademarks or registered trademarks of the respective companies. Note that ® and
TM marks are not indicated in the text of this manual.
Notes:
• Unauthorized use or reproduction of part or all of this product software and
manuals is strictly prohibited.
• Panasonic cannot be held liable for any effects resulting from the use of this
product software and manuals.
• Panasonic reserves the right to revise this product software specifications and
manual contents without notice.
Professional/Industrial Video
Panasonic Projector Systems Company
Unit Company of Panasonic North America
One Panasonic Way 2A-4 Secaucus, NJ 07094
FOR THE NEAREST SERVICE CENTER
CALL 1-800-526-6610 or
Website: http://www.panasonic.com/support/
FOR TECHNICAL SUPPORT
CALL 1-800-524-1448 or
Email: [email protected]
Panasonic Puerto Rico, Inc
Ave. 65de Infanteria, Km.9.5 San Gabriel Industrial Park Carolina, Puerto Rico 00985
CALL 787-750-5135
Matsushita Electric Industrial Co., Ltd.
Web Site: http://www.panasonic.co.jp/global/
© 2006 Matsushita Electric Industrial Co., Ltd. All Rights Reserved.
TQBH0168-1 (E/U)
M0306-1036