1
Windows
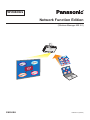
Network Function Edition
(Wireless Manager ME 5.0)
ENGLISH
TQBH0193-1(E/U/EA)
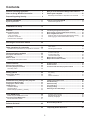
Contents
Software Licensing Agreement……………………… 3
Notes on Using Wireless Connection… …………… 4
Request Regarding Security… ……………………… 6
What you can do with Wireless Manager mobile edition 5.0…… 7
Check your computer… ……………………………… 10
Software Installation…………………………………… 11
Contents on Provided CD-ROM…………………………………… 12
Wireless Manager ME 5.0… ……………………………………… 12
Necessary environment for computers to be connected… …… 10
System requirements… …………………………………………… 11
Installation free set up………………………………… 13
Connecting through the access point……………………………
When logging on without administrator authority … …………
When using Windows Vista…………………………………………
When the user has the computer administrator authority………
When logging on without administrator authority … ……………
Connect…………………………………………………… 14
Easy Wireless Set Up… ……………………………………………
“S-MAP” Connection… ……………………………………………
“1-4/U” Connection… ………………………………………………
“PC Search” Connection……………………………………………
Connection error messages… ……………………………………
14
14
16
19
21
23
24
26
26
26
Selecting the connection method…………………… 29
Other search………………………………………………………… 30
Canceling the connection… ……………………………………… 32
Other operations for connection… ………………… 30
Operations when password entry is required for connection…… 30
4-screen multi style…………………………………………………
4-screen index style…………………………………………………
16-screen index style… ……………………………………………
Multiple Source Live Mode…………………………………………
Multiple Source Multi Live Mode… ………………………………
Various projection methods… ……………………… 33
Description of the launcher…………………………………………
Live mode………………………………………………………………
Multi live mode… ……………………………………………………
Switching from one style to another………………………………
33
35
36
36
AV mute function… ………………………………………………… 47
Pointer function……………………………………………………… 47
Functions used with each projection method… ……………… 48
Useful Functions… …………………………………… 45
Selective area transmission… …………………………………… 45
Secondary display transmission… ……………………………… 46
Secondary viewer…………………………………………………… 46
Key setting…………………………………………………………… 50
Other… ……………………………………………………………… 51
Version information… ……………………………………………… 51
Setting options… ……………………………………… 49
Setting option window……………………………………………… 49
Transmission………………………………………………………… 49
Changing the projector name………………………………………
Password setting… …………………………………………………
Network standby… …………………………………………………
Live mode cut-in………………………………………………………
Verifying settings… …………………………………………………
Returning to the initial settings……………………………………
Network/Security setting of the projector… ……… 52
Displaying the Wireless Menu… …………………………………
Changing the network number… …………………………………
[USER] settings… ……………………………………………………
IP address settings… ………………………………………………
Wireless settings… …………………………………………………
Default settings of [USER1] - [USER3]…………………………
37
38
40
41
43
52
53
53
53
54
55
56
56
57
57
58
58
Projector control window…………………………………………… 62
Detailed settings window… ……………………………………… 63
Switching Languages… …………………………………………… 64
Using WebBrowser… ………………………………… 59
Before using the WebBrowser control… ………………………… 59
Accessing from the WebBrowser………………………………… 60
Monitor information window… …………………………………… 61
Software Uninstall……………………………………… 65
Wireless Manager ME 5.0…………………………………………… 65
Glossary… ……………………………………………… 66
Frequently Asked Questions… ……………………… 68
Software Licensing Agreement
Use of this Software is governed by the terms defined in this Software Licensing Agreement.
Article 1 License
Licensee is granted the right to use this software, including the information recorded or described on the CD-ROM and in the
instruction manual and any other media provided to the Licensee (collectively “Software”), but all applicable rights to copyright
or intellectual property in the Software are not transferable to the Licensee.
Article 2 Use by a Third Party
Licensee may not transfer or allow any third party, to use or copy the Software, whether free of charge or not.
Article 3 Restrictions on Copying the Software
Licensee may make a single copy of the Software in whole or in part solely for backup purposes.
Article 4 Computer
Licensee may install and use the Software on more than one computer owned or managed by Licensee.
Article 5 Reverse Engineering, Decompiling or Disassembly
Licensee may not reverse engineer, decompile or disassemble the Software. Matsushita shall not be bound by warranty for
any defects in the Software caused by Licensee’s reverse engineering, decompiling or disassembly of the Software.
Furthermore, Matsushita or its distributors or dealers will not be responsible for any damage to the Licensee caused by
Licensee’s reverse engineering, decompiling or disassembly of the Software.
Article 6 After-sales Service
If a problem should occur with the Software while Licensee is using the Software, Licensee should notify Matsushita of the
problem by telephone or letter. Matsushita shall undertake to notify Licensee of whether the problem is a known error in the
program (“bug”), or whether the way in which the Software is to be used should be modified.
Furthermore, the Software is subject to revision without prior notice.
Article 7 Indemnification
Matsushita’s liability with respect to this Software is limited to the conditions defined in Article 6 herein.
Matsushita or any of its distributors or dealers shall not be liable for any damage suffered by Licensee, either directly or
through claims from a third party, arising from or in connection with Licensee’s use of the Software.
Furthermore, Matsushita makes absolutely no warranty for the use of this Software for any purpose other than for applications
associated with the projector with which this Software is bundled.
Article 8 Export Control
Licensee agrees not to export or re-export the Software to any county other than the country of purchase of the projector in
any form without the appropriate export licenses under the regulations of the country where Licensee resides or of any other
country as may be required by such export or re-export.
Wireless Manager ME 5.0 uses the following software:
Portion of this software are based in part on the work of the Independent JPEG Group
Please note the following.
•Panasonic cannot be held liable for any direct or indirect damages resulting from the use or malfunction of this projector.
• Panasonic cannot be held liable for damages arising from data corruption or loss as a result of using this projector.
Notes on Using Wireless Connection
Wireless connection function of the projector uses radio waves in the 2.4 GHz band.
A radio station license is not required, but be sure to read and fully understand the following items before use.
Do not use near other wireless equipment.
The following equipment may use radio waves in the same band as the projector.
When the projector is used near these devices, radio wave interference may make communication impossible, or the
communication speed may become slower.
•Microwave ovens, etc.
•Industrial, chemical and medical equipment, etc.
•In-plant radio stations for identifying moving objects such as those used in factory manufacturing lines, etc.
•Designated low-power radio stations
If at all possible, avoid the use of cellular phones, TV sets or radios near the projector.
Cellular phones, TV sets, radios and similar devices use different radio bands from the projector, so there is no effect on
wireless communication or the transmission and reception of these devices. However, radio waves from the projector may produce
audio or video noise.
Wireless communication radio waves cannot penetrate steel reinforcements, metal, concrete,
etc.
Communication is possible through walls and floors made from materials such as wood and glass (except glass containing
wire mesh), but not through walls and floors made from steel reinforcements, metal, concrete, etc.
Avoid using the projector in locations prone to static electricity.
If the projector is used in a location prone to static electricity, such as on a carpet, the wireless LAN connection may be lost.
If this happens, eliminate the source of static electricity or electromagnetic noise and reconnect to the wireless LAN.
In rare cases static electricity or electromagnetic noise may make it impossible to establish a connection to the LAN.
If this happens, press the power button on the remote control or on the projector to power off the projector temporarily.
After the cooling fan stops operating (after the power monitor on the projector changes from orange to red), power on the
projector and reconnect to the LAN.
Using the projector outside the country
It is forbidden to take the projector outside the country or region where you purchased it, so use it only in the said country or
region. Also, note that depending on countries or regions there are restrictions on the channels and frequencies at which you
can use the wireless LAN.
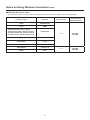
Notes on Using Wireless Connection (cont.)
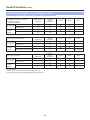
Channels that can be used
The channels (frequency range) that can be used differ according to the country or region. Refer to the table below.
Country or region
Standard
Japan
ARIB STD-T66
China
SRRC
England, Germany, France, Spain,
Italy, Belgium, Austria, Sweden, Norway,
Denmark, Switzerland, Holland, Finland,
Portugal, Greece, Thailand, South Korea
ETSI 300.328
Singapore
IDA
Australia,
New Zealand
C-Tick
Malaysia
SIRIM
United States
FCC part 15
Taiwan
DGT
Channels used
Frequency band
(Center frequency)
1 - 13
2,412 MHz 2,472 MHz
1 - 11
2,412 MHz 2,462 MHz
Request Regarding Security
When using this product, security breaches of the type described below are conceivable.
•Leakage of your private information via this product
•Illegal operation of this product by a malicious third-party
•Harm to or cessation of operation of this product by a malicious third-party
Be sure to implement sufficient security measures.
•Make sure the password is as hard to guess as possible.
•Change the password periodically.
•Matsushita Electric Industrial Co., Ltd. and its affiliated companies never directly ask customers for their password.
Do not give out your password even if directly asked by a third-party representing themselves as Matsushita Electric
Industrial Co., Ltd.
•Always use on a network that has safety protection such as a firewall implemented.
•Set passwords, and limit the users that are permitted login access.
About Wireless LANs
The advantage of a wireless LAN is that information can be exchanged between a PC or other such equipment and an
access point using radio waves as long as you are within range for radio transmissions.
On the other hand, because the radio waves can travel through obstacles (such as walls) and are available everywhere
within a given range, problems of the type listed below may occur if security-related settings are not made.
•A malicious third-part may intentionally intercept and monitor transmitted data including the content of e-mail and personal
information such as your ID, password, and/or credit card numbers.
•A malicious third-party may access your personal or corporate network without authorization and engage in the following
types of behavior.
Retrieve personal and/or secret information (information leak)
Spread false information by impersonating a particular person (spoofing)
Overwrite intercepted communications and issue false data (tampering)
Spread harmful software such as a computer virus and crash your data and/or system (system crash)
Since most wireless LAN cards or access points are equipped with security features to take care of these problems, you can
reduce the possibility of these problems occurring when using this product by making the appropriate security settings for the
wireless LAN device.
Some wireless LAN devices may not be set for security immediately after purchase. To decrease the possibility of occurrence
of security problems, before using any wireless LAN devices, be absolutely sure to make all security-related settings
according to the instructions given in the operation manuals supplied with them.
Depending on the specifications of the wireless LAN, a malicious third-party may be able to break security settings by special
means.
Please contact Panasonic if you need help taking care of security settings or other such.
If you cannot perform security settings for your wireless LAN by yourself, please contact the Panasonic Support Center.
Panasonic asks customers to thoroughly understand the risk of using this product without making security settings, and
recommends that the customer make security settings at their own discretion and responsibility.
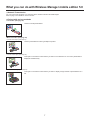
What you can do with Wireless Manager mobile edition 5.0
Network Transmission
You can connect the projector to a computer via the wireless LAN and send still images.
Refer to page 14 for details on how to connect.
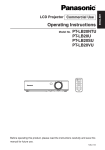
Project with various methods
<Live mode> (See page 35)
Used for normal presentations.
<Multi live mode> (See page 36)
<4-screen multi style> (See page 37)
Used for presentations involving multiple computers.
<4-screen index style> (See page 38)
This style is convenient in cases where you wish to focus attention on one of four presentations
displayed simultaneously.
<16-screen index style> (See page 40)
This style is convenient in cases where you wish to display a large number of presentations as a
list.
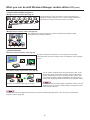
What you can do with Wireless Manager mobile edition 5.0 (cont.)
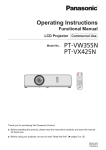
Project with multiple projectors
<Multiple source live mode> (See page 41)
This arrangement can be used when a number of projectors are
installed in a large conference room, or when holding simultaneous
presentations in several conference rooms, for example.
<Multiple source multi live mode> (See page 43)
This arrangement can be used when you wish to simultaneously display multiple
presentations using multiple projectors.
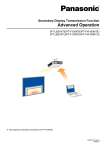
Useful functions
<Selective area transmission> (See page 45)
By using the selective area window, you can specify the necessary
information alone from the computer screen, and display it on the projection
screen.
<Secondary display transmission> (See page 46)
You can set the computer screen and the projector screen to the
multi-monitor mode, and use the computer screen as the primary
monitor and the projector screen as the secondary monitor. This
is convenient for when holding a presentation using the projector
screen while displaying reference material on the computer screen.
Moving the cursor outside the computer screen with the mouse
For details on the secondary display transmission function, see the
application section for the secondary display transmission function
in the instruction manual.
For a list of functions and projectors that can be connected to Wireless Manager ME 5.0, see “Functions used with each
projection method” (Page 48).
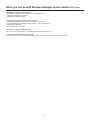
What you can do with Wireless Manager mobile edition 5.0 (cont.)
<WebBrowser control> (See page 59)
The following operations are possible when using WebBrowser.
•Setting and adjusting the projector
•Displaying the projector status
<Virtual remote control function> (See page 34)
The following operations are possible when using remote control.
•Same operations as the wireless remote control, but from the computer
•Changing the channels
•Turning the power on and off
<One-click Connection> (See page 32)
You can connect to the projector by double-clicking or using drag-and-drop.
<Live mode cut-in function> (See page 57)
During live mode or multi live mode, a different computer can interrupt and project images in live mode.
Check your computer
Necessary environment for computers to be connected
•First, check your computer to see whether or not it has a built-in wireless LAN※ function. ※LAN : “Glossary” (See page 66)
•Before connecting the projector to the computer, be sure to check the following settings.
•Operation is not guaranteed for all wireless LAN cards and built-in wireless LAN adapters.
Check 1
Wireless LAN settings
<Computer with a built-in wireless LAN function>
•Is your wireless LAN switched on?
<Computer without a built-in wireless LAN function>
•Is your wireless LAN card properly recognized?
•Is the wireless LAN card switched on?
•Install the wireless LAN card driver beforehand. For details on how to install the driver, refer to the instructions
accompanying the wireless card.
Check 2
Logon user’s settings
•Have you logged in as the Administrator?
Check 3
Computer’s settings
•When security (firewall) software and utilities for network cards are installed, these may prevent connection of the projector.
<Windows XP/Windows Vista>
•Is Network Bridge enabled? (See page 69)
•Has your firewall been disabled? (See page 70)
10
Software Installation
System requirements
The computer must meet the following requirements in order to use the supplied software.
OS:Microsoft Windows 2000 Professional SP4/XP Home Edition/XP Professional
Microsoft Windows VistaTM Ultimate 32 bit/VistaTM Business 32 bit
Microsoft Windows VistaTM Home Premium 32 bit/VistaTM Home Basic 32 bit
CPU:Intel® Pentium® III 800 MHz or faster, or compatible processor
(1 GHz or faster is recommended when using live mode)
RAM:
256 MB or more
Empty hard disk capacity:
60 MB or more
Hardware conditions:
CD or DVD drive (for software installation and viewing the user’s manual)
An IEEE802.11 b/g built-in wireless LAN system or an IEEE802.11 b/g wireless LAN adapter must be installed
and running properly.
However, some IEEE802.11 b/g wireless LAN may not allow connection to IEEE802.11 g projectors.
WebBrowser: Internet Explorer 6.0 or newer
Netscape Communicator 7.0 or newer
Note that operation is not guaranteed when used with system environments other than the above or on homemade computers.
Precautions when using Windows Vista
•The following limitations apply to displaying Launcher on the projection screen.
– Software installed: Launcher is displayed.
– Software not installed: Launcher is not displayed.
Operation is not guaranteed for all computers that meet the above
conditions.
The illustrations and screenshots in this manual may be different from those on your computer.
11
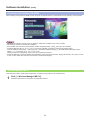
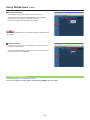
Software Installation (cont.)
Contents on Provided CD-ROM
When inserting the provided CD-ROM into the computer, the installer starts up automatically and the following screen appears.
•Shut down all software currently active on Windows. Otherwise, installation may not be possible.
•Administrator authority is required for installation.
•If the installer does not start up automatically, double-click [EasyInstall] → [Easy_Inst.exe] in the CD-ROM.
•If Wireless Manager ME 1.0, 2.0, 3.0, 4.0 or 4.5 has been installed, uninstall it by following the method below.
From the desktop, select [Start] → [All Programs] → [Panasonic Wireless Display] → [Uninstall Wireless Manager mobile
edition *.*]. (*.* in the menu is 1.0, 2.0, 3.0, 4.0 or 4.5)
Follow the instructions appearing on the screen and uninstall the software.
•If Wireless Manager is used immediately after installation, some functions (secondary display transmission, etc.) may not work.
In such a case, restart the computer once and then use Wireless Manager.
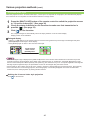
Wireless Manager ME 5.0
This software is used to send screen images from a computer to the projector via a wireless LAN.
1
Click [1. Wireless Manager ME 5.0].
Follow the instructions on the screen and install the software.
12
Installation free set up
You can use Wireless Manager ME 5.0 without installing it in the computer.
If you copy Wireless Manager ME 5.0 to a removable medium, such as an SD card, you can use Wireless Manager ME 5.0
without installing it in any computer that permits you to access this removal medium.
When copying Wireless Manager ME 5.0 to a removable medium, empty capacity of at least 32 MB is required.
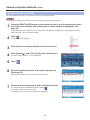
1
2
3
Insert provided CD-ROM into the CD-ROM drive.
Setup screen appears.
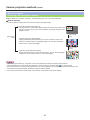
Click [Installation Free Set Up].
[Direct CD-ROM Startup] and [Other Media Source Startup, Make Copy Here] appear on the window.
A
When using without copying the program: Click [Direct CD-ROM Startup].
Wireless Manager ME 5.0 starts up, and the <Projector Search> window appears.
Operation is the same as when operating after installing CD-ROM.
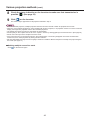
B
hen using after copying the program: Click [Other Media Source Startup, Make
W
Copy Here].
A window opens to select the destination to save.
<If you chose B in step 3, follow steps 4 - 5.>
4
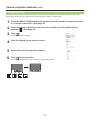
Select the destination to save, and click [OK].
5
Double-click the Wireless Manager ME 5.0 icon (WM.exe) in the destination to save
chosen in step 4.
CD-ROM data is copied to the destination.
After the copy ends, click [Close] of the setup screen.
Wireless Manager ME 5.0 starts up.
Operation is the same as when operating after installing CD-ROM.
If selecting removable medium as the destination to save, ensure that the removable medium is recognized by the
computer to which you wish to connect the projector.
Some removable mediums start the program automatically.
•When using without installing, following functions are not available.
•Secondary display transmission (See page 46)
•Producing audio along with video at live mode (See page 49)
•Automatic connection by double-clicking (See page 51)
•Operation is slower compared to when the computer is used with Wireless Manager ME 5.0 installed.
•If you have logged on without administrator authority or as a [GUEST], you cannot use network numbers [1]-[4] for
easy wireless set up. If you need to connect using a wireless LAN connection, use [USER] as the network number.
13
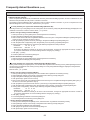
Connect
Easy Wireless Set Up
There are 3 different connection methods, “S-MAP” (Projector Signal Map) Connection, “1-4/U” Connection, and “PC Search”
Connection.
(When using Easy Wireless Set Up to connect to a conventional model projector, use “1-4/U” Connection (see page 16).)
• [S-MAP] Connection: Search and connect to the projectors set up using [Network Number] [S-MAP] (see page 53).
The projectors that can be connected to are displayed in order of wireless reception strength (see
page 14).
• [1-4/U] Connection: Search and connect to the projectors set up using [Network Number] [1]-[4] or [USER1]-[USER3].
Projectors that can be connected to are displayed in a list (see page 16).
• [PC Search] Connection: Use the [Computer search] function on the projector to search and connect (see page 19).
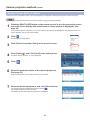
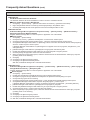
“S-MAP” Connection
1
Click [ ] on the desktop.
Alternatively, select [Start] → [All Programs] → [Panasonic Wireless Display] →
[Wireless Manager mobile edition 5.0].
<Projector search> window – [S-MAP] is displayed.
●When the <Input User Name> window appears
Set the icon and user name, and click [OK].
2
Select and click the icon [
] of the projector you want to connect to.
The Connect/Connectability menu is displayed.
[
] is displayed in the selected projector.
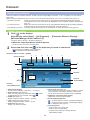
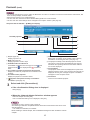
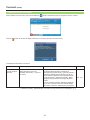
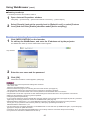
<Projector Search> window – [S-MAP]
②
Current settings
③
④
⑤
⑥
⑦
Current setting > - [Single] - [S-MAP]
①
Setting
PCSearch
⑧
Update
Select access port
⑨
Name6789
Proj6789
Weak
↑
Signal strength level
↓
Strong
Name1234
Proj1234
AAAABBB
Connect
PRJ02555
Name2345
Proj2345
Name2212
Proj2212
Projector
Connectability
Cancel
Name8833
Proj8833
Name6679
Proj6679
Name7771
Proj7771
Connect/
Connectability
Scrollbar
Connect/
Connectability menu
Close
ASetting menu display
You can chose to display or hide the B~ F buttons.
BAccess Devices (See page 43)
When only one projector is connected, select [
]. When
multiple projectors are connected, select [
].
CS-MAP (See page 14)
Display <Projector Search> window – [S-MAP].
D1-4/U (Upper figure) (See page 16)
Display <Projector Search> window – [1-4/U].
EPC Search (See page 19)
Display <PC Search> window.
FOther search (See page 30)
From the projectors that are currently switched on, search
for the projector of specified IP address, domain name,
and ID. (From all network numbers except for [USER])
GUpdate the connection status display
Update the connection status display.
HSwitching Display Window
: <Projector Search> window – [S-MAP] is displayed.
:<Projector Search> window – [S-MAP] (list display)
is displayed. (See page 15)
IFound projectors
• Projector found on a wired LAN
• Projector found using [USER]
• Projector found using the currently selected
[NETWORK] number
14
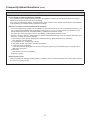
Connect (cont.)
•The “Signal strength level” is just a guide. As differences occur due to conditions such as the communication environment, this
does not always display accurate values.
•Enter the user name in up to 8 alphanumerics.
•The icon and user name are set when Wireless Manager ME 5.0 is first launched.
•The icon and user name settings can be changed in the <Option> window. (See page 49)
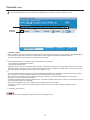
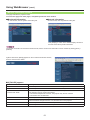
<Projector Search> Window – [S-MAP] (List display)
Current setting > - [Single] - [S-MAP]
Setting
Update
PCSearch
Select access port
Selected projector
Live Mode
Standby
C
A
D
B
E
F
G
Connectability
Connect
Close
J
H
I
GConnection message
Blinks when connection is not possible. Click to display
information on resolving the issue. (See page 21)
HThe [Projector Name] of the selected projector and the
name given in the favorites are displayed (see page 51).
Guides for the operating status and connection method
etc are also displayed.
AID (See page 30)
Display projector’s ID.
BMode (See page 35)
Display projector’s mode or style.
CAvailable modes and functions
Unavailable modes/functions among [Live mode
] and
[Multi live mode
] are displayed with [ ] overlaid on
them.
DThe number of people connected to this projector
Display the number of people that are connected to this
projector.
EThe status of this projector
Display the projector’s connection status.
IConnectability
The projector name and ID are displayed at top left of the
selected projector screen. If the projector name and ID are
displayed correctly, the message “Projector is available.”
will appear on the computer screen.
JConnection
Connect to the selected projector.
F[ ] appears when password entry is needed for
connection. (See page 30)
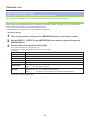
3
Select and click [Connections].
●If the <Confirmation Dialog> box is displayed
Click [Yes(Y)].
●When the <Network Adapter Selection> window appears
Select the adaptor and click [OK].
If the <Confirmation Dialog> box is displayed, click [Yes].
•For details on how to connect, refer to page 29.
•The following models are compatible with the wired LAN communication that can be used
with this Software.
PT-F100NT, PT-FW100NT, PT-F200NT
•When enabling a network adapter, first exit Wireless Manager and then enable the network
adapter.
15
Connect (cont.)
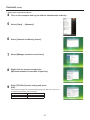
4
Connection completed.
When the connection with the projector is established, the launcher
appears. (“Description of the launcher”→ See page 33)
•The launcher is not projected on the projector. However, if you are using Windows Vista, the installed launcher is
projected.
•If you cannot connect the projector and computer using Easy Wireless Setup (see page 68).
•Set the projector to which Wireless Manager ME5.0 connects to automatically when it is started (see page 51)
•Connection error message (see page 21)
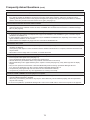
“1-4/U” Connection
Select the projector to connect from the computer.
(The projectors that can be connected to are displayed in a list. You can search for and select the projector that you want to
connect to using easy set up.)
1
Click [ ] on the desktop,
or select [Start] → [All Programs] → [Panasonic Wireless Display] →
[Wireless Manager mobile edition 5.0].
<Projector search> window – [S-MAP] is displayed.
When the <Input User Name> window appears
Set the icon and user name, and click [OK].
2
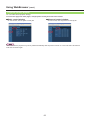
Click [Setting ], and click [1-4/U] in the setting menu.
Current setting > - [Single] - [S-MAP]
Setting
PCSearch
Update
Select access port
Name6789
Proj6789
Name1234
Proj1234
AAAABBB
PRJ02555
Name8833
Proj8833
Name2345
Proj2345
Name6679
Proj6679
Name2212
Proj2212
Name7771
Proj7771
Close
When the <Confirmation dialog> box appears
Click [Yes].
When the <Network Adapter Selection> window appears
Select the adaptor that you want to connect to the projector from the list, and click [OK].
If the <Confirmation dialog> box appears, click [Yes].
•For details on how to connect, refer to page 29.
•Enter the user name in up to 8 alphanumerics.
•The icon and user name are set when Wireless Manager ME 5.0 is first launched.
•The icon and user name settings can be changed in the <Option> window. (See page 49)
•The following models are compatible with the wired LAN communication that can be used with this Software.
PT-F100NT, PT-FW100NT, PT-F200NT, PT-FW200NT
•When enabling a network adapter, first exit Wireless Manager and then enable the network adapter.
16
Connect (cont.)
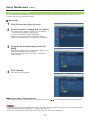
3
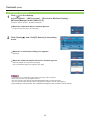
A list of projectors that can be connected to are displayed in the <Projector Search> window – [1-4/U].
Current setting > - [Single] - [1-4/U]
Setting
Update
PCSearch
Select access port
All
A
Selected
projector
Live Mode
Connectability
Standby
Connect
Close
A“Network” number
When you specify the network number (See page 53) set on the projector from [1], [2], [3], [4], [USER]※1, and [Display all], all
projectors that are presently switched on in the selected network number are displayed in [Projector Name].
The initial value for both the computer and the projector is [S-MAP]※2.
※1
•In the following situations, connections other than [USER] are not possible.
- Not logged in with Administrator authority
- When using Windows Vista
•Depending on the computer and wireless LAN card used, Easy Wireless Set Up may not be possible. If this is the case, the
[Network] number of <Projector search> window automatically switches to [USER]. For details of the connection procedure,
first close Wireless Manager ME 5.0, and then refer to pages 24 - 28.
※2
•The initial network number for both the projector and Wireless Manager ME 5.0 is [S-MAP]. These numbers must match for
the connection. To check the network number, refer to the network menu of the projector.
•When importance is placed on security, select the network number [2] - [4], because WEP (wireless communication
encryption)※ is set on these network numbers.
•Important video/audio data is protected because AES※ encryption processing takes place in advance for all network numbers,
even if [ENCRYPTION] is set to [NONE].
•Other network adapters may not be usable under Easy Wireless Set Up connections.
•Connections to other networks connected through the wireless LAN card are broken under Easy Wireless Set Up
connections.
※ “Glossary” (See page 67)
For details of other button operations, see [S-MAP] Connection (pages 14-15).
17
Connect (cont.)
4
Select the same network number (1 - 4) from the [Network] number as is displayed
in the A [NETWORK] menu (See page 53) of the projector you want to connect to.
Projectors powered on in the chosen network group are listed.
5
Select the desired projectors, and click [Connections].
The launcher appears and the connection with the projector is established.
(“Description of the launcher” → See page 33)
•Launcher is not displayed on the projection screen. However, in Windows Vista, Launcher is displayed if the software
is installed.
•If you cannot connect the projector and computer using Easy Wireless Setup (see page 68).
•Set the projector to which Wireless Manager ME5.0 connects to automatically when it is started (see page 51)
•Connection error message (see page 21)
18
Connect (cont.)
“PC Search” Connection
1
Click [ ] on the desktop,
or select [Start] → [All Programs] → [Panasonic Wireless Display] →
[Wireless Manager mobile edition 5.0].
<Projector search> window – [S-MAP] is displayed.
When the <Input User Name> window appears
Set the icon and user name, and click [OK].
2
Click [Setting ], and click [PC Search] in the setting
menu.
Current setting > - [Single] - [S-MAP]
Setting
PCSearch
Update
Select access port
Name6789
Proj6789
Name1234
Proj1234
AAAABBB
PRJ02555
Name8833
Proj8833
Name2345
Proj2345
Name6679
Proj6679
Name2212
Proj2212
Name7771
Proj7771
Close
When the <Confirmation dialog> box appears
Click [Yes].
When the <Network Adapter Selection> window appears
Select the adapter from the list and click [OK].
If the <Confirmation dialog> box appears, click [Yes].
•For details on the confirmation screen when connecting, refer to page 29.
•Enter the user name in up to 8 alphanumerics.
•The icon and user name are set when Wireless Manager ME 5.0 is first launched.
•The icon and user name settings can be changed in the <Option> window. (See page 51)
•When enabling a network adapter, first exit Wireless Manager and then enable the network adapter.
19
Connect (cont.)
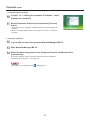
3
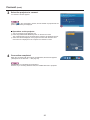
Select the projector to connect.
<PC Search> window appears.
Current setting > - [Single] - [PCSearch]
Setting
PCSearch
Select the computer to connect from the projector.
Turn on the projector power.
Press the [
] button on the remote control.
Please select user name [
Click on [
] in the <PC Search> window, and the models of projector that can
perform [PC Search] are displayed.
Operations on the projector
ATurn on the power to the projector unit.
BPress the [COMPUTER SEARCH] button on the remote control.
The computers that can be connected to the projector are displayed in a list.
CSelect from the list displayed on the projector an item with the same icon/
user name as is displayed on the computer <PC Search> screen.
4
Connection completed.
When the connection with the projector is established, the launcher appears.
(“Description of the launcher” → See page 33)
The launcher is not projected on the projector.
However, if you are using Windows Vista, the installed launcher is projected.
20
UserName ] from list.
Close
Connect (cont.)
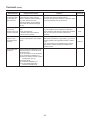
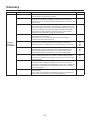
Connection error messages
When wireless LAN connection cannot be established, [
] blinks in the bottom left of the <Projector Search> window.
Current setting > - [Single] - [1-4/U]
Setting
Update
PCSearch
Select access port
Searching projector.
<<<< Please wait >>>>
Connectability
Click the [
Connect
Close
] button at this time to display information on resolving the issue as shown below.
The displayed information is as follows.
Detected issue
A firewall or
network bridge is
detected
Displayed information
[****]※ is installed.
When destination cannot be
identified, deactivate [****] which is
the cause.
Remarks
Reference page
•Has your firewall in Windows XP been disabled?
•Is Wireless Manager ME 5.0 registered in
[Exceptions] ([Control Panel] → [Security Center] →
[Windows firewall]) with the Windows XP SP 2?
•Is this software registered in the [Exceptions] tab
in [Control Panel] – [Windows Firewall] – [Allow
P.69 - P.71
program through Windows firewall] in Windows
Vista?
•Are any firewall-containing applications installed?
•If you do not expect ever to use Network Bridge
and see no need for it, delete it from your system.
※“Windows Firewall”, “Network Bridge” and other security software found will appear in [****].
21
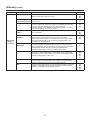
Connect (cont.)
Detected issue
Displayed information
Remarks
Reference page
-
When a change in
the settings made
by the utility has
been detected
The settings of Wireless Network
connection have been changed.
When a Wireless LAN Card utility or
any other utilities are active,
stop the operation of such utilities,
then restart the Wireless Manager
ME 5.0.
The wireless LAN card utility used by the computer
may have changed the wireless settings.
Close the utility, and then make the connection again
using Easy Wireless Set Up connection.
When a setting
error for the
wireless LAN card
has been detected
No response from the wireless LAN
card.
Check the followings:
- Wireless LAN Card conditions
- Driver version (Latest)
•Is the wireless LAN card effective?
•Is your wireless LAN card properly recognized?
•Some wireless LAN cards may allow Easy Wireless
Set Up connections to function if drivers are
updated.
P.68
When the user
does not have
the administrator
authority
Please execute “Easy Connection”
using the administrator authorization
mode.
If you have logged in as a user that does not have
administrator permission or as [GUEST], you cannot
use easy wireless setup [S-MAP]/network numbers
[1]-[4].
If you must perform Easy Wireless Set Up without
administrator authority, designate [USER] as the
network number.
P.24/P.26
Issues other than
the above
Please perform the following checks,
when the projector cannot be found.
[Projector setup]
(1) Is the power on for the projector?
(2) Is the Network capability on?
(3) H
as the network channel number
correctly been set up?
[Computer setup]
(1) Is Wireless capability on?
(2) Is the Firewall application
causing a network block?
22
Connect (cont.)
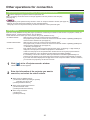
Connecting through the access point
You can make the setting for infrastructure mode※ (connection through the access point※); however, confirm to your system
administrator on network settings before changing any settings.
※“Glossary” (See pages 66 - 67)
AProjector settings
1
Turn on the projector and press the [NETWORK] button on the remote control.
2
Select [USER 1] - [USER 3] from [NETWORK] at the wireless menu and press the
[ENTER] button.
3
Set the details of network and select [OK].
As for network setting items, see pages 53 - 55.
Confirm to your system administrator on network settings before changing any settings.
The projector’s MAC address※ can be checked with [STATUS] in the wireless menu of the projector unit.
(“Verifying settings”→ see page 58) ※“Glossary” (See page 66)
BComputer settings
4
Turn on the computer.
5
Make the network setting according to your system administrator.
6
Connect to your access point.
7
Start Wireless Manager ME 5.0.
8
Select the desired projector in the <Projector Search> window and click
[Connections].
A confirmation message appears asking whether to switch the projector to the network or not. Select [No].
The launcher appears and the connection with the projector is established.
(“Description of the launcher” → See page 33)
If the projector is not displayed, click [
]. (See page 30)
If you are unable to connect to the wireless LAN through the access point even after performing the steps in “A Projector
settings,” contact the manufacturer of the access point.
23
Connect (cont.)
When logging on without administrator authority
Before starting Wireless Manager ME 5.0, it is necessary to carry out “Computer settings” (next page) under the administrator
authority in advance.
Next, logon as a restricted user or [GUEST], and start Wireless Manager ME 5.0.
Confirm to your system administrator before changing any settings.
Following settings are examples of when using a default setting projector.
AProjector settings
1
Turn on the projector and press the [NETWORK] button on the remote control.
2
Select [USER 1] - [USER 3] from [NETWORK] at the wireless menu and press the
[ENTER] button.
3
Set the details of network and select [OK].
As for network setting items, see pages 53 - 55.
Confirm to your system administrator before changing any settings.
<Example>
DHCP※
IP ADDRESS
OFF
※
SUBNETMASK※
※
192.168.11.100
255.255.255.0
SSID
MODE
Panasonic Projector
AUTHENTICATION
OPEN※ (Some computers may require connection by [SHARED※] authentication.)
NONE….When not performing encryption
WEP……When performing encryption
ENCRYPTION
ENCRYPTION KEY
SETTING
AD HOC※
When [ENCRYPTION] setting is [WEP※]:
DEFAULT KEY : Set 1 – 4 numerals for the default key.
KEY 1 – 4
:S
et these to match the WEP key registered in [DEFAULT KEY].
※“Glossary” (See pages 66 - 67)
24
Connect (cont.)
BComputer settings
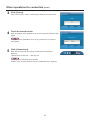
4
Turn on the computer and log on with the administrator authority.
5
Select [Internet Protocol (TCP/IP※)] on [General] tab, and click [Properties].
Click [Start] → [Control Panel] → [Network and Internet Connections] → [Network Connections], right click [Wireless
Network Connections], and click [Properties], then <Wireless Network Connection Properties> window appears.
※“Glossary” (See page 66)
<Internet Protocol (TCP/IP) Properties> window appears.
6
Select [Use the following IP address] on [General] tab, enter the IP address and
Subnetmask, and click [OK].
Make the IP addresses of the upper three of the four break points the same value as that of the projector, and change
the value of the last break point alone.
Make the Subnetmask as the same value as that of the projector.
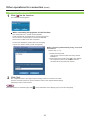
7
Click [Addition] of [Preferred networks] on [Wireless Networks] tab in <Wireless
Network Connection Properties> window.
<Wireless network properties> window appears.
When the [Wireless Networks] tab does not appear, refer to page 71.
8
Make the SSID, network authentication, data encryption and communication mode
settings the same as those of step 3, and click [Connections].
9
Click [OK] in <Wireless Network Connection Properties> window.
10
Click [Start]→[Log Off] and log off from the computer.
The connection with the projector is established.
CComputer operation
11
Log on with the user who operates Wireless Manager ME 5.0.
12
Start Wireless Manager ME 5.0.
13
Select the desired projector in the <Projector Search> window and click [OK].
The launcher appears and the connection with the projector is established.
(“Description of the launcher” → See page 33)
If the projector is not displayed, click [
]. (See page 30)
25
Connect (cont.)
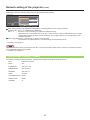
When using Windows Vista
When the user has the computer administrator authority
You can perform Easy Wireless Set Up if you have administrator authority on the computer. See page 14.
When logging on without administrator authority
Before starting up Wireless Manager ME 5.0, the “Setting the computer IP address ” (See page 27) must first be performed.
After completing this operation, start up Wireless Manager ME 5.0.
Confirm to your system administrator before changing any settings.
Following settings are examples of when using a default setting projector.
AProjector settings
1
Turn on the projector and press the [NETWORK] button on the remote control.
2
Select [USER 1] - [USER 3] from [NETWORK] at the wireless menu and press the
[ENTER] button.
3
Set the details of network and select [OK].
As for network setting items, see pages 53 - 55.
Confirm to your system administrator before changing any settings.
<Example>
DHCP※
IP ADDRESS
OFF
※
192.168.11.100
SUBNETMASK※
255.255.255.0
SSID※
MODE
Panasonic Projector
AUTHENTICATION
OPEN※ (Some computers may require connection by [SHARED※] authentication.)
NONE….When not performing encryption
WEP……When performing encryption
ENCRYPTION
ENCRYPTION KEY
SETTING
AD HOC※
When [ENCRYPTION] setting is [WEP※]:
DEFAULT KEY : Set 1 – 4 numerals for the default key.
KEY 1 – 4
:S
et these to match the WEP key registered in [DEFAULT KEY].
※“Glossary” (See pages 66 - 67)
26
Connect (cont.)
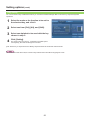
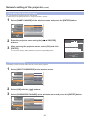
B Setting the computer IP address
4
Turn on the computer and log on with the administrator authority.
5
Select [Start] → [Network].
6
Select [Network and Sharing Center].
7
Select [Manage network connections].
8
Right click the mouse and open the
[Wireless Network Connection Properties].
9
Enter [TCP/IPv4] as the setting and press
[OK].
If the projector settings are the default settings (page 55), then the computer can
be used with the following network settings.
IP ADDRESS
SUBNETMASK
GATEWAY
192.168.11.101
255.255.255.0
192.168.11.1
27
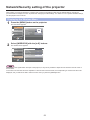
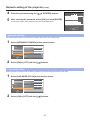
Connect (cont.)
C Computer network settings
10
In step 7 of “B Setting the computer IP address”, select
[Connect to a network].
11
Select [Panasonic Projector] and press the [Connect]
button.
•When the connection completion message appears, the network settings are
complete.
•When a connection utility is used, use the utility and connect to “Panasonic
Projector”.
D Computer operation
12
Log on with the user who operates Wireless Manager ME 5.0.
13
Start Wireless Manager ME 5.0.
14
Select the desired projector in the <Projector Search> window and click
[Connections].
The launcher appears and the connection with the projector is established.
(“Description of the launcher” → See page 33)
If the projector is not displayed, click [
]. (See page 30)
28
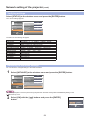
Selecting the connection method
The following models are compatible with the wired LAN communication that can be used with this Software.
PT-F100NT, PT-FW100NT, PT-F200NT
•When enabling a network adapter, first exit Wireless Manager and then enable the network adapter.
When the <Network Adapter Selection> window appears, select [Wireless LAN] and click [OK].
AWhen there is a usable wireless LAN (Disconnected)
Connects to the wireless LAN. (See page 14)
BWhen the wired LAN is connected and there is usable wireless LAN (Disconnected)
The <Network Adapter Selection> window appears.
Select [Wireless LAN], select the connection destination and click [OK].
CWhen there are two or more usable wireless LANs (all Connected)
Select [Wireless LAN], select the connection destination and click [OK].
The <Confirmation dialog> box appears. Click [Yes].
If [No] is clicked, the connection will stay in its original condition and the <Projector Search> window appears.
(See page 14)
DWhen there is one usable wireless LAN (Connected)
Connects to the wireless LAN.
The <Confirmation dialog> box appears. Click [Yes].
If [No] is clicked, the connection stays in its original condition and the <Projector Search> window appears.
(See page 14)
29
Other operations for connection
Operations when password entry is required for connection
A [ ] mark is displayed for projectors that have passwords set.
When connecting, the window shown to the right appears. Enter the password and click [OK].
(See page 56)
•Click [CANCEL] at the password entry window to return to <Projector Search> window. (See page 33)
•When an incorrect password is entered, an error message appears.
Click [OK] to return to the password entry window and enter the correct password again.
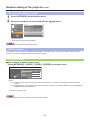
Other search
Apart from “Easy Wireless Set Up” (See page 14), there are 3 other ways to search for and connect to a projector, namely “IP
address Search”, “Domain Name Search”, and “ID Search”.
These methods can be used if you cannot search using “Easy Wireless Set Up”.
•IP address Search
Search for and connect to a projector from the IP address※.
The projector that you want to connect to must have a network number of [USER1]-[USER3] and
must have the IP address set. (See page 53)
•Domain Name Search
Search for and connect to a projector from the domain name※.
The projector that you want to connect to must have a network number of [USER1]-[USER3] and
must have the IP address set. (See page 53)
※ “Glossary” (See page 66)
•ID Search
Even if there are two or more projectors with the same name, an ID ([Proj] + 4-digit number) is
assigned to each projector to enable the projectors to be identified.
A search for the projector of the specified ID is carried out from among the projectors that are
presently switched on, from all network numbers other than [USER1]-[USER3].
It is necessary to know ID in advance. When input selection is switched to [NETWORK] on a
projector, the ID appears on the upper right of the projection screen for approximately 5 seconds.
If you write down the ID displayed in the [ID] column of the <Projector search> window in advance,
you can search a projector by the ID from next time.
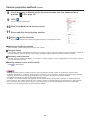
1
Click [
2
Enter the information of the projector you want to
search for, and select the search criteria.
] at the <Projector search> window.
<Other search> window appears.
Other search
Search by IP address
Search by domain name
Search by ID
Search
Close
l When using “IP address Search”
AEnter the IP address (including its periods).
Example: 192.168.10.100
BSelect [IP Address Search]
l When using “Domain Name Search”
AEnter the domain name.
BSelect [Domain Name Search].
l When using “ID Search”
AEnter the ID.
BSelect [ID Search].
30
Other operations for connection (cont.)
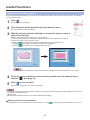
3
Click [Search].
When <Other search> window – [Searching] is displayed, the search starts.
Other search
Searching
Connectability
4
Connect
Close
Check the search results.
When the projector of the applicable ID is found, the [Projector Name] and [ID]
appear.
Other search
Projector detected.
If a projector of the applicable ID is not found, [Could not find a connection
point] appear.
Projector Name
Name1234
Connectability
5
Click [Connections].
When the connection with the projector is established, the launcher is
displayed.
(“Description of the launcher” → See page 33)
The launcher is not projected by the projector.
However, if you are using Windows Vista, the installed launcher is projected.
31
Proj1234
Connect
Close
Other operations for connection (cont.)
Canceling the connection
Click [ ] on the launcher.
1
The following window appears.
Close Wireless Manager ?
YES
NO
When connecting the projector for the first time
The <Preservation of a Profile> window appears.
Create a profile with information about connected projectors.
You can use the created profile to connect automatically.
This function is called “One-click Connection”.
Set the save destination and file name, and click [OK].
If you do not need to create a profile, click [Close].
When connecting automatically using “One-click
Connection”
Perform step A or B.
ADouble-click the profile.
(This function cannot be used when using without
installation.)
BDrag and drop the profile to the [ ] on the desktop.
The computer connect to the projector that was
connected when the profile was created.
2
Click [Yes].
The computer returns to the original network settings when the connection is ended.
However, note that some time may be needed to return to the original network settings.
Click [No] to return to the launcher.
When the launcher is minimized, right click [
] on the notification area to display pop up menu and click [End].
32
Various projection methods
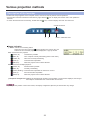
Description of the launcher
The launcher always appears on the computer screen, and can be used to perform various operations.
•If the launcher has been minimized to the task tray, right click the [ ] icon to display the launcher menu and operate the
launcher.
•To return the launcher from the task tray, double-click the [ ] icon, or select “Display menu bar” from the menu.
Cancel connection
A
B
Place in notification area
Status indication
A Status: Indicate the connecting status.
When the cursor is moved onto [ ] of the launcher, the names, IDs, and
statuses of the connected projectors are displayed in a pop up window.
When connected to one projector
(Green, lit):
Transmission possible
(Blue, lit): Own computer currently transmitting (when in live mode)
(Yellow, lit): Other user currently transmitting
(Red, lit): Communication impossible
(Black, lit): When the projector has not been selected
When connected to multiple projectors
(Green, lit): All transmission possible
(Blue, lit): Currently Transmitting
(Yellow, blinking): Communication impossible for more than one unit
(Red, lit): All communication impossible
(Black, lit): When the projector has not been selected
BReception strength level: D
isplays the strength level condition of the reception. The more bars displayed, the stronger
the reception and the better the communication environment.
Depending on the position of the moved screen, the display configuration (direction) of the launcher may change.
33
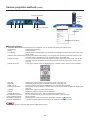
Various projection methods (cont.)
Cancel connection
Volume
control
Mute
A
B
C
D
E
Place in notification
area
Start/Pause
Stop
Live Mode
Selective Area Transmission
Display Change
Virtual Remocon
Pointer
AV Mute
WEB control
Select Access Port
Option
About
ALL
1
2
3
4
Live mode
Menu
Launcher Menu
End
Operating Button
ALauncher menu button: The launcher menu will appear. You can operate it by clicking the various items.
[Start/Pause]:
Starts/pauses projecting.
[Stop]:
Stops projecting.
[Live Mode]:The live mode menu will appear. Set the shape of the projected screen when in live mode. (See
pages 35-36)
[Selective Area Transmission]:By using the selective area window, you can specify the necessary information alone from the
computer screen, and display it on the projection screen. (See page 45)
[Display Change]:You can set the computer screen and projector screen to the multi-monitor mode, and use the
computer screen as the primary monitor and projector screen as a secondary monitor. (See
page 46)
[Virtual Remocon]:
The projector remote control is displayed on the computer screen, where it can be operated.
[Pointer]:
Switches the pointer shape on the projected screen. (See page 47)
[AV Mute]: Temporarily mutes the projector screen and volume. (See page 47)
[WEB control]:
Control a projector through the WebBrowser of a computer. (See page 59)
[Select Access Port]:Displays the <Projector Search> window. Return to the screen before the launcher display. (See
page 14)
[Option]:
Displays the <Option> window. (See page 49)
[About]:
Display the version information for the application.
[Display Menu Bar]:
Displays the launcher menu. (When minimized into the task tray.)
BFavorite function button: You can set the function you use frequently to this button. (See page 51)
CStop projection button: Stops projecting.
DProjection start button: Starts projection. During transmission, the display changes to [ ] (paused).
EVolume Adjust Button:
The volume control slider and mute button are displayed. Click again to close.
The 2 screen function cannot be used with the virtual remote control.
34
Various projection methods (cont.)
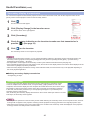
Live mode
Connect a computer to a projector, and display the computer screen over the entire projection screen.
1
Press the [MULTI-LIVE] button on the remote control to turn the projection screen
into a full screen display (the status when no index window (small screens) is
displayed). (See page 36)
If you press the [MULTI-LIVE] button once or twice when index windows are displayed on the projection screen, the
screen will switch over to a full screen display.
The live mode cannot be displayed if the index is being displayed.
2
Check the status indication on the launcher to make sure that
transmission is possible ( ). (See page 33)
3
Click [
4
].
Start/Pause
Stop
The launcher menu will appear.
Live Mode
Selective Area Transmission
Display Change
Virtual Remocon
Click [Live Mode] in the launcher menu.
Pointer
AV Mute
WEB control
Select Access Port
Option
About
End
5
Click [All].
6
Click [
ALL
] on the launcher.
The current computer screen is transmitted to the selected projector. In the live mode the
projector is occupied by a single computer, so operations from other computers are not
possible.
•Picture quality or other options can be set on the <Option> window by clicking [Option] in the launcher menu. (See page 49)
•For presentations in live mode, the [PAGE ▲▼] buttons on the remote control will function in the same way as the computer’s
Page Up and Page Down keys. (When using “Presenter View” of “PowerPoint”, the [PAGE ▲▼] buttons of the remote control
correspond to Back space key and Space key.) This means that if you run a computer application that supports the Page Up
and Page Down keys, the presentation screen can be changed using the remote control.
•Some portions of images are not projected under some applications (MS Office Assistant, IME Bar, animation and locus of the
mouse cursor, and others).
•If the connection error occurs during projection, the message [Stop “Live mode”] will appear. Check the communication
environment, then restart projection by clicking launcher buttons.
•Set the [LIVE MODE CUT IN] of the unit to [ON] in advance to enable a different computer to interrupt and project images in
live mode. (See page 57)
Quitting live mode
Click [
] on the launcher.
35
Various projection methods (cont.)
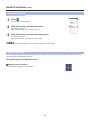
Multi live mode
Switching from one style to another
Multi live mode has “4-screen multi style”, “4-screen index style” and “16-screen index style”.
How to operate
Press the [MULTI-LIVE] button of the remote control to change the style.
•4-screen multi style (See page 37)
Set the projector to a full screen display. Assign an area of one quarter of the
projector screen to each of up to four computers, and project images on the
projector screen.
[MULTI-LIVE]
button
[MULTI-LIVE]
button
•4-screen index style (See page 38)
Display the indexes (small screens) of up to four computer screens, and
make one of these screens an enlarged display. You can also temporarily
switch over to a full screen display.
[MULTI-LIVE]
button
•16-screen index style (See page 40)
Display the indexes of up to 16 computer screens. You can also temporarily
switch over one of these screens to a full screen display.
•When the projector starts up, it resumes in the current style the last time the projector was turned off.
] on the computer.
•When transferring to the live mode, first select the 4-screen multi style, and then click [
•If you switch over to a 4-screen multi style when five or more computers are connected in a 16-screen index style, the
connections to the fifth and higher numbered computers will be nullified.
•You cannot use the “MULTI-LIVE” button on the remote control when in full screen display.
36
Various projection methods (cont.)
4-screen multi style
Connect up to four computers to one projector, and then divide the projector screen into four parts, and simultaneously display
the screens for the four computers on the projector screen.
1
Press the [MULTI-LIVE] button on the remote control to turn the projection screen
into a full screen display (the status when no index window (small screens) is
displayed). (See page 36)
If you press the [MULTI-LIVE] button once or twice when index windows are displayed on the projection screen, the
screen will switch over to a full screen display.
2
Check the status indication on the launcher to make sure that transmission is
possible ( ). (See page 33)
3
Click [
4
Click [Live Mode] in the launcher menu.
].
Start/Pause
Stop
The launcher menu will appear.
Live Mode
Selective Area Transmission
Display Change
Virtual Remocon
Pointer
AV Mute
WEB control
Select Access Port
Option
About
5
Select and click the projection position.
6
Click [
End
ALL
] on the launcher.
The computer image is transmitted to the selected quarter of the projection screen.
1
2
3
4
nSwitching to a different position
Select and click a different projection position in step 4 above.
nEnlarged display
If [Live Mode] – [All] is clicked in the launcher menu, projector screens
temporarily change to full screen display. To return to the original display,
click [Live mode] on the launcher and select original projection positions
with each computer.
nQuitting 4-screen multi style
Click [
] on the launcher.
•In the 4-screen multi style, the computer screens from all the computers connected to the projector can be transmitted to the
projector. (If an image from another computer has been sent to the image position where an image is already displayed, the
existing image is replaced by the new image.)
•Picture quality or other options can be set on the <Option> window by clicking [Option] in the launcher menu. (See page 49)
•If the connection error occurs during projection, the message [Stop “Live mode”] will appear. Check the communication
environment, then restart projection by clicking launcher buttons.
37
Various projection methods (cont.)
4-screen index style
When the projector is set to “4-screen index style”, connect up to four computers to one projector, and then simultaneously
display the screens for the four computers on the index windows and also on a large screen.
1
Press the [MULTI-LIVE] button of the remote control to switch the projection screen
to “4-screen index style”. (See page 36)
2
Check the status indication on the launcher to make sure that transmission is
possible ( ). (See page 33)
3
Click [
4
Click [Live Mode] in the launcher menu.
Start/Pause
Stop
].
Live Mode
Selective Area Transmission
Display Change
Virtual Remocon
The launcher menu will appear.
Pointer
AV Mute
WEB control
Select Access Port
Option
About
End
5
Select and click the projection position.
6
Click [
1
2
] on the launcher.
The computer image is transmitted to the area of corresponding window.
3
4
38
ALL
Various projection methods (cont.)
Enlarged display
•Use the [
] buttons on the remote control to move the focus (yellow box) to the image to be
enlarged, and press the [ENTER] button. The image is enlarged and displayed at the top of the
projection screen.
•The image display will fill the entire screen if the [ENTER] button is pressed again.
•To return to the 4-screen index style, press the [ENTER] button again.
•While an enlarged image is displayed, the [PAGE ▲▼] buttons on the remote control will function in the same way as the
computer’s Page Up and Page Down keys. (When using “Presenter View” of “PowerPoint”, the [PAGE ▲▼] buttons of the
remote control correspond to Back space key and Space key.) This means that if you run a computer application that supports
the Page Up and Page Down keys, the presentation screen can be changed using the remote control.
•Picture quality or other options can be set on the <Option> window by clicking [Option] in the launcher menu. (See page 49)
•If the connection error occurs during projection, the message [Stop “Live mode”] will appear. Check the communication
environment, then restart projection by clicking launcher buttons.
Quitting the 4-screen index style projection
Click [
] on the launcher.
In the 4-screen index style, the status display lamp remains (
).
Other computers can send images only to the windows which are not being used.
39
Various projection methods (cont.)
16-screen index style
When the projector is set to “16-screen index style”, connect up to 16 computers to one projector, and simultaneously display
the screens for the 16 computers on index windows and also on a large screen.
1
2
3
Press the [MULTI-LIVE] button of the remote control to switch the projection screen
to “16-screen index style”. (See page 36)
Check the status indication on the launcher to make sure that transmission is
possible ( ). (See page 33)
Click [
] on the launcher.
The computer images are automatically sent to the empty windows on the 16-screen display.
Display position is not selectable.
Enlarged display
• Use the [
▲▼] buttons on the remote control to move the focus (yellow box) to the image to be enlarged and press
[ENTER] to expand that image to fill the display.
• Press [ENTER] again to return to the 16-screen index style.
Toggle between
these with the
[ENTER] button.
• While an enlarged image is displayed, the [PAGE ▲▼] buttons on the remote control will function in the same way as the
computer’s Page Up and Page Down keys. (When using “Presenter View” of “PowerPoint”, the [PAGE ▲▼] buttons of the
remote control correspond to Back space key and Space key.) This means that if you run a computer application that supports
the Page Up and Page Down keys, the presentation screen can be changed using the remote control.
• Picture quality or other options can be set on the <Option> window by clicking [Option] in the launcher menu. (See page 49)
• If the connection error occurs during projection, the message [Stop “Live mode”] will appear. Check the communication
environment, then restart projection by clicking launcher buttons.
Quitting the 16-screen index style projection
Click [
] on the launcher.
40
Various projection methods (cont.)
Multiple Source Live Mode
You can simultaneously project one computer’s screen on up to eight projectors.
Can be projected by projectors that have a network number of [1]-[4] or [USER1]-[USER3].
1
Press the [MULTI-LIVE] button on the remote control to turn the projection screen
into a full screen display (the status when no index window is displayed). (See
page 36)
If you press the [MULTI-LIVE] button once or twice when index windows are displayed on the projection screen, the
screen will switch over to a full screen display.
2
Click [
Start/Pause
Stop
].
Live Mode
Selective Area Transmission
Display Change
Virtual Remocon
The launcher menu will appear.
3
Click [Select Connection Point] in the launcher menu.
4
Click [Setting ], and click [1-4/U] in the setting menu.
Pointer
AV Mute
WEB control
Select Access Port
Option
About
End
<Projector Search> window – [1-4/U] is displayed.
Current setting - [Single] - [S-MAP]
Setting
Update
PCSearch
Select access port
Name6789
Proj6789
Name1234
Proj1234
Name2345
Proj2345
AAAABBB
PRJ02555
5
Click [
].
Name8833
Proj8833
Name2212
Proj2212
Name6679
Proj6679
Name7771
Proj7771
Close
6
Select the network number of the desired projectors.
(See page 53)
Projectors powered on in the chosen network group are listed.
Current setting > - [Single] - [1-4/U]
Setting
All
AAAABBB
Name4567
Name8901
Proj8547
Proj4567
Proj8901
Live Mode
Live Mode
Live Mode
Connectability
7
Select the desired projectors, and click [Connections].
The selected projector is displayed with a blue-colored [
].
If click again, selected items are canceled.
If click [OK], the connection with the projectors is established.
Standby
Standby
Standby
Connect
Close
Current setting > - [Single] - [1-4/U]
Setting
Update
PCSearch
Select access port
All
AAAABBB
Name4567
Name8901
Proj8547
Proj4567
Proj8901
Live Mode
Live Mode
Live Mode
Connectability
41
Update
PCSearch
Select access port
Standby
Standby
Standby
Connect
Close
Various projection methods (cont.)
8
Check the status indication on the launcher to make sure that transmission is
possible ( ). (See page 33)
9
Click [
] on the launcher.
The same image is projected from all projectors selected in step 5.
•From the selected projectors, multiple projectors that have the same network number are projected in live mode.
•When one of the selected projectors is communicating with another computer, or its projection screen is not set to full screen
display, the images are projected onto the other selected projectors.
•The greater the number of projectors, the slower the transmission.
•Picture quality or other options can be set on the <Option> window by clicking [Option] in the launcher menu. (See page 49)
•Sound cannot be output in the multiple source live mode.
• If the connection error occurs during projection, the message [Stop “Live mode”] will appear. Check the communication
environment, then restart projection by clicking launcher buttons.
•Set the [LIVE MODE CUT IN] of the unit to [ON] in advance to enable a different computer to interrupt and project images in
live mode. (See page 57)
Quitting multiple source live mode
Click [
] on the launcher again.
42
Various projection methods (cont.)
Multiple Source Multi Live Mode
Connect up to four computers to each of up to eight projectors, and project in each projector by the 4-screen multi style.
Can be projected by projectors that have a network number of [1]-[4] or [USER1]-[USER3].
1
Press the [MULTI-LIVE] button on the remote control to turn the projection screen
into a full screen display (the status when no index window is displayed). (See
page 36)
If you press the [MULTI-LIVE] button once or twice when index windows are displayed on the projection screen, the
screen will switch over to a full screen display.
Start/Pause
Stop
2
Click [
].
3
Click [Select Connection Point] in the launcher menu.
Live Mode
Selective Area Transmission
Display Change
Virtual Remocon
The launcher menu will appear.
Pointer
AV Mute
WEB control
Select Access Port
Option
About
End
4
Click [Setting ], and click [1-4/U] in the setting menu.
Current setting - [Single] - [S-MAP]
Setting
<Projector Search> window – [1-4/U] is displayed.
Update
PCSearch
Select access port
Name6789
Proj6789
Name1234
Proj1234
5
Name2345
Proj2345
AAAABBB
PRJ02555
Click [
].
Name8833
Proj8833
Name2212
Proj2212
Name6679
Proj6679
Name7771
Proj7771
Close
6
Select the network number of the desired projectors.
(See page 53)
Projectors powered on in the chosen network group are listed.
Current setting > - [Single] - [1-4/U]
Setting
All
AAAABBB
Name4567
Name8901
Proj8547
Proj4567
Proj8901
Live Mode
Live Mode
Live Mode
Connectability
7
Select the desired projectors, and click [Connections].
The selected projector is displayed with a blue-colored [
].
If click again, selected items are canceled.
If click [OK], the connection with the projectors is established.
Standby
Standby
Standby
Connect
Close
Current setting > - [Single] - [1-4/U]
Setting
Update
PCSearch
Select access port
All
AAAABBB
Name4567
Name8901
Proj8547
Proj4567
Proj8901
Live Mode
Live Mode
Live Mode
Connectability
43
Update
PCSearch
Select access port
Standby
Standby
Standby
Connect
Close
Various projection methods (cont.)
8
Check the status indication on the launcher to make sure that transmission is
possible ( ). (See page 33)
9
Click [
10
].
Start/Pause
Stop
The launcher menu will appear.
Live Mode
Selective Area Transmission
Display Change
Virtual Remocon
Click [Live Mode] in the launcher menu.
11 Select and click the projection position.
12 Click [
Pointer
AV Mute
WEB control
Select Access Port
Option
About
End
ALL
] on the launcher.
The computer image is transmitted to the selected quarter of the projection screen.
Switching to a different position
Select and click a different projection position in step 7 above.
Enlarged display
If [Live Mode] – [All] are clicked in the launcher menu, projector screens temporarily change to full screen display. To return to
the original display, click [Live Mode] on the launcher and select original projection positions with each computer.
Secondary viewer function
If another computer enlarged the display, your screen is out of the projection screen and displayed in the secondary viewer on
your computer. (See page 46)
Quitting multiple source multi live mode
Click [
] on the launcher.
•From the selected projectors, multiple projectors that have the same network number are projected in multi-live mode.
•If LB10NT/20NT/30NT or a projector whose projection screen is not set to full screen display is included among the selected
projectors, the launcher live mode [1]-[4] will be grayed out, preventing the projector from being selected.
•The greater the number of projectors, the slower the transmission.
•In multiple source multi live mode even when the remote projector [MULTI-LIVE] button is pressed no operation will result.
•Picture quality or other options can be set on the <Option> window by clicking [Option] in the launcher menu. (See page 49)
•If the connection error occurs during projection, the message [Stop “Live mode”] will appear. Check the communication
environment, then restart projection by clicking launcher buttons.
44
Useful Functions
Selective area transmission
By using the selective area window, you can specify the necessary information alone from the computer screen, and display it
on the projection screen.
1
Click [
2
Click [Selective Area Transmission] in the launcher menu.
3
With the left mouse button held down, surround the area you want to
send to the projector.
].
Start/Pause
Stop
The launcher menu will appear.
The range selection screen is displayed.
Live Mode
Selective Area Transmission
Display Change
Virtual Remocon
Pointer
AV Mute
WEB control
Select Access Port
Option
About
End
Selective area window (green) appears on computer screen.
You can perform operations in the selective area window with the same operation for moving or
changing the window on the computer screen.
•If clicking [
], the selective area window automatically fit the inside window’s size.
•If clicking [
], the selective area window changes to its default size.
•If clicking [
], the selective area transmission function ends.
If you have drawn a straight line, a selective area window is displayed in the diagonal direction from your line.
4
Check the status indication on the launcher to make sure that transmission is
possible ( ). (See page 33)
5
Click [
] on the launcher.
The picture in the selective area window is projected.
•The picture inside the selective area window is displayed as big as possible with keeping the original aspect ratio to be fit for
the resolution of projection screen.
•Windows Vista
Selective area transmission does not work, without Administrator authority.
Quitting selective area transmission
Click [Selective Area Transmission] on the launcher again, or click [
45
] on the upper right of the selective area window.
Useful Functions (cont.)
Secondary display transmission
You can set the computer screen and the projector screen to the multi-monitor mode, and use the computer screen as the
primary monitor and the projector screen as the secondary monitor.
1
2
Click [
Start/Pause
Stop
].
The launcher menu will appear.
Live Mode
Selective Area Transmission
Display Change
Virtual Remocon
Click [Display Change] in the launcher menu.
Pointer
AV Mute
WEB control
Select Access Port
Option
The window shown to the right appears.
About
End
3
Click [Secondary].
4
Check the status indication on the launcher to make sure that transmission is
possible ( ). (See page 33)
5
Click [
Primary
secondary
] on the launcher.
The secondary screen on the computer is projected.
•Like the normal multi-monitor function, you can change the relative positions of the primary monitor (computer screen) and
secondary monitor (projector screen) in the [Settings] tab in the [Screen Properties] window ([Start] →[Control Panel] →
[Appearances and Themes] → [Screen]).
•It is impossible to send images to the secondary monitor by the selective area transmission (See page 45).
•If the computer has been set to the multi-monitor mode, the monitor for the display switch-over function will be displayed as the
third monitor in [Display Properties] of Windows.
•When secondary display transmission is being used in Windows Vista, the movie section may not be playable depending on
the movie playback application.
Quitting secondary display transmission
Click [Primary] in step 2.
Secondary viewer
If you are using secondary display transmission function and projecting a secondary monitor
screen in multiple source multi live mode, once [Live Mode] – [All] is pressed on one of the
computers, the full screen display from the computer will override all the rest, and it will no longer
be possible to verify the secondary screens of the other computers on the projector screen(s).
In this case, the secondary screen that you were projecting will appear on your desktop as a
secondary viewer in reduced form.
Also, while using the secondary display transmission in the 4-screen index style and the 16-screen
index style, the secondary viewer appears.
•You can perform operations on the secondary monitor while observing the secondary viewer on the computer screen, however
an image will not appear on the projection screen(s) until the projection screen(s) goes back to the original projection style.
•When the projector screen(s) return to its original status, the contents of the secondary viewer are displayed on the projection
screen(s), and the secondary viewer is closed as well.
46
Useful Functions (cont.)
AV mute function
Blanks the screen for a moment.
1
Click [
].
2
Click [AV mute] in the launcher menu.
Start/Pause
Stop
The launcher menu will appear.
Live Mode
Selective Area Transmission
Display Change
Virtual Remocon
Pointer
AV Mute
WEB control
Select Access Port
Option
The image is turned off.
When sound is output, the sound also goes out.
About
End
3
Click [AV mute] in the launcher menu again.
The image comes back.
When sound is output, the sound can also be heard.
The AV mute Function is available only in live mode or multiple source live mode.
Pointer function
You can change the shape of the pointer appearing on the projection screen in live mode or multiple source live mode to one
that can be used for presentation purposes.
Click [Pointer] in the launcher menu.
Quitting pointer function
Click [Pointer] in the launcher menu again.
47
Useful Functions (cont.)
Functions used with each projection method
Wireless Manager ME 5.0 can be used when connected to the following projectors.
When using PT-LB80NT/PT-LW80NT/
PT-F200NT/PT-F100NT/PT-FW100NT/
PT-LB51NT/PT-LB50NT/
PT-LB55NT/PT-LB60NT
Secondary
display
transmission
Selective area
transmission
AV mute
Pointer
When connected Live mode
to one projector Multi live mode
×
×
When connected Multiple Source Live Mode
to multiple
Multiple Source Multi Live Mode
projectors
×
×
AV mute
Pointer
×
×
When using PT-LB20NT/LB30NT
When connected Live mode
to one projector Multi live mode
×
When connected Multiple Source Live Mode
to multiple
Multiple Source Multi Live Mode
projectors
×
When using PT-LB10NT
Secondary
display
transmission
Selective area
transmission
×
Note
Note
―
―
―
―
Unavailable
Selective area
transmission
Secondary
display
transmission
AV mute
Pointer
Note
×
×
―
―
When connected Live mode
to one projector Multi live mode
×
When connected Multiple Source Live Mode
to multiple
Multiple Source Multi Live Mode
projectors
×
×
―
―
= Yes, = No
•Sound can be output only in live mode. (See page 49)
•Sound is not output when multiple projectors are connected.
48
Unavailable
Setting options
You can make various settings related to Wireless Manager ME 5.0.
Setting option window
1
Click [
].
Start/Pause
Stop
The launcher menu will appear.
Live Mode
Selective Area Transmission
Display Change
Virtual Remocon
Pointer
AV Mute
WEB control
Select Access Port
Option
About
End
2
Click [Option] in the launcher menu.
3
Click the desired tab to be set.
4
Click [OK].
The <Option> window shown to the right appears.
Transmission
Resolution
Select the quality of the image transmitted from the computer to the projector.
Live Mode Settings
•[Remove image when shutting down Live Mode]
Check this box to clear the projection screen from the projector when live mode ends.
•[Disable Screen Saver]
This disables the computer screen saver function while Wireless Manager ME 5.0 is operating. Check this box to disable
screen saver operation during live mode.
•[Display sender’s name in Multi Live Mode]
The characters (max. 8) which have been entered are displayed at the upper right of the transmitted screen.
In the 4-screen and 16-screen index style modes, they are also displayed at the bottom of each image.
(Alphanumerics are not displayed when the check mark has been removed.)
•[Produce audio along with video at live mode]
You can set this when you want to output audio data from a projector in live mode. Also, volume setting operated from
the launcher is different from the Windows’ volume setting, and it is effective only for wireless connection. When finishing
Wireless Manager ME 5.0, the Windows’ volume setting becomes active.
Sound can be output only in live mode.
•[Start Live mode at the same time as connection]
Projection starts when the connection is made without having to click the live button.
In the initial settings, [Disable Screen Saver] is enabled. Please remember that the password protected screen saver is disabled
if you need to leave your computer.
49
Setting options (cont.)
Key setting
You can set shortcut key combinations that let you control the Wireless Manager ME 5.0 functions by computer keyboard
operations.
1
Select the mode or the function to be set for
the shortcut key, and click it.
2
Select one from [Ctrl], [Alt], and [Shift].
3
Select one alphabet to be used with the key
chosen in step 2.
4
Click [Setting].
The shortcut key set in step 2 - 3 appears in the blank space.
If click [Clear], the shortcut settings are canceled.
[Use “Pause” key to stop/continue Live Mode]: Stops/continues live mode and multi live mode.
In live mode and multi live mode, the shortcut key switches the mode without stopping live mode.
50
Setting options (cont.)
Other
Perform other settings.
Setting Favorites
It is possible to assign a different name to connected projectors.
When connected, a field is displayed at the bottom of the
<Projector Search> window.
Click [Settings] to display the <Register favorite names> screen,
and enter a name for the projector.
Automatic connection setting
You can perform automatic settings for newly connected
projectors.
•If the [Make an automatic connection] box is checked and a projector is registered as a
destination for automatic connection when Wireless Manager ME 5.0 is started, <Projector
Search> window does not appear and connection is performed automatically.
•When [Setting] is clicked, <Access Log> window appears and you can select projector(s)
for automatic connections.
Up to 5 projectors may be displayed in the order of most recent connection history.
When it is desired to remove a projector from the display list, select it and press the
[DELETE] → [OK] button.
User settings
•User name
When [Setting] is clicked, the <User name setting> window to the right appears.
Specify the icon and user name shown on the <Projector search> window.
Enter the user name in up to 8 alphanumerics.
•Favorites Button
Assign whichever function you like to a specific launcher button. (See page 34)
: [Select Access Port]
: [WEB control]
: [Option]
: [AV Mute]
: [Selective Area Transmission]
: [Display Change]
: [Virtual Remocon]
: [None]
•Adaptors
Set the adaptor that is used normally. (Wireless/wired LAN adaptor).
Version information
The version information of Wireless Manager ME 5.0 is displayed when [
51
] on the <Option> window is clicked.
Network/Security setting of the projector
When making a connection between a computer and a projector with settings other than the default settings, perform the
procedure below to display the menu required when changing the initial settings. For details on how to perform detailed settings,
see the projector user’s manual.
Displaying the Wireless Menu
1
Press the [MENU] button on the projector.
The main menu appears.
PICTURE
PICTURE MODE
POSITION
CONTRAST
0
-
+
LANGUAGE
BRIGHTNESS
0
-
+
SHARPNESS
0
-
+
COLOR TEMPERATURE
STANDARD
OPTION
SECURITY
DAYLIGHT VIEW
WIRELESS
SELECT
2
DYNAMIC
AUTO
DETAILED SETUP
RETURN
ENTER
Select [WIRELESS] with the [▲▼] buttons.
The wireless menu appears.
PICTURE
NETWORK
POSITION
NAME CHANGE
LANGUAGE
INPUT PASSWORD
S-MAP
OFF
PASSWORD CHANGE
OPTION
NETWORK STANDBY
OFF
SECURITY
WEB CONTROL
ON
WIRELESS
LIVE MODE CUT IN
OFF
RETURN
STATUS
INITIALIZE
SELECT
ENTER
Depending on the signals which are input to the projector, it may not be possible to adjust some of the items and use some of
the functions.
In the case of an item that cannot be adjusted or a function that cannot be used, the corresponding on-screen item will not be
displayed, and you will not be able to execute it even when you press the [ENTER] button.
52
Network setting of the projector (cont.)
Changing the network number
1
2
Select [NETWORK] at the wireless menu.
Select the number to be connected with the [
PICTURE
NETWORK
POSITION
NAME CHANGE
LANGUAGE
INPUT PASSWORD
USER1
OFF
PASSWORD CHANGE
OPTION
OFF
NETWORK STANDBY
SECURITY
WIRELESS
SELECT
] buttons.
RETURN
WEB CONTROL
ON
LIVE MODE CUT IN
OFF
STATUS
INITIALIZE
ENTER
•Network number
Off, [S-MAP], [1]-[4], [USER1]-[USER3]
You can disable the wireless LAN by selecting [Off].
[USER] settings
If you selected one of [USER1] to [USER3] for [NETWORK] in the wireless menu, you can make detailed network settings.
Confirm to your system administrator before changing any settings.
IP address settings
How to display IP address setting menu
Press [NETWORK]→[USER1] - [USER3]→[ENTER] on wireless menu.
DETAILED SETUP
USER1
1/3
USER1
NAME CHANGE
OFF
DHCP
SELECT
RETURN
IP ADDRESS
192.168. 11.100
SUBNETMASK
255.255.255.
GATEWAY
192.168. 11. 1
ENTER
NEXT
0
CANCEL
DHCP※:
ON:If a DHCP server exists in the network to which the projector is connected, the IP address will automatically be
acquired.
OFF:If a DHCP server does not exist in the network to which the projector is connected, additionally set [IP ADDRESS※],
[SUBNETMASK※] and [GATEWAY※].
※ “Glossary” (See page 66)
A wired LAN and wireless LAN cannot be used in the same segment.
53
Network setting of the projector (cont.)
Wireless settings
Select [NEXT] on the IP address setting window to switch to the wireless setting window.
Make the settings related to the wireless connection between the projector and the network.
DETAILED SETUP
USER1
2/3
Panasonic Projector
SSID
AD HOC
MODE
SELECT
SSID※
RETURN
ENTER
AUTHENTICATION
OPEN
ENCRYPTION
NONE
1
CHANNEL
RETURN
NEXT
CANCEL
:If the mode is [INFRASTRUCTURE※], enter the SSID registered at the access point. If the mode is
[AD HOC], enter the same character string as that of SSID set on the computer to be connected.
MODE
:Select [AD HOC] or [INFRASTRUCTURE].
AD HOC※
:Connect projector and computer directly without access point.
INFRASTRUCTURE※ :Connect through access point.
AUTHENTICATION :Set the user authentication method used by the network to be connected.
OPEN
:Select when making a connection using [AD HOC], or when the access point authentication method is
OpenSystem※.
SHARED
:Select when making a connection using [AD HOC], or when the access point authentication method is
Shared Key※.
WPA-PSK※
:Select when the access point authentication method is WPA-PSK.
WPA2-PSK※
:Select when the access point authentication method is WPA2-PSK.
ENCRYPTION :Select the encryption method to be used for communication between the projector and the network.
NONE
:Select when transmit without encryption. It is selectable only when [AUTHENTICATION] is [OPEN] or
[SHARED].
WEP※
:Select when ENCRYPTION is WEP.
TKIP※
:Select when ENCRYPTION is TKIP.
Selectable when [Authentication] is either [WPA-PSK] or [WPA2-PSK].
AES※
:Select when ENCRYPTION is AES.
Selectable when [Authentication] is either [WPA-PSK] or [WPA2-PSK].
※ “Glossary” (See page 67)
•If you are unable to connect to the wireless LAN through the access point even after performing the steps in “A Projector
settings (See page 23),” contact the manufacturer of the access point.
•IEEE802.1x is not supported.
54
Network setting of the projector (cont.)
Additionally perform the following setting using the [AUTHENTICATION] setting.
DETAILED SETUP
USER1
3/3
1
DEFAULT KEY
********
KEY1
********
KEY2
SELECT
RETURN
********
KEY3
********
KEY4
RETURN
OK
CANCEL
When setting [OPEN] or [SHARED] as authentication and setting [WEP※] as the encryption method:
DEFAULT KEY:Set 1 – 4 numerals for the default key.
KEY 1 – 4
:Set these to match the WEP key registered in [DEFAULT KEY].
Either the 64-bit or 128-bit WEP key can be set. For the 64-bit key, input five alphanumerics (or a 10-digit
string for the hexadecimal format) for the 128-bit key, input 13 alphanumerics (or a 26-digit string for the
hexadecimal format).
When using [WPA-PSK※] or [WPA2-PSK※] : Set key and select [OK].
Input either 8 to 63 alphanumerics or a 64 digit string in the hexadecimal format.
※ “Glossary” (See page 67)
Important video/audio data is protected because AES※ encryption processing takes place in advance for all network numbers,
even if [ENCRYPTION] is set to [NONE].
※ “Glossary” (See page 67)
Default settings of [USER1] - [USER3]
The following settings as network [USER1] - [USER3] are set before the projector leaves the factory.
SSID
:Panasonic Projector
DHCP
:OFF
IP ADDRESS
:192.168.11.100
SUBNETMASK
:255.255.255.0
GATEWAY
:192.168.11.1
MODE
:AD HOC
AUTHENTICATION :OPEN
ENCRYPTION
:NONE
CHANNEL
: 11
55
Network setting of the projector (cont.)
Changing the projector name
You can change the projector name on the network.
It makes easy to recognize projectors in <Projector Search> window.
1
Select [NAME CHANGE] at the wireless menu and press the [ENTER] button.
PICTURE
NETWORK
POSITION
NAME CHANGE
LANGUAGE
INPUT PASSWORD
OFF
PASSWORD CHANGE
OPTION
NETWORK STANDBY
SECURITY
WIRELESS
SELECT
USER1
RETURN
OFF
WEB CONTROL
ON
LIVE MODE CUT IN
OFF
STATUS
INITIALIZE
ENTER
▲▼ENTER]
2
Enter the projector name using the [
buttons.
3
After entering the projector name, select [OK] and click
[ENTER].
To cancel the change, select [CANCEL] and press the [ENTER] button.
NAME CHANGE
LB80NT
A
N
a
n
B
O
b
o
C
P
c
p
D
Q
d
q
E
R
e
r
F
S
f
s
G
T
g
t
H
U
h
u
I
V
i
v
J
W
j
w
K
X
k
x
L
Y
l
y
M
Z
m
z
DELETE
1 2 3 4 5 6 7 8 9 0 SPACE
! " # $ % & ’ * + - / = ? @ / ^
_ ` | ~ ( ) < > [ ] { } , . : ;
OK
SELECT
CANCEL
RETURN
ENTER
Password setting
This setting is used to limit the users that can connect to the projector.
1
Select [INPUT PASSWORD] at the wireless menu.
PICTURE
NETWORK
POSITION
NAME CHANGE
LANGUAGE
INPUT PASSWORD
OFF
PASSWORD CHANGE
OPTION
NETWORK STANDBY
SECURITY
WIRELESS
SELECT
USER1
RETURN
OFF
WEB CONTROL
ON
LIVE MODE CUT IN
OFF
STATUS
INITIALIZE
ENTER
2
Select [ON] with the [
3
Select [PASSWORD CHANGE] at the wireless menu and press the [ENTER] button.
PICTURE
NETWORK
POSITION
NAME CHANGE
LANGUAGE
INPUT PASSWORD
USER1
OFF
PASSWORD CHANGE
OPTION
NETWORK STANDBY
SECURITY
WIRELESS
SELECT
] buttons.
RETURN
OFF
WEB CONTROL
ON
LIVE MODE CUT IN
OFF
STATUS
INITIALIZE
ENTER
56
Network setting of the projector (cont.)
4
5
Enter the password using the [
▲▼ENTER] buttons.
After entering the password, select [OK] and click [ENTER].
To cancel the change, select [CANCEL] and press the [ENTER] button.
PASSWORD CHANGE
******
A
N
a
n
B
O
b
o
C
P
c
p
D
Q
d
q
E
R
e
r
F
S
f
s
G
T
g
t
H
U
h
u
Network standby
You can leave the projector connected to the computer, even when it is in standby mode.
Select [NETWORK STANDBY] at the network menu.
NETWORK
POSITION
NAME CHANGE
LANGUAGE
INPUT PASSWORD
WIRELESS
2
OFF
OFF
NETWORK STANDBY
SECURITY
SELECT
USER1
PASSWORD CHANGE
OPTION
RETURN
WEB CONTROL
ON
LIVE MODE CUT IN
OFF
STATUS
INITIALIZE
ENTER
Select [ON] or [OFF] with the [
] buttons.
Live mode cut-in
During live mode or multi live mode, a different computer can interrupt and project images in live mode.
1
Select [LIVE MODE CUT IN] at the wireless menu.
PICTURE
NETWORK
POSITION
NAME CHANGE
LANGUAGE
INPUT PASSWORD
NETWORK STANDBY
SECURITY
WIRELESS
2
OFF
PASSWORD CHANGE
OPTION
SELECT
USER1
RETURN
OFF
WEB CONTROL
ON
LIVE MODE CUT IN
OFF
STATUS
INITIALIZE
ENTER
Select [ON] or [OFF] with the [
] buttons.
57
K
X
k
x
L
Y
l
y
M
Z
m
z
DELETE
! " # $ % & ’ * + - / = ? @ / ^
_ ` | ~ ( ) < > [ ] { } , . : ;
SELECT
PICTURE
J
W
j
w
1 2 3 4 5 6 7 8 9 0 SPACE
OK
1
I
V
i
v
CANCEL
RETURN
ENTER
Network setting of the projector (cont.)
Verifying settings
Select [STATUS] at the wireless menu and press the [ENTER] button.
Your current settings appear.
PICTURE
NETWORK
POSITION
NAME CHANGE
LANGUAGE
INPUT PASSWORD
OFF
PASSWORD CHANGE
OPTION
NETWORK STANDBY
SECURITY
WIRELESS
SELECT
USER1
RETURN
OFF
WEB CONTROL
ON
LIVE MODE CUT IN
OFF
STATUS
INITIALIZE
ENTER
The status of the following will appear.
ANTENNA LEVEL
NETWORK
MODE
CHANNEL
SSID
AUTHENTICATION
DEFAULT KEY
ENCRYPTION
DHCP
IP ADDRESS
SUBNETMASK
GATEWAY
MAC ADDRESS
(The strength of the connection will appear.)
“DISABLE”, “1” - “4”, “USER1” - “USER3”, “S-MAP”
“AD-HOC” - “INFRASTRUCTURE”
Refer to page 5 for usable channels.
(See page 54)
“OPEN” - “SHARED” - “WPA-PSK” - “WPA2-PSK”
“-” - “1” - “4”
“NONE” - “WEP” - “TKIP” - “AES”
“OFF” - “ON”
(See page 53)
(See page 53)
(See page 53)
Returning to the initial settings
You can return the changed settings to the initial conditions.
1
Select [INITIALIZE] at the wireless menu and press the [ENTER] button.
PICTURE
NETWORK
POSITION
NAME CHANGE
LANGUAGE
INPUT PASSWORD
OFF
PASSWORD CHANGE
OPTION
NETWORK STANDBY
SECURITY
WIRELESS
SELECT
USER1
RETURN
OFF
WEB CONTROL
ON
LIVE MODE CUT IN
OFF
STATUS
INITIALIZE
ENTER
You will be prompted to enter the password if [ON] has been selected as the [INPUT PASSWORD] setting on the
[
SECURITY] menu.
2
Select [OK] with the [
button.
] buttons and press the [ENTER]
INITIALIZE
INITIALIZE
OK
SELECT
58
CANCEL
RETURN
ENTER
Using WebBrowser
Control a projector through the WebBrowser of a computer. It is called “WEB Control”.
(The example is when using Microsoft Internet Explorer.)
Before using the WebBrowser control
Connect projector and computer. (See page 14)
AProjector settings
Set the [WEB CONTROL] of wireless menu [ON].
1
Select [WEB CONTROL] on the wireless menu.
2
Select [ON] or [OFF] with the [
] buttons.
ON :This enables control on the WebBrowser.
OFF:This disables control on the WebBrowser.
PICTURE
NETWORK
POSITION
NAME CHANGE
LANGUAGE
INPUT PASSWORD
OFF
PASSWORD CHANGE
OPTION
NETWORK STANDBY
SECURITY
WIRELESS
SELECT
USER1
RETURN
OFF
WEB CONTROL
ON
LIVE MODE CUT IN
OFF
STATUS
INITIALIZE
ENTER
•When the projector settings have been changed using a WebBrowser, the projector will not appear on the connection list until
the projector network is switched to [USER 1] - [USER 3].
•After the projector network has been switched to [USER 1] - [USER 3], manually release the proxy settings of the WebBrowser
used.
BComputer settings
Proxy server settings
Release the proxy settings of the WebBrowser used.
1
Open <Internet Properties> window.
2
Open [Connections] → [LAN Settings].
3
If [Use a proxy server for your LAN] is checked, remove the
check.
If [Use automatic configuration script] has been checked,
remove the check.
4
Click [OK].
Click [Start] → [Control Panel] → [Network and Internet Connections] → [Internet Option].
59
Using WebBrowser (cont.)
Enabling JavaScript
If JavaScript has been set to disable, enable it.
1
Open <Internet Properties> window.
2
Select [Security] and set the security level to [Default Level], or select [Custom
Level] and check the [Enable] checkbox under [Active scripting].
Click [Start] → [Control Panel] → [Network and Internet Connections] → [Internet Option].
Accessing from the WebBrowser
1
Click [WEB CONTROL] on the launcher.
Or start up the WebBrowser, and enter the IP address set by the projector.
The WebBrowser starts up and the authentication window appears.
<Top window>
2
Enter the user name and the password.
3
Click [OK].
<Monitored information> window appears. (Next page)
•The default user name and password settings are as follows.
User name: user1
Password: (The password is not set.)
•Password used in this page is for accessing the web control window. (See page 64)
This password is different from the password set in page 56 for accessing a projector.
•The system locks for several minutes if an incorrect password is entered three times in succession.
•No password is set at time of purchase or after default settings are restored. Be sure to set a password at such times.
•Make sure the password is as hard to guess as possible.
•Change the password periodically.
• If you forget the password, perform [INITIALIZE] using the network menu of the projector (See page 58) and set a password
again using the <Change password> window on the WebBrowser. (See page 64)
•Matsushita Electric Industrial Co., Ltd. and its affiliated companies never directly ask customers for their password.
Do not give out your password even if directly asked by a third-party representing themselves as
Matsushita Electric Industrial Co., Ltd.
•The top window may not appear depending on the WebBrowser. In this case start up WebBrowser again, or press the [Ctrl] +
[R] keys for example to update the screen.
•Connection cannot be made while the WebBrowser is set to dial-up network. Cancel the dial-up network setting.
•It may take some moments for WebBrowser to start up.
60
Using WebBrowser (cont.)
Monitor information window
This page indicates the projector status.
To access this page from other pages, click [Status] at the left of the window.
Monitored information
Network information
On this window, click the [Status information] tab.
On this window, click the [Network status] tab.
Click [Display] to switch to the detailed display window for
the sent and received packet information.
The monitor information is refreshed at fixed intervals, but the current exact information can be checked by clicking [View] →
[Refresh].
If [SELF TEST Error (Detail)] appears on the monitored information window,
click it to view the error details.
n If [FAILED] appears
Item
MAIN CPU BUS
FAN
INPUT AIR TEMP.
OUTPUT AIR TEMP.
LAMP REMAIN TIME
LAMP STATUS
INPUT AIR TEMP.SENSOR
OUTPUT AIR TEMP.SENSOR
Description
There is a problem with a microcontroller circuit. Contact your dealer.
There is a problem with the fan or fan drive circuit. Contact your dealer.
Excessive temperature by the air intake or around the lamp area.
The following may be causing the problem.
• The ambient temperature is too hot; the projector may be near a heater
• The exhaust vent is obstructed
The lamp has been used for longer than its rated useful life, and it is time to replace it.
The lamp could not be lit.
Allow the bulb of the light source to cool, and then turn on the projector.
There is a problem with the air intake temperature sensor. Contact your dealer.
There is a problem with the exhaust temperature sensor. Contact your dealer.
61
Using WebBrowser (cont.)
Projector control window
You can make various projector settings.
To access this page from other pages, click [Projector control] at the left of the window.
Basic control window
Advanced control window
On this window, click the [Basic control] tab.
On this window, click the [Advanced control] tab.
Connection with the projector may not be possible immediately after the power is turned on. In this case wait a bit and then
make the connection again.
62
Using WebBrowser (cont.)
Detailed settings window
You can make detail network settings on projector, when connecting without the administrator authority or when connecting
through an access point (infrastructure mode).
LAN settings
1
Click [Detailed set up] in the menu.
2
Select the items to change and click [Next].
3
Complete the detailed settings and click
[Next].
The settings window appears, showing the current settings.
•To change the LAN settings, click [Change].
•To return to the previous window, click [Back].
Settings in this page are the same when setting [USER 1] [USER 3] from network menu of the projector. (See page 53)
When [Next] is clicked, the next page appears, enabling you to
complete the detailed settings as desired.
After all required items have been entered, a confirmation
window appears.
4
Click [Submit].
The settings will be registered.
Making the above settings effective
Select [NETWORK] in the wireless menu of the projector, and use the [
] buttons to select the network set in this page.
•Important video/audio data is protected because AES※ encryption processing takes place in advance for all network numbers,
even if [ENCRYPTION] is set to [NONE]. ※ “Glossary” (See page 67)
•If you have changed the LAN settings that are currently in use, the connection may break off.
63
Using WebBrowser (cont.)
Password settings
Click [Detailed set up]→[Change password] in the menu.
Set a password for access of the [WebBrowser control window].
Enter the previous password and the new password.
Enter the new password in [Retype] and click [OK].
You can enter a password up to 16 characters (upper case/lower case)
and symbols.
Connection test
Performs a test as to whether it is possible to connect to the target
computer or access point.
Specify the destination that you want to test in the [Connection point
IP address] field, and click [Submit].
Switching Languages
Switch the language of the WEB control window.
To access this page from other pages, click [English] [日本語] at the main menu.
64
Software Uninstall
Wireless Manager ME 5.0
From the desktop, select [Start] → [All Programs] → [Panasonic Wireless Display] →
[Uninstall Wireless Manager mobile edition 5.0].
Follow the instructions appearing on the screen and uninstall the software.
65
Glossary
Category
Item
LAN
Access point
MAC address
TCP/IP
IP address
Common
Setting of
connections
DHCP
Subnetmask
Gateway
Domain Name
Descriptions
Page
Abbreviation for Local Area Network. This is a network with a relatively
narrow range such as inside a company.
These are stations for relaying electromagnetic signals between
computers in a wireless LAN. When a computer is connected to an
access point, it can communicate through the network connected to the
access point.
Each network card has its own ID No.
A discrete ID No. is assigned to each and every network card around
the world. These IDs are used to exchange data between cards. These
IDs are a combination of a discrete number managed and assigned
by the IEEE to each individual manufacturer and a unique number
assigned to each individual card by the manufacturer.
Abbreviation for Transmission Control Protocol/Internet Protocol. This is
the standard internet protocol.
This protocol is a set of rules and agreements governing data
communications between computers.
Internet Protocol (IP) is a protocol for distributing data, and the address
corresponding to the data distribution destination is called the IP
address. The same IP address cannot be used within the same LAN.
10
Abbreviation for Dynamic Host Configuration Protocol. This function
automatically assigns IP addresses to the connected equipment. If
a device with the DHCP server function is present within a LAN, it
automatically assigns IP addresses to the connected equipment.
This limits the range of the IP addresses assigned to computers in
order to divide the network into a number of sections during TCP/IP
connection. The value used to divide the network at this time is called
the subnetmask.
This is a relay point for connecting different networks.
This refers to the hardware and software used when connecting a
network with a network that uses a different protocol, etc. It adjusts the
protocol and other differences between networks to allow connection
with other networks.
The identifier that corresponds to the location to which data is delivered
by the network.
It is an alias name consisting of alphabet, numbers, and symbols that
replace the more difficult to use enumerated IP address.
66
23
23
25
24
26
30
53
24
26
53
24
26
53
53
30
Glossary (cont.)
Category
Item
This is the mode in which computers communicate with each other
directly, rather than via access points.
INFRASTRUCTURE
(infrastructure mode)
This is the mode in which communications are performed via the
access point.
SSID
Abbreviation for Service Set ID. The SSID identification code must
be set to distinguish equipment included in a wireless LAN that uses
access points from equipment not included in that LAN.
This may appear as the “ESSID” or the “network name” for wireless
LAN cards made by some manufacturers.
This is an authentication of wireless signals employing a public key
encryptosystem.
Open System/
OPEN
Shared Key/
SHARED
Advanced
setting of
connection
Descriptions
AD_HOC
WPA-PSK
WPA2-PSK
WEP
TKIP
AES
This is a secret key encryptosystem for wireless signals in which
authentication is performed with a key pre-set in the WEP.
Other terms for this method, in which the same key is used for both
encryption and decryption, are “shared key encryptosystem” and
“common key encryptosystem”.
This is a standard covering encryption methods used in wireless LAN.
It provides greater security than WEP, and has functions such as a
user authentication function and also TKIP (encryption protocol) which
automatically changes the encryption key at fixed intervals.
And this authentication requires no authentication server.
Abbreviation for Wired Equivalent Privacy. This is a method for
encrypting communication data. The encryption key is created and
notified only to the communicating user, so the communication data
cannot be decrypted by a third party.
Abbreviation for Temporal Key Integrity Protocol.
This encryption protocol provides even greater security than WEP
because it changes the encryption key at fixed intervals.
These are the US Government’s next-generation standard encryption
methods, the selection work of which is performed by the National
Institute of Standards and Technology (NIST).
67
Page
24
26
54
23
54
24
26
54
24
26
54
24
26
54
54
55
18
24
26
54
55
54
18
54
55
63
Frequently Asked Questions
Check the following points once more before requesting repair.
No wireless connection can be made between my projector and my computer.
•Is Wireless Manager ME 5.0 running?
Wireless Manager ME 5.0 must be started in the computer in order to enable wireless transmissions of images to the
projector.
<When a setting error for the wireless LAN card has been detected>
A Is the wireless LAN card effective?
Even if your computer has built-in wireless LAN, the wireless LAN may still be turned OFF. If so, turn it ON and re-start
Wireless Manager ME 5.0. See the User’s Manual of your computer to learn how to turn the wireless LAN power ON/
OFF.
B Is your wireless LAN card properly recognized on the network?
Sometimes, cards are not correctly recognized by the computer. Check Windows [Device Manager] to make sure your
card has been recognized.
If the Network Adapter is indicated with [?] in [Device Manager], wireless LAN card installation is not complete. See the
User’s Manual of your card and re-install the card driver.
To display [Device Manager]
Click [Start] → [Control Panel] → [Performance and Maintenance] → [System]. This will bring up the [System Properties]
dialog box. Click [Device Manager] in the [Hardware] tab.
C Some wireless LAN cards may allow Easy Wireless Set Up connections to function if drivers are updated.
(Consult the manufacturer of your driver about updates.)
68
Frequently Asked Questions (cont.)
No wireless connection can be made between my projector and my computer. (cont.)
<When the Network Bridge setting has been detected>
Is Network Bridge enabled?
Some computers with Windows XP, and Windows Vista may have Network Bridge (a built-in function of Windows XP, and
Windows Vista) enabled; this will prevent a wireless connection.
The settings in Network Bridge must be changed in order to make a wireless connection. If you do not expect ever to use
Network Bridge and see no need for it, delete it from your system.
To verify whether your system has Network Bridge (Windows XP)
Choose [Connect to] on the [Start] menu and click [Show all connections]. Verify that [Network Bridge] is displayed in the
<Network Connections> window. Perform either A or B below.
A How to change settings in Network Bridge
1. Select [Connect to] on the [Start] menu and click [Show all connections].
2. Right-click [Network Bridge] and click [Properties].
3. Remove the check mark from the [Wireless Network Connection] box in the [Network Bridge Properties] dialog box
(if the box is not checked, proceed to step 4.)
4. Click [Properties] in [Internet Protocol (TCP/IP)] in the [Network Bridge Properties] dialog box.
5. Click the [Alternate Configuration] tab in the [Internet protocol (TCP/IP) properties] dialog box.
6. Check the [User configured] box and set the [IP address] and [Subnet mask] as follows:
IP address :
10. 10. 11.101
Subnet mask : 255.255. 0. 0
(If the above IP address is already in use in the LAN environment, change it as appropriate in Class A. Confirm to
your system administrator on network settings before changing any settings.)
7. Click [OK] → [Close].
8. Close the [Network Connections] dialog box.
B How to delete the network bridge
1. Select [Connect to] on the [Start] menu and click [Show all connections].
2. Right-click [Network Bridge] and click [Delete].
To verify whether your system has a Network Bridge (Windows Vista)
Select [Control Panel] on the [Start] menu, and double-click on [Network and Sharing Center]. Select [Manage network
connections] in the [Network and Sharing Center] dialog box. Verify that [Network Bridge] is displayed in the [Network
connection] dialog box.
Perform either A or B below.
A How to change settings in Network Bridge
1. Select [control panel] on the [Start] menu, and double-click on [Network and Sharing Center].
2. Select [Manage network connections] in the [Network and Sharing Center] dialog box.
3. Right-click [Network Bridge] and click [Properties].
4. Click [Continue] in [User Account Control].
5. Remove the check mark from [Wireless Network Connection] box in the [Network Bridge Properties] dialog box (if
the box is not checked, proceed to step 6).
6. Click properties in [Internet Protocol Version 4 (TCP/IPv4)] in the [Network Bridge Properties] dialog box.
7. Click the [Alternate Configuration] tab in the [Internet Protocol Version 4 (TCP/IPv4) Properties] dialog box.
8. Check [User Configuration], and set the [IP address] and [Subnet Mask] as follows:
IP address :
10. 10. 11.101
Subnet mask : 255.255. 0. 0
(If the above IP address is already in use in the LAN environment, change it as appropriate in Class A. Confirm to
your system administrator on network settings before changing any settings.)
9. Click [OK]→ [Close].
10. Close the [Manage Network Connections] dialog box.
11. Close the [Network and Sharing Center] dialog box.
B How to delete the Network Bridge.
1. Select [Control Panel] from the [Start] menu, and double-click on [Network and Sharing Center].
2. Select [Manage network connections] in the [Network and Sharing Center] dialog box.
3. Right-click [Network Bridge] and click [Delete].
4. Click [Yes] in the [Confirm Connection Delete] dialog box.
5. Click [Continue] in [User Account Control].
69
Frequently Asked Questions (cont.)
No wireless connection can be made between my projector and my computer. (cont.)
<When Windows Firewall has been detected>
l Windows XP
Has Windows XP firewall been disabled?
The firewall in Windows XP must be disabled in order to connect to a wireless network.
How to disable the firewall in Windows XP
1. Click [Start] → [Control Panel] → [Network and Internet Connections] → [Network Connections].
2. Right-click [Wireless Network Connection] and click [Properties] in the pulldown menu.
3. Click the [Advanced] tab and set the [Internet Connection Firewall] checkbox to OFF.
l Windows XP SP2
Is Wireless Manager ME 5.0 registered in the [Control Panel] → [Security Center] → [Windows Firewall] →
[Exception] tab with the Windows XP SP2.
Register Wireless Manager ME 5.0 in the Exceptions to Application List of the firewall.
How to register
1. Click [Start] → [Control Panel].
2. Click [Security Center] → [Windows Firewall] when <Control Panel> window opens.
3. Click the [Exceptions] tab and then [Add Program…] when the <Windows Firewall> window opens.
4. Click [Wireless Manager mobile edition 5.0 (WM.exe)] to allow connection with external devices under [Programs]
when the <Add a Program> window opens.
If [Wireless Manager mobile edition 5.0 (WM.exe)] does not appear on the list of programs, click [Browse...] and
select [WM.exe].
5. [Wireless Manager mobile edition 5.0] is displayed in the [programs and services] field.
6. Double-click [Wireless Manager mobile edition 5.0], and open the [Edit a Program] window.
7. Click the [Change Scope] button at the lower left of the window.
8. When the [Change Scope] window opens, select the desired network as described below. Select [Any computer
(including those on the Internet)].
9. Click [OK].
10. Click [OK] in the [Edit a Program] window.
11. Click [OK] in the [Windows Firewall] window.
With this, the Wireless Manager ME 5.0 firewall will be deleted.
l Windows Vista
Is Wireless Manager ME 5.0 registered in the [Start] → [Control Panel] → [Windows Firewall] → [Allow a program
through Windows Firewall] → [Exceptions] tab?
Register Wireless Manager ME 5.0 in the Exceptions to Application List of the firewall.
How to Register
1. Click [Start] → [Control Panel].
2. Double-click the [Windows Firewall] tab when the [Control Panel] window opens.
3. Click [Allow a program through Windows Firewall] when the [Windows Firewall] dialog box opens.
4. Click [Continue] in [User Account Control].
5. Click the [Exceptions] tab and then [Add program...] when the [Windows Firewall Settings] window opens.
6. Click [Wireless Manager mobile edition 5.0] when the [Add program...] window opens.
If [Wireless Manager mobile edition 5.0] does not appear in [Programs], click [Browse...] and select [WM.exe].
7. [Wireless Manager mobile edition 5.0] is displayed in the [Program or port] field.
8. Double-click [Wireless Manager mobile edition 5.0], and open the [Edit a Program] window.
9. Click the [Change scope...] button at the lower left of the window.
10. When the [Change scope] window opens, select the desired network as described below. Select [Any computer
(including those on the Internet)].
11. Click [OK]
12. Click [OK] in the [Edit a Program] window.
13. Click [OK] in the [Windows Firewall] window.
14. With this, the Wireless Manager ME 5.0 firewall will be deleted.
70
Frequently Asked Questions (cont.)
No wireless connection can be made between my projector and my computer. (cont.)
<When another firewall has been detected>
Are any firewall-containing applications installed?
If any applications which contain firewalls are installed, the installation may hang up at the [Projector search in progress]
display (some firewalls function even when not started).
If this occurs, firewall settings must be changed in order to allow connection to the wireless network. See the User’s Manuals
for all applications containing firewalls to perform these settings.
<When the user does not have the administrator authority>
• If you have logged onto a computer as a [GUEST] or a restricted user who does not have administrator authority, you
can not perform Easy Wireless Set Up ([S-MAP], Network No. [1] – [4]). If you must perform Easy Wireless Set Up
without administrator authority, designate [USER1] - [USER3] as the network number.
See pages 53 - 55 for instructions in how to set [USER1] - [USER3] as the network number.
• With the connection method in “When logging on without administrator authority,” when the “Wireless Networks” tab is
not shown, complete the following settings.
1. C
lick [Start]→[Control Panel]→[Performance and Maintenance]→[Administrative Tools]→[Services].
The <Services> window appears.
2. Find [Wireless Zero Configuration] in the list.
3. If the status is blank, right-click it and select [Properties].
4. In [Service status], click [Start].
If you cannot click the [Start] button for [Service status] (it is grayed out), check whether [Type of startup] is set to
[Manual] or [Automatic]
5. C
lick [OK].
The status is now shown as [Started].
6. Close the window.
<Network setting error>
When connecting with Network number [USER1] - [USER3], make sure whether Wireless menu setting of the projector
is correct or not. (See page 53)
71
Frequently Asked Questions (cont.)
Wireless connection is lost shortly.
•If the live mode is canceled or the connection is lost, start the reconnection procedure from the launcher.
If it is still not possible to establish a connection to the LAN, power off the projector, wait for the cooling fan to stop
operating (after the power monitor on the projector changes from orange to red), power the projector back on, and then
start the connection procedure from the launcher once again. (See page 14)
The connection has been lost in the multi live mode.
•If a computer with a certain version of the Intel Centrino mobile technology (wireless LAN) is connected to the unit, the
multi live mode may be released. If this is the case, re-establish the connection from the launcher of Wireless Manager
ME 5.0. (See page 33)
The connection cannot be established with IEEE802.11 g.
•In environments with wireless LAN adapters that support both IEEE802.11b and IEEE802.11g, the connection may be
established via IEEE802.11b.
•In some operating environments, the connection may be established via IEEE802.11b, depending on the location, radio
signal conditions, distance, or other factors.
•Some wireless LAN adapters only support ad hoc connections via IEEE802.11b.
The transfer rate is slow.
•The transfer rate may be slower in some operating environments (depending on such factors as the location, radio signal
conditions or distance).
•Avoid placing metal objects or other conductors near the wireless LAN antenna of a computer, otherwise the transfer rate
may be slower.
•When WEP is set the image data is converted, so transfer takes time.
Image display is slow or animation is not displayed smoothly.
•Is the computer CPU speed slow? (See page 11)
Live mode depends largely upon the computer CPU performance.
•Adverse effects may be exerted if there is any wireless communication in the vicinity.
•When [Resolution] is set to [High Definition] in the <Option> window (See page 49), it may take longer time to display
images.
•Did you start up Microsoft PowerPoint or Windows Media Player before starting up Wireless Manager ME 5.0?
If so, start up the application only after you have started up Wireless Manager ME 5.0.
•The speed may drop significantly if the user does not have administrator authority.
•The speed may be slower when any other applications are running concurrently.
Contents of DVD or MPEG2 cannot be played on computer.
The following limitations apply when Wireless Manager ME 5.0 is running.
•DVD and MPEG2 playback is disabled.
using 3-D software, performance may be poor. Some items may not be rendered properly, and some operations
•When
may not work correctly.
To correct such problems, quit Wireless Manager ME 5.0 and use an RGB cable to connect the computer to the projector.
72
Frequently Asked Questions (cont.)
There is a time lag between operations at the computer and results in the projected image.
•Wireless Manager ME 5.0 reads the screen, compresses the data and transmits it to the projector. In the projector, the
received data are extracted and then projected. Some delays occur in this system, due to the processing time and factors
in the wireless environment. Different computers may also produce varying lag times.
I can’t hear the computer sound from the projector in the live mode.
•Check whether the check mark has been entered for [Produce audio along with video at live mode] from [Live Mode
Settings] under the [Transmission] tab selected from Wireless Manager ME 5.0’s <Option> window. (See page 49)
•Did you start up a player (Windows Media Player, Real Player or Quick Time, etc.) before starting live mode?
If so, start the application only after starting live mode.
Don’t know to which projector the computer is connected in multiple source live mode or multiple source multi live mode.
•Connected projectors’ names, IDs and their status are displayed in the pop up window when the cursor is on [
launcher.
] of the
Changing the display style.
•Press the remote control [MULTI-LIVE] button to change the display style.
The Wireless Manager ME 5.0 color display is strange and characters are difficult to read.
•Click [Start] → [Control panel] → [Appearance and Themes] → [Display]. Then, open the [Settings] tab of the <Display
Properties> window and set [Color quality] to [Medium (16 bit)] or higher.
Screen saver is not displayed properly in live mode.
•Some screen savers may not be displayed properly in the live mode.
Check the [Disable screen saver] box in [Live Mode Settings] in the <Option> window of Wireless Manager ME 5.0.
(See page 49)
Making a wireless LAN connection while using the internet
•If you have a wireless LAN environment which allows an internet connection, placing the projector on that network will
allow you to use the internet and the wireless connection at the same time. (See page 23)
•If you have a wired internet connection (Ethernet), this projector allows wireless use with simultaneous wired connection
to the internet.
The web control window does not appear.
<When Easy Wireless Set Up connection is used>
•When any WebBrowser except Internet Explorer is used, the proxy settings of the WebBrowser must be manually
released.
<When [USER] connection is used>
•Manually release the proxy settings of the WebBrowser used.
73
Frequently Asked Questions (cont.)
When Windows Media Player 11 is used with Windows Vista, audio is disconnected in the live mode.
•When using Windows Media Player 11, close as many other running programs as possible. If there still are dropouts in
the audio, try using another player application.
When using Wireless Manager ME 5.0 with Windows Vista, the launcher is projected.
•This limitation applies when installing and using the software under Windows Vista.
The “Aero” setting is cancelled.
•When Wireless Manager ME 5.0 is running, the “Aero” setting is cancelled.
74
Trademarks
•Microsoft and its logo as well as Windows, Windows XP®, Windows Vista®, Windows Media, and PowerPoint are either
registered trademarks or trademarks of Microsoft Corporation in the United States and/or other countries.
•Intel, Pentium and Centrino are registered trademarks or trademarks of Intel Corporation or its affiliates in the United States
and other countries.
•Other company names, product names or other names noted in this manual are trademarks or registered trademarks of the
respective companies. Note that ® and TM marks are not indicated in the text of this manual.
Notes:
• Unauthorized use or reproduction of part or all of this product software and manuals is strictly prohibited.
• Panasonic cannot be held liable for any effects resulting from the use of this product software and manuals.
• Panasonic reserves the right to revise this product software specifications and manual contents without notice.
S0208-4098E