1
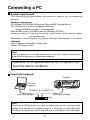
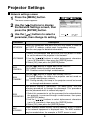
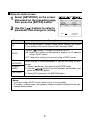
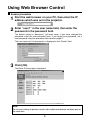
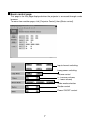
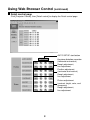
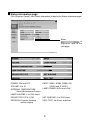
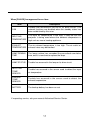
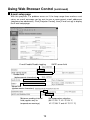
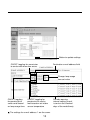
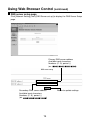
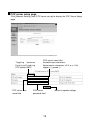
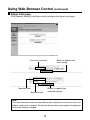
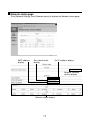
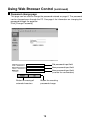
Network Function Edition
(PT-L785U)
This projector has networking functions which allow it to be
controlled through a web browser on a PC.
The controlled items are:
• Projector’s settings and adjustment
• Projector’s status display
• Transmission of a E-mail message when the projector has a
problem
TQBJ0158
Contents
Connecting a PC ..................................................3
System requirements ...............................................3
Connection example ................................................3
Projector Settings ................................................4
Network settings screen ..........................................4
Network status screen .............................................5
Using Web Browser Control ...............................6
Access procedure ....................................................6
Basic control page ...................................................7
Detail control page ...................................................8
Status information page ..........................................9
Error information page...........................................10
E-mail setup page ...................................................12
DNS server setup page ..........................................14
POP server setup page ..........................................15
Adjust clock page ...................................................16
Network status page ..............................................17
Password change page..........................................18
Trademarks:
• Windows is a trademark or registered trademark of U.S.
Microsoft Corporation in the U.S. and other countries.
• Other company names, product names or other names noted in
this manual are trademarks or registered trademarks of the
respective companies. Note that ® and TM marks are not
indicated in the text of this manual.
2
Connecting a PC
System requirements
The following system specifications are required in order to use the networking
functions.
Hardware requirements
OS: Windows XP/2000/Me (Millennium Edition)/98SE (Second Edition)
CPU: Pentium III or faster or compatible processor
(Celeron 633 MHz or faster is recommended)
RAM: 64 MB or more (128 MB or more for Windows XP/2000)
Hardware conditions: If you want to use the e-mail function, make sure the system
can handle e-mail.
Web browser: Internet Explorer 6.0 or newer, Netscape Communicator 7.0 or newer
LAN cable
Type: Category 5 compatible straight cable
Length: 100 meters or less
Note:
Note that operation is not guaranteed when used with system environments
other than the above or on homemade computers.
Operation is not guaranteed for all computers that
meet the above conditions.
Connection example
Projector
Personal
computer
10 BASE-T or 100 BASE-TX
LAN cable (straight)
LAN cable (straight)
Hub
Note:
Touching the LAN port with your hand (or body) when you are carrying a static
charge may damage the equipment due to a discharge of static electricity.
Therefore, be careful not to touch the LAN port or metal parts of the LAN cable.
3
Projector Settings
Network settings screen
1 Press the [MENU] button.
the [
] buttons to display
2 Use
the Network Settings screen, then
The menu screen appears.
NETWORK
NETWORK
HOSTNAME
WEB CONTROL
WEB STANDBY
WEB PASSWORD
MAC ADDRESS
LAN1
PROJECTOR
OFF
OFF
ON
ON
00 : 0B : 97 : 41 : 00 : 00
press the [ENTER] button.
the [
] buttons to select a
3 Use
parameter, then change its setting.
SELECT : [ ] [ ]
ENTER : [ENTER]
ESC : [MENU]
Description
Parameter
NETWORK
Select this parameter and press the [ENTER] button in order to
set DHCP, IP address, subnet mask, and gateway settings.
(See the next page for detailed information.)
HOSTNAME
1. Select this parameter and press the [ENTER] button in order
to set the name of the projector in the network.
2. Use the [
] buttons to select alphanumeric characters
(up to 16 characters), then press the [ENTER] button.
3. Select [OK], then press the [ENTER] button.
WEB
CONTROL
Use the [
] buttons to toggle web control ON/OFF.
ON: Enables control through a web browser.
OFF: Disables control through a web browser.
WEB
STANDBY
Use the [
] buttons to toggle web standby ON/OFF.
ON: During standby, the lamp in the projector can be turned on
through web browser controls.
OFF: During standby, the lamp in the projector cannot be turned
on through web browser controls.
The default setting is “panasonic” (all lower case). Use the
following procedure to change the password. This procedure
sets the password which is entered on page 6.
1. Select this parameter to set the password to be entered when
WEB
the projector is accessed through a web browser, then press
PASSWORD
the [ENTER] button.
2. Use the [
] buttons to select alphanumeric characters
(up to 16 characters), then press the [ENTER] button.
3. Select [OK], then press the [ENTER] button.
MAC
ADDRESS
A MAC address (Media Access Control Address) which is unique
to the network equipment is displayed here. The MAC address
may be needed when, for example, a DHCP server is used.
4
Network status screen
[NETWORK] on the screen
1 Select
discussed on the preceding page,
then press the [ENTER] button.
NETWORK
ID
DHCP
IP ADDRESS
SUBNET MASK
GATEWAY
ENTER
LAN1
OFF
ON
192.168.0.8
255.255.255.0
192.168.0.254
ESC
the [
] buttons to select a
2 Use
parameter, then change its setting.
SELECT : [ ] [ ]
ENTER : [ENTER]
ESC : [MENU]
Description
Parameter
ID
IDs are identification numbers under which settings are stored.
Three different IDs can be stored (LAN1 through LAN3).
DHCP
Use the [
] buttons to toggle this setting ON/OFF.
ON: Select this setting to automatically acquire an IP address
using a DHCP server.
OFF: Select this setting if you are not using a DHCP server.
IP
ADDRESS
SUBNET
MASK
GATEWAY
Enter settings in these parameters if you are not using a DHCP
server.
1. Select a parameter, then press the [ENTER] button.
2. Use the [
] buttons to select numbers and periods, then
press the [ENTER] button.
3. Select [OK], then press the [ENTER] button.
Notes:
• If you are using a DHCP server, make sure it is on and ready.
• IP address, subnet mask, and gateway settings should be obtained from your
network administrator.
5
Using Web Browser Control
Access procedure
the web browser on your PC, then enter the IP
1 Start
address which was set in the projector.
“user1” in the user name field, then enter the
2 Enter
password in the password field.
The default setting is “panasonic” (all lower case). If you have changed the
password, enter the new password here. If you forget your password, set a
new password using the procedure described on page 4.
The host name set in the projector is displayed in the “Realm” field.
3 Click [OK].
The Basic Control page is displayed.
Note:
Do not enter settings or perform controls with multiple web browser windows open at
the same time.
6
Basic control page
This page is the first page displayed when the projector is accessed through a web
browser.
To move from another page, click [Projector Control], then [Basic control].
Input channel switching
Lamp power switching
Volume control
(+: increase volume;
–: lower volume)
Video mode selection
Shutter control
Power ON/OFF control
7
Using Web Browser Control (continued)
Detail control page
Click [Projector Control], then [Detail control] to display the Detail control page.
AUTO SETUP start button
Keystone distortion correction
(horizontal and vertical)
Rough adjustment,
fine adjustment
Position adjustment
(horizontal and vertical)
Rough adjustment,
fine adjustment
Picture adjustment
(contrast, bright, color, and
sharpness)
Rough adjustment,
fine adjustment
8
Status information page
Click [Projector Control], then [Status information] to display the Status information page.
When
is
displayed, refer to the
next page.
POWER: ON and OFF
VOLUME: 0 to 20
INTERNAL TEMPERATURE:
Good, Warning and Caution
INPUT: RGB1, RGB2, RGB3, DVI,
VIDEO and S-VIDEO
LAMP POWER: HIGH and LOW
LAMP RUNTIME: 0 to 1500 hours
PROJECTOR TYPE: L785
SET RUNTIME: 0 to 2000 hours
VERSION: Projector firmware
version display
SELF TEST: No Errors and Error
9
Using Web Browser Control (continued)
Error information page
When
to display the error details.
Items checked for errors
is displayed on the status information screen, click it
[OK]: Normal
[FAILED]: Error
Note:
In the case of some errors, the standby status is established in order to protect the
projector. "WEB STANDBY" must be set to [ON] to display the error information
page. (See page 4.)
10
When [FAILED] has appeared for an item:
Item
Description
FAN
Trouble has occurred in the fan or its drive circuit. The
network functions are disabled when the standby status has
been established by this error.
INPUT AIR
TEMPERATURE
The input air temperature is too high. It may be that the
projector is being used where the ambient temperature is
high such as near a heating appliance.
EXHAUST
TEMPERATURE
The air exhaust temperature is too high. The air outlet or
exhaust holes may be blocked.
LAMP REMAIN
TIME
The lamp runtime has exceeded the prescribed cumulative
time, and it is now time to replace the lamp.
LAMP STATUS
Trouble has occurred in the lamp or its drive circuit.
INPUT AIR
TEMP.
SENSOR
Trouble has occurred in the sensor used to detect the input
air temperature.
EXHAUST
TEMP.
SENSOR
Trouble has occurred in the sensor used to detect the
exhaust temperature.
BATTERY
The backup battery has been run out.
If requesting service, ask your nearest Authorised Service Center.
11
Using Web Browser Control (continued)
E-mail setup page
With this projector, if a problem occurs or if the lamp usage time reaches a set
value, an e-mail message can be sent to one or more preset e-mail addresses
(maximum two addresses). Click [Projector Control], then [E-mail set up] to display
the E-mail setup page.
E-mail Enable/Disable toggling
SMTP server field
Sender field
(alphanumeric characters)
Memo field
(alphanumeric characters)
Minimum sending interval
field (applies only to
temperature warnings)
Set temperature selection
(38 °C/100 °F, 40 °C/104 °F,
42 °C/108 °F and 44 °C/111 °F)
12
Button to update settings
ON/OFF toggling for permission
to send e-mail when error occurs
Destination e-mail address field
Change lamp usage
time set value
ON/OFF toggling
for permission to
send e-mail based
on lamp usage time
ON/OFF toggling for
permission to send email based on air intake
sensor temperature
The settings for e-mail address 1 are the same.
13
Periodic warning
interval setting (e-mail
is sent on the checked
days of the week/times)
Using Web Browser Control (continued)
DNS server setup page
Click [Network Setting], then [DNS Server set up] to display the DNS Server Setup
page.
Primary DNS server address
Available input characters:
Numbers (0 - 9), period (.)
(ex.
.
.
.
Secondary DNS server address
Available input characters:
Numbers (0 - 9), period (.)
(ex.
.
.
.
)
14
)
Button to update settings
POP server setup page
Click [Network Setting], then [POP server set up] to display the POP Server Setup
page.
Toggling between
Enabling/Disabling
POP before SMTP
POP server user
name field
POP server name field
Available input characters:
Alphanumeric characters (A–Z, a–z, 0–9),
hyphen (-), period (.)
POP server
password field
15
Button to update settings
Using Web Browser Control (continued)
Adjust clock page
Click [Network Setting], then [Adjust clock] to display the Adjust clock page.
Time zone selection
New date field
Button to update time
zone setting
Button to update time
and date settings
New time field
Note:
If the time becomes incorrect immediately after setting the correct time, then the
battery needs to be changed. Contact the dealer where you bought the projector
to have the battery changed.
16
Network status page
Click [Network Setting], then [Network status] to display the Network status page.
MAC address
display
Set subnet mask
display
Set IP address display
Network software
version display
Network status display
17
Using Web Browser Control (continued)
Password change page
This page can be used to change the password entered on page 6. The password
can be changed even through the PC. See page 4 for information on changing the
password through the projector.
Click [Change Password].
Old password input field
New password input field
New password input field
(re-enter for confirmation)
Button for erasing all
entered characters
Button for executing
password change
18
19
Professional/Industrial Video
Panasonic Broadcast & Television Systems Company
Division of Matsushita Electric Corporation of America
One Panasonic Way 4E-7 Secaucus, NJ 07094 (201) 392-4443
3330 Cahuenga Blvd West Los Angels, CA 90068 (323) 436-3500
Technical Support:
(800) 524-1448
(800) 526-6610
FAX: (201) 392-6514
E-Mail: [email protected]
© 2004 Matsushita Electric Industrial Co., Ltd. All Rights Reserved.
Printed in Japan
M0604-0