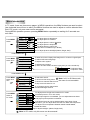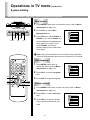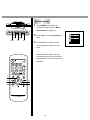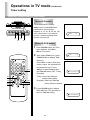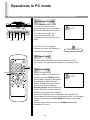
1
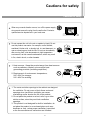
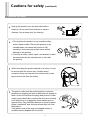
OWNER'S MANUAL
51CM CORDLESS REMOTE LCD TV/MONITOR
MODEL: TFTV-510
Type Tested
Electrical
Safety
AS/NZ 3250
Standards Australia
PALSONIC CORPORATION PTY LTD
1 JOYNTON AVENUE
WATERLOO NSW 2017 AUSTRALIA
TEL: (02) 9313 7111
FAX: (02) 9313 7555
www.palsonic.com.au
PALSONIC CUSTOMER SERVICE
TELEPHONE
AUSTRALIA: 1300 657 888
Congratulations on your purchase of this Palsonic LCD TV/MONITOR.
We recommend that your thoroughly read this manual before use to fully enjoy
the many functions and excellent effects of this LCD TV/MONITOR.
Retain this manual in an easily accessible location for future reference.
Note: Screen displays and illustrations in this manual may differ from the actual
ones for better visibility.
Contents
Features .................................................... 1
Cautions for safety .................................. 2
Identification of controls ......................... 5
Front ...................................................... 6
Back ...................................................... 6
Remote Control ........................................ 7
Battery installation ................................. 8
Effective remote range .......................... 8
Installation ................................................ 9
Antenna installation ............................... 9
Power connection .................................. 10
Elevation adjustment ............................. 10
Connecting video/audio equipment ....... 11
Basic operations ...................................... 13
Turning on ............................................. 13
Turning off ............................................. 13
Selecting input signal ............................ 13
Menu introduction .................................. 14
Operations in TV mode ........................... 15
Channel Preset ..................................... 15
Auto Search ........................................... 15
Channel Search ..................................... 15
Fine Tuning ........................................... 16
Skip Setting ........................................... 16
Channel Edit .......................................... 17
Channel Select ......................................
Using DIGIT buttons ...........................
Using CH+/- buttons ...........................
Using previous channel button ...........
Picture Adjustment ...............................
Sound Adjustment ................................
Adjusting Sound .................................
Adjusting volume ................................
Muting the sound.................................
System Setting ......................................
Blue screen ........................................
OSD language ....................................
Colour system ....................................
Sound system ....................................
Timer Setting .........................................
Use SLP button ..................................
Use CLOCK button ............................
Operations in AV/S-VIDEO mode ........
Operations in PC mode ........................
Accessing PC mode ...........................
PC signal format .................................
Auto adjustment .................................
Adjusting picture .................................
Trouble Shooting ..................................
Specifications .......................................
18
18
18
18
19
20
20
20
20
21
21
21
21
22
23
23
23
24
25
25
25
25
26
27
28
Features
Features
TV/Monitor
High brightness/High contrast LCD
Resolution: 640 x 480 @ 60Hz
Brightness: 450 cd/m2
Contrast Ratio: 350:1
Multi digital processing & Picture improvement circuit
English/Chinese on-screen menu display
Sleep Timer
Backlight Adjustment
Channel Edit
Low power consumption/Low voltage
PC audio input
VGA input
AV input
S-VIDEO input
Earphone jack
1
Cautions for safety
Cautions for safety
When any unusual situation occurs, turn off the power supply
at once and remove the plug from the wall outlet. Contact a
qualified service department in your local area.
Do not expose this unit in the rain or spatter by liquid, Do not
use this product near water- for example, near a bathtub,
washbowl, kitchen sink, or laundry tub, in a wet basement, or
near a swimming pool, and the like. Do not use immediately
after moving from a low temperature to high temperature
environment, as this causes condensation, which may result
in fire, electric shock, or other hazards.
1. Heat sources - Keep the product away from heat sources
such as radiators, heaters, stoves other heat
generating products (including amplifiers).
2. Requirement of environment temperature;
00C~500C for storage;
50C~400C for working.
1. The vents and other openings in the cabinet are designed
for ventilation. Do not cover or block these vents and
openings since insufficient ventilation can cause
overheating and/or shorten the life of the product.
2. Do not place the product on a bed, sofa, rug or other
similar surface, since they can block ventilation
openings.
3. This product is not designed for built-in installation; do
not place the product in an enclosed place such as a
bookcase or rack, unless proper ventilation is provided
or the the manufacturer's instructions are followed.
2
Cautions for safety (continued)
Cautions for safety
Unplug this product from the wall outlet before
cleaning. Do not use liquid cleaners or aerosol
cleaners. Use a damp cloth for cleaning.
1. Do not place the product on an unstable trolley,
stand, tripod or table. Placing the product on an
unstable base can cause the product to fall,
resulting in serious personal injuries as well as
damage to the product.
2. Use only a trolley, stand, tripod, and bracket or table
recommended by the manufacturer or sold with
the product.
When relocating the product placed on a trolley, it must
be moved with the utmost care. Sudden stops,
excessive force and uneven floor surfaces can cause
the product to fall from the trolley.
The power cords must be routed properly to prevent
people from stepping on them or objects from resting on
them. Check the cords at the plugs and product. Power
supply cords should be routed so that they are not likely
to be walked on or snagged by items placed upon or
against them. Pay particular attention to cords at doors,
plugs, receptacles, and the point where they exit from
the product.
If the power cord or the plug is damaged contact a
qualified service department for service.
3
This TV set can operate on a power of ~240V, 50Hz. You must not use any
other type of power supply.
Do not overload wall outlets, extension cords, or
convenience receptacles on other equipment as
this can result in a risk of fire or electric shock.
High Voltage exists in this TV set. Do not remove the cover.
In case the product needs replacement parts, make sure
that the service person uses replacement parts specified by
the manufacturer, or those with the same characteristics
and performance as the original parts. Use of unauthorised
parts can result in fire, electric shock and/or other danger.
The LCD panel used in this product is made of glass.
Therefore, it can break when the product is dropped or
impacted upon by other objects. Be careful not to be injured
by broken glass pieces in case the LCD panel breaks.
Don't try to push anything into the cabinet or place any
vessel with water on the TV set.
During a lightning storm, or when it is left unattended and
unused for long periods of time, unplug it from the wall outlet
and disconnect the antenna. This will prevent damage to the
equipment due to lightning and power-line surges.
4
Identification of controls
Front/Back
Front
6
7
1
2
4
3
5
1. To input signal select
2. To access menu
3. CH+/-: to select a higher/lower numbered channel or cycle through the menus.
4. VOL+/-: press to raise/lower the volume or adjust the selected item.
5. Power on/standby
6. Indicator: standby mode: red
power on: yellow
7. Remote sensor
5
Back
AUDIO IN
S-VIDEO input
PHONE
SPEAK OUT
Earphone
jack
VGA input
PC audio
line in
TUNER
POWER IN
Antenna input
AC Power input
Speaker
output
Video/audio input
6
Remote control
Remote control
Power on/standby
Muting Sound
Channel select
In PC mode, auto correct picture
Press the button to switch the
set among TV/AC/S-VIDEO/PC
Clock/Timer setting
Previous channel
To enter into menu
Press to adjust picture
(including brightness,
contrast, saturation and
sharpness).
On-screen display
Channel up/down selector. In
menu operations, used to select
item upwards or downwards.
Volume up/down selector.
In menu operation adjust
the selected item or access
the sun-menu.
Setting sleep timer
To select different picture modes
7
Battery Installation
Please install the batteries before using the remote control.
Open the battery cover.
Install two "AA"
batteries matching
the +/- polarities of
the battery to the +/marks.
Effective remote range
Replace the battery
cover.
Notes:
1. When the remote control will not be used for a long
period of time or when the batteries are worn out,
remove the batteries.
2. Do not drop, dampen the remote control.
3. Do not disassemble the remote control.
4. There should be no obstacle between the TV and
the transmitter.
5. Use the remote control within the effective range
30
30
as the left figure.
6. If the remote control does not work, please check
whether the batteries are exhausted or the
5m
polarity is wrong.
7. When direct sunlight, and incandescent lamp,
fluorescent lamp or any other strong light shines
on the remote sensor of the TV, the remote
operation may be unstable.
8. Different batteries have different features. Please
don't mix different- type batteries.
8
Installation
Antenna connection/Power connection/Elevation adjustment
Antenna connection
Optimum reception of colour requires a good signal and will generally mean that an outdoor aerial must
be used. The exact type and position of the aerial will depend upon your particular area.
Tuner
Notes:
Turn off the power firstly when you connect an outdoor antenna to the antenna input terminal.
When installing an outside antenna system, extreme care should be taken to keep from
touching power lines or circuits as contact with them might be fatal. In thunder and lightning
weather, please disconnect the outdoor antenna to avoid thunder/lightning strike.
9
Power Connection
Power cord
To the wall outlet
POWER IN
Notes:
1. This TV can only be operated on a power of AC 240V 50 Hz.
2. Please remove the power plug from the wall outlet when the TV will not be used for
a long period of time.
Elevation adjustment
You can adjust the angle of the LCD TV as follows.
The elevation can be adjusted from -50 to +150.
150
-50
10
Installation (continued)
Connecting video/audio equipment
Connecting video/audio equipment
Composite VIDEO Signal Connection (RCA)
Connect the composite signal terminal on the TV to the output of AV equipment through composite
cable as illustrated.
If you select the video signal, please set the input signal source to AV mode (please refer to page
13).
To video input
To video output
Y
Y
w
w
R
R
VCR, DVD etc.
To audio outputs
To audio inputs
Y
W
R
AUDIO IN
PHONE
SPEAK OUT
TUNER
POWER IN
Yellow (video)
White (audio, L)
Red (audio, R)
Back panel
S-VIDEO Signal Connection
Connect the S-video terminal on the TV to the output of AV equipment through S-video cable as
illustrated.
If you select S-video signal, please set the input signal source to S-video mode (please refer to
page 13).
11
1. Carefully check the terminals for position and type before making any connections.
2. Loose connectors can result in image or colour problems. Make sure that all connectors are securely
inserted into their terminals.
3. When connecting an external device, turn off the power of the main unit first to prevent any possible
damage.
To S-VIDEO input
To S-VIDEO output
w
w
R
R
VCR, DVD etc.
To audio outputs
To audio inputs
W
R
AUDIO IN
PHONE
SPEAK OUT
TUNER
White (audio, L)
Red (audio, R)
POWER IN
Connecting the PC input terminals
Connect the D-sub signal terminal on the TV to the output of PC equipment through Min D-sub 15
pin cable as illustrated. Connect a cable, which matches the audio output terminal on the computer.
If you select PC signal, please set the input signal source to PC mode (please refer to page 13).
To VGA output
To VGA input
To audio output
To audio input
Equipment with
VGA output
Notes:
1.
The display native resolution is 640 x 480. If the signal resolution exceed the native
resolution, it may not be possible to show fine detail with sufficient clarity.
2.
We recommend that you do not set the vertical scanning frequency for PC signals to
exceed 60Hz otherwise it maybe display incorrectly.
12
Basic operations
Turning On/Turning Off/Selecting input signal/Menu introduction
Turning On
SOURCE
MENU
CH-
VOLCH+
POWER
1
Insert the power plug to wall outlet, then the red indicator lights
up and the unit is in STANDBY mode.
2
Press the POWER button on the unit's control panel or the
button on the remote control to turn on (the indicator turns to
yellow).
3
The TV will display the program before turning off last time.
VOL+
Turning Off
Press the POWER on the unit or the button
on the remote
control again. Then the TV is in STANDBY mode. The indicator
turns to red.
This TV set can automatically turn off (standby) by Sleep timer.
Note:
Please unplug the power cord from the wall outlet if not in
use.
Selecting input source
SOURCE
CH+
OSD
VOL-
VOL+
MENU
CH-
1
Press the SOURCE button on the unit or on the remote control.
The screen displays AV/S-Video/PC/TV. Select your desired
input signal.
2
To resume TV mode, press the SOURCE button on the unit or
on the remote control repeatedly until the screen displays TV.
You can also press digit buttons or CH+/- buttons to resume TV
mode.
3
Press OSD button, the screen displays current mode. Press
again to cancel OSD.
Note:
All buttons in the manual are buttons on remote
control if without special indication.
13
Menu introduction
In TV mode, there are three menu pages. In MENU operations, the CH+/- buttons are used to select
item (selected item will turn to white), the VOL+/- buttons are used to adjust or confirm selected item.
But in PC mode, only one menu can be accessed.
During MENU operation process, pressing MENU button repeatedly or waiting for 5 seconds can
exit menu.
Press MENU
button
50
Bright
Contrast 100
Saturation 80
Sharpness 3
Color Hue
Backlight
To adjust picture's brightness.
To adjust picture's contrast.
To adjust picture's colour saturation.
Bright
To adjust picture's sharpness.
To adjust picture's colour hue.
(This item is available only in NTSC)
To adjust picture's backlight (Nature, Bright, Soft).
Press MENU button
Press MENU
button twice
Blue Background Disable
To select the screen to display blue background or not when no signal inputs.
Language
English
To select OSD menu language.
Color Sys
Auto
To adjust colour system.
Sound Sys
B/G
To adjust sound system.
(In AV or S-Video mode, the item is grey and you can not select it).
Bass
6
To adjust the Bass
Treble
9
To adjust the Treble
Sound Set
Press MENU button
Press MENU
button third
time
Press MENU
button in
PC mode
Auto search
Fine tuning
Channel search
Skip setting
Channel edit
50
Bright
Contrast 50
Horizontal 50
Vertical 50
9
Phase
Frequency 1334
9300K
Color
Bright
Backlight
To start auto search.
To enter into fine tuning menu.
Note: In AV or S-Video mode,
the menu is not accessible.
To enter into channel search menu.
To skip current channel or not.
To exchange current channel with
the selected target channel.
To adjust picture's bright and contrast in PC mode.
(not affect picture in TV or AV mode)
If VGA input signal is not standard, you can adjust these two items
until proper picture position is obtained.
If the best picture can not be obtained after many times of auto
correction, you can adjust these two items to obtain the best picture.
To adjust colour temperature between 9300K 7300K 6500K,
5000K and User.
To adjust backlight. (Nature, Bright, Soft)
Note: In PC mode, only this menu can be accessed.
14
Operations in TV mode
Channel preset
Auto search/Channel search/Fine tuning/Skip setting
Auto search
1
SOURCE
CH
MENU
VOL
CHMENU
POWER
VOLCH+
VOL+
Press MENU button third times to
access menu (Refer to Menu
introduction on page 14).
2
Press CH+/- to select Auto search
item.
3
Press VOL+/- buttons to start Auto
search and all active programs will
be memorised.
During the process of Auto Search,
pressing MENU button can stop
Auto Search.
Auto search
Fine tuning
Channel search
Skip setting
Channel edit
Channel searching ...VHFH 5
If desired channel can not be preset by Auto search or if you
would like to preset channels to specific position numbers one by
one, use Channel search function.
Channel search
DIGIT
CH+
VOL-
VOL+
MENU
CH-
1
Press DIGIT buttons or CH+/buttons to select desired channel
number.
2
Press MENU button third times to
enter into menu (refer to Menu
introduction on page 14).
3
Press CH+/- to select Channel
search item. Press VOL+/buttons to access the sub-menu,
then press VOL+/- to start Channel
search.
Pressing MENU button can exit
Channel search sub-menu.
15
Auto search
Fine tuning
Channel search
Skip setting
Channel edit
Channel searching ...VHFH 0
To conduct the following operation, you must select TV input signal
(Refer to Selecting input signal on page 13).
Fine tuning
SOURCE
CH
MENU
VOL
CH-
Press DIGIT buttons or CH+/buttons to select the desired
channel.
2
Press MENU button third times to
access menu. (refer to Menu
introduction on page 14).
3
Press CH+/- to select Fine tuning
item. Press VOL+/- to access the
sub-menu. Then press VOL+/- to
start Fine tuning to obtain best
picture and sound.
POWER
VOLCH+
MENU
1
Auto search
Fine tuning
Channel search
Skip setting
Channel edit
VOL+
Fine Tuning
VHFH 5
Skip setting
DIGIT
1
2
3
4
5
6
7
8
9
After Channel preset, You can skip unwanted channels by
using this function.
1
0
2
Press MENU button third times to
access the menu. (refer to Menu
introduction on page 14).
3
Press CH+/- buttons to select Skip
setting item. Press VOL+/- buttons
to access the sub-menu. Press
VOL+/- to select Skip. Now the
channel will be skipped when you
browse program by CH+/-.
CH+
VOL-
VOL+
MENU
CH-
Use DIGIT buttons or CH+/- buttons
to select an unwanted channel.
4
To restore the skipped channel,
please select the skipped channel
by DIGIT buttons and then access
the Skip Set sub-menu to set skip
to save.
Auto search
Fine tuning
Channel search
Skip setting
Channel edit
Skip Set
VHFH 4
Skip
Skip Set
VHFH 4
Save
16
Operations in TV mode (continued)
Channel preset
Channel edit
Channel Edit
After Auto Channel Preset, this function is for you to edit the
order of programs conveniently according to your favourite.
SOURCE
CH
MENU
VOL
CHMENU
POWER
1
Use DIGIT buttons or CH+/buttons to select current
channel number.
2
Press MENU button third times
to access menu (refer to Menu
introduction on page 14).
3
Press CH+/- buttons to select
Channel edit item. Press
VOL+/- buttons to access the
sub-menu. Press CH+/- buttons
to select a target channel to
exchange with current channel.
Exiting the menu, then the
programs of these two channels
are exchanged.
VOLCH+
VOL+
DIGIT
CH+
VOL-
VOL+
MENU
CH-
17
Auto search
Fine tuning
Channel search
Skip setting
Channel edit
Current Channel
Change to
6
3
Channel Select
Using DIGIT buttons/Using CH+/- buttons/Using previous channel button
Using DIGIT buttons
SOURCE
CH
MENU
VOL
1
To select one-digit channel number:
Press 0-9 digit buttons to select the desired channel. Two
seconds later, the channel is selected.
2
To select two-digit channel number:
Press -/-- button repeatedly to display -- on the screen.
Press 1-9 buttons to select tens digit. Press 0-9 buttons to
select ones digit (The period of the two presses must be within
2 seconds). Two seconds later, the channel is selected.
POWER
CHCH+
Using CH+/- buttons
1
2
Press CH+ button, the channel number increases;
Press CH- button, the channel number decreases.
Using previous channel button
DIGIT
Press
button to switch between the current channel
and previous channel.
-/-CH+
CH-
18
Operations in TV mode (continued)
Picture adjustment
Picture adjustment
1
SOURCE
CH
MENU
VOL
CHMENU
2
Press CH+/- to select item.
3
Press VOL+/- to adjust selected
item.
50
Bright
Contrast 100
Saturation 80
Sharpness 3
Color Hue
Backlight
Bright
POWER
VOLCH+
Press MENU button once to
access the menu (refer to Menu
introduction on page 14).
VOL+
Item
Function
Range
Bright
To adjust picture's brightness
0-100
Contrast
To adjust picture's contrast
0-100
Saturation To adjust picture's colour saturation
Sharpness
0-100
To adjust picture's sharpness
0-6
Colour Hue To adjust picture's colour hue
Backlight
0-100
To adjust the backlight
Soft, Nature, Bright
Note: The item Colour Hue is for NTSC only.
CH+
PIC
VOL-
VOL+
MENU
P.M
CH-
You can access Brightness
menu, Contrast menu, Saturation
menu, Sharpness menu by
pressing PIC button directly and
adjust brightness, contrast,
saturation, sharpness with VOL+/buttons.
You can select picture mode
by P.M button. There are four
picture modes: Bright, Nature,
Soft and User mode.
19
Brightness
50
Contrast
80
-
+
-
+
Saturation
60
Sharpness
3
-
+
Soft
Bright
User mode
Nature
Sound adjustment
Adjusting sound/Adjusting volume/Muting the sound
Adjusting sound
1
SOURCE
CH
MENU
VOL
CHMENU
POWER
VOLCH+
VOL+
Press MENU button twice to
access the menu (refer to
Menu introduction on page 14).
2
Press CH+/- to select Sound
Set item.
3
Press VOL+/- to access the
sub-menu. Press CH+/- to
select item and press VOL+/to adjust the selected item.
Blue Background Disable
Language
English
Color Sys
Auto
Sound Sys
B/G
Sound Set
Bass
Treble
6
9
Item
Function
Range
Bass
Adjust bass
0-10
Treble
Adjust treble
0-10
Adjusting volume
CH+
VOL-
VOL+
MENU
CH-
Press VOL+/- to adjust
volume. Press VOL+ button, the
volume increases. Press VOLbutton, the volume decreases
(Range 0-45).
Muting the sound
If you want to mute the sound,
press button on the remote control.
Press button again to restore. You
can also press VOL+ or VOL- to
restore the sound.
20
Volume
-
+ 30
Operations in TV mode (continued)
System Setting
Blue screen/OSD Language/Colour system/Sound system
Blue screen
SOURCE
CH
MENU
VOL
CHMENU
Press MENU button twice to access the menu (refer to Menu
introduction on page 14).
2
Press CH+/- to select Blue
Background item.
POWER
3
VOLCH+
1
VOL+
Press VOL+/- to select Enable or
Disable. If you select Enable, the
screen displays blue background
when there is no signal. If you
select Disable, the screen
displays noisy picture when there
is no signal.
Blue Background Disable
Language
English
Color Sys
Auto
Sound Sys
B/G
Sound Set
Note: Only when the Blue screen is Enable, the set would be
turned off automatically when there is no signal for 15 minutes.
ODS language
1
CH+
VOL-
VOL+
MENU
CH-
Press MENU button twice to
access the menu (refer to Menu
introduction on page 14).
2
Press CH+/- to select Language
item.
3
Press VOL+/- to select language.
Blue Background Disable
Language
English
Color Sys
Auto
Sound Sys
B/G
Sound Set
Colour system
1
Press MENU button twice to enter into menu (refer to Menu
introduction on page 14).
2
Press CH+/- to select Color Sys
item.
3
Press VOL+/- to select a proper
colour system according to your
area.
21
Blue Background Disable
Language
English
Color Sys
Auto
Sound Sys
B/G
Sound Set
Sound system
SOURCE
CH
MENU
VOL
CHMENU
1
Press MENU button twice to
access the menu (refer to Menu
introduction on page 14).
2
Press CH+/- to select Sound sys
item.
POWER
VOLCH+
Blue Background Disable
Language
English
Color Sys
Auto
Sound Sys
B/G
Sound Set
VOL+
3
Press VOL+/- to select correct
sound system according to your
area.
Some models are with only one
sound system and in this case the
Sound System does not need to be
adjusted.
CH+
VOL-
VOL+
MENU
CH-
22
Operations in TV mode (continued)
Timer setting
Using SLP button/Using CLOCK button
Using SLP button
SOURCE
CH
MENU
VOL
CH-
Press SLP button to display
Sleep menu. Press SLP button
repeatedly to set sleep time
between: 0, 10, 20, 30, 60, 90, 120,
180, 240 minutes. If you select 0
minute, it means the sleep timer
function is turned off.
POWER
VOLCH+
Sleep
30
Time
1: 14
VOL+
Using CLOCK button
1
Press CLOCK button, the Time
menu appears. Use CH+/-,
VOL+/- to set time.
2
After setting Time menu, press
CLOCK button to display Turn
on menu.
Press CH+/- to select item (hour,
minute, status, the selected item
is displayed in blue). Press
VOL+/- to adjust Turn on time
and Turn on status (OFF, Today,
Everyday).
Today: means the Turn on
setting effects today.
Everyday: means the Turn on
setting effects everyday.
CLOCK
CH+
VOL-
VOL+
SLP
CH-
3
Turn On 0:00 Status: Today
Press CLOCK again to display
Turn off menu. The operation is
same to Turn on setting.
Turn off 0:00 Status: Everyday
23
Operations in AV/S-VIDEO mode
Operations in AV/S-VIDEO mode
You can connect the set to video tape recorder, VCD, DVD, or
other equipment with AV, S-VIDEO output to watch the program
from them (refer to Connecting video/audio equipment).
SOURCE
CH
MENU
VOL
POWER
Firstly, the TV set-must be in AV/S-VIDEO mode (refer
Selecting input signal on page 13).
SOURCE
MENU
CH-
VOLCH+
In AV/S-VIDEO mode, for menu operation please refer to
Operations in TV mode.
VOL+
In AV/S-VIDEO mode, it is unnecessary to preset channel and
set sound system, so the channel preset menu is inaccessible and
the sound system can not be adjusted.
SOURCE
CH+
VOL-
VOL+
MENU
CH-
24
Operations in PC mode
Accessing PC mode/PC signal format/Auto adjusting/Picture adjustment
Accessing PC mode
SOURCE
CH
MENU
SOURCE
MENU
VOL
CH-
Press SOURCE button on the
unit or on the remote control
repeatedly until the screen displays
PC, which indicates that the set is in
PC mode (refer to page 13).
If you connect the set to PC
equipment, be sure the set is in PC
mode.
POWER
VOLCH+
VOL+
In PC mode, if no PC signal is
inputted, the screen will display the
information as illustrated.
PC
PC No Input Signal
PC signal input
Please connect VGA input and be sure that there is VGA
input signal. The signal format should be: 640 x 480 @ 60Hz.
AUTO
CORRECT
Auto adjusting
SOURCE
When PC signal format
changes or when you switch to PC
Adjusting signal
mode by pressing SOURCE button,
the set adjusts frequency and phase
automatically to obtain the best
display. During the process of auto
correction, the screen displays
Adjusting Signal, and all buttons on
the set and on the remote control do
not work until this process is finished.
When the set displays some nonstandard VGA signals and
can not adjust the picture to the best status by itself, you can adjust
it again by pressing the AUTO.CORRECT button on the remote
control.
When the input signal is correct, press MENU button and it
will display PC menu.
25
Picture adjustment
1
SOURCE
CH
MENU
VOL
CHMENU
2
POWER
Press MENU button to access the
menu.
Press CH+/- buttons to select the
item.
50
Bright
Contrast 100
Saturation 80
Sharpness 3
Color Hue
Backlight
Bright
VOLCH+
3
VOL+
Press VOL+/- buttons to adjust the
item.
Item
Function
Remarks
To adjust picture's bright and
contrast in PC mode (does
not affect picture in TV or
Contrast Adjusting the contrast
AV mode).
If
Horizontal Adjusting horizontal position VGA input signal is not
standard, you can adjust these
two items until proper picture
Vertical
Adjusting vertical position
position is obtained.
Brightness Adjusting the brightness
Phase
Adjusting phase
Frequency Adjusting frequency
CH+
VOL-
VOL+
MENU
CH-
Colour
Adjusting preset
Temperature colour temperature
Backlight
Adjusting the backlight
26
If the best picture can not be
obtained after many times of
auto correction, you can
adjust these two items to
obtain the best picture.
Colour temperature switch
between User, 9300K,
7300K 6500K & 5000K
You can select Soft, Nature
and Bright.
Troubleshooting
Troubleshooting
Before calling service personnel, please check the following chart for a possible cause to the trouble
you are experiencing.
Symptoms
Check the following items
Power is not turned on
Be sure the power cord is plugged in.
Poor colour, poor tint
Contrast, colour, tint are not correctly adjusted
Spots appear on the screen
Possible interferences of automobiles, motorcycle,
trolley bus, neon lamps, etc.
Stripes appear on the screen
Possible interference of electronic interference
from another TV set, a computer, an electronics
game machine, a broadcast station, etc.
Double images or "ghosts"
This may be caused by reflections from nearby
mountains or buildings.
Check the antenna direction.
Snowy picture
It is possible that the aerial "lead-in" is damaged or
comes off.
Check the antenna direction.
Remote controller does
not work
The batteries may be worn out.
The batteries may be installed with their polarity
reversed.
27
Specifications
Specifications
~240V, 50Hz
Power Supply:
65W
Power Consumption:
Dimensions (mm):
730 x 290 x 560
Weight (kg):
15
CRT:
51cm
TV system & channel range
System
VHF
UHF
CATV
PAL-B/G
21-69
X~Z+2,S1~S41
2-12
Colour System:
PAL, NTSC (AV)
Sound output:
Accessories:
2W x 2
Owner's manual x 1
Power cord x 1
VGA cable x 1
Remote control x 1
Design and specifications are subject to change without notice.
28
PALSONIC CORPORATION PTY LTD
1 JOYNTON AVENUE
WATERLOO NSW 2017 AUSTRALIA
TEL: (02) 9313 7111
FAX: (02) 9313 7555
www.palsonic.com.au
PALSONIC CUSTOMER SERVICE
TELEPHONE
AUSTRALIA: 1300 657 888
604-L22A13-00