1
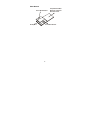
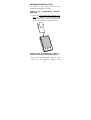
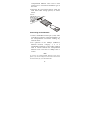
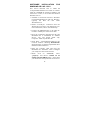
CompactFlash Size
Ethernet LAN Card
For Both Notebook PC and
Windows CE-based
PDA/ Palm PCs/Pocket PCs
Quick Installation Guide
M73-APO01-440
FCC REGULATORY STATEMENTS
Part15, Class B
This device complies with Part 15 of FCC rules.
Operation is subject to the following two conditions:
1. This device may not cause harmful interface, and
2. This device must accept any interface received,
including interface that may cause undesired
operation. This equipment has been tested and
found to comply with the limits for a Class B
digital device, pursuant to Part 15 of the FCC
Rules. These limits are designed to provide
reasonable
protection
against
harmful
interference in a residential installation. This
equipment generates, uses and can radiate radio
frequency energy, and if not installed and used in
accordance with the instructions, may cause
harmful interference to radio communications.
However, there is no guarantee that interference
will not occur in a particular installation. If this
equipment does cause harmful interference to
radio or television reception, which can be
determined by turning off and on, the user is
encouraged to try to correct the interference by
one or more of the following measures:
•
Reorient or relocate the receiving antenna.
•
Increase the distance between the equipment and
receiver.
•
Connect the equipment into an outlet on a circuit
different from that to which the receiver is
connected.
Changes or modifications not expressly approved
by party responsible for compliance could void
the user the user authority to operate the
equipment.
INTRODUCTION
This CompactFlash Size Ethernet LAN Card is
designed for Windows CE-based palm-sized PCs,
handheld PCs and any computer with a
CompactFlash slot.
Plus, with connecting to a PCMCIA Adapter
(not included), this CompactFlash Ethernet
LAN Card turns into a PC card that plugs into
any computer with a PCMCIA slot.
The CompactFlash Ethernet LAN Card is easy to
install, and no external power is required.
SYSTEM REQUIREMENTS
For Windows CE-based PDA/Palm PC:
A Type I or Type II CompactFlash Slot
supporting I/O functionality.
Windows CE 2.0 or newer version
Windows CE Service Disk
CF+ and CompactFlash Spec. Reversion 1.4
compliant Card Services and Socket
Services
For Notebook PC:
• An IBM compatible notebook computer with
386SX or faster processor
• At least one Type II PC Card socket
• Drivers and utilities provided with this
product
-1-
PCMCIA release 2.1 compliant Card Services
and Socket Services
OPERATING ENVIORNMENTS
For Windows CE-based PDA/Palm PC:
Software Compatibility
Windows CE 2.0 or newer version
For Notebook PC:
Novell Netware 3.x/4.x
Microsoft LAN Manager
Packet Driver Applications
Microsoft Windows for Workgroups 3.11
Microsoft Windows 3.1
Microsoft Windows NT 4.0
Windows 98
Windows 2000
Windows ME
Windows XP
Lantastic 6.0
IBM OS/2 Warp Version 3
Hardware Compatibility for Processor
Families:
Supports PDA/Palm PC using MIPS4000 series,
Hitachi Sh3 series, and Hitachi Sh4 series
processors.
-2-
Parts Names
ACT LED Indicator
RJ-45 port
CompactFlash Size
Ethernet LAN card
with Direct Port
Link LED Indicator
-3-
HARDWARE INSTALLATION
It’s referred to “the Compact Card” for the
CompactFlash Ethernet LAN Card.
Inserting the
LAN Card
1.
CompactFlash
Ethernet
Insert the CompactFlash Size Ethernet LAN
Card into Windows CE-based PDA/Palm
PC by aligning the Compact Card with wide
connector toward the CompactFlash slot.
Installing into a Notebook PC (Only for
users who also purchased this option)
1. Plug the CompactFlash-Size Ethernet LAN
Card into the PCMCIA Adapter. The
-4-
CompactFlash Ethernet LAN Card is then
turning into a conventional PCMCIA type II
PC Card.
2. Align the PC Card toward the PC Card slot
with brand label facing upward, as shown
below.
Notebook
Connecting to the Network
1. Connect unshielded twisted pair (UTP) cable
to the RJ-45 connector in the Attached Port of
the CompactFlash card before loading any
network driver.
For operation in the 10Mbps (10Base-T)
Ethernet network, Category 3, 4 or 5
unshielded twisted pair (UTP) cable could be
used to connect between the CompactFlash
Ethernet LAN Card and a 10Mbps hub or
switch.
Note
To remove the CompactFlash Ethernet LAN Card,
please refer to the Compact Card removal instruction
in the document for your PDA/Palm PC.
-5-
SOFTWARE INSTALLATION
WINDOWS CE 2.0/2.11/3.0
FOR
This section describes how to install the
“CompactFlash Ethernet LAN Card” on a Palmsized PC, handheld PC based on Windows CE
Version 2.x or later, or on a Pocket PC based on
Windows CE 3.0.
1.Establish a connection between a Windows
CE based PDA/Palm PC and your Host PC,
typically the Host PC runs under
Windows9x/NT.
2.Install “ActiveSync” connection from the
WinCE Services CD to your desktop PC. For
more information, refer to the Online help.
3.Connect the PDA/Palm PC to the Host PC
COM1 or COM2 port with a serial cable.
4.Once the connectiopn between Host PC and
PDA/Palm PC is established, an “Mobile
device” icon will appear inside “My
Computer” folder of your Host PC.
5.Insert Disk “ CompactFlash Ethernet LAN
Card for WinCE”. Running WINCE.EXE
file from floppy to install CompactFlash Size
Ethernet LAN Card drivers.
6.Insert the Compact Card and reset the
PDA/Palm PC thereafter. Then Configure
your Compact LAN Card as follows.
7.Doble click on “Network”, select
“property” and choose “Obtain an IP
address through DHCP sever”. At this time,
you should see “CompactFlash Size Ethernet
-6-
LAN Card” installed and appearing in the
WinCE screen.
8.If your local LAN doesn’t run DHCP, you
may have to manully configure the IP
address under “Specific an IP address”
option.
9.After you have followed the procedure
described above and setup the Compact Card
correctly, you may now use the pocket
Internet Explore to browse the Internet.
-7-
SOFTWARE INSTALLATION FOR
NOTEBOOK PC (ONLY FOR USERS WHO
ALSO PURCHASED THIS OPTION)
Windows 98 Installation
Make sure that the drivers of PC Card slot are
well installed. The System Icon in the Status
Area can report on its functionality.
1.
Once the PC Card is connected to your
computer, Windows will automatically
detect the new device. Windows will
prompt an ADD NEW HARDWARE
WIZARD dialog box, then press Next.
2.
Select Search for the best… and press
Next.
3.
Select Floppy disk drives and insert driver
diskette. Then press Next, the driver will be
installed.
-8-
4.
Click Next to continue. Windows will start
to copy the appropriate driver to your
system. If Windows asks you to supply
your original Windows 98 installation CDROM, load it in the CD-ROM drive.
5.
For the first time installation, please click
Network icon in Control Panel to add
Protocols, Client and Service if you needed.
6.
Reboot the machine and the card will take
effect.
Windows ME Installation
1.
Once the PC Card is connected to your
computer, Windows will automatically
detect the new device. Insert the device
Driver Disk into the floppy disk drive of
your system. Select Automatic search
for a better driver (Recommended) and
click Next.
-9-
2
Windows will copy the appropriate driver to
your system. If Windows ME asks you to
supply your original Windows ME
installation CD-ROM, load it in the CDROM drive.
3
Click Finish to complete the software
installation.
Windows NT 4.0
1.
Make sure that the Network Services
- 10 -
already installed in the NT 4.0 system.
2.
Insert the Ethernet Adapter into one of the
system's PCMCIA Slots
3.
Power up Windows NT 4.0
4.
Open My Computer
5.
Open Control Panel
6.
Run the Network
7.
Select Adapters page
8.
Press Add to add network adapter
9.
Press Have Disk button
10. Insert the driver disk into drive A:
11. Specify the path to ” A:\ and press OK
12. A dialog box will appear to adjust the
driver's settings. The resources assignment
to the adapter must be unique in the system.
13. Press OK when all settings are completed.
Press Close to complete network setting.
Windows 2000 Installation
1.
Connect one end of the cable for the
PCMCIA Ethernet card to your computer
and the other end to the port of the new
hardware device. Windows will appear the
following picture. Click Next.
- 11 -
2.
Select Search for a suitable driver for my
device (recommended). Click Next.
3.
Select Floppy disk drives and insert the
disk associated with the PCMCIA Ethernet
card in the disk drive. Click Next.
- 12 -
4.
Click Next to make Windows install the
appropriate driver for the new device.
5.
Click Yes to continue.
- 13 -
6.
Click Finish to complete the software
installation.
Windows XP Installation
1
Once the device is connected, Windows will
automatically detect the new device. Insert
the device Driver Disk into the floppy disk
drive of your system. Click Install the
software automatically (Recommended)
and click Next.
- 14 -
2.
Click Continue Anyway to proceed.
3.
Wait while Windows copies the appropriate
driver to your system.
4
Click Finish to complete the software
installation.
- 15 -
- 16 -