1
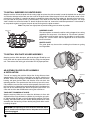
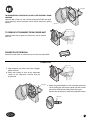
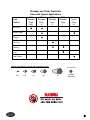
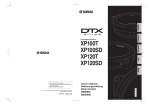
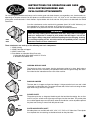
INSTRUCTIONS FOR OPERATION AND CARE
XVGA GRATER/SHREDDER AND
XVSA SLICER ATTACHMENTS
Our versatile grater/shredder attachments can be used to grate and shred cheeses, raw vegetables, nuts, breadcrumbs, etc.
depending on the plate selected. Our S/S plates are available with 3/32", 3/16", 1/4", 5/16" or 1/2" size holes and a special
grating plate for breadcrumbs & hard cheeses. A plate holder with shaft and one 3/16" plate are included with the XVGA
attachment.
Our slicer attachments can be used for slicing potatoes (from 1/16" to 5/8" thickness); cutting vegetables for salads and coleslaw; or for slicing fruits and nuts.
An adjustable slicer plate with shaft are included with the XVSA attachment.
WARNING
There are sharp rotating knives behind the front door; keep hands out of hopper
and use a feed pusher or stomper to push product into the hopper – do not use
your fingers. Always stop power unit before opening front for changing, cleaning,
or servicing anything on this unit. Only trained and qualified persons 18 years
and older should use these attachments.
XVGA
XVSA
These attachments are made up of the following four basic components:
1.
2.
3.
4.
XVSH Housing
XVSD Front Door or Hopper
XVSP Pusher Plate
Plate Holder or Adjustable Slicer Plate units
1. Adjustable Slicer Shaft XASP with S/S "S" knife
2. Shredder Plate Holder XPH
XVSH
HOUSING OR BACK CASE
The housing or back case mounts into the attachment socket of a mixer, food cutter or
power drive unit and is retained by the pointed thumbscrew that goes through the attachment hole into the indentation on the neck of the machine.
XVSD
DOOR OR HOPPER
The front door is a hopper and lever feed design. It hinges onto the back case and is held
closed with an adjustable latch. To remove the front door, lift the latch and swing the door
open while lifting it from the hinge holes.
XVSP
PUSHER PLATE
The pusher plate has an integrated handle to push the food into the rotating disc or slicer
knife. It has pins at both ends of the top and hinges into the front door. The pusher plate
has a rubber-tipped stop screw (XP1018) under the handle that can be adjusted to prevent
the plate from coming in contact with the plate or blade.
XPH
PLATE HOLDER WITH SHAFT
Shredder plates are available with 3/32", 3/16", 1/4", 5/16" or 1/2" hole sizes. These plates
have keyhole slots for attaching to shouldered studs on the plate hubs.
1
TO INSTALL SHREDDER OR GRATER DISCS
Stop the machine. Orient the plate with the cutting edge away from the shaft assembly. Locate the keyhole slots on the plate
and slide the wide part of the slots over the studs on the plate holder. When the plate is flush with the holder, rotate it clockwise to lock it in position. It is possible to loosely assemble the plate to the hub (sharp edge out), then place it on a work surface (the teeth on the plate will mar a finished table). Press down and turn the hub until plate locks into place. The sharp
"teeth" should face out on the holder. To detach the plate from the hub, reverse the installation procedure. A safe method is
to use protective gloves and press the palm of one hand against the plate to rotate it.
Note: The plates are slightly bent to provide holding pressure when in position.
Keyhole Slots
Studs
SHREDDER PLATE
The coarse plates are normally used for making chopped slaw, cutting
vegetables for soup stock, salad blends or "hash brown" potatoes.
The medium and finer plates are for fine shredding of carrots, beets,
turnips, etc., and for salads. See our application chart at the end of
these instructions.
GRATER PLATE
The grater plate may be used for crumbling hard cheese or grating
hard vegetables.
Locking Pin
TO INSTALL XPH PLATE HOLDER ASSEMBLY
Stop the machine. With door open, pull the locking pin XP1007 up and
insert XPH until the square end of the shaft fits snugly into the power
unit. Then release the locking pin to hold the XPH in proper position.
Open Door
ADJUSTABLE SLICER PLATE ASSEMBLY
& INSTALLATION
Adjustment
Nut
Turn off and unplug the machine. Adjust the slicing thickness from
approximately 1/16" to 5/8" by turning the gray plastic adjusting nut
XP1022. Lift the silver locking pin XP1007 on the top of the rear of the
housing and open the front door and slide the slicer unit back into
operating position. The square end of the shaft may have to be manually rotated to seat into the machine socket properly. Secure the unit
to the machine by tightening the pointed thumbscrew in the hole on the
top side of the attachment hub. Attach the pusher plate XVSP and
close and latch the door XVSD before turning the machine on.
TO ADJUST THICKNESS OF SLICES
Locking Pin
Stop the machine. While you can adjust the thickness of slices with
Adjustable Slicer Plate Assembly in position, by turning the gray plastic Adjusting Knob XP1022, accessed through the opening in the rear
housing, we recommend that you remove the Adjustable Slicer Plate
Assembly from the housing and turn the Adjusting Knob while carefully holding the plate.
CAUTION: The adjusting nut turns with the shaft and adjustments should not be attempted unless the power unit is turned
off and unplugged.
2
Adjustment
Nut Access
Open Door
Locking Pin
TO REMOVE XASP ADJUSTABLE SLICE PLATE ASSEMBLY FROM
HOUSING
Open the door all the way and raise the locking pin XP1007 (on top of
rear of housing) and the assembly will be free for removal by pulling
outward.
Open Door
Thumb Screw
TO REMOVE ATTACHMENT FROM POWER UNIT
Loosen thumbscrew on power unit until hub is free for removal
from unit.
PUSHER PLATE REMOVAL
Raise the Pusher Plate and slide it out of the slot in the door XVSD.
OPERATION
Thumb Screw
1. Stop the power unit (mixer, food cutter, chopper,
power drive etc.)
2. Attach the housing of slicer to the attachment
socket of the companion machine with the
thumbscrew.
Locking Pin
3. Select the grater/shredder or slicer assembly to be used.
Lift the locking pin and insert the plate and shaft assembly into the drive position. Release the locking pin.
Set the slice adjustment (if used) to the proper thickness.
Adjustment
Nut
3
4. Drop the hinge pins of the front door into
the holes in the housing.
Pusher Plate
5. Close the slicer front door and fasten the latch.
6. Start the machine. Set at a speed to produce the best
product (see machine manual)
7. Raise the pusher plate lever.
Pusher Plate
Lever
8. Place the food to be sliced in the hopper and gently press
down on the pusher plate lever.
Note: Too much pressure crushes the food and causes
irregularity in the slices. Large items may have to
be cut down to fit into the hopper.
CAUTION: Keep Hands out of Hopper – use a
stomper or food pusher.
MAINTENANCE INSTRUCTIONS
CLEANING
1. Stop the power unit (mixer, food cutter, power drive, etc.).
2. Release the latch and remove the front door.
3. Lift the locking pin and withdraw the shredding or slicing
unit from the housing.
4. The shredder and grater plates can be easily removed from
the plate hub by rotating plate counter-clockwise to release
the keyhole slot from the studs.
CAUTION: These plates are sharp and must be
handled with care.
5. All components of these attachments may be cleaned by HAND WASHING ONLY, using mild detergent in warm water.
These units are NOT DISHWASHER SAFE due to the corrosive nature of commercial detergents, which can discolor aluminum and turn it black. Rinse in hot, clear water and dry immediately. It is important that juices be cleaned from the
attachments before they dry.
Note: Frequent lubrication with a USDA approved grease is necessary to prevent shaft seizing.
4
Adjustment
6.When using the adjustable slicer plate, make sure it is
Thrust
Nut
Bearing
cleaned frequently to assure easy thickness adjustment.
Occasionally disassemble the slicer plate for a thorough
cleaning. To do this it is necessary to unscrew the
knurled thrust bearing, which has a left hand thread, to
Spring
release the spring. Withdraw the knife and shaft assembly. Unscrew the adjusting nut from the plate. Use a drop
of approved food machinery oil on the shaft and adjustment threads after cleaning.
Note: After cleaning, to prevent damage the thrust bearing must be tightened until sealed against shoulder on shaft.
Failure to properly reassemble can result in damage to knives, shaft and slicer plate. Do not clean any of these components in a dishwasher with strong detergents or chemicals. Use a USDA approved grease on the shaft for best operation.
CAUTION: Do not permit water or moisture to remain on or in the hub, shaft, or the rear opening in the housing. This condition will result in rusting which will eventually destroy the rear end components and shaft and
void the factory warranty.
KNIFE SHARPENING
Occasional touching up along the edges of the knife with a honing stone will keep cutting operations at peak performance.
PUSHER PLATE STOP
Frequently check that the pusher plate does not hit the grater plate holder or knife shaft assembly. The Pusher Plate Stop
XP1018 can be adjusted to avoid touching the internal moving parts. With proper care and maintenance, your Vegetable
Grater/Shredder/Slicer Attachment will provide you with many years of performance.
XPH Plate Holder
XP1030
XP1026A
Plate
XP1026 Brass
XP1007
XP1010
XP1012
XP1009
XVSP
Pusher Plate
XP1035
XVSD
XP1011
XP1008
XP1005A
XP1014
Housing
XP1036
XP1004
XP1005
XP1017
XP1018
XVSH Housing
XP1013
XVSD Door
with Hopper Opening
XP571
(Knife only)
XP1024 Brass
XP1023
XP1022 Plastic
XP1571 (Knife and Shaft)
XASP Adjustable Slicer Plate Assembly
5
PART NUMBER LISTING
XVSH HOUSING
XVSH
XP1004
XP1005
XP1005A
XP1007
XP1008
XP1009
XP1010
XP1011
Housing size 12
Threaded (Hex) Pin for housing latch
Latch with setscrew
Latch setscrew only
Shaft Lock knob - top
Housing Hub with locating pin – six holes
Flat Head Machine Screw (6) for hub
Knife Lock Screw
Fiber gasket
XPH PLATE HOLDER
XPH
XP1026
XP1026A
XP1030
XSP332
XSP316
XSP14
XSP516
XSP12
XGP
Plate Holder Assembly Complete
Brass Collar with set screw
Set Screw for Collar
Stud for Plate Holders
3/32" S/S Shredder Plate
3/16" S/S Shredder Plate
1/4" S/S Shredder Plate
5/16" S/S Shredder Plate
1/2" S/S Shredder Plate
S/S Grater Plate
XASP ADJUSTABLE SLICER PLATE
XP571
XP1571
XP1022
XP1023
XP1024
“S” Knife only
“S” Knife and Shaft Assembly
Knife Adjusting Nut- Gray Plastic
Tension Spring
Bronze Lock Nut or Thrust Bearing
XVSD DOOR
XP1012
XP1013
XP1014
Upper Hinge Pin (long)
Lower Hinge Pin (short)
Latch Pin
XVSP PUSHER PLATE
XP1017
XP1018
XP1035
XP1036
6
Stop Nut
Stop Screw
Ball End Hinge Pin
Hinge Pin
Shredder and Grater Plate Hole
Sizes with Typical Applications
1/2"
Shredder
Plate
000
Food
Product
5/16"
Shredder
Plate
0
3/16"
Shredder
Plate
3
3/32"
Shredder
Plate
7
Universal
Grater
Plate
14
Cole Slaw
Bread Crumbs
Cheese
Soft Cheese
For Pizza
Carrots For
Coloring
Cheese For
Tacos
Hard Cheese
Stainless steel Shredder Plate hole sizes (not drawn to scale)
3/32"
3/16"
1/4"
5/16"
SS Grater Plate
1/2"
For Hard
Cheese only
7
LIMITED XVSA/XVGA ATTACHMENT WARRANTY
Globe Food Equipment Company (“GFE”) warrants to the original purchaser of new equipment that said equipment,
when installed in accordance with our instructions within North America and subjected to normal use, is free from defects
in material or workmanship for a period of 1 year from invoice date. The XVSA Vegetable Slicing Attachment and XVGA
Shredder/Grater Attachment have a 1-year replacement warranty. There is no labor warranty for mixer attachments.
THIS WARRANTY IS IN LIEU OF ALL OTHER WARRANTIES, WHETHER EXPRESS OR IMPLIED. GFE EXPRESSLY
DISCLAIMS ANY IMPLIED WARRANTY OF MERCHANTABILITY OR EXPRESS OR IMPLIED WARRANTY OF FITNESS FOR A PARTICULAR PURPOSE.
GFE’S OBLIGATION AND LIABILITY UNDER THIS WARRANTY IS EXPRESSLY LIMITED TO
REPAIRING AND REPLACING EQUIPMENT WHICH PROVES TO BE DEFECTIVE IN MATERIAL OR WORKMANSHIP
WITHIN THE APPLICABLE WARRANTY PERIOD. All repairs pursuant to this
Warranty will be performed by an Authorized Designated GFE Service Location during normal working hours. IN NO
EVENT SHALL GFE BE LIABLE FOR INCIDENTAL OR CONSEQUENTIAL DAMAGES TO BUYER OR ANY THIRD
PARTY, INCLUDING, WITHOUT LIMITATION, LOSS OF PROPERTY, PERSONAL INJURY, LOSS OF BUSINESS OR
PROFITS OR OTHER ECONOMIC LOSSES, OR STATUTORY OR EXEMPLARY DAMAGES, WHETHER IN NEGLIGENCE, WARRANTY, STRICT LIABILITY, OR OTHERWISE.
This Warranty is given only to the first purchaser from a retail dealer. No warranty is given to subsequent transferees.
This Warranty does not cover product failures caused by: failure to maintain, neglect, abuse, damage due to excess
water, fire, normal wear, improper set up and use. Periodic maintenance is not covered.
THE FOREGOING WARRANTY PROVISIONS ARE A COMPLETE AND EXCLUSIVE STATEMENT BETWEEN THE
BUYER AND SELLER. GFE NEITHER ASSUMES NOR AUTHORIZES ANY
PERSONS TO ASSUME FOR IT ANY OTHER OBLIGATION OR LIABILITY IN CONNECTION WITH SAID EQUIPMENT.
Example of items not covered under warranty, but not limited to just these items:
1.
2.
3.
4.
5.
6.
7.
8.
9.
Acts of God, fire, water damage, vandalism, accident, theft.
Freight damage.
Improper installation or alteration of equipment.
Use of generic or after market parts.
Repairs made by anyone other than a GFE designated servicer.
Lubrication.
Expendable wear parts – shredder/grater plates and “S” knife.
Cleaning of equipment.
Misuse or abuse.
FOR COMPLETE XVSA, XVGA AND SHREDDER PLATE SALES
TOLL FREE: 1-800-347-5423
FAX: 937-299-4147
FOR SPARE PARTS SALES:
TOLL FREE: 1-800-745-6238
FAX: 937-290-0585
GLOBE FOOD EQUIPMENT COMPANY
PO BOX 3209 DAYTON, OHIO 45439
www.globeslicers.com
8