1
CLEANING ROBOT
Model: A325
USER MANUAL
Multi-functional vacuum cleaner
*ffi
ffi
Thank you for your choice A325.
Please read carefully this manual before using.
*o@
CLEAN I NG ROBOT
CLEANING ROBOT
ULEANING
SAFETY PRECAUTIONS
TABLE OF CONTENTS
SAFETY PRECAUTIONS
PRODUCT FEATURES
PRODUCT PARTS
Main body and
r Please read this USER
01
..,.... 02
..... . 03
....- 03
accessories
u.t
L
l'\ Aira^+i
v
Name of each part (Docking station & Virtual
PRODUCTOPERATING.
Battery storage and
Qtar{ina
wall)-
rrn
l,
m^rl^
Cleaning of side
07
Don't touch high-voltage power cord of the /<h
electric appliance with wet hands, or it may(lN{l )
cause electric shock.
\7
Don't vigorously bend the power cord or
place weight on it, or it may cause damage
to the Dower cord, fire or electric shock.
(
08
Don'ttwist your clothes or any part of your,zl
body into the brush or wheel of the cleaner, N
or it may cause personal injury.
\y
Don't vacuum up cigarettes, liqhters,
matches or any oth6r heat obj6cts or
combustible materials such as petrol
or gasoline.
f\ )
\)/
[:ft:ff #x"T;,"":1;:'Jf,:[:!'^""1-""
o
I
ff1,'J:1ffi:J:lJ,l"'l'lL?1?y"T#lJ:
o
I
9.1Xir:
"'
shock or personal injury.
Cleaning of the
12
.-----
brushbrush-
wheel
Cleaning of dustbin and
filters
TROUBLESHOOTING
'l
O
,-,
\
\7
)
Check whether the charger and socket is
mai cause charsins
Please use the cleaner cautiously in
or harming
then.
the .^,
{\
\J
Don't allow the cleaner to suck up water or
otherliquids,oritmaycauseproduct
damage.
--.-.
14
Don't use the cleaner outdoors, or it
cause product damage.
16
t a
tt
FUNCTIONSOFROBOTINBRIEF
to
". 19
--.20
/<\
\J
I\
may ,-
lo
.... . 16
.r\
u
presenceofchildrentoavoidfrightening
13
rama.,al
SPECIFICATIONS
A nrrENTtoN
------.
modules-----
TECHNICAL
12
12
_--
vrvqrrrrrvvrggrrgvto
lu
4,
i;ir;"i::["J].or.it
"..
Cleaning of mid-brush and rubber
t
UO
tt
PRODUCT MAINTAINING
Ela+lar.,
Don't use another charger except for the
the
n
_--_---
Replaceable
No one else can disassemble, maintain
or transform the product except
^
UV
Q^1^^L,ti^^
vvrrvuurrrrv
l-laaninn
A cnurroN
/A\
maintenance technicians designated by ('llt ) ::;J: x:ff I,T#,lJl?"1i3i,"J;T-llJ
our company, or it may cause fire, electric \9
shock or fire due to high volta
--.08
charging--"
r
MANUAL carefully before operation and follow
all guidelines before using this cleaning robot.
Please keep this Manual for future reference.
S,
other.-.
(\)
or the brush may become entangled. \-z
Don t leave movable thread, wire and
objectslongerthan 150mm ontheground
circuit, smoking or fire.
long, or the battery may be da
Don't stand or sit on the cleaner, or it may
o"rrn",o the cleaner or oersonal
Don't use the cleaner on smalltables and .^.
chairs or other small spaces, olherwise f\
the cleaner may become damaged.
\Y
)
commercial .^.
use.
\Y
Don t use the cleaner in
places,orthecleanermaybecome (\)
bamaged by excessive
Remove all easily damaged objects(including luminous objects, fabrics, glass bottles, etc)
before using, or it may cause damage to these objects or affect the using of the cleaner.
This appliance is not intended for use by persons(including children) with reduced physical,
i,ij,T
ji,XX?l
j :i
',[:# 3 I
ll Xi 3 ;"J.1 ; :: fl1 i J 1::1]ii
ffiXJ: i?"; ; :
their safety. Children should be supervised to ensure that they do not play with the appliance.
;i*"""fl ;: I iJ:X
/<\
\
(
ffi
n
\y
tt
01
CLEANING ROBOT
CLEANING ROBOT
PRODUGT FEATURES
Applicability
The product, mainly applicable to home, hotel rooms and small offices, is
good for cleaning various short-haired carpet, wood floor, hard floor,
ceramic tile, etc.
PRODUGT PARTS
Main body and accessories
Gleaning function
Cleaning robot has good clean ability with the design of triple cleaning.
They are duel brush cleaning, vacuum cleaning and mopping up.
All dust on the floor can be removed effectively with the help of A325.
Gonsiderate designs
Main body
(1 pc)
Sensitive control and the working area control:
1 .With the wireless remote control:control the robot within 10m to clean
the specified area.
2.Virtual Wall is with two way launch, you can control the cleaner work in
the given area effectively.
lntelligent various cleaning modes
Five cleaning modes are provided to meet your needs.
{.Auto
Press Auto key, lt will clean by zigzag, spiral, follow the wall modes
automatically and adjust its cleaning according to the floor situation.
2.Spot
Virtualwall
,
(1nc)
The robot will turn into the spiral cleaning mode(partial cleaning),and
will last about 2-3mins(without manual control)
station I
(1nc)
a
4.Full go mode
Filter
Side brush
(2pcs)
(2pcs)
Dust brush
User manual
(1 pc)
Mopping plate
{1
pc)
5.Scheduling mode
When certain time is scheduled, the robot will leave the charging docking
station in the scheduled time.
2
4
5
/@E
@
1@
@
i.
Adapter
I
(1pc)
w(h
v
When the robot detects obstacles(for example wall, table, chair etc.)
it will start cleaning follow the obstacles mode with side brush.
(3-4h charging).
? :i':'
Docking
/LA-
3.Edge cleaning
The cleaner will start cleaning automatically when the battery is charged
Remoie control
(1
pc)
10
Quick start guide
11
(1pc)
Mopping cloth
(2pcs)
CLEANING ROBOT
CLEANING ROBOT
PRODUGT PARTS
LGD directive sign
PRODUGT PARTS
Robot struction
I
nfrared signal receiving
Front bumper
E
Display screen
weem
ffiH:ffiffi
Smart touch key
FN
Cover
234567
ai
H
__]_
s
i
Dust bin button
_
12Stair detection ."n"orSide brush
10
Universal wheel
a
UV sterilizing lamp
Battery cover
Right wheel
Left wheel
rubber brush
Main brush
Main brush
Mopping cloth
Dust absorption area
Mopping cloth
Mopping plate
11
RIIJ?@
.ERROR displays in case of malfunction, Effi;EBOisplays the error code
from E001 to E005. (Please refer to page18)
2.UV displays the UV lamp is on when the cleaner is working, when open the
UV lamp, it can sterilize, or off when not working.
3. ffi weem displays the current date per week automatically based on the date.
4.HffisEE displays the current time per day and malfunction code.
1
5. @
means selecting the full charging cleaning or some days or everyday
of one week. p means FULL GO. 1 means Monday, 2 means Tuesday, ......
accordingly, 7 means Sunday. (Please refer to page10.)
6. SPOT displays the cleaner is cleaning in the spot cleaning mode.
7. AUTO displays the cleaner is cleaning in the auto cleaning mode.
.ffi"
8W
means running speed: fast speed on speed 1, or slow speed on
spEed 2.
9.
Dust bin
Note: The mopping plate(cloth) is only used for the hard floor.
ffi Oisptays the battery. three grids mean full power, or decreased power
with less grids.
10. SPOT cleaning key.
11 . AUTO cleaning key.
12. UV lamp key.
05
CLEANING ROBOT
CLEANING ROBOT
PRODUGT PARTS
PRODUCT PARTS
Name of each part
Remote control
Docking station
l.Press this button to exchange from sleeping
mode to selected mode, or from selected mode
1
to sleeping mode.
2.Press this button to return robot to charging 2
dOCking StatiOn.
Signal transmitting
Power led
(1 means Monday when setting cleaning time)
+
3.Press this button to enter scheduling mode
when in selected mode. including presetting 6
the cleaning time and beginning to work when
full Chafged . (2meansTuesdaywhensettingcleaningtime) 8
4.Press this button to enter current time setting.
Charging indicator
Clock 3
Sp€ed
?
Aulo 5
UV
4
Signal transmitting
Futt Go
Spot
Charge connecting point
6
(3 means Wednesday when setting cleaning time)
light. 10
11
6.Press this button to select the Speed.
means Sunday when setting cleaning time)
7.Full Go Button,When full charged,it will start fi
5.Press this button to openi close the UV
(4 means Thursday when setting cleaning time)
12
Virtual wall
Signal transmitting
(7
button)
S.Press this button to start auto cleaning mode.
Power switch of the Emission hole 2
Power switch of the Emission hole 1
14
to work itself(Please note that you should press
Schedule mode first before press the full go
Emission hole 1
Emission hole 2
Side cover
*:k**
CL€ANING ROBOT
(5 means Friday when setting cleaning time)
9.Press this button to start spiralcleaning mode.
(6 means Saturday when setting cleaning time)
Directional buttons
Battery(R20/D) cover
A
Press this button to increase number in
scheduling mode & clock mode.
Press this button to make robot move forward
in selected mode.
11 . V Press this button to decrease number in scheduling mode&clock mode.
Press this button to make robot go backward in selected mode.
12. { Press this button to from hour to minute in scheduling mode & clock
mode.
Press this button to make robot turn left in selected mode.
13. F Press this button to from minute to hour in scheduling mode & clock
mode.
Press this button to make robot turn right in selected mode.
14. Press this button to confirm scheduling in scheduling mode.
10.
Pivot
rrr$
rruf
Note:
l.lnstall twoAAAtype batteries into remote control.
2.lf not used for long time, please pull the batteries out.
3.Wireless remote control,no need to direct to the robot,the control distance
is within 10 meters.
1 .Spin the pivot and Lift the cover of the virtual wall;
2.lnstalltwo R20/D type batteries into the virtualwallas shown by the figure.
3.The right place of batteries by the figure.
* Please take out the battery if it was unused for long.
07
CLEANING ROBOT
PRODUGT OPERATING
Battery storage and charging
Place charging docking station
1.Put charging docking station
against the wall and remove
obstacles about 1 meterat
two sides and about 2 meters
forward.
2.Turn on the power switch at the
right side of the robot, then display
willflash.
Automatic recharging
3.The cleaning robot will search the
docking station for charging automatically
in case of low battery during cleaning..
4.lf you want to charge the robot manually,
you can press the docking button on the
remote control.
(lf no command received, the robot will
' turn to SLEEPING mode after 3 minutes.)
Manual charging
S.You can use the adaptor of the cleaning
robot to charge for the main body directly.
6.Connect the output terminal of the adaptor
with DC socket of the main body while
using the adaptor for charging.
CLEANING ROBOT
,6
rl.r
".t,
$-
ct
g
t
tiB
fi
u
t
{
PRODUCT OPERATING
Starti n g u p/Pause/Sleepi ng/Speed/UV
Starting up
Make sure the power switch is on;
Press AUTO button on main body or on remote
control to start cleaning;
Note:
lf robot is in sleeping mode, press AUTO button
to wake the robot up from sleeping mode.
Then press AUTO for a second time, the robot
starts cleaning automatically.
Pause/SIeeping
1 .To exchange robot from AUTO mode to selected mode,
Press either button among AUTO, SPOT on main body.
Press standby or Spot, Auto on remote control.
2.To turn robot into sleeping mode from selected mode,
press Standby on remote control.
Note: lf not using the robot for a long time, please turn
the power switch off.
Speed
l.Normally,you can choose speed 1(Quick), When much
dirtier, you can choose Speed 2(Slow).
2.To choose the working speed according to the ground
cond ition.
UV
Press the UV button on main body or on remote control,
lf the UV lamp is unused, press the key to turn off, then
the icon UV will be off.
This cleaning robot is supplied of a UV lamp which can
disinfect the floor and it is especially suitable for people
suffering allergy or for home with pets.
X.?'"?i,r., time use, make sure the battery full charged
12 hours to
reaching the best performance, after that 3-4 hours can be full charged.
After battery uses up, recharge the robot as soon as possible.
charging, fi display panelwill show f
and repeat from down to up.
D. lf the robot is not used for long time, please turn the power switch off.
B.
C. When cleaning robot is
08
* When the remote control does not work, check that the remote and
cleaner have enough power, turn off the cleaner, press ENTER on the
remote control for more than 4 seconds, and then turn on the cleaner
without releasing ENTER. After the cleaner beeps twice, release
ENTER, then the code check set is finished.
* lf you fall to hear a beep during the code check, just repeat the above
process.
09
{
CLEANING ROBOT
CLEANING ROBOT
PRODUCT OPERATING
How to schedule the robot?
Week & Time setting (On remote control)
1 .Press ffi
on the remote controller, the icon ffiweem
in the LCD screen of robot will flicker. Then press
correct week button, there is display in icon Bwnem,
1 means Monday, 2means Tuesday.'.7means Sunday1
2. After setting correct week, then you can set time.
( No need to press "ENTER' after setting the week.)
PRODUGT OPERATING
Gleaning mode
Ostandby
@
Press
A or Y
(:re
Schsdul62.
(@
Cloch
-l
UV
(xx5a@
Speed-7
re@
Auto 5
the lcd screen of the robot will flicker.
4. Press A or V to set the correct hour
6.
1.Auto cleaning
(@
4
Full Go
Spoi
Week button
to set the correct minute.
Timing cleaning setting (on remote conlrol)
1. Press timing cleaning.setting button
then the icon
^. in tne
Q/
lcd screen of the robot will flicker.
"ffi,
2. Press any week button / some week buttons or all week buttons you
want to set timing cleaning on any day or days or everyday of a week.
then the selected date or dates will flickerin
@_legeCgZ
' 1 means Monday, 2 means Thursday, accordingly
7 means Sunday.
4. lf you want to cancel any setting day or days, press the week button again.
(No need to press .ENTER' after setting the week.)
After setting cleaning day of each week, it is possible to set the starting
time of cleaning.
Cleaning time setting:
Ostandby
1 .Press F to enter cleaning time setting. the
@
Charqe l
iconffiffi:-- in the lcd screen of the cleaner will flicker.
€3w
2.Press A or V to set the timing cleaning hour.
Clock -3
UV 4
w
y
A
again --ffi willflicker.
or V to set the timing cleaning minute.
@ @x3&
@(lwwe
Auto .5
Spot
5.Afterfinishing week&time setting. press ENTER to
save it.
Week button
Full Go cleaning setting:
Press "schedule" first, then press Full Co, @: of the LCD screen flicker,
press ENTER to save it.the robot will start cleaning automatically when the
battery is charged(3-4 hours charging).
When the cleaning robot is connected to the docking station. at the set
time it will start cleaning automatically (when the battery is fully charged);
when the cleaning is finished or the battery is low. the cleaning robot will
go back to the docking station.
6
10
It will clean by spiral, linear, zigzag, follow the wall
modes automatically.
Note:
Clear up gadgets or obstacles in the room before
cleaning.
6
7. After finishing week & time setting, press ENrER to save it.
3.Press
4.Press
The robot will clean a room automatically and adjust
its cleaning according to the floor situation.
2.Spot cleaning
Press Spot cleaning key, it will enter into the area
about 1m'and clean by the spiral mode.
The cleaning time of Spot mode is about 2-3mins,
and it will stop automatically after the cleaning.
3.Edge cleaning
When the robot detects obstacles(wall for example),
it may start cleaning the corner with its side brushes.
Virtual wall use
o
m
I
I
OAA-
I
I
-l
-1,
li
p. High: Slide to high, you can select the distance
within 5-6m as required by infrared wall.
pn Middle: Slide to middle, you can select the distance
within 2-3m as required by infrared wall.
Virtual Wall is with two way launch, you can control the cleaner work in the
given area effectively.
11
CLEAN!NG ROBOT
CLEANING ROBOT
PRODUGT MAINTAINING
PRODUCT MAINTAINING
Assembly & Disassembly and Cleaning side brushes
Assembly & Disassembly and cleaning of Front wheel
l.Release the screw in the main shaft
.Pull out the front wheel with your finger and tools and then clean it.
(Refer to the figure)
2.lnsert and press the front wheel into the right position while assembling.
of the side brush before changing
the side brush.
2.Clean the side brushes.
3.Replace side brushes if it's damaged.
4.Press the side brush against the main
shaft and then fasten the screw.
1
I'"f
O +i
lv
@
--E-
Clean ing Mid-brushes assembly
l.Clean the hair or big dust particles on the
main brush and rubber brush regularly
to improve the cleaning performance.
2.Clean the wastepaper or small particles by
dust brush directly rotate the brush carefully
and cut by scissors or pull by hand the hair,
yarn and other twisted objects.
3.The robot of the main brush and rubber-brush can be done by reference
. to the assembly & disassembly.
Assembly & Disassembly and cleaning of L/R wheel:
.Release the screw of the left/right wheel by the screwdriver.
(Refer to Figure 1)
2.Take out the left/right wheel and clean them with the brush.
(Refer to Figure 2)
3.Place the left/right wheel in the original position, and tighten the screw
while assembling.
Note: Don't wash the wheel in water!
1
Assembly & Disassembly
and cleaning of main brus
and rubber brush.
l.Force the locking bar forward and
raise the cover by right thumb, and
then raise rod of the Mid cleaning
brush by your left hand.
(Refer to Figure 1 and 2)
2.Take out the main brush and rubber
brush(Refer to Figure 3)
3.lnsert the main brush and rubber
brush into the holes before closing
the cover in assembly.
CLEANING ROBOT
CLEAN ING ROBOT
PRODUGT MAINTAINING
Gleaning dustbin and filter
PRODUGT MAINTAINING
Gleaning sensors
.Press the button on fan-assembly, and then the blower will pop up
automatically.
2.Clean them with Dust brush.
Note: When taking out the fan assembly, Please put the dustbin in 30
degree slope.
.Clean the senor and infrared transparent window with the cotton swab
or soft cloth.
2.The wall detection sensor is in front of the robot, while the ground
detection sensor and infrared transparent window are at the bottom
of the cleaner.
1
1
Note:
rrrrf
Charge connecting points on charging docking station need to clean if dirty.
Never let water, thinner etc directly touch the sensor window.
lf you want to pick up the robot cleaner while it is working, please use
the remote controlto make the cleaner step back about 20-30cm. Then
pick up the machine after turning it off for fear of dust leakage from dust
mouth.
Clean the filter
1 .Open the bracket and the filter will appear, take out the filter, and then
clean the dustbin in water.
2.Clean the filter by hair dryer or dust brush.
Replace the filter
1 .Change a new filter, press the semicircle bracket by one hang to release
the fastener from the filter screen, and then change a New one.
14
15
CLEANING ROBOT
CLEANlNG ROBOT
TROUBLESHOOTING
TROUBLESHOOTING
Battery removal
Replaceable modules
Split type design
l.Release the screw with a screwdriver, open its base plate and then
There are a number of modules that can be replaced.
ffi
r=---71
take out the battery.
2.Place the battery in the right position ensuring the positive and
negative electrodes are aligned correctly.
Assy of Risht wheer
L_H
ilr)
Note:
Assy of
frlia-Orusn /
f _=)
Battery
fi--*T1
rL--_t]/
I
tu/
Assy of Front wheel
V
Main body
16
U
1.Use factory authorized battery only.
2.Please don't forget to take out the battery before discarding the robot.
3.Please remember to turn off the switch before taking out the battery
from the robot.
4.Please don't place the battery in the high-temperature environment
above 45'C or in the water.
5.Please don't exert externalforce to the battery or drop them from
high place.
6.The battery should be recycled with safe disposal. Please don't disc
-ard it freely or throw it into fire for fear of explosion.
7.lf the battery is lack of electricity while heating, it will go to docking
station for recharging which will be finished within t hour, then the
robot will leave from docking station to restart working under "full go"
mode, but the robot can not work for more than 50 minutes after rech
-arging for low battery electricity. lf above phenomena happened, you
need to power off the robot for more than 2 hours to cool the battery.
8.lf you did not use the machine for a long time, please charge it every
three months at least to avoid the battery short life or damaged.
9.The battery warranty period is 6 months.
17
CLEANING ROBOT
CLEANING ROBOT
TEGHN IGAL SPEGI FIGATIONS
TROUBLESHOOTING
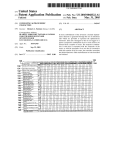
Error code sheet
Failure code
E001
E002
E003
E004
E005
Failure cause
How to solve
Ground detection
sensors
Clean the sensors at the
front bottom of the robot.
Middle brush
Power off
Clean the rubbish such
as hair, thread wrapped
on the brush.
Mechanical
technical
specifications
Use the adaptor to charge,
after full charged, then use
again.
Ground detection
sensors
Check the left and right
wheels, clean the rubbish
Ground detection
Please check whether the
fan assembly is clean,lf not,
please chean it ,then put
inside to the dustbin and put
back to the cleaner
SENSOTS
Classification
Note:
lf the failure still exist after the above check, please contact the after
sale service maintenance, professional maintenance staff or the
technical center of the company, don't disassemble and maintain it
by yourself
Diameter
320mm
Height
87mm
Weight
3.2k9
Remote control
Wireless
Sterilization
UV
Filter material
HEPA
Button type
Touch
Rated voltage
14.4V
Battery specifications
on it.
Remote control
technical
Specifications
Ni-MH 2200mAh
Transmitting distance
10m
Rated voltage
3V
Battery
Specification
2*AAAbatteries
Docking station
technical
Specifications
Specification
'l
95*50*105mm
2289
Rated voltage
24V
102*71*106mm
Weight
1429
Rated voltage
3V
Battery
Emission hole
not include)
62g
Weight
Specification
(
152*42*24mm
Weight
Virtualwall
technical
Specifications
8
Detail
Item
2 Batteries "D" 3V (not include)
Double direction angle
19
CLEAN I NG ROBOT
FUNCTIONS OF ROBOT IN BRIEF
*
Triple cleaning technique:
A.Both rubber brush and hair brush
B.Vacuum cleaning
C.Mopping
Main dust collecting area
Secondary dust
collecting area
dUSt
o
dust wiping
(Mopping cloth)
@
x Two-way launch virtualwall,cleaning the given place effectively
* UV lamp for sterilization
* Wireless remote control
* Anti-collision function
* Anti-fallfunction
*
Presetting cleaning time
:t Three cteaning routes:
Zigzag cleaning,
Spiralcleaning,
Wall-Following cleaning
* Return to charge automatically