1
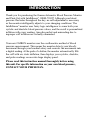
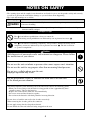
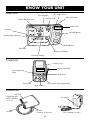
R
INSTRUCTION MANUAL
Automatic Blood Pressure Monitor
and Print-Out with IntelliSense™
Model
HEM-705CP
TITLE
TABLE OF
CONTENTS
Introduction...................................................................................................4
Notes on Safety.............................................................................................5
Know Your Unit ............................................................................................6
Quick Reference Guide ................................................................................7
Initial Set-Up ................................................................................................8
Battery Installation/Replacement............................................................8
How to Set Time and Date .....................................................................9
How to Connect Printer-Unit................................................................10
How to Load Printer Paper ...................................................................11
How to Use the Optional AC adapter...................................................12
Correct Usage .............................................................................................13
How to Apply Arm Cuff .................................................................13, 14
How to Take a Reading ..................................................................15, 16
How to Use the Memory Function .......................................................17
How to Use the Printer-Unit.....................................................18, 19, 20
Troubleshooting ....................................................................................21, 22
Caution........................................................................................................23
Care and Maintenance ................................................................................24
Warranty......................................................................................................25
Specifications........................................................................................26, 27
3
INTRODUCTION
TITLE
Thank you for purchasing the Omron Automatic Blood Pressure Monitor
and Print-Out with IntelliSense™, HEM-705CP. Although your blood
pressure fluctuates throughout the day, no self-adjustment is necessary
as the monitor intelligently adjusts to your changing conditions. The
IntelliSense™ monitor uses fuzzy logic intelligence to sense both your
systolic and diastolic blood pressure values, and the result is personalized
inflation with every reading. Arm discomfort and misreading due to
improper cuff inflation are virtually eliminated.
Your new OMRON monitor uses the oscillometric method of blood
pressure measurement. This means the monitor detects your blood's
movement through your brachial artery and converts the movements into
a digital reading. At the push of a button, the monitor automatically fills
the cuff with air, starts deflation, then displays your systolic, diastolic,
and pulse readings on an extra large display panel.
Please read this instruction manual thoroughly before using
this unit. For specific information on your own blood pressure,
CONTACT YOUR PHYSICIAN.
4
NOTESTITLE
ON SAFETY
• The warning signs and the sample icons shown here are listed for you to use the product safely and correctly
as well as to prevent the risk and the damage to you and others from happening.
• The icons and meanings are as follow.
Warning sign
Caution
Contents
Indicates matters in which bodily harm or material damage* may arise as a result
of incorrect handling.
* Material damage refers to a wide range of damage involving your house, household goods,
domestic animals, and pets.
Examples of signs
The
icon indicates prohibitions (what you cannot do).
Matters involving actual prohibitions are indicated by text or pictures in or near
.
The
icon indicates something compulsory (always follow). Matters involving actual
compulsory actions are indicated by text or pictures in or near
. The left icon refers
to "general compulsion".
Caution
Self-diagnosis of measured results and treatment are dangerous. Please follow
the instructions of your doctor.
Do not use the unit on infants or persons who cannot express one's intention.
Do not use the unit for any purpose other than measuring blood pressure.
Do not use a cellular phone near the unit.
Improper operation may result.
Do not disassemble, repair, or remodel the main unit or the arm cuff
of the blood pressure monitor.
The battery liquid may leak and damage the main unit. Please observe the following points.
• When you are not going to use the unit for a long period of time (approximately three
months or more), take out the batteries.
• Replace the worn batteries with new ones immediately.
• Do not use worn and new batteries together.
• Do not insert the batteries with their polarities in wrong direction.
Do not force to bend the arm cuff or the air tube excessively.
When removing the air tube, pull at the connector.
Do not apply strong shock or drop the main unit.
Do not inflate the arm cuff without it being wrapped on the arm.
5
KNOWTITLE
YOUR UNIT
Main Unit:
Heart Symbol
AC Adapter Jack
Adjust Date/Time
Set Date/Time
Systolic Blood Pressure
Printer Jack
Cuff Jack
ON/OFF Button
Diastolic Blood Pressure
START Button
Pulse Rate
Memory Call Button
Date/Time Display
Printer-Unit:
Printer Cover
Printer Cable Plug
Power/Operation
Light
Paper Feed
Print Current Data/Stop Printing
Print Graph
Print All Data
Accessories:
Arm Cuff
(Applicable arm
cuff for Adults 9
to 13 in.)
Air Tube
AC Adapter
Air Plug
(Connects to Air Jack)
6
(not a standard accessory)
TITLE
QUICK REFERENCE
GUIDE
1. Avoid eating, smoking, and exercising for at least 30 minutes before
taking a measurement.
2. Remove tight-fitting clothing from your upper arm.
3. Sit in a chair with your feet flat on the floor and place your arm
on a table so that the cuff is at the same level as your heart.
4. Put your arm through the cuff loop making sure that the bottom edge
of the cuff is approximately one-half inch above the elbow and that
the Green Marker on the cuff is above brachial artery.
1/2 inch
Green Marker
5. Pull the end of the cuff so that the entire cuff is evenly tightened around
your arm and press the hook material firmly against the pile side of the
cuff.
6. Press the ON/OFF button.
7. After the Heart Symbol ( ) appears on the digital panel, press the Start
button, and remain still until the measurement is complete.
8. When measurement is complete, the monitor displays your blood
pressure and pulse rate, and automatically deflates the cuff.
9. Wait 2-3 minutes before taking another blood pressure measurement.
You may require more rest time between readings depending
on your individual physiological characteristics.
7
BATTERY INSTALLATION/REPLACEMENT
Main Unit:
1. Slide the battery cover off
in the direction of the arrow.
2. Install or replace 4 "AA"
size batteries so the +
(positive) and – (negative)
polarities match the polarities
of the battery compartment
as indicated.
3. Replace the battery cover.
Notes:
If the Low Battery Indicator
( ) appears on the display,
replace all four batteries.
Long-life alkaline batteries
are recommended.
Remove the batteries if the
monitor will not be used for
an extended period of time.
8
Printer Unit:
HOW TO SET TIME AND DATE
1. When the batteries are installed, the
display will show 12:00a.m.
2. Press and hold the “SET” button. The
year digits (2001) will flash.
3. Press the “ADJUST” button to
advance the digit(s) one at a time.
If you hold down the “ADJUST”
button, the digits will advance rapidly.
4. Press “SET” button when desired
number is on the display to lock setting.
5. Repeat Step 3-4 for month and date.
6. Repeat Step 3-4 for hour and
minutes.
9
HOW TO CONNECT PRINTER UNIT
1. Remove printer cable plug from
around printer unit.
2. Connect printer cable plug cord to the
main unit. Arrow () on printer cable
plug should face down
to main unit.
10
HOW TO LOAD PRINTER PAPER
1. Open printer cover in the direction
indicated by the arrow symbol and
remove paper roll from the main unit.
2. Peel of the glued edge of the printing
paper included with the unit, and cut
the first 4 inches with a pair of scissors.
3. Press the PAPER FEED button while
inserting the edge of the printing paper
into the paper feeding slot. When the
edge of the paper protrudes sufficiently,
release the PAPER FEED button.
4. Close the plastic printer cover. Make
certain that the paper sticks out from
the top when the cover is replaced.
5. Thermal sensitive paper is supplied
with the unit. Use only thermal paper
of similar size (width approx. 38mm)
and roll diameter (not to exceed approx.
26mm). These rolls of paper (model
number 90TRP) can be ordered from
OMRON HEALTHCARE, INC., 300
Lakeview Parkway, Vernon Hills, IL
60061 (1-800-634-4350).
11
4in
HOW TO USE THE
OPTIONAL AC ADAPTER
To avoid potential damage to the monitor, use only the exclusive
AC adapter (Model HEM-ADPT1).
To connect the AC adapter
1. Insert the AC adapter plug into the AC Adapter jack on the back of
the main unit.
2. Plug in the AC adapter into a 120V AC outlet (50 - 60 cycles).
To remove the AC adapter
To remove the AC adapter,
disconnect the adapter plug
from the AC outlet first and
then disconnect the cord from
the monitor’s jack.
1
NOTE: The monitor is designed not
to draw power from the
batteries when the AC
adapter is in use.
12
2
TITLE
HOW TO APPLY
THE ARM CUFF
AU ODEL H
M
1. If the cuff is assembled correctly, the
hook material will be on the outside of
the cuff loop and the metal D-ring will
not touch your skin.
2. If the cuff is not assembled, pass
the end of the cuff furthest from
the tubing through the metal D-ring
to form a loop. The smooth cloth
should be on the inside of the cuff loop.
IC
TOL
SYS
LIC
STO
DIA
Pile Side Material
Sewn Hook Material
3. Sit in a chair with your feet flat on the
floor and place your arm on a table
so that the cuff is at the same level
as your heart.
4. Put your arm through the cuff
loop. The bottom of the cuff should
be approximately 1/2" above
the elbow. The Green Marker
on the cuff should lie over the
brachial artery on the inside
of the arm. Tube should
run down center of arm
approximately even
with middle finger.
13
D-Ring
Bottom Edge 1/2 Inch
Cuff Tube
Green Marker
PULS
TITLE
HOW TO APPLY
THE ARM CUFF
5. Pull the cuff so that the top and
bottom edges are tightened
evenly around your arm.
6. When the cuff is positioned
correctly, press the sewn hook
material FIRMLY against the
pile side of the cuff.
7. Make certain the cuff fits
snugly around your arm.
The cuff should make
good contact with
your skin.
You should be able
to fit your index finger
between the cuff and your
arm easily, so you can pull
the cuff off and on.
8. Relax your arm and turn your
palm upward.
9. Be sure there are no kinks
in the air tubing.
14
TITLEA READING
HOW TO TAKE
1. Press the ON/OFF button.
a) All display symbols appear for approximately
one second.
b) When the monitor becomes ready to measure,
the Heart Symbol appears on the display.
2. Press the START button and remain still.
As the cuff begins to inflate, the monitor automatically
determines your ideal inflation level. Because this
monitor detects the pulse even during inflation, do not
move your arm and remain still until the entire
measurement completes.
3. Inflation stops automatically
and measurement is started.
As the cuff slowly deflates, decreasing
numbers appear on the display and the Heart Symbol
( ) flashes at every heartbeat. In rare circumstances, a
higher inflation may be necessary. In those cases, the
monitor reinflates the cuff up to 30 mmHg higher than
initial inflation and restarts the measurement.
4. When the measurement is complete,
the arm cuff completely deflates and
your blood pressure and pulse rate
are displayed.
NOTE: The monitor automatically stores blood pressure
and pulse rate into the memory.
5. Press the ON/OFF button to turn the
monitor off.
NOTE: If you forget to turn the monitor off, it will
automatically shut itself off after five minutes.
15
Inflation
Deflation
TITLEA READING
HOW TO TAKE
Instructions for special conditions:
• If your systolic pressure is known to
be more than 220 mmHg, push and
hold the START button until the
monitor inflates 30 to 40 mmHg
higher than your suspected systolic
pressure.
NOTE: Do not apply more pressure
than necessary.
The monitor will not inflate
above 300 mmHg.
• If you want to stop the measurement,
push the ON/OFF button. The monitor
will stop inflating and start deflating
rapidly, then the monitor will turn off.
16
START
Continue to press button
TITLE
HOW TO USE THE
MEMORY FUNCTION
This monitor has a memory capable of storing twenty-eight (28) sets of readings.
Every time you complete the measurement, the monitor automatically
stores blood pressure and pulse rate.
• Push the
Symbol (
button to recall stored readings while the Heart
) is displayed.
• When twenty-eight (28) sets of readings are stored in memory, the
oldest set will be deleted to store a new set.
• Date and Time of stored readings will be alternately displayed.
• To delete stored readings, press the
button and the
Start button simultaneously, then all the readings will be deleted.
NOTE: You can not delete the stored readings partially.
START
Press these two buttons
at the same time.
17
HOW TO USE THE PRINTER-UNIT
The HEM-705CP has the ability to print all the readings stored in memory.
NOTE:
• Make sure printer-unit is connected to main unit (see How to
Connect Printer-Unit)
• Do not use printer-unit without loading printer paper (see How
to Load Printer Paper). Improper use will decrease operation life
cycle of printer-unit.
• Main unit does NOT have to be ON to operate printer-unit.
• Printer-unit will automatically shut OFF when printing is
completed.
• If you need to stop printing during printing process, press
“DATA/STOP” button.
1. Press “DATA/STOP” to print measurement of
most recent reading.
The numeric print-out will look like the
following example:
Month/Date
Systolic Reading
Diastolic Reading
Pulse Reading
7/9
6:36 AM
SYS
DIA
PULSE
111mmHg
67mmHg
77/min
Time
2. Press “ALL DATA” button to print a numerical
list and average of all stored readings (stores a
maximum of 28 readings).
18
HOW TO USE THE PRINTER-UNIT
The numerical print-out will list all stored readings (maximum of 28
readings) starting with the most recent reading to last stored reading:
Systolic Reading
Column
Month(s)
Date
Time/Hour
Diastolic Reading
Column
3-6
mmHg
D. T.
20 15
23 11
1 15
3 14
5 7
15 7
20 12
3 12
10 12
12 14
14 7
21 15
22 12
4 6
*AV.
SYS
113
117
113
110
112
110
106
110
108
111
107
111
121
112
112
/min
DIA
75
69
71
67
66
61
66
65
61
56
64
64
62
64
65
PUL
67
64
63
66
64
64
65
64
67
62
64
64
66
63
65
Pulse Reading
Column
Last reading stored
Most recent reading
Average of all
stored readings
• Month(s)
The month or months will be printed.
Example: If the blood pressure reading was stored between months
March-June, then the printout will indicate “3-6”.
• Date
Only the day’s date (1-31) will be printed.
Example: If the blood pressure reading was stored on June 1st, then the
printout will indicate 1 under the “D” column.
• Time/Hour
Only the hour (in military time) will be printed.
Example: if the blood pressure reading was stored at 3:00 PM, then
the printout will indicate 15 under the “T” column.
Note: If Time and Date was not initially set up before taking blood pressure measurement
(see How to Set Time and Date) on printer-unit, the numerical value will not appear on
print-out for month, time/hour and date.)
19
HOW TO USE THE PRINTER-UNIT
3. Press “GRAPH” button to print a graph
of all stored readings (stores a maximum
of 28 readings).
Month(s)
3-6
50
100
mmHg
150 200
Last reading stored
If reading is lower
than 50 mmHg or
higher than 200
mmHg, () will
appear.
Diastolic Reading
Systolic Reading
Most recent reading
Average diastolic
reading of stored
measurements
Average systolic
reading of stored
measurements
20
TITLE
TROUBLESHOOTING
Main Unit:
Error Indicator
Cause
Cuff under-inflated.
Movement during
measurement.
Correction
Turn monitor off, wait 2-3 minutes
and take another measurement.
Repeat steps listed under "How
to Take a Reading." If "EE"
is displayed again, take another
measurement by pressing and
holding the START button
as shown on instruction page
12 under "How to Take
a Reading", instructions
for special conditions.
Your cuff maybe wrapped
too tightly around your arm.
Cuff over-inflated
(more than 300 mmHg).
Turn the monitor off, carefully
read and repeat steps listed
under "How to Take a Reading."
Battery voltage
is excessively low.
Replace all four "AA" batteries
with new batteries.
Problem caused by abnormal Refer to warranty page for sending
memory function.
unit in for repair service.
If you continue to have difficulty obtaining a reading, call
OMRON HEALTHCARE CUSTOMER SERVICE TOLL FREE 1-800-634-4350.
Please tell the representative you have an OMRON Model HEM-705CP.
21
TITLE
TROUBLESHOOTING
Printer Unit:
Error Indicator
Nothing is printed
Power/Operation light is
blinking, stopped printing
No printer paper comes out
Cause
Correction
Printer cable plug is not
connected properly or
damaged
Connect correctly reference p.10
Batteries are worn
Replace with new batteries
No readings stored
Take measurement then print
Printer paper is not installed
correctly
Install correctly
Batteries are worn
Replace with new batteries
No printer paper installed
Take paper jammed from the
printer and install again
Contact Omron Customer Service
Printer paper jammed
Ran out of printer paper
Purchase new printer paper
If you continue to have difficulty obtaining a reading, call
OMRON HEALTHCARE CUSTOMER SERVICE TOLL FREE 1-800-634-4350.
Please tell the representative you have an OMRON Model HEM-705CP.
22
TITLE
CAUTION
CAUTION:
Changes or modifications not expressly approved by Omron Healthcare, Inc.
could void the user’s warranty.
NOTE:
POTENTIAL FOR RADIO/TELEVISION INTERFERENCE (for U.S.A. only)
This product has been tested and found to comply with the limits for a Class B
digital device, pursuant to part 15 of the FCC rules. These limits are designed
to provide reasonable protection against harmful interference in a residential
installation. The product generates, uses, and can radiate radio frequency energy
and, if not installed and used in accordance with the instructions, may cause
harmful interference to radio communications. However, there is no guarantee
that interference will not occur in a particular installation. If the product does
cause harmful interference to radio or television reception, which can
be determined by turning the product on and off, the user is encouraged
to try to correct the interference by one or more of the following measures:
• Reorient or relocate the receiving antenna.
• Increase the separation between the product and receiver.
• Connect the product into an outlet on a circuit different from that to which
the receiver is connected.
• Consult the dealer or an experienced radio/TV technician for help.
POTENTIAL FOR RADIO/TELEVISION INTERFERENCE (for Canada only)
This digital apparatus does not exceed the Class B limits for radio noise emissions
from digital apparatus as set out in the interference-causing equipment standard
entitled "Digital Apparatus", ICES-003 of the Canadian Department of Communications.
Cet appareil numérique respecte les limites de bruits radioeléctriques applicables aux
appareils numériques de Classe B prescrites dans la norme sur le matériel brouilleur:
"Appareils Numériques", ICES-003 èdictée par le ministre des communications.
23
CARE AND MAINTENANCE
To protect your monitor from damage, please AVOID the following:
• Subjecting your monitor and cuff to extreme temperatures,
humidity, moisture, and direct sunlight.
• Folding the cuff and tubing tightly.
• Inflating the monitor over 280 mmHg.
• Disassembling the monitor.
• Subjecting the monitor to strong shocks
(for example, dropping the monitor on the floor.)
• Do not clean the monitor with volatile liquids.
THE MONITOR SHOULD BE CLEANED WITH
A SOFT, DRY CLOTH.
• Do not clean cuff.
24
WARRANTY
Your HEM-705CP IntelliSense™ Automatic Blood Pressure Monitor
is warranted to be free from manufacturing defects for a period
of five years under normal use. The five year warranty excludes
the monitor cuff. The cuff is warranted for a one year period.
This warranty extends only to the original retail purchaser.
Should repair be needed within the warranty period, ship the unit
prepaid with the proof of purchase date and $5.00 for return
shipping and insurance to:
Omron Healthcare, Inc.
Attn: Repair Department
300 Lakeview Parkway
Vernon Hills, IL 60061
Be sure to include the model number and your phone number
on any correspondence.
We will either repair or replace (at our option) free of charge any parts
necessary to correct defects in the materials or workmanship.
The above warranty is complete and exclusive. The warrantor expressly
disclaims liability for incidental, special, or consequential damages of any
nature. (Some states do not allow the exclusion or limitation of incidental
or consequential damages, so the above warranty may not apply to you.)
Any implied warranties arising by the operation of law shall be limited
in duration to the term of this warranty. (Some states do not allow
limitations on how long an implied warranty lasts, so the above
limitation may not apply to you.)
This warranty gives you specific legal rights, and you may have other
rights which vary from state to state. As a condition to operation of your
warranty, the enclosed registration card must be completed and sent
to us within 10 days from the date of purchase.
FOR CUSTOMER SERVICE CONTACT:
By phone toll free
By using the feedback form at
1-800-634-4350
www.omronhealthcare.com
25
SPECIFICATIONS
MAIN UNIT:
Model:
HEM-705CP
Display:
LCD Digital Display
Measurement Range:
Pressure: 0 to 299 mmHg
Pulse: 40 to 180/minute
Accuracy/Calibration:
Pressure: ±4 mmHg
Pulse: ±5% of reading
Inflation:
Automatic by electric pump
Deflation:
Active electronic control valve
Rapid Pressure Release:
Active electronic control valve
Pressure Detection:
Capacitive pressure sensor
Measurement Method:
Oscillometric method
Pulse Wave Detection:
Capacitive pressure sensor
Power Source:
4 "AA" batteries or AC adapter
Battery Life:
Approximately 300 uses
Operating
Temperatures/Humidity:
50°F to 104°F (10°C to 40°C)
30 to 85% RH maximum
Storage
Temperatures/Humidity:
–4°F to 140°F (–20°C to 60°C)
10 to 95% RH maximum
Main Unit Weight:
Approximately 13.4 oz (380g) not including batteries
Main Unit Dimensions:
Approximately 4 1⁄2" (l) x 7" (w) x 2 4⁄5" (h)
(115 mm x 177 mm x 71 mm)
Cuff Dimensions:
Approximately 5 1/2" x 19" (140 mm x 480 mm)
Cuff Circumference:
Fits arm circumference 9" to 13"
Accessories:
Arm cuff, printer-unit, paper rolls (2), instruction manual
26
SPECIFICATIONS
PRINTER UNIT:
Power Source:
4 “AA” batteries
Battery Life:
Approximately 300 uses (current data)
Paper Usage:
Approximately 200 uses for 1 roll (current data)
(Printer) Weight:
Approximately 6 oz. (170 g) (not including batteries)
(Printer) Dimensions:
Approximately 4 4⁄5'' (l) x 2 4⁄5'' (w) x 2'' (h)
(123 mm x 72 mm x 50 mm)
NOTE: These specifications are subject to change without notice.
*Optional accessories: large cuff (fits arms 13" to 17" in circumference) and small cuff (fits
arms 7” to 9” in circumference) are sold separately.
27
For Customer Service
Call Toll Free
1-800-634-4350
Manufactured by OMRON
Distributed by:
OMRON HEALTHCARE, INC.
300 Lakeview Parkway
Vernon Hills, Illinois 60061
www.omronhealthcare.com
Copyright © 2001 OMRON HEALTHCARE, INC.
705CPINST Rev A