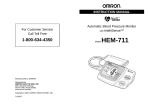
1
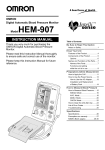
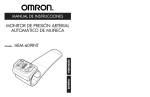
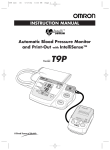
10/23/03
3:13 PM
Page 1
INSTRUCTION MANUAL
IntelliSense™ Blood Pressure Monitor
HEM-907XL
Model
Table of Contents
DIA
Be Sure to Read This Section
XL
SYS
mmH
Exemptions ........................................2
Notes on Safety .................................3
g
Know Your Unit
PUL
SE
mm
Hg
ON/O
BPM
FF
AC
HID
E
STA
RT
P-S
ET
140
100
180
MO
D
220
AU
TO
E
AVG SINGL
E
.
MA
260
280
NU
.
CHE
CK
AV D E F
G . L AT I O
/1 s
N
t / 2n
d / 3rd
STO
P
Features of the Product .....................7
Components of the Product ...............8
Options ...........................................9
Features and Functions ...................10
Names of the Parts ......................10
Functions and setting
while the unit is in use ..................12
Preparations before Measurement
DE
X
M
A
X
How to Apply the Cuff ......................14
How to Use the Power Source ........16
How to Use the AC Adapter ............16
Installation and Replacement
of Battery Pack .............................17
IN
How to Measure Blood Pressure
AR
T.
HEM-907
Thank you for purchasing the OMRON
IntelliSense™ Blood Pressure Monitor.
Please thoroughly read this Instruction Manual
before using this monitor to ensure safe and
accurate use.
Please keep this manual near the monitor all
the time for future reference.
List of Measurement Modes ............19
SINGLE Mode ..............................20
AVG Mode ....................................22
MANU Mode .................................24
How to Check Pressure Accuracy..26
How to Clean the Unit after Use........27
List of Error Codes ...........................28
Troubleshooting................................29
Specifications
Caution.............................................30
Five Year Limited Warranty..............31
Specifications ...................................31
HEM-907
10/23/03
3:13 PM
Page 2
EXEMPTIONS
OMRON does not accept liability and warranty becomes void under the following
circumstances:
NOTES ON SAFETY
• The warning signs and the sample icons shown here are listed to insure safe and accurate use.
• The icons and meanings are as follows.
Warning sign
Contents
1. When persons, not authorized by OMRON, perform repairs or modifications of this
product.
Indicates matters in which death or severe bodily damage may arise as a result
of incorrect handling.
2. When use and/or operation of this device is adversely effected by a device not
manufactured by OMRON.
Indicates matters in which bodily harm or material damage* may arise as a
result of incorrect handling.
3. When use and/or operation of this device is adversely effected by use of parts, not
authorized by OMRON, to repair or modify this product.
4. When Notes on Safety or Instructions for Use contained in this manual are not followed.
5. When use and/or operation of this device is effected by an act of God, such as fire,
earthquake, flood or other natural disasters.
* Material damage refers to a wide range of damage involving your house, household goods, domestic animals, and pets.
Examples of signs
The
icon indicates caution (including warning and danger).
Matters involving actual caution are indicated by text or pictures in or near
The pictured icon refers to "caution for flammability".
.
The
icon indicates prohibitions (what you cannot do).
Matters involving actual prohibitions are indicated by text or pictures in or near
The pictured icon refers to "prohibition to disassemble".
The
icon indicates something that is compulsory (always follow).
Matters involving actual compulsory actions are indicated by text or pictures in or near
The pictured icon refers to "unplugging the power source plug".
Self diagnosis of measured results or treatment is dangerous. Please follow
the instruction of the doctor or healthcare provider.
If cuff inflation does not stop, remove the cuff or pull out the air tube from the
main unit.
If battery fluid gets into your eye or comes in contact with skin, wash the effected
area with water repeatedly. Immediately consult a doctor for treatment.
Do not wrap the cuff over an arm to which intravenous injection or transfusion
is being conducted, or when otherwise contraindicated.
Do not connect the air tube or the cuff to other equipment which is connected
to an intracorporeal organ. Air embolisms may result.
1. The product and contents of this Instruction Manual may be changed without prior notice.
Do not use this unit in the presence of flammable gas or anesthetics or in a
high pressure oxygen room or oxygen tent.
2. We have prepared the contents of this Instruction Manual thoroughly. However, if an
inadequate description or error is found, please let us know.
Do not use the battery pack for devices other than for this unit.
3. Reproducing or copying any or all of this Instruction Manual without OMRON’s written
consent is prohibited.
Do not disassemble the battery pack.
Do not touch the AC adapter with wet hands.
2
3
.
.
HEM-907
10/23/03
3:13 PM
Page 4
NOTES ON SAFETY
Unplug the AC adapter from the electric outlet if this unit is unused for an
extended period of time.
Unplug the AC adapter from the electric outlet when installing, removing, or
cleaning the unit.
NOTES ON SAFETY
Do not use a cellular phone near this unit.
Do not use this unit in a vehicle.
Do not install the parts and/or instruments not specified for this unit.
Do not use a broken power cord or AC adapter.
Confirm readings with a stethoscope when an irregular pulse wave is
displayed or when the measured value is questionable or erratic.
Use an AC adapter indicated for use with a power supply of 110 VAC.
Do not install or store this unit where it may come in contact with water or
liquid medication.
This is a Class II device with double isolation. Earth pin is not for protective
purposes.
General advice
Do not share an electric outlet with other unit or electric appliance.
After cleaning this unit, dry it well before plugging the AC adapter in the
electric outlet.
Do not place or put anything on this unit.
If this unit fails to perform as indicated, discontinue use, turn off the unit,
unplug the AC adapter from the electric outlet, and contact OMRON’s repair
department.
Turn off power to the unit and unplug the AC adapter from the electric outlet before moving
the unit.
Do not disassemble or modify this unit.
Do not use any cuff other than the models exclusive for this unit.
Do not use this unit on infants.
Do not use this unit on patients using a pump oxygenator.
Do not use an AC adapter or battery pack not specified for this unit.
4
Do not drop this unit.
Read the instruction manual of the other devices to be used at the same time with this unit, to
understand and be aware of the interaction between the devices.
When using the unit
• Do not inflate the cuff without being wrapped over the arm.
• Do not use a damaged cuff.
• Be sure that patients do not touch the Buttons of this unit.
After using the unit
• Do not disinfect this unit by autoclave or gas sterilization (EtO, gluteraldehyde, or high
concentration ozone).
Do not install or store this unit in the following places.
• Under the direct sunlight,
• Dusty or salty environment,
• Places having slope, vibration, and/or shock,
• Storage of chemicals or where combustable gas may be generated,
• Under high temperature and high humidity.
5
HEM-907
10/23/03
3:13 PM
Page 6
NOTES ON SAFETY
FEATURES OF THE PRODUCT
OMRON IntelliSense™ Blood Pressure unit, Model HEM-907XL is developed to measure blood
pressure and pulse rate accurately and simply in a doctor's office, examination room,
or patient bedside.
Maintenance and inspection
1. Check the unit operation on regular basis.
2. If this unit has not been used for more than three months, be sure to check that this unit
operates normally and safely before use.
• One-button operation
Simply wrap the cuff and push the START Button. Blood pressure and pulse rate are automatically
measured by the oscillometric method.
• Automatic pressure setting
Troubleshooting
If device error 9 (Er9) occurs, take the following procedure promptly:
(1) Remove the cuff from the patient's arm.
(2) Turn off the power of the unit and unplug the AC adapter from the electric outlet.
(3) Display "Out of use" on this unit so that it cannot be used.
(4) Contact Omron for repair service (1-877-216-1336).
When the P-SET (Pressure Setting) Knob is set to "AUTO," the unit will automatically inflate the
cuff to the optimal pressure according to each patient's blood pressure. Pre-setting inflation level
is not necessary.
• Noiseless operation
This unit operates so quietly that it can be used in the patient room at night.
• Average Mode (AVG Mode)
In the AVG Mode, this unit will automatically measure for two or three times. The average of
systolic and diastolic blood pressures and pulse rate are displayed. Each measurement can also
be shown individually. The number of measurements, waiting time before first measurement, and
the interval can be changed.
• Auscultation Mode (MANU Mode)
You can measure auscultatory blood pressure by using a stethoscope, with automatic cuff inflation
and deflation by this unit. Because the cuff pressures during deflation are displayed digitally and
synchronized with the heart beat, they can be read with accuracy. After taking systolic reading
you can accelerate cuff deflation to shorten measurement time.
• Large and easy to read display
Large and easy to read figures are displayed on the LCD display.
The IntelliSenseTM Monitor inflates the cuff to the ideal level with each use. No adjustments are
required by the user to select an inflation level. This is especially convenient for hypertensive users
and for people with certain arrhythmia or heart disorders, because their blood pressure is likely to
fluctuate. The advantage is Personalized Inflation for maximum comfort.
6
7
HEM-907
10/23/03
3:13 PM
Page 8
COMPONENTS OF THE PRODUCT
Main unit
COMPONENTS OF THE PRODUCT
Options
IntelliSense™ Blood Pressure
Monitor, Model HEM-907XL
(not included)
Cuffs without bladder *
Bladders *
XL
Extra Large Bladder
For use with the
HEM-907XL only.
Model: HEM-907-BLDRX
Extra Large Cuff
For use with the
HEM-907XL only.
Model:HEM-907-CUFFX
Large Cuff
Model:HEM-907-CUFFL
Large Bladder
Model: HEM-907-BLDRL
Medium Cuff
Model: HEM-907-CUFFM
Medium Bladder
Model: HEM-907-BLDRM
Small Cuff
Model: HEM-907-CUFFS
Accessories
(Included and also available separately)
Cuff / bladder set Large
(with built-in bladder) *
Model: HEM-907-CL19
Applicable arm circumference:
13" to 17" ( 32 to 42 cm)
Model: HEM-AC-J
Air tube 1.3 m (51 1/6")*
Model: HEM-TUBE-130
Cuff / bladder set Medium
(with built-in bladder) *
Model: HEM-907-CR19
Applicable arm circumference:
9" to 13" (22 to 32 cm)
Cuff / bladder set Extra Large
(with built-in bladder) *
Model: HEM-907-CX19
For use with the HEM-907XL
unit only.
Applicable arm circumference:
17" to 20" ( 42 to 50 cm)
AC adapter
Small Bladder
Model: HEM-907-BLDRS
Cuff / bladder set Small
(with built-in bladder) *
Model: HEM-907-CS19
Applicable arm circumference:
7” to 9" (17 to 22 cm)
Air tube
1.0m (39 1/3")
Model: HEM-TUBE-100X
*
Battery pack
(48H907N)
Model: HEM-907-PBAT
The air tube is available for the large,
medium or small size cuff.
It is NOT for use with the extra-large
cuff size.
Exclusive Stand
Model: HEM-907-STAND
Wall-hanging kit
Model: HEM-907-WKIT
Pole-mounting kit
Model: HEM-907-PKIT
Instruction Manual
Items identified
with an asterisk (*)
are consumables
and not covered by
the guarantee.
Accessories and
options are subject
to change without
prior notice.
The air tube is available for the
large, medium or small cuff size.
It is NOT for use with the
extra-large cuff size.
Items identified with an asterisk (*) are consumables and not covered by the guarantee.
8
9
HEM-907
10/23/03
3:13 PM
Page 10
FEATURES AND FUNCTIONS
Names of the Parts
FEATURES AND FUNCTIONS
Display
Main unit
1. Display
(See Page 11 for detail)
Systolic blood pressure
XL
SYS
6. ON/OFF (power)
Button
2. HIDE (non-display) Button
Ready to Measure /
Pulse synchronization
mmH
g
DIA
PUL
SE
Diastolic blood pressure
Pulse level /
Number of irregular pulses
7. START Button
mm
Number of irregular pulse waves: The pulse
wave having a difference of more than 25%
from the average interval of pulse waves is
determined irregular. Number of irregular
pulse waves is displayed up to three times.
Hg
SYS
DC
BPM
ON/O
8V
FF
AC
HID
E
STA
RT
P-S
3. DC jack
140
100
ET
180
4. P-SET (pressure
setting) Knob
TO
mmHg
Example of display
DIA
MO
D
220
AU
8. DEFLATION
(deflation control)
/Measurement
Result Display
Switch Button
E
AVG SINGL
E
.
AV D E F
G. L AT
ION
/1 s
t /2n
d /3rd
MA
260
280
NU
.
CHE
C
1
9. Air Connector
No. of irregular pulses
2
3
K
mmHg
STO
P
PULSE
10. STOP Button
BPM
5. MODE Selector
1. Display: Displays blood pressure and, pulse rate readings, and oscillation pulse level.
2. HIDE Button: Switches display and non-display of measured results.
3. DC jack: Connects the AC adapter.
4. P-SET (pressure setting) Knob: In the AUTO position, inflation level is automatically set.
Otherwise, inflation level can optionally be set manually between 100 and 280 mmHg.
5. MODE Selector: Selects the operation mode.
• One-time Measurement Mode (SINGLE Mode): Measurement with automatic inflation.
• Average Mode (AVG Mode): Automatically measures two (or three) times consecutively.
• Auscultation Mode (MANU Mode): Automatic inflation, automatic deflation, and pressure display for auscultation (does
not measure blood pressure).
• Check Mode (CHECK Mode): Checks the accuracy of pressure display. Displays only pressure.
AC
Battery level
Displays
HIDE
Contents when the AVG
Mode is selected
AVG. : Mean value
1st : First reading
2nd : Second reading
3rd : Third reading
Blinks
Displays
for a low charged
level
for the inoperable
level.
Pulse rate
Charging
Displays
when the battery
pack is being charged.
External power source
Displays AC when the unit is connected
6. ON/OFF (power) Button: Turns on or off the unit.
7. START Button: Starts the measurement.
8. DEFLATION (deflation control) /Measurement Result Display Switch Button:
to the external power source via the AC
adapter.
• In the MANU Mode, deflates the cuff by approximately 5 to 10 mmHg with each push during deflation.
• In the AVG Mode, switches the display of average values and the measurement results with each push.
9. Air Connector: Connects the air tube.
10. STOP Button: Stops the measurement and deflates air rapidly.
10
for the operable level.
11
HEM-907
10/23/03
3:13 PM
Page 12
FEATURES AND FUNCTIONS
FEATURES AND FUNCTIONS
List of Functions for each Mode
Functions setting
(1) Inflation level setting
Measurement
Mode Single (SINGLE)
Mode
Function
P-SET
Auscultation
(MANU) Mode
Check
(CHECK) Mode
Inflation level setting
AUTO (Automatic setting): Can be used when the SINGLE, AVG, or MANU Mode is selected.
The unit estimates the systolic blood pressure during inflation and inflates to a proper cuff pressure
(approximately 30-40 mmHg above the patient’s systolic pressure).
Manual level setting: Inflation level can be set manually between 100 and 280 mmHg. Set the
level to 30 to 40 mmHg higher than the expected systolic pressure.
• To set the P-SET to "AUTO," turn the P-SET Knob counterclockwise as far as it goes until you can hear a click.
• In the "AUTO" setting, inflation level may not be set automatically when the systolic blood pressure is more than
220 mmHg. Use the unit in the manual setting.
• If the cuff has not been inflated to the necessary level, it may be re-inflated automatically.
Non-display function
Manual deflation
control
(4) AVG Function setting
You can set the number of measurements, the waiting time until the 1st measurement, and the
measurement interval for the AVG Mode.
Function #
F1
F2
F3
HIDE
(2) Non-display function
Average
(AVG) Mode
Use to prohibit the display of measurement results. However,
the cuff pressure during measurement is displayed.
This function can be used in the SINGLE and AVG Modes.
Set value
Number of measurements
2 times or 3 times
Waiting time until the start of 1st measurement 0 sec, 3 min, 5 min, or 10 min.
Measurement interval
5 sec, 30 sec, 1 min, or 2 min.
Note: The bold letters represent the factory-set values.
ON/OFF
XL
Procedure to change the set values
START
HIDE
DEF
N
AVG L AT I O r d
/1st / 2nd / 3
HIDE
By pushing the
Button, display or non-display of status
is switched alternatingly.
Items to set
P-SET
140
MODE
SINGLE
180
AVG.
220
100
MANU.
CHECK
1) When the power is OFF, push the ON/OFF (power) Button
for more than three seconds while holding the START Button;
F1 is displayed.
ON/OFF
AC
STOP
260
START
280
AUTO
HIDE
DEF
N
AVG L AT I O r d
/1st / 2nd / 3
P-SET
140
MODE
MANU.
CHECK
AVG.
220
100
SYS
STOP
260
280
AUTO
Display
SINGLE
180
mmHg
2) Push the START Button and select the function to set from
F1 to F3. Each time you push the START Button, the functions change in the order of
.
Non-display
DIA
XL
mmHg
PULSE
BPM
AC
AC
ON/OFF
AC
START
HIDE
DEF
N
AVG L AT I O r d
/1st / 2nd / 3
P-SET
140
3) Push the DEFLATION (deflation control)/Measurement
Result Display Switch Button and change the set values.
(3) Manual deflation control
Accelerate deflation by pushing the DEFLATION (deflation
control) / Measurement Result Display Switch Button during
deflation in the measurement by the MANU Mode.
MODE
SINGLE
180
AVG.
220
100
MANU.
CHECK
STOP
260
280
AUTO
ON/OFF
XL
START
HIDE
DEF
N
AVG L AT I O r d
/1st / 2nd / 3
P-SET
With each push of the
in increments of 5 to 10 mmHg.
Button, cuff is deflated rapidly
140
100
MODE
SINGLE
180
AVG.
220
MANU.
CHECK
min
STOP
ON/OFF
260
AUTO
280
4) When the setting is finished, push the ON/OFF (power)
Button to turn off the power. The setting is changed.
sec
AC
START
HIDE
DEF
N
AVG L AT I O r d
/1st / 2nd / 3
P-SET
140
100
MODE
SINGLE
180
AVG.
220
MANU.
CHECK
STOP
260
AUTO
12
13
280
HEM-907
10/23/03
3:13 PM
Page 14
HOW TO APPLY THE CUFF
HOW TO APPLY THE CUFF
The cuff of OMRON IntelliSense™ Blood Pressure Monitor HEM-907XL plays an important role of
collecting the information on blood vessels. Please wrap the cuff according to the procedure, below.
3. Place the right or left hand of the patient
with the palm of hand facing upward.
Do not wrap the cuff over an arm to which
intravenous injection or transfusion is being
conducted, or when otherwise contraindicated.
4. Align the Artery Position Mark
with the brachial artery.
Do not connect the air tube or the cuff to other
equipment which is connected to intracorporeal
organ. Air embolisms may result.
General advice
• Do not inflate the cuff without being wrapped over
the arm.
• Do not use a damaged cuff.
5. Wrap the cuff snugly using both hands
and securely fasten it with the Velcro™
tape. At this time, the lower edge of
the cuff must be placed 1/2" to 1"
above the inner side of elbow joint.
• If the INDEX is positioned outside the RANGE, select the cuff suitable for the
patient's arm circumference and wrap it again.
• Wrap the cuff so that you can insert only one finger between the cuff and arm.
1. Select the cuff according to the arm size
Arm circumference Name of the cuff
(7" - 9") 17-22 cm HEM-907-CS19
(9" - 13") 22-32 cm HEM-907-CR19
(13" - 17") 32-42 cm HEM-907-CL19
(17" - 20") 42-50 cm HEM-907-CX19
(Small)
(Medium)
(Large)
(Extra Large)
Cuff
• Check the following before applying the cuff:
1) The bladder is correctly installed in the cuff.
2) The bladder is not twisted inside the cuff.
3) The bladder tube is protruding from the cuff as shown in
the Figure on the right.
1/2"-1"
Extract the air tube from
.
Air tube
Enlarged figure of
the circled part
Air connector
Air plug
2. Connect the air tube securely.
To use the cuff in small, medium or large size
• Connect the air tube to the main unit by securing
the air plug to the base of the air connector.
• Securely connect the air tube and the cuff/bladder
set by rotating the luer connection as shown in
the Figure on the right.
6. Keep the level of the cuff at the
same level as the heart during the
measurement.
To use the cuff in extra-large size only
The extra-large cuff comes with an air tube with
an integrated air plug. Connect the air plug of the
cuff to the air connector securely when
connecting to the main unit.
Cuff side
14
Air tube side
15
HEM-907
10/23/03
3:13 PM
Page 16
HOW TO USE THE POWER SOURCE
How to use the AC adapter
HOW TO USE THE POWER SOURCE
Installation and Replacement of Battery Pack
Be sure to use the AC adapter from the
power supply of 110 VAC.
Do not use this unit in the presence of
flammable gas, or anesthetics, or in a high
pressure oxygen room or oxygen tent.
Do not install or store this unit where it may
come in contact with water or liquid medication.
Do not touch the AC adapter with wet hands.
This is a Class II device with double isolation.
Earth pin is not for protective purposes.
General advice
• Read the instruction manual of the other devices
to be used at the same time with this unit to
understand and be aware of the interaction
between the devices.
Connect the AC adapter to the DC jack of the main unit [1] and the electric outlet [2].
NOTE: When the AC adapter is connected and the unit is turned off, the AC adapter
charges the installed rechargeable battery.
If battery fluid gets into your eye or comes in
contact with skin, wash the affected area with
water repeatedly. Immediately consult a doctor
for treatment.
Do not use the battery pack for devices other
than for this unit.
Do not disassemble the battery pack.
1. Remove both screws on the upper portion of
the battery cover of this unit, and remove
the cover.
2. Disconnect the old battery pack from the
connector and replace with a new one.
3. Install the battery cover and fasten it with both
screws. Be careful not to pinch the lead wire.
4. Connect the main unit to the AC adapter to
charge the new battery. The battery is not
charged when you purchase the monitor. When you use the battery for the first
time, charge it for more than twelve hours before use.
[2]
[1]
16
17
HEM-907
10/23/03
3:13 PM
Page 18
HOW TO USE THE POWER SOURCE
HOW TO MEASURE BLOOD PRESSURE
Battery life
• You can use the unit for approximately three hundred measurements with one charge.
• Approximate life of battery is two years. However the battery life from each charging may be
shortened depending on the state of using. If the interval between charging becomes short and
the
icon appears frequently, replace it.
Charging time
• At approximately five seconds after connecting the AC adapter, the unit will start battery charging
automatically.
• While the battery is being charged, the
icon turns on.
• The battery can be completely charged in approximately twelve hours.
• If the
the battery.
General advice
Do not use a cellular phone near this unit.
• Patients should not touch the unit.
Battery low
• When the
Confirm readings with the stethoscope when
an irregular pulse wave is displayed or when
the measured value is questionable or erratic.
If cuff inflation does not stop, remove the cuff
or pull out the air tube from the main unit.
Do not use this unit in a vehicle.
icon starts to blink, twenty to thirty measurements remain on the battery.
However if the Battery Low Mark starts to blink, charge it soon.
icon is displayed, the battery is low and the unit cannot operate. Please charge
Automatic Power Off
• When using the unit with the battery, the unit will turn off automatically after five minutes
of inactivity.
• While the AC adapter is connected, the Auto Power Off function does not work.
18
List of Measurement Modes
Refer to Page
To measure
only once
SINGLE Mode
To measure two
times (or three times)
automatically and
consecutively
AVG Mode
To measure by
using a stethoscope
MANU Mode
20.
Refer to Page
22.
Refer to Page
19
24.
HEM-907
10/23/03
3:13 PM
Page 20
HOW TO MEASURE
BLOOD PRESSURE (IN SINGLE MODE)
HOW TO MEASURE
BLOOD PRESSURE (IN SINGLE MODE)
5. Push the START Button to start the
measurement.
1. Push the ON/OFF (power) Button to
turn on the power.
• Do not push the
START Button without
wrapping the cuff.
• If you want to stop
measurement, push
the STOP Button. The
cuff will rapidly
deflate.
6. The measurement results are
displayed.
2. Set the MODE Selector to "SINGLE".
• While the battery pack is in use, the
monitor will turn off automatically after
five minutes of inactivity and the display
(measurement results) will disappear.
(Automatic Power Off)
7. Push the ON/OFF (power) Button to
turn off the power.
3. Set the P-SET (inflation level) Knob
to "AUTO" or to the target pressure
value.
4. Measure the patient’s arm size, and
wrap appropriate cuff over the
patient's arm. (Refer to Pages 14
and 15.)
If the monitor determines that the pressure value is not correct,
an error display appears (Er1 to 9). In this case, refer to Page
28 and start the measurement again.
20
21
HEM-907
10/23/03
3:13 PM
Page 22
HOW TO MEASURE
BLOOD PRESSURE (IN AVERAGE MODE)
HOW TO MEASURE
BLOOD PRESSURE (IN AVERAGE MODE)
5. Push the START Button to start the
measurement.
1. Push the ON/OFF (power) Button to
turn on the power.
After the pre-select waiting time, the unit
takes the 1st measurement.
After displaying the results of 1st
measurement, subsequent measures occur
automatically at the specified intervals.
2. Set the MODE Selector to "AVG".
The factory-set values are set as follows:
• Number of measurements: 2
• Waiting time until the 1st measurement: 0 sec.
• Interval: 1 min.
To change these factory-set values, refer to
Page 13.
• For setting the number of measurements,
the waiting time until the 1st measurement,
and the interval, refer to Page 13.
• If you want to stop measurement, push the
STOP Button. The unit will rapidly deflate.
• If an error occurs during measurement, the
monitor will automatically start measurement
again. If a second error occurs, measurement
will automatically stop.
• Do not push the START Button without
wrapping the cuff.
6. The measurement results are displayed.
After all the measurements are finished,
average values will be displayed.
Each time the DEFLATION (deflation control)
/ Measurement Result Display Switch Button
is pushed, the measurement results for each
reading and the average value will be displayed.
3. Set the P-SET (inflation level setting)
Knob to "AUTO" or the target
pressure value.
• While the battery is in use, the monitor will
turn off after five minutes of inactivity and
the display (measurement results) will
disappear. (Automatic Power Off)
7. Push the ON/OFF (power) Button to
turn off the power.
4. Measure the patient’s arm size and
wrap appropriate cuff over the
patient's arm. (Refer to Pages 14
and 15.)
If the monitor determines that the pressure
value is not correct, an error display appears
(Er1 to 9). In this case, refer to Page 28 and
start the measurement again.
22
23
HEM-907
10/23/03
3:13 PM
Page 24
HOW TO MEASURE
BLOOD PRESSURE (IN MANUAL MODE)
HOW TO MEASURE
BLOOD PRESSURE (IN MANUAL MODE)
5. Place the stethoscope on the
patient's arm.
1. Push the ON/OFF (power) Button to
turn on the power.
6. Push the START Button to start the
measurement.
• Do not push the START Button without
wrapping the cuff.
• Do not squeeze or press the cuff during
the measurement.
• If you want to inflate again after the start
of deflation, push the START Button.
• If you want to accelerate deflation after the
start of deflation, push the DEFLATION
(deflation control) / Measurement Results
Display Switch Button. Each time the
Button is pushed, cuff is deflated rapidly in
increments of 5 to 10 mmHg.
2. Set the MODE Selector to "MANU".
7. Take the readings.
8. Push the STOP Button to remove air
inside the cuff.
3. Set the P-SET (inflation level setting)
Knob to "AUTO" or the target
pressure value.
• The unit does not automatically deflate in
the MANU Mode.
9. Push the ON/OFF (power) Button to
turn off the power.
4. Measure the patient’s arm size and
wrap appropriate cuff over the
patient's arm. (Refer to pages 14
and 15.)
If the monitor determines that the pressure
value is not correct, an error display appears
(Er1 to 9). In this case, refer to Page 28 and
start the measurement again.
24
25
HEM-907
10/23/03
3:13 PM
Page 26
HOW TO CHECK
PRESSURE ACCURACY (IN CHECK MODE)
Accuracy of pressure display can be checked in the CHECK Mode.
What you need to prepare
(1) Calibrated mercury manometer (including inflation bulb), (2) T-tube, (3) two air tubes, and (4)
a sturdy cylindrical shaped object on which the cuff is wrapped.
HOW TO CLEAN THE UNIT AFTER USE
General advice
When cleaning this unit, unplug the AC
adapter from the electric outlet.
• Do not clean this unit with gasoline, paint thinner, or
high concentration alcohol.
After cleaning this unit, dry it well, before
plugging the AC adapter in the electric outlet.
• Do not disinfect this unit by autoclave or gas sterilization (EtO, gluteraldehyde, or high concentration
ozone.)
HOW
TO
CLEAN
THE
UNIT
AFTER
USE
1. Wipe the monitor with a soft, damp cloth diluted with disinfectant alcohol, or
diluted detergent.
2. Complete cleaning by wiping the monitor with a soft, dry cloth.
How to check
1. Connect the manometer,
inflation bulb, cuff, and the
monitor with the T-tube as
shown in the figure on
the right.
XL
2. Tightly wrap the cuff over a
sturdy cylinder.
3. Release the valve of inflation
bulb to remove the air inside
the cuff completely.
4. Push the ON/OFF (power) Button to turn on the monitor.
5. Set the MODE Selector to “CHECK”.
6. Close the valve of inflation bulb and inflate the cuff to the
pressure to be checked, based on the manometer read.
7. Compare the pressure values displayed on the monitor to
the one on the manometer.
Check result
Accuracy of the monitor is validated to be ±3 mmHg or 2% of standard manometer reading. If your
result shows a difference exceeding the tolerance, contact Omron repair department (1-877-216-1336).
26
27
HEM-907
10/23/03
3:13 PM
Page 28
LIST OF ERROR CODES
Error code
Explanation
How to correct
Inflation error
• When the pressure does not exceed 12
mmHg within the set time after the start of
inflation
• When the inflation does not reach the set
cuff pressure within the specified time
after the start of inflation
• Confirm that the air tube connecting the cuff and
the main unit is connected securely.
Deflation error
• When the deflation speed is too fast during
the measurement
• When the deflation speed is too slow
during the measurement
• When the measurement does not finish
within the specified time after starting the
measurement
• Confirm that the cuff is wrapped correctly (refer
to pages 14 and 15).
• Check bladder for leaks and, if necessary,
replace the bladder with new one (option).
• Confirm that air flow in the air tube connecting
the cuff and the main unit isn’t being restricted.
Insufficient inflation error
• Blood pressure could not be measured
due to insufficient inflation level.
• If the measurement is made by setting the P-SET
to "AUTO", ask the patient not to move during
the inflation.
• Confirm that the P-SET is securely set to
"AUTO". Turn the Knob counterclockwise as far
as it goes until you can hear a click sound.
• If the measurement is made by manual inflation
level setting, set the value to 30 to 40 mmHg
higher.
Low pulse level error
• Pulse wave was too small.
• Confirm that the cuff is wrapped correctly (refer
to pages 14 and 15).
• Confirm that the cuff is wrapped correctly (refer
to pages 14 and 15).
Blood pressure error
• Relationship between systolic and diastolic pressures was abnormal.
Pulse rate error
• Pulse rate did not stay within the range of
30 to 199 beats/min.
Device error
• Main unit malfunction.
• Ask the patient not to move during the measurement.
• Check the patient for arrhythmia.
• Contact Omron’s repair department toll-free at
(1-877-216-1336).
28
If the unit malfunctions during use, please check the following:
Trouble
• Confirm that the air flow in the air tube
connecting the cuff and the main unit isn’t
being restricted.
Overpressure error
• The cuff pressure exceeded 299 mmHg.
Indeterminable blood pressure error
• Blood pressure could not be measured
even when the cuff pressure reached the
specified pressure.
TROUBLESHOOTING
The unit inflates to
abnormally high (low)
pressure.
The monitor cannot
measure blood
pressure.
What to inspect
How to correct
Is the cuff wrapped correctly?
Wrap the cuff correctly, and
measure again.
(Refer to Page 14 and 15.)
Is the patient moving during
inflation?
Ask the patient not to move
during measurement, and
measure again.
Does this patient have arrhythmia?
Set the P-SET to 30 to 40 mmHg
higher than estimated systolic
pressure of the patient, then
measure.
Check the patient's condition.
After checking the patient with
the stethoscope refer to the "list
of error codes".
(Refer to Page 28.)
Is the patient moving during the
measurement?
Ask the patient not to move
during measurement, and
measure again.
Does the patient have an
arrhythmia?
Set the P-SET to 30 to 40 mmHg
higher than estimated systolic
pressure of the patient, then
measure.
Is the size of the cuff correct and
is it wrapped correctly?
Select the cuff according to the
patient's arm circumference, wrap
it correctly, then measure again.
(Refer to Pages 14 and 15.)
Measured values are
abnormally high (low).
Is the level of the brachium to
which the cuff is wrapped at the
same level as the heart?
Keep the level of the brachium to
which the cuff is wrapped at the
same level as the heart, then
measure again.
Are the patient’s clothes restricting
normal blood flow to the arm?
Remove the clothing and
measure again.
29
HEM-907
10/23/03
3:13 PM
Page 30
CAUTION
CAUTION:
Changes or modifications not expressly approved by Omron Healthcare, Inc. could void the user’s authority to
operate this product.
FIVE YEAR LIMITED WARRANTY
Your HEM-907XL IntelliSense™ Automatic Blood Pressure Monitor is warranted to be free from manufacturing defects for a period
of five years under normal use. The five year warranty excludes the monitor cuff. The cuff is warranted for a one year period. This
warranty extends only to the original retail purchaser.
Should repair be needed within the warranty period, ship the unit prepaid to Omron Healthcare, Inc., 300 Lakeview Parkway,
Vernon Hills, IL 60061, Attn: Service Dept., together with $5.00 for return shipping and insurance. Be sure to include the model
number of your unit and your phone number on any correspondence.
NOTE:
POTENTIAL FOR RADIO/TELEVISION INTERFERENCE (for U.S.A. only)
This product has been tested and found to comply with the limits for a Class B digital device, pursuant to part 15 of the
FCC rules.
These limits are designed to provide reasonable protection against harmful interference in a residential installation. The
product generates, uses, and can radiate radio frequency energy and, if not installed and used in accordance with the
instructions, may cause harmful interference to radio communications. However, there is no guarantee that interference
will not occur in a particular installation. If the product does cause harmful interference to radio or television reception,
which can be determined by turning the product on and off, the user is encouraged to try to correct the interference by
one or more of the following measures:
• Reorient or relocate the receiving antenna.
• Increase the separation between the product and receiver.
• Connect the product into an outlet on a circuit different from that to which the receiver is connected.
• Consult the dealer or an experienced radio/TV technician for help.
POTENTIAL FOR RADIO/TELEVISION INTERFERENCE (for Canada only)
This digital apparatus does not exceed the Class B limits for radio noise emissions from digital apparatus as set out in
the interference-causing equipment standard entitled "Digital Apparatus", ICES-003 of the Canadian Department of
Communications.
Cet appareil numérique respecte les limites de bruits radioeléctriques applicables aux appareils numériques de Classe
B prescrites dans la norme sur le matériel brouilleur: "Appareils Numériques", NMB-003 èdictée par le ministre des
communications.
We will either repair or replace (at our option) free of charge any parts necessary to correct defects in the materials or workmanship.
The above warranty is complete and exclusive. The warrantor expressly disclaims liability for incidental, special, or consequential
damages of any nature. (Some states do not allow the exclusion or limitation of incidental or consequential damages, so the above
warranty may not apply to you.)
Any implied warranties arising by the operation of law shall be limited in duration to the term of this warranty. (Some states do not
allow limitations on how long an implied warranty lasts, so the above limitation may not apply to you.)
This warranty gives you specific legal rights, and you may have other rights which vary from state to state. As a condition to operation
of your warranty, the enclosed registration card must be completed and sent to us within 10 days from the date of purchase.
FOR CUSTOMER SERVICE CALL TOLL FREE:
1-877-216-1336
SPECIFICATIONS
Name:
Model:
Display:
Measurement:
Measurement Range:
Accuracy:
Medical Equipment with respect to electric shock, fire and
mechanical hazards only in accordance with UL 2601-1 and
CAN/CSA C22.2 No. 601.1
Inflation:
Deflation:
Air Release:
Pressure Detection:
Power supply:
Electric Shock Protection Method:
Operating Temperature and Humidity:
Weight of Main Unit:
External Dimensions:
Accessories:
Options:
OMRON Digital Automatic Blood Pressure Monitor
HEM-907XL
Digital display
Oscillometric method
Pressure; 0 to 299 mmHg
Pulse rate; 30 to 199 beats/min
Pressure; Within ±3 mmHg or 2%
Pulse rate; Within ±5% of reading
Automatic inflation with pumping
Automatic deflation by electromagnetic control valve
Automatic rapid air release by electromagnetic control valve
Electrostatic capacity semi-conductor pressure sensor
AC adapter (120 VAC, 60 Hz, 20 VA) or
Battery pack (4.8 VDC, 6W)
Class II B type
50°F to 104°F (10 to 40°C), 30 to 85% RH, IPX 0 Rating
Approx. 32 oz (910 g)
Approx.5 1/2" (W) x 8"(H) x 5 1/6"(D)
139 (W) x 203 (H) x 131 (D) mm
Cuff / bladder set Extra Large, Cuff / bladder set Large, Cuff / bladder set Medium,
Cuff / bladder set Small,
AC adapter, Battery pack, air tube (1.0 m), Instruction Manual (with guarantee card)
Cuff Extra Large (without bladder), cuff Large (without bladder), cuff Medium
(without bladder), cuff Small (without bladder), Bladder Extra Large, bladder Large,
bladder Medium, bladder Small, air tube 1.3 m (51 1/6"),
Stand exclusive for this unit, wall-hanging kit, pole-mounting kit
* Please note that specifications may be changed without prior notice.
30
31
HEM-907
10/23/03
3:13 PM
Page 32
For Customer Service
Call Toll Free
1-877-216-1336
Manufactured by OMRON
Distributed by:
OMRON HEALTHCARE, INC.
300 Lakeview Parkway
Vernon Hills, Illinois 60061
www.omronhealthcare.com
Copyright © 2003 OMRON HEALTHCARE, INC.
HEM-907XLINST Rev A