1
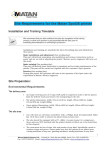
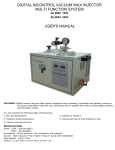
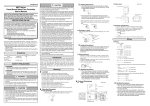
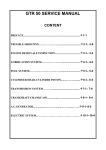
ENGLISH (M5)-5 9/18/02 3:20 PM Page 1
Instruction Manual
AUTOMATIC BLOOD
PRESSURE MONITOR
Model M5
ENGLISH (M5)-5 9/18/02 3:20 PM Page 2
Table of Contents
page
Know Your Unit . . . . . . . . . . . . . . . . . . . . . . . . . . . . . . . . . . . . . . . . . . . . . . . . . . .3
Battery Installation / Replacement . . . . . . . . . . . . . . . . . . . . . . . . . . . . . . . . . . . .3
Care and Maintenance . . . . . . . . . . . . . . . . . . . . . . . . . . . . . . . . . . . . . . . . . . . . .4
How to Use the AC Adapter . . . . . . . . . . . . . . . . . . . . . . . . . . . . . . . . . . . . . . . . .4
About Blood Pressure . . . . . . . . . . . . . . . . . . . . . . . . . . . . . . . . . . . . . . . . . . . . .5
Before Measurement . . . . . . . . . . . . . . . . . . . . . . . . . . . . . . . . . . . . . . . . . . . . . .6
How to Apply the Arm Cuff . . . . . . . . . . . . . . . . . . . . . . . . . . . . . . . . . . . . . . . . . .7
How to Take a Reading . . . . . . . . . . . . . . . . . . . . . . . . . . . . . . . . . . . . . . . . . . . .8
How To Use the Memory Function . . . . . . . . . . . . . . . . . . . . . . . . . . . . . . . . . . . .9
Error Indicators . . . . . . . . . . . . . . . . . . . . . . . . . . . . . . . . . . . . . . . . . . . . . . . . . .10
Specifications . . . . . . . . . . . . . . . . . . . . . . . . . . . . . . . . . . . . . . . . . . . . . . . . . . .11
Introduction
Thank you for purchasing the Omron M5 Automatic Blood Pressure Monitor. This
completely automatic instrument quickly measures your blood pressure and pulse
rate and displays them on an extra large digital panel.
Your new M5 uses the oscillometric method of blood pressure measurement. This
means the monitor detects your blood’s movement through your brachial artery and
converts the movements into a digital reading. An oscillometric monitor does not
need a stethoscope so the monitor is simple to use. The cuff fills with air at the push
of a button and automatically deflates when the measurement is complete. Error indicators alert you to incorrect procedures and an automatic power-off function conserves the batteries:
Please read this instruction manual thoroughly before using the
Omron M5 Automatic Blood Pressure Monitor.
For specific information on your own blood pressure, CONTACT
YOUR DOCTOR
2
ENGLISH (M5)-5 9/18/02 3:20 PM Page 3
Know Your Unit
Systolic Blood Pressure
Display
AC Adapter
Jack
Diastolic Blood Pressure
/Pulse Display
Air Jack
ON/OFF Button
Air Plug
START Button
MEMORY Button
Arm Cuff
Cuff Tube
Battery Installation / Replacement
1. Slide the battery cover off in the
direction of the arrow.
2. Install or replace four “AA” size
batteries so + (positive) and (negative) polarities match the
polarities of the battery compartment as indicated.
3. Replace the battery cover.
Note:
• If the Low Battery Indicator appears on the display,
replace all four batteries. Long-life alkaline batteries
are recommended.
• Remove the batteries if the monitor will not be used for
an extended period of time.
3
Low Battery
Indicator Display
ENGLISH (M5)-5 9/18/02 3:20 PM Page 4
Care and Maintenance
To protect your monitor from damage, please observe the following:
Do not subject your monitor to extreme temperatures, humidity,
or direct sunlight.
Do not fold the cuff and tubing tightly.
Do not inflate the monitor over 280 mmHg.
Do not disassemble the monitor.
Do not subject the monitor to strong shocks, such as dropping it on the floor.
Do not clean the monitor with volatile liquids.
THE MONITOR SHOULD BE CLEANED WITH A SOFT, DRY CLOTH ONLY.
How to Use the Optional AC Adaptor
(Accessory Item Sold Separately)
1. When using AC power, use only the exclusive AC adapter that can be purchased from
Omron dealers.
2. Insert the AC adapter cord into the jack on the right side of the monitor.
Actual adapter may
look different from
picture shown here.
3. Insert the AC adapter plug into the outlet.
4. To remove the AC adapter, disconnect the adapter plug from the AC outlet first and then
disconnect the cord from the monitor’s jack. To avoid possible damage to the monitor, use
only the exclusive AC adapter specified by Omron dealers. Other adapters may vary in output voltage and polarities.
Note: The monitor is designed not to draw power from the batteries when the AC adapter is in use.
4
ENGLISH (M5)-5 9/18/02 3:20 PM Page 5
About Blood Pressure
The World Health Organization (WHO) and International Society of Hypertension
(ISH) jointly developed the following Blood Pressure Classification. This classification, however, is only a general guidline because your optimum blood preesure
depends on your age, morbidity, and treatment strategy by doctor. CONSULT
YOUR DOCTOR TO DETERMINE YOUR OPTIMUM BLOOD PRESSURE.
WHO - ISH Blood Pressure Classification
Diastolic 110
mmHg
100
Grade 3 Hypertension
Grade 2 Hypertension
Grade 1 Hypertension
90
High Normal
85
80
Normal
Optimal
120 130 140 160 180
Optimum
Normal
High-Normal
Grade 1 Hypertension
Grade 2 Hypertension
Grade 3 Hypertension
Systolic
mmHg
Systolic (mmHg)
Diastolic (mmHg)
< 120
< 130
130 -139
140 -159
160 - 179
> 180
< 80
< 85
85 - 89
90 - 99
100 - 109
> 110
•
For further information about the WHO-ISH classification,
www.oms.ch/ncd/cvd/HT-Guide.html
•
There is not a universally accepted definition of hypotension ( low blood
preesure), but a systolic preasure below 100mmHg is usually regarded
as hypotension.
5
ENGLISH (M5)-5 9/18/02 3:20 PM Page 6
Before Measurement
1. Avoid eating, smoking, and exercising for at least 30 minutes before taking
a measurement. Also rest for at least 15 minutes before taking your
first reading.
2. Stress raises blood pressure. Avoid taking measurements during
stressful times.
3. Remove tight-fitting clothing from your left upper arm.
4. Measurement should be taken in a quiet
place and you should be in a relaxed, seated
position. Rest your left arm on the arm of a
chair or on a table so that the cuff is at the
same level as your heart.
5. Remain still and do not talk during the measurement.
6
ENGLISH (M5)-5 9/18/02 3:20 PM Page 7
How to Apply the Arm Cuff
1.
2.
If the cuff is assembled correctly, the sewn
hook material will be on the outside of the cuff
loop and the metal D-ring will not touch your skin.
Pass the end of the cuff furthest from the
tubing through the metal D-ring to form a loop.
The smooth cloth should be on the inside of
the cuff loop.
Pile Side Material
Sewn Hook Material
Smooth Cloth
D-Ring
3.
Put your left arm through the cuff loop. The
bottom of the cuff should be approximately 1/2
inch above the elbow. The green artery marker
on the cuff should lie over the brachial artery
on the inside of the arm. Tube should run down
center of arm even with the middle finger.
Bottom Edge
1/2 inch
Cuff Tube
Artery Marker
4.
Pull the cuff so that the top and bottom edges
are tightened evenly around your arm.
5.
When the cuff is positioned correctly, press the
sewn hook material FIRMLY against the pile
side of the cuff.
6.
Make certain the cuff fits snugly around your arm.
The cuff should make good contact with your skin.
7.
Sit in a chair with your feet flat on the floor and
place your arm on a table so that the cuff is at
the same level as your heart.
8.
Relax your arm and turn your palm upward.
9.
Be sure there are no kinks in the air tubing.
NOTE: If the circumference around your arm is greater than 32 cm you will need to use a large adult
size cuff. The large adult cuff is an accessory item and it is sold separately. You may purchase this cuff by
calling Omron representative or dealers.
7
ENGLISH (M5)-5 9/18/02 3:20 PM Page 8
How to Take a Reading
Be sure to read “Before Measurement” and “How to Apply the Arm Cuff” before
taking a reading.
1. Press the ON/OFF button.
a) All display symbols appear for approximately one
second. This is the initial LCD test.
b) The display symbols disappear and the Deflation
Indication symbol (
) starts to flash.
c) When the monitor completes the necessary preparations before measurement, the Heart symbol ( )
appears in the screen.
NOTE: Wait for the Heart symbol (
surement.
Initial LCD Test
) before taking a meaDeflation Indication
2. By pressing the START button the unit automatically
inflates the cuff to 170 mmHg.
a) If during your measurement the monitor determines
that a higher pressure value is required, it will
momentarily stop deflation and automatically
increase the pressure value by 40 mmHg.
Ready to Measure
b) To set inflation level manually higher than 170 mmHg,
press and hold the START button until the desired
pressure value is reached. Do not inflate higher than
280 mmHg.
3. When the correct pressure value is reached, the cuff
starts to deflate automatically. As the cuff deflates,
decreasing numbers appear on the display. The Heart
symbol ( ) flashes at every heartbeat.
4. When the measurement is complete, the Heart symbol ( ) stops
flashing and your blood pressure
and pulse rate are displayed alternately. Results will be displayed
until you turn the unit off. The unit
will automatically shut off in approximately 5 minutes.
Indicated
Value Drops
Blood Pressure
Reading Display
Measuring
Pulse Reading
Display
REMEMBER TO KEEP A RECORD OF YOUR BLOOD PRESSURE AND
PULSE MEASUREMENTS.
8
ENGLISH (M5)-5 9/18/02 3:20 PM Page 9
How To Use the Memory Function
This monitor has a memory capable of storing fourteen (14) sets of readings.
Every time you complete the measurement, the monitor automatically
stores blood pressure and pulse rate.
• Push the MEMORY button to recall stored readings while the Heart
Symbol ( ) is displayed.
• When fourteen (14) sets of readings are stored in memory, the oldest
set will be deleted to store a new set.
• To delete stored readings, press the MEMORY button and the START
button simultaneously, then all the readings will be deleted.
NOTE: You cannot delete the stored readings partially.
Keep pressing the MEMORY button
and the START button for 2 seconds.
9
ENGLISH (M5)-5 9/18/02 3:20 PM Page 10
Error Indicators
Error Symbol
Cause
Cuff under-inflated.
Movement during
measurement
No pulse or blood
pressure reading due to
very weak artery pulse.
Correction
Wait 2-3 minutes and
take another measurement.
Repeat steps listed under
“How to Take a Reading”
but manually inflate the cuff
40 mmHg higher than the
previous inflation value.
Cuff over-inflated
(more than 300 mmHg).
Carefully read and repeat
steps listed under “How to
Take a Reading.”
Batteries have run down.
Replace all four “AA”
batteries.
If you continue to experience difficulty obtaining a reading, contact your nearest
OMRON representative or dealer.
10
ENGLISH (M5)-5 9/18/02 3:20 PM Page 11
Specifications
Model:
M5
Display:
LCD Digital Display
Measurement Range:
Pressure: 0-280 mmHg,
Pulse: 40-180/minute
Accuracy:
Pressure: ±3 mmHg or 2% of the reading
Pulse: ±5% of reading
Inflation:
Automatic by electric pump
Deflation:
Automatic pressure release valve
Rapid Pressure Release:
Automatic exhaust valve
Pressure Detection:
Capacitance type pressure sensor
Measurement Method:
Oscillometric method
Pulse wave Detection:
Capacitance type pressure sensor
Power Source:
4 “AA” batteries, Optional AC Adaptor
Battery Life:
Approx. 300 uses when used once a day for
2 minutes
Operating Temperature/Humidity: 10˚C to 40˚C, 30-85% RH maximum
Storage Temperature/Humidity:
-20˚C to 60˚C, 10-95% RH maximum
Console Weight:
Approx. 430g (not including batteries)
Outer Dimensions:
Approx. 125mm (l) x 119mm (w) x 94mm (h)
Cuff Dimensions:
Approx. 140mm x 480mm
Arm Circumference:
(22cm - 32cm)
Accessories:
Cuff, Instruction manual
Optional Large Cuff:
For arm circumference 32 to 38cm.
NOTE: These specifications are subject to change without notice.
11
ENGLISH (M5)-5 9/18/02 3:20 PM Page 12
Product of OMRON Corporation, Japan
OMRON HEALTHCARE SINGAPORE PTE LTD.
83 Clemenceau Avenue
#11-01, UE Square
Singapore 239920