1
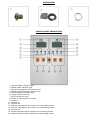
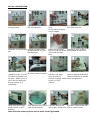
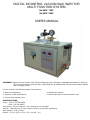
DIGITAL INCONTROL VACUUM WAX INJECTOR
MULTI FUNCTION SYSTEM
No.0662 120V
No.0663 240V
USER'S MANUAL
FEATURES: Digital lncontrol-Vacuum Wax injector Designed inject consistent, repeatable wax patterns, draws air
out of the mold before inject the wax, eliminating the air bubbles and voids all cause pattern defects,
and shrinkage increas.
You are incontrol the following steps of the process:
1. Wax pot temperature.
4. Applied air pressure.
2. Injection nozzle temperature.
5. Counts each day of total production rate.
3. Vacuum and injection time.
SPECIFICATIONS:
Power:120V / 10A (No.0662)
240V / 5A (No.0663)
Air pressure:30 psi maximum (Air compressor not supplied)
Vacuum:High vacuum 27 Hg or higher (Vacuum pump order separately)
Wax capacity:6 lbs (2.7kg)
Overall:22-1/4 "(W) x 14-1/4 "(D) x 16-3/8 " (H)
Machine weight:51lbs (23kgs)
Shipping weight:57lbs (26Kgs)
NOTE: For better performance, usd No.0449 oil-type vacuum pump for No.0662 injector;No.0450 vacuum pump for
No.0663 injector.
No.0662 120V
No.0663 240V
Parts No.
Parts Description
1
0596-028
Compressed air inlet barb 120V
2
0660-003
Air pressure control valve (regulator)
3
0596-023
Air pressure indicator gauge
4
0660-008
Long nipple
0596-002
Safety & pressure release valve for wax
pot
5
6
0590-015
Cover lid hold-dawn nuts (2)
7
0660-010
Wax Pot Cover Lid
8
0660-011
Stainless steel inner lid
9
0590-007
"O" Ring G165
10
0660-012
Wax pot
11
0590-008
Band heater for wax pot 800W 120V
12
0660-114
Brass filter screw
13
0660-113
Brass filter for wax
14
0660-121
E-Type ring stopper
15
0660-023B-2
"O" Ring G25
16
0660-023B
Solenoid valve assy
17
0662-003
Thermocouple
18
0660-022
Three way block
19
0660-034
Injection nozzle
20
0660-034-1
Rubber ring
21
0660-035
Pipe heater f/nozzle (120V)
22
0660-095
Vacuum chamber air release valve
23
0660-093
Vacuum gauge
24
0660-094
Four way fitting
25
0625-035
Vacuum chamber air outlet barb
26
0660-005
Fitting
27
0610-01-2104
"O" RingP14
28
0660-092
Cover lid nuts (2) for vacuum chamber
29
0660-085
Acrylic lid-vacuum chamber
30
0660-084
"O" Ring G100
31
0660-090
Filter (Stainless steel)
32
0473-003
Vacuum chamber wax drain valve (Rocker
handle)
33
0660-061
Fitting union for vacuum pot
34
0660-088
Band heater for fitting union 60W
120V
35
0660-083
Vacuum pot
36
0660-082
Band heater for vacuum pot 50W 120V
37
0662-002
PC board
38
0662-004
PVC sheet
39
0660-112
Connector (3pins)
40
0590-028
Vacuum chamber heater switch
41
0660-101
Handle
42
0590-011
Wax pot drain cock
43
YLC-004
Main power line cord 120V
44
0660-086
Wax pot heater fuse (120V / 10A)
45
0660-110
Fuse holder
46
0660-112
Connector (3pins)
47
0660-065
Foot pad switch socket (2pins)
48
0660-063
Main power switch
49
0660-085
Acrylic lid-vacuum chamber
50
0660-102
6 pins terminal
51
0660-060
Transformer
52
1298-014
Rubber foot
Parts No.
Parts Description
1
0610-071
Compressed air inlet barb 240V
2
0660-003
Air pressure control valve (regulator)
3
0596-023
Air pressure indicator gauge
4
0660-008
Long nipple
5
0596-002
Safety & pressure release valve for wax pot
6
0590-015
Cover lid hold-dawn nuts (2)
7
0660-010
Wax Pot Cover Lid
8
0660-011
Stainless steel inner lid
9
0590-007
"O" Ring G165
10
0660-012
Wax pot
11
0591-008
Band heater for wax pot 800W 240V
12
0660-114
Brass filter screw
13
0660-113
Brass filter for wax
14
0660-121
E-Type ring stopper
15
0660-023B-2
"O" Ring G25
16
0660-023B
Solenoid valve assy
17
0662-003
Thermocouple
18
0660-022
Three way block
19
0660-034
Injection nozzle
20
0660-034-1
Rubber ring
21
0661-035
Pipe heater f/nozzle (240V)
22
0660-095
Vacuum chamber air release valve
23
0660-093
Vacuum gauge
24
0660-094
Four way fitting
25
0625-035
Vacuum chamber air outlet barb
26
0660-005
Fitting
27
0610-01-21-04
“O” RingP14
28
0660-092
Cover lid nuts (2) for vacuum chamber
29
0660-085
Acrylic lid-vacuum chamber
30
0660-084
“O” Ring G100
31
0660-090
Filter (Stainless steel)
32
0473-003
Vacuum chamber wax drain valve (Rocker
handle)
33
0660-061
Fitting union for vacuum pot
34
0661-088
Band heater for fitting union 60W 240V
35
0660-083
Vacuum pot
36
0661-082
Band heater for vacuum pot 50W 240V
37
0662-002
PC board
38
0662-004
PVC sheet
39
0660-112
Connector (3pins)
40
0590-028
Vacuum chamber heater switch
41
0660-101
Handle
42
0590-011
Wax pot drain cock
43
YLC-004
Main power line cord 240V
44
0661-086
Wax pot heater fuse (240V / 5A)
45
0660-110
Fuse holder
46
0660-112
Connector (3pins)
47
0660-065
Foot pad switch socket (2pins)
48
0660-063
Main power switch
49
0660-085
Acrylic lid-vacuum chamber
50
0660-102
6 pins terminal
51
0660-060
Transformer
52
1298-014
Rubber foot
No.0660-023B
No.0660-023B
1
2
3
4
5
6
0660-023B-4
0660-023B-3
0660-023B-5
0660-023B-1
0660-023B-6
0660-049B
Silicon rubber pad
C-type clamp
Brass washer
"O" Ring P5
Three way block lid
Solenoid valve
1
2
3
4
5
6
0660-023B-4
0660-023B-3
0660-023B-5
0660-023B-1
0660-023B-6
0660-049B
PARTS NAME
1.Compress air inlet barb.
2.Air pressure regulator.
3.Safety & preesure release valve.
4.Pressure gauge.
5.Serew nuts(2) for wax pot.
6.Lid.
7.Vacuum gauge.
8.Win nuts (2) for vacuum chamber.
9.Lid for vacuum chamber.
10.Control pane(1) panel.
11.Injection nozzle.
12.Vacuum release valve.
13.Vacuum outlet barb.
14.Wax drain cock.
15.Main power line cord.
16.Main power fuse(10A).
17.Connector for No.0634/0635 TECHTROL PRO.
18.Foot pad switch.
19.Main power switch.
20.Wax drain valve for vacuum chamber.
21 Heat. switch for wax drain.
Silicon rubber pad
C-type clamp
Brass washer
"O" Ring P5
Three way block lid
Solenoid valve
ACCESSORIES
CONTROL PANEL INSTRUCTION
1. Wax pot heater indicator light.
2. Nozzle heater indicator light.
3. Wax pot temperature and vacuum time.
4. Nozzle temperature and injection time.
5. Set temperature indicator light.
6. Single injection time set.
7. Multi injection time set.
8. Single or multi injection set light.
9. Power on.
10. Vacuum on.
11. Injection on.
12. Wax pot temperature and vacuum time increasing button.
13. Wax pot temperature and vacuum time decreasing button.
14. Function set.
15. Nozzle temperature and injection time increasing button.
16. Nozzle temperature and injection time decreasing button.
SET-UP INSTRUCTION
Place machine on a
working bench.
Connect foot pad switch to Close NO.14 wax drain
NO. 18 connector.
cock
for the wax pot before
wax is heated.
Loosing NO.5 screw nuts
from lid of wax pot.
Open NO. 6 lid from wax Unpack wax drain filter
(accessories No. 1) from
pot.
the Wax tank.
Insert the wax drain
Connect air hose to NO.1
filter into the wax drain compressed air inlet barb
hole inside the wax
tank.
Connect the other end of
Connect PU hose
(accessories No. 3 to NO. PU hose to vacuum pump
13)Vacuum chamber out
let barb.(Make sure it is
tie fit and no leaking air
during vacuum is in
processing.)
Close NO.20 Vacuum
Check both NO.9 lid of
chamber wax drain
vacuum chamber and NO.12
valve and NO.21
Vacuum chamber air release
Vacuum chamber heater valve are tightened.
switch is in"OFF"
position.
Make sure NO.19 main
power switch in "OFF"
position.
Fill in waxes to the full line Close the wax pot lid
Plug NO.15 Main power line
with 2 NO.5 screw nuts cord to power source.
mark inside wax pot.
Note: Elecrical outlet of power source must be well grounded.
1) SET WORKING TEMPERATURE FOR WAX POT AND INJECTION NOZZLE
Switch NO.19 power on.
Both NO.3 indicate wax pot
temperature (It shows present temp.)
NO.4 indicate nozzle temperature (It
shows present temp.) NO.12NO.9
lights are brinking at same.
Press NO.14 button (once) one
time, NO.5 light will on and same
time both NO.34 display will shows
"72.5" (Factory set temperature).
Wax pot temp set by pressing
NO.12 button for increasing up
and NO.13 button for decreasing
to your desire set temperature
will show on NO.3 dispay.
Nozzle temp set by pressing NO.15
button for increasing up temp and
NO.16 button for decreasing temp to
your desire set temperature.
Stop and waite for 10 seconds the
both NO.3 and NO.4 will shows
present temperature and NO.9
lights (shows power on) will on.
Remark:
1.When heating both wax pot and nozzle temp and both NO. 1 and NO. 2 indicate lights will be
on.
2.Your desire set temp please confirm the correct temperature with your wax supplier for best
use with WW DIVWI.
(2) SET VACUUM AND INJECTION TIME
Pressing NO.14 button
TWICE and NO.6 lights
will on NO.34 will show
002 (factory set time).
Set vacuum time: pressing Set injection time:
pressing NO.15 to
NO.12 to increasing and
NO.13 to decreasing set to increasing and NO.16 to
your desire vacuum time as decreasing set to your
show on NO.3 display 003 desire injection time-as
Stop and waite for 10
seconds the NO.9 light will
on and NO.34 will shows
continue of wax pot and
injection nozzle
for 3 seconds. 004 for 4
seconds and on or down.
show on NO.4 display
004 for 4 seconds, 005
for 5 seconds and on or
down.
temperatures.
Remarks:
1.Both vacuum and injection time can set from 1 second to 990 seconds working time.
2.Injection time must be set from one second and up. Do not set at 0 second and the
machine will not founction.
(3) YOU ARE READY TO WORK!!
1.Make sure wax has fully melted and ready to work.
2.Increasing pressure by adjust the NO.2 air regulator to read NO.4 vacuum gauge to your desire
pressure.
(4) HOW TO READ DAILY PRODUCTION RATE COUNTER
Pressing NO.14 button 4 times NO.8 Pressing NO.16 one time and all
lights will on and same time both counter will show "0 000", now you
NO.3 and NO.4 display will shows
can start a day work.
"1 204" this is means there are
1204
injections been made.
You must set counter back "0
000" to start work, otherwise
all will start with factory set "1
204" when next power on.
(5) DOUBLE PRESSURES INJECTION FOUNCTION SET
Pressing NO.14 button 4 times and Pressing NO.13 once (one time)
NO.8
and NO.3 display will show 2 0 .
lights will be on. NO. 3 display will It is ready to work combined with
show
our NO.0634 120V / 0635 240V,
1 0 .
TECHTROL
PRO ROBUT CLAMP to work.
You may change back to single
injection work by pressing
NO.12 button one time. (NO.3
display will read 1 0 .
(6) SET DOUBLE PRESSURE INJECTION TIME
Pressing NO.14 button 3 times
and
NO.7 lights will on NO.4 display
will
shows "002" for 2 seconds.
Pressing NO.15 button to increasing
injection time as show 005 for 5 seconds
and you may increasing up to 990 seconds
for large big mold and decreasing by pressing
NO.16 button.
USEFUL GUIDELINES
1. Different waxes inject at different temperatures (actual injection temperature depends on the wax
being used).
2. Temperature of wax in tank and nozzle are significant and must be adjusted by experienced
operator and according to wax property and test result. The same is true of vacuum ant injection
time.
3. Keep molds clean and free of wax residues at all times.
4. Lubricate mold with very light application of mold release compound as required.
5. Air pressure very depending on the size, shape, and delicacy of a wax pattern and its mold. Such
information can be written on each mold as reference for later use.
6. From time to time wax pot should be drained and kept clean. Old contaminated wax should be
discarded and replaced. Do not re-use dirty or contaminated wax because this could cause nozzle
stoppage and poor fidelity in patterns.
7. If nozzle stoppage is caused by contaminated wax, wax pot has to be emptied and cleaned. Set
maximum air pressure and activate injection cycle several times to force out foreign objects that
might be jammed inside the nozzle.
8. Raising wax pot temperature 10~20°F above operating temperature for about one hour may speed
up the melting process of newly added wax.
9. Do not allow wax level to get below 2 lbs (1 kg), because low level of wax in tank could cause air
bubbles in wax pattern.
10. It is not necessary to shut down the unit everyday after work. Keep unit warmed up over night
will save you time and electricity.
11.Call service personnel, if you have problems that can not be resolved.
MAINTENANCE
1. Keep a minimum space distance of 8” from back and all sides of unit .
2. Turn off unit completely, if it is not going to be used within 24 hours.
3. Always release vacuum by loosening air release valve (12) before shutting off vacuum pump.
Otherwise, due to in balance of air pressure. wax can be sucked into vacuum pump and hence
damage the pump.
4. Vacuum pot has to be cleared regularly, at least once a day, to maintain the best performance of
the unit. Too much leftover wax in vacuum tank may disable vacuum cycle. To clean wax, turn on
Vacuum chamber heater switch (21) wait for wax to meet completely (about 10 min.) make sure
vacuum pump is off, and then open wax drain valve (14) to have wax drained out. Until wax
drained and close wax drain valve (14) and must to shut off heater switch(21).
5.If No.0449/0450 vacuum pump is used, change vacuum pump oil every three months.
CAUTIONS
For the safety of a person who operates the unit, the following safety guidelines have to be followed
and good judgement has to be utilized at all times.
1. Release air pressure, if the unit is not operated.
2. Do not remove cover lid with air pressure in wax pot.
3. Do not use bottled oxygen as air pressure supplier.
4. Electrical plug must be properly grounded at electrical outlet.
5. Do not use you hand to touch liquid wax in tank. Hot wax can cause painful burns.
6. Do not depress foot pad switch and activate injection process while not injecting wax patterns.
Spilled wax on body, especially on eyes and face, could cause serious injry.
7. Do not sit (or stand) right in front of injection nozzle to prevent from possible harm, particularly
while doing maintenance or troubleshooting the unit.
TROUBLESHOOTING
Problems
1.MACHINE DOES NOT OPERTE
Possible Causes
No power
Broken fuse
2.WAX POT NOT MELTING WAX
Solution
.Check
.Check
.Check
.Check
circuit breaker or fuse.
if unit is plugged in properly.
Main power fuse (16).
fuse (10Amp 250V) if necessary.
.Check Main power fuse (16).
.Replace fuse(10Amp 250V) if necessary.
Incorrect temperature .Check wax pot temperature (3).
Broken fuse
.Check Main power fuse (6).
.Change fuse (10Amp 250V) if necessary.
3.NOZZLE DOES NOT HEAT
Incorrect temperature .Check injection nozzle temperature (3).
4.VACUUM PUMP DOES NOT
OPERATE
No power
Vacuum pump not
working
Air leakage
5.UNIT HAS NO VACUUM
Too much wax in
vacuum chamber
6.UNIT VACUUMS BUT CAN NOT
INJECT WAX
.Check if vacuum pump is plugged in socket
properly.
.Use another vacuum pump.
.Check that vacuum release valve (12) is shut.
.Check if vacuum chamber O-ring is properly
sealed.
.Check vacuum hose connection for tightness.
.Check if there is too much wax left in the
vacuum chamber and needs to be cleaned.
Incorrect injection time .Check Nozzle injection time.
.Check wax in pot. If not melted, raise
Wax in pot not melted temperature slightly. Allow enough time for wax
to melt. Also refer to the solution of problem 2.
Injection nozzle not
heated
.Refer to the solution of problem 3.
.Check air pressure indicator gauge (4) for
Air pressure in wax pot correctness. Adjust air pressure control (2) to
desired pressure.
is too small
.Check all air hoses and connection for leakage.