1
More...
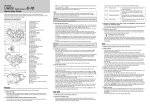
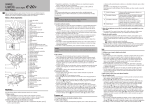
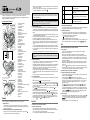
1 The flash mode button
and record mode button
camera, just above the control panel.
Important Points to Remember
2 To restore the default settings, press and hold down the flash mode button
and the record mode button together.
• If the camera is left with the power on and not used for a specified amount of time (1 minute
unless you have changed this setting), it will enter the sleep mode and automatically switch
off the control panel and other displays to conserve battery power. To restore the camera to
normal operation, half-press the shutter button, or turn the zoom ring one position left or
right and then back to its original position.
• If the camera remains idle in the sleep mode for 1 hour, it will switch itself off automatically.
To restsore full operation, you must move the power switch to the OFF position and then
back to the ON position.
• To conserve battery power, we recommend that you purchase an optional Olympus
CAMEDIA-brand AC adapter and use it for long shooting sessions indoors. The camera
never enters the sleep mode while the AC adapter is connected to the camera and a power
outlet. You can power the camera with the AC adapter without removing the batteries.
• The amount of data required to store a picture depends on the subject, so you may be able to
store more or fewer images on a card. Because of this difference in size, you may not be able to
store another picture, even after you delete one image from the card with single- frame delete.
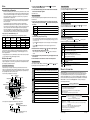
Storage capacity of a 16MB and 32MB memory card
The numbers of images per 16MB and 32MB memory are only approximate estimations.
Quality
RAW*
TIFF
SHQ
HQ
SQ
Images per Card (Reference value)
Resolution (pixels)
Compression
File Size
(Default settings)
(Default settings)
(Reference value)
2560 x 1920 (FULL) 1:1 (not compressed)
2560 x 1920 (FULL) 1:1 (not compressed)
2560 x 1920 (FULL)
1:2.7
2560 x 1920 (FULL)
1:8
1280 x 960 (SXGA)
1:8
10
15
3.9
1.5
320
MB
MB
MB
MB
KB
16 MB
1
1
4
10
49
shot
shot
shots
shots
shots
32 MB
3
2
8
21
99
shots
shots
shots
shots
shots
are on top of the
Playback Mode Menu
Four menus are provided: Shooting Mode, Playback Mode, Print Reserve Mode, and Setup/
Connection Mode.
1 To open a menu, set the mode dial on top of the camera to the appropriate
setting, and then press the menu button
in the center of the back panel of
the camera.
Shooting Mode Menu
Playback Mode Menu
2 Press
or
to move the green highlight in the left column to select the
icon for the setting that you want to change.
• Some Shooting Mode Menu and Setup/Connection Mode Menu have more than one page.
The notation in the upper right corner of the menu display tells you which page you are on
(1/3, 2/3, and so on.)
• If you press
with the highlight at the last icon, the next page of the menu is displayed.
-or• If you press
with the highlight at the first icon, the previous page of the menu is
displayed.
* To display RAW data files on a PC, CAMEDIA Master software or Adobe Photoshop is required.
(Photoshop requires the Olympus RAW data plug-in software.)
4 Click the OK button to save your selection. The green highlight returns to the
icon on the left.
What’s on the menu?
5 Click the OK button to close the menu and return to normal operation.
The default settings are the settings in effect when you purchased the camera. Some menu
settings are not released after the camera is switched off and switched on again so you may need
to do this occasionally to restore the camera to its original operating status, especially when you
are experimenting with the camera to learn how to use it.
or
to increase or decrease the
Red-eye reduction
Record mode
Image
adjustment
Slow
synchro
ISO
Set the mode dial to P, A, S, or M, press the menu button , and then press
the green highlight. The Shooting Mode Menu has 3 pages.
or
to move
1/3
Delete all images from selected SmartMedia or CompactFlash card, and format a card.
Macro
Flash intensity control.
Some settings are also displayed in the viewfinder when you take a picture.
AF correct mark
Macro
Exposure compensation/
Exposure level
AE (Automatic Exposure) lock
to move the green
Select or cancel all pictures for index printing.
Setup/Connection Mode Menu
Set the mode dial to , press the menu button , and then press
highlight. The Setup/Connection Mode Menu has only 2 pages.
to move the green
1/2
Determines whether conversion lens
is selected when marcro button
is pressed.
Set year/month/day format, and set current date and time.
After you replace a memory card, you can restart file numbering (RESET) or
continue sequential file numbering (AUTO).
Monitor preview mode.
When shooting in the M (manual) mode, select:
• MANUAL to check the image to be shot with the monitor, or
• AUTO to gain the best monitor image.
3/3
Image display after shooting.
Select IS mode/PS mode/Noise Reduct.
Visit us on-line. You can contact us at www.olympus.com or contact your local Olympus
authorized digital camera dealer.
Technical Support (USA)
Set interval time (specify time interval between shots during automatic time lapse
photography).
Warning sound (ON, OFF).
Where to Go from Here
Two Corporate Center Drive, Melville, NY 11747-3157, U.S.A. Tel. 631-844-5000
Record mode customization (resolution, compression).
Shutter sound setting (high, low, OFF).
Pixel mapping.
Checks the image processing circuit and adjusts the CCD.
OLYMPUS AMERICA INC.
Overall image contrast.
Memory gauge
Conversion lens
Battery
Card error
check
Number of storable pictures
Self-timer
Sequential Selected memory card
shooting
SmartMedia
CompactFlash/Microdrive
or
Read the Instructions. The Instructions provide details about all the exciting features of your
camera. Simple step-by-step instructions describe how to not only use the camera, but show you
how to download data from the memory cards to your computer for further processing with a
graphics software application, and so on. If you are new to digital photography, a detailed glossary
at the end of the Instructions explains many terms that are not explained here or in the Instructions.
ISO (sensitivity) setting.
2/3
Auto bracket
White balance
Metering mode
Exposure compensation/
Exposure level
Flash intensity control
Shutter speed
Aperture value
Remote control
Set the mode dial to , press the menu button , and then press
highlight. The Print Reserve Mode Menu has only 1 page.
Sleep mode timer setting.
Sharpness.
2nd-curtain
2/3
Print Reserve Mode Menu
Switches histogram on and off.
Shooting Mode Menu
Bracket same subject with 3 rapid shots with different exposures.
Manual focus
Monitor brightness.
2/2
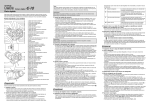
The current settings are displayed in the control panel.
Flash off
Delete all images from card, format card.
Set date or time stamping on prints.
Setup/Connection Mode Menu
3 With the desired icon selected, press
or
to move the green highlight
right or left to the setting that you want to select.
Restoring the Default Settings
1/3
Select or cancel all pictures for printing.
Print Reserve Mode Menu
Because of the difference in memory partitions on the SmartMedia, CompactFlash, and Microdrive
cards, the number of images stored may vary due to the differences between the card formats.
When using a CompactFlash card, the actual capacity of the card will be slightly more or less
than the capacity indicated.
This is a brief summary of the menus and how to use them. The menus are used to select special
settings for taking pictures. Use this summary as a quick reference. Detailed explanations about
these settings are provided in the Instructions.
to move the
Copy images card-to-card.
How to Use the Menus
• If the setting requires a number selection, press
number.
or
Slide show (Automatic playback).
That is all there is to it!
P, A, S, M
Set the mode dial to , then press the menu button , and then press
green highlight. The Playback Mode Menu has only 1 page.
24/7 online automated help: http://support.olympusamerica.com/
Phone customer support: Tel. 1-888-553-4448 (Toll-free)
Our phone customer support is available from 8 am to 10 pm (Monday to Friday) ET
E-Mail: [email protected]
Olympus software updates can be obtained at: http://olympus.com/digital/
OLYMPUS OPTICAL CO. (EUROPA) GMBH.
Premises/Goods delivery: Wendenstrasse 14-18, 20097 Hamburg, Germany
Tel. 040-237730
Letters: Postfach 10 49 08, 20034 Hamburg, Germany.
Hotline Numbers for customers in Europe:
Tel. 01805-67 10 83
Tel. 00800-67 10 83 00
Tel. +49 180 5-67 10 83
Tel. +49 40-237 73 899
for Germany
for Austria, Belgium, Denmark, France, Netherlands, Norway, Sweden, Switzerland,
United Kingdom
for Finland, Italy, Luxemburg, Portugal, Spain, Czech Republic
for Greece, Croatia, Hungaria and the Rest of Europe
Our Hotline is available from 9am to 6pm (Monday to Friday)
E-Mail: [email protected]
Flash warning
Metering
White balance (Displays setting
Shutter speed mode
other than AUTO)
Aperture value
© 2001 OLYMPUS OPTICAL CO., LTD.
Printed in Japan
VT320301