1
Loading the batteries
C-730 Ultra Zoom
DIGITAL CAMERA
sure the camera is turned off;
1 Make
● The monitor is off.
Quick-start guide
2
Package contents
3
Software installation guide (included in
the CD-ROM package)
CD-ROM with Windows 98 USB driver
software, Reference manual, and more.
Warranty card/Registration card (not
provided in some areas)
Safety Precautions (booklet)
16 MB xD-Picture Card
xD-Picture Card instructions
Slide the battery compartment lock on the
battery compartment cover in the direction of
.
Slide the battery compartment cover in the
direction of arrow (A) with your fingertip, then
lift it in the direction of arrow (B) to open it.
● Do not use your fingernail, as this could result in
injury.
2
B
A
When using AA When using CR-V3
(R6) batteries
lithium battery packs
the battery compartment cover down in
5 Press
the direction of arrow (C), hold it pressed at
the ñ mark against the camera, and then slide
it in the direction of arrow (D).
● When pressing the battery compartment cover
shut, be sure to press the center of the cover, as
it may be difficult to close properly by pressing
the edge.
● Make sure the cover is completely closed.
the other end of the strap (which you
3 Thread
will have around your neck) through the camera
strap loop that has already gone through the
camera’s strap eyelet. Pull on the strap attached
to the camera’s strap eyelet to make sure it is
securely fastened.
Printed in Japan
1AG6P1P1414
VT394302
Viewing still pictures
Zoom lever
Inserting the card
3 Insert
the card in the appropriate
Ejecting the card
Push the card slowly toward the inside of the card slot
with your finger until it stops. Continue to hold the card
so that it does not forcibly eject, then remove the card
from the slot by pulling it straight out.
W (wide-angle):
To zoom out.
T (telephoto):
To zoom in.
Card access lamp
focus on the subject, press the shutter
3 To
button halfway, slowly and gently.
● When the subject is in focus, the green lamp
lights up. (If the green lamp is flashing, the
subject is not in focus. Release the shutter
button and repeat step 3.)
C
D
4 Close the card cover securely until it clicks.
Note:
● Never open the card cover, remove the batteries, or disconnect the optional AC
adapter while the camera is on. Doing so could destroy all data on the card. In
addition, never use the camera with the card inserted insecurely. A loose
connection may result in being unable to access the card or recording pictures on
the card, or loss of data. Destroyed data cannot be restored.
the battery compartment lock on the battery
6 Slide
compartment cover in the direction of
.
4 Adjust the strap length.
Point the camera towards a subject
while viewing through the viewfinder.
direction.
● xD-Picture Card and SmartMedia card
cannot be inserted into the camera at
the same time. You can only insert one
of the other at any given time.
● Hold the card in a straight orientation to
xD-Picture Card
SmartMedia
the card slot, and then insert it fully until
it is locked securely. Do not attempt to insert the card at an angle.
● Note the orientation of the card. If it is inserted incorrectly, it may become
jammed.
the lens1 Attach
securing string to
Strap eyelet
and press
Insertion direction
indication
the batteries in the direction shown in
4 Insert
the illustration.
the lens cap.
Remove the lens cap. Set the mode dial to
1 the
POWER switch.
2 Open the card cover.
Battery alignment
from the monitor side, then thread the camera
strap loop through the lens-securing string
loop.
Full-auto shooting
● The viewfinder is off.
● The lens is not extended.
Attaching the strap
the camera
2 Thread
strap loop through the camera’s strap eyelet
Taking still pictures
sure the camera is turned off;
1 Make
● The monitor is off.
● The viewfinder is off.
● The lens is not extended.
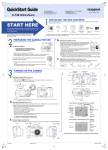
We have included this convenient Quick-Start Guide to show you basic functions and
techniques that will help you quickly master your new camera. For more detailed
descriptions of procedures, as well as for additional information on more sophisticated
features not covered here, please refer to the printed “Basic Manual”, or the
comprehensive “Reference Manual” on the CD-ROM.
Camera
Strap
Lens cap
Lens cap string
CR-V3 lithium battery pack (2 packs)
AV cable
USB cable
Basic manual
Quick-start guide
Inserting/Removing the card
Note:
● Manganese (zinc-carbon) batteries cannot be
used.
Recording movies
Playing back movies
Green lamp
Number of storable still pictures
start shooting, press the shutter button gently all the way (fully).
4 To
● If the flash is up, it will fire automatically when required.
● The card access lamp blinks and the camera begins storing pictures on the card.
● To turn off the camera, press the POWER switch again.
● If the date/time has been returned to the factory default setting, "Y/M/D" appears
on the monitor.
Erasing pictures
Single-Frame Erase
the mode dial to
1 Set
POWER switch.
Remove the lens cap. Set the mode dial to
1 the
POWER switch.
(playback mode) and press the
2
Press
to avoid
accidentally erasing
images.
To cancel protection,
press
again.
and press
Point the camera towards a
subject while viewing through the
viewfinder or the monitor.
1
Display the movie frame (picture with
) you want to play back
T See steps 1 and 2 in “Viewing still pictures”.
2
Press
.
● The top menu appears.
Press Ñ on the arrow pad to
3 select
MOVIE PLAY.
1
Display the picture you want to erase. T See steps 1 and 2 in “Viewing still
pictures”.
2
Press
.
(erase)
button
MOVIE PLAY
INFO
MODE MENU
the
ERASE screen appears, press Ñ to select YES.
3 ●When
To cancel erasure, press ñ to select NO.
ERASE
HQ
YES
Press Ññ to select MOVIE
4 PLAYBACK.
● To exit MOVIE PLAY screen,
press É.
Card access lamp
NO
4 Press
to erase the picture.
SELECT
GO
MOVIE PLAY
PLA
You can play back pictures while the camera is
in the shooting mode (Quick View).
Press
twice quickly. To return to shooting,
press the shutter button halfway.
the desired
2 Display
pictures using the
arrow pad.
● Pictures indicated
by
are movie
frames.
MOVIE PLAYBACK
INDEX
Zoom lever
3
the shutter button all the
4 Press
way to start recording.
Jumps to the picture
Turning the zoom
10 frames behind.
lever towards
T: Enlarges the
Displays the
picture.
next picture.
W: Displays
Jumps to the picture
multiple pictures
10 frames ahead.
at the same
time.
Displays the previous picture.
Press
to avoid accidentally
erasing images.
To cancel protection, press
again.
Press the shutter button halfway.
● The green lamp lights up.
Green lamp
● The card access lamp blinks and
the camera starts writing the movie
to the card.
● During movie recording,
lights in red.
Seconds remaining
the shutter button all the way again to stop recording.
5 Press
● If the displayed seconds remaining reach “0”, shooting finishes
automatically and the camera starts writing the movie to the card.
EDIT
CANCEL
SELECT
GO
to start Playback.
5 ●Press
When playback finishes, the screen returns to the beginning of the movie.
● If
is pressed again when the movie playback is finished, the MOVIE
PLAYBACK screen appears. To exit the movie playback mode and return to the
.
MOVIE PLAY screen, press Ññ to select EXIT, then press
Note:
● When playing back a movie, access time will vary depending on the length and
record mode of the movie. The card access lamp blinks while movie data is being
accessed.
OLYMPUS AMERICA INC.
Two Corporate Center Drive, Melville, NY 11747-3157, U.S.A. Tel. 1-631-844-5000
24/7 online automated help: http://support.olympusamerica.com/
Phone customer support: Tel. 1-888-553-4448 (Toll-free)
OLYMPUS OPTICAL CO. (EUROPA) GMBH.
Premises/Goods delivery: Wendenstrasse 14-18, 20097 Hamburg, Germany
Tel. 040-237730
Letters: Postfach 10 49 08, 20034 Hamburg, Germany
http://www.olympus.com/
Buttons and Dial
Menu functions
Moving around the Menu screen
Shooting W/T
Playback
/
: Zooms out/in.
: Displays multiple pictures at the same time (Index-display)/
enlarges pictures (close-up playback).
1
2
Top menu (Mode dial: “P”)
3
DRIVE
Press
Shutter button
Note:
The Top menu and available
menu
functions
vary
depending on the mode.
(See the Reference Manual
for more details.)
Focuses (half press) or shoots (fully press).
Mode dial
Full-auto
Portrait
Sports
Landscape-Portrait
Landscape-Scene
Night-Scene
Self Portrait
Flash switch
Pops up the flash.
Viewfinder
My mode
A/S/M (Aperture
priority/Shutter priority/
Manual shooting)
P (Program)
Playback
Shooting : View subjects while shooting.
Playback : Displays recorded images.
:
:
:
:
:
:
:
:
:
:
Full automatic exposure with one press of the shutter button.
Renders in-focus subject against a blurred background.
Suitable for capturing fast-moving action without blurring.
Both subject and background are in focus.
Suitable for taking pictures of landscapes and other outdoor scenes.
Suitable for shooting pictures in the evening or at night.
Enables you to take a picture of yourself while holding the camera.
Records movies.
Activates your customized settings.
User sets aperture and/or shutter speed manually.
Selects a mode from
(single-frame shooting),
(sequential shooting),
(High-speed sequential shooting)
(AF sequential shooting) or BKT (auto bracketing).
Selects ISO sensitivity from AUTO/100/200/400.
Selects a shooting mode from A (Aperture priority shooting), S
(Shutter priority shooting), M (Manual shooting).
1/2/3/4
Selects a shooting mode from 1 MY MODE 1,
3 MY MODE 3, 4 MY MODE 4.
NOISE
REDUCTION
Self-timer/Remote control button
) : Selects self-timer/Remote control mode.
Playback
SLEEP
A/S/M
SLOW
Self-timer shooting
Remote control shooting (requires optional Remote Control RM-1)
: Erases pictures one-by-one.
Playback
DIGITAL ZOOM
FULLTIME AF
AF MODE
Macro/Spot button
Shooting
MULTI
METERING
Flash mode button
Shooting
Playback
: Selects flash modes.
AUTO (No indication)
The flash fires in low-light and backlight conditions.
Minimizes “red-eye” phenomena.
The flash always fires.
SLOW1/ SLOW2/
SLOW
Adjusts the flash for slow shutter speeds.
: Prevents pictures from being erased accidentally.
MY MODE
SETUP
FILE NAME
PIXEL
MAPPING
2 IN 1
FUNCTION
AF AREA
INFO
VIDEO OUT
Adjusts the flash for slow shutter speeds.
Reduces the noise on images during long exposures.
BATTERY SAVE
SHORT CUT
Decides the best exposure by metering up to 8 different spots in the
image.
The maximum optical zoom (10x) can be extended even more by the
3x digital zoom, making possible up to approx. 30x zoom.
Keeps the image in focus at all times without having to press the
shutter button halfway.
CUSTOM
BUTTON
Displays the menu screen or sets selected
menu items.
Monitor/Quick View button
● Turns the monitor on/off.
● Press quickly twice to play back the last recorded
image.
Monitor
Shooting : View subjects while shooting.
Playback : Displays recorded images.
POWER switch
Turns the camera on/off.
CONTRAST
Allows panorama pictures to be taken with Olympus CAMEDIA-brand
cards.
Shooting
Playback
: AEL Locks exposure.
Performs whichever function you have set for it.
: Rotates a picture.
Combines two pictures taken in succession and stores them as a
single picture.
Lets you shoot pictures in black & white or sepia tone.
Menu
: Selects/adjusts the menu functions and items.
Shooting : Sets aperture/shutter speed/exposure compensation values in
the appropriate shooting modes.
Playback : Selects pictures to be displayed.
ALL RESET
SET
Brings up SETUP menu
Sets the tone and its volume. There are 2 options for each selection.
Sets the sleep timer.
Customizes settings, which are activated in the
mode.
Chooses how to name files and folders of images to be saved.
Checks the CCD and image processing circuit for errors.
Sets the measurement units (m/ft) used during manual focus.
Selects NTSC or PAL according to your TV’s video signal type. TV
video signal type differs depending on the region.
Enables camera operation with reduced power consumption.
Lets you assign frequently-used functions as shortcut menus on the
top menu.
Lets you assign a frequently used function to the camera’s custom
button.
Changes the amount of shooting information displayed on the monitor.
Lets you change the position of the AF target mark using the arrow
pad.
Changes the amount of shooting information displayed on the
monitor.
Displays a histogram showing the luminance distribution of recorded pictures.
PLAY
During playback, adds sound to still pictures or changes sound that
has been recorded.
EDIT (still pictures)
Sets the appropriate white balance according to the light source.
Makes the file size smaller.
Enlarges a part of a picture and saves it as a new picture.
Adjusts the sharpness of images.
Adjusts the contrast of images.
CARD
Adjusts the level of color depth without changing tint.
Selects whether to keep the current camera settings when you turn
off the power.
Formats cards (FORMAT), or erases all images on them (ALL
ERASE).
SETUP
Formats cards (all images on the card are deleted).
SETUP
Arrow pad
Brings up CARD menu
INFO (still pictures)
CARD
CARD SETUP
CARD
Plays back movies. You can also edit movies or make indexes of still-shots from movies.
CARD SETUP
AE lock/Custom button
Brings up PICTURE menu
MOVIE PLAY (movies)
Sets the record mode resolution.
SATURATION
PIC
Runs through all saved pictures one after another (slide-show).
PICTURE
SHARPNESS
Brings up CAMERA menu
(still pictures)
Selects the auto focus method (iESP or SPOT).
Lets you make fine changes to the white balance manually.
OK/Menu button
CAM
Menu functions during playback
Displays a histogram showing the brightness and contrast of the
subject on your monitor.
WB
SLOW1
Sets the date and time.
m/ft
For macro shooting as close as 4cm (1.6 inches) away from the
subject (super macro mode).
PANORAMA
to enter each menu
Adjusts the monitor brightness.
2 MY MODE 2,
Records sound while taking still pictures.
: Activates macro mode or metering mode.
●
Macro shooting
Wide: 0.1 m – 0.6 m (0.3 ft – 2 ft)/Tele: 1.2 m – 2.0 m (4 ft – 6.6 ft)
●
Spot metering
Meters within the AF target on the viewfinder. (Normally, digital ESP is activated.
Digital ESP meters the center of the subject and the area around it.)
●
During macro mode shooting, spot metering is activated.
: Print reserve
SLOW
AUTO
Sets the beep sound (used for warnings. etc.) to OFF/LOW/HIGH.
CAMERA
DRIVE
DRIVE
ISO
A/M/S
The top menu functions can be changed to
your liking in the modes other than
and
(SHORT CUT setting).
Adjusts the flash intensity for different shooting conditions.
Adjusts the diopter for the best viewfinder focus.
/
WB
SHUTTER
Diopter adjustment dial
Shooting (
to select
Menu functions during shooting
ISO
: The camera sets aperture and shutter speed.
: Plays back a picture.
MODE MENU
to select
4
If you select the MODE MENU in step 2
SET CARD PIC CAMERA
Zoom lever
SCREEN
SETUP
Registers a stored picture so that you can select it in PW ON SETUP
and/or PW OFF SETUP.
VOLUME
Adjusts the volume of the sound during playback.
Selects the number of frames in the index display. (4/9/16-frame)
Selects a language for on-screen display.
PW ON/OFF
SETUP
REC VIEW
Sets the picture displayed on the monitor when the power is turned
on/off.
Selects whether to display images while saving them to a card.
ALL RESET,
, PW ON/OFF SETUP,
,
,
in SETUP under “Menu functions during shooting”.
, VIDEO OUT: Same as described