1
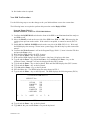
December 10, 1999 * YEAR 2000 READINESS DISCLOSURE STATEMENT * • • • TO OLYMPUS CUSTOMERS PRESENTLY USING: OLYMPUS DEMAND®, OLYMPUS® AU5000, OLYMPUS REPLY®, OLYMPUS® AU560, OLYMPUS® AU5200, OLYMPUS® AU800, OLYMPUS® AU1000, OLYMPUS® AU600, OLYMPUS® AU640, and OLYMPUS® AU400 Automated Chemistry Analyzers OLYMPUS® PK7100 and OLYMPUS® PK7200 Automated Microplate Systems OLYMPUS® Aliquotting System (OASYS) *** This Year 2000 Readiness Disclosure Statement revises, supplements, and/or restates important information previously disseminated in our Year 2000 Readiness Disclosure Statement dated February 12, 1999 (the “February 1999 Statement”). Revised and supplemental paragraphs and sections are so noted in this new Year 2000 Readiness Disclosure Statement. Those systems described in this Statement as “year 2000 compliant” are year 2000 compliant in accordance with the attached Year 2000 Compliance Limited Warranty. • OLYMPUS DEMAND Automated Chemistry Analyzer: REVISED STATUS: A four-digit year code must be entered in the date. Entering a two-digit year code in the date may generate an input error and prevent analysis. • OLYMPUS AU5000 Automated Chemistry Analyzer: REVISED STATUS: • A four-digit year code must be entered in the date. Entering a two-digit year code in the date may generate an input error and prevent analysis. ‚A parameter save/load function performed using the Parameter Floppy Disk after December 31, 1999 will result in the date stamp indicating the “Last Modified” status as the year “1900”. • OLYMPUS REPLY and OLYMPUS AU560 Automated Chemistry Analyzers: The OLYMPUS REPLY and OLYMPUS AU560 will display a year of “1900” upon transition to January 1, 2000. OLYMPUS REPLY systems with operating software versions 2.4 and above and OLYMPUS AU560 systems will require a special software tool to ensure year 2000 compliance. Olympus is preparing a special software disk that must be installed in these systems. This disk will be provided to you at no charge during the first half of 1999. Customer installation of the special software must be performed upon initial use of the system AFTER 12:00 a.m. on January 1, 2000. No action should be taken prior to 12:00 a.m. on January 1, 2000. Please follow the Year 2000 Conversion Instructions and Test Procedures attached to this Year 2000 Readiness Disclosure Statement. Upon complete and correct installation of the special software provided by Olympus, OLYMPUS REPLY and OLYMPUS AU560 units will be year 2000 compliant. NOTE: OLYMPUS DSD/00001/7194.5 REPLY systems with operating software versions below version 2.4 cannot be upgraded using the special software disk. SUPPLEMENTAL INFORMATION: After December 31, 1999, a four-digit year must be used to define the date in the OLYMPUS AU560 “SET DATE & ROUND” and OLYMPUS REPLY “SET DATE & CAROUSEL” menus. If existing data indexes have a two-digit year entry they must be searched separately from those data indexes having a four-digit year entry. • OLYMPUS AU5200 Automated Chemistry Analyzer: To ensure the year 2000 compliance of the OLYMPUS AU5200, the system MUST be powered off (by performing an “END PROCESS”) prior to midnight on December 31, 1999. The system must remain off during the brief transition from December 31, 1999 to January 1, 2000. If this process is followed completely and correctly, the date field will be correctly displayed as “01/01/2000” upon initial power on after 12:00 a.m. on January 1, 2000, no further corrective action will be necessary, and the system will be year 2000 compliant. However, if the OLYMPUS AU5200 is not powered off during the transition from December 31, 1999 to January 1, 2000, the date displayed in the upper right-hand corner of the monitor will be incorrectly listed as “01/01/1900” on January 1, 2000. In such event, you must follow the steps set forth in the attached Year 2000 Conversion Instructions and Test Procedures to correct the displayed date. • OLYMPUS AU800 and OLYMPUS AU1000 Automated Chemistry Analyzers: Much of the information contained in the following paragraph has been gleaned from HewlettPackard and certain independent test laboratories. Olympus has relied upon the information provided by Hewlett-Packard and these independent test laboratories. The OLYMPUS AU800 and OLYMPUS AU1000 utilize a number of different Hewlett-Packard computers. If the computer installed with a system is a Hewlett-Packard Vectra VL 5/133 or higher clock speed unit, no corrective action will be required. OLYMPUS AU800 and OLYMPUS AU1000 units which utilize these higher clock speed computers are year 2000 compliant. Within the OLYMPUS AU800 and OLYMPUS AU1000 software program, on systems utilizing HewlettPackard computers with slower clock speeds (all 386, 486, 5/75, and 5/120 units), the display date, data index, and printout date appear to change properly from “12/31/1999” to “01/01/2000”. However, upon powering off, the computer’s internal clock will revert to 1980 when the system is next powered on. Therefore, those Hewlett-Packard computers with slower clock speeds will require manual updating of the current date by using the MS-DOS “DATE” command to set the date to 2000 upon initial use AFTER 12:00 a.m. on January 1, 2000. No action should be taken prior to 12:00 a.m. on January 1, 2000. Please follow the Year 2000 Conversion Instructions and Test Procedures attached to this Year 2000 Readiness Disclosure Statement. This update MUST be performed on all Hewlett-Packard computers with clock speed slower than the Hewlett-Packard Vectra VL 5/133. SUPPLEMENTAL INFORMATION: ¬ The OLYMPUS AU800 and OLYMPUS AU1000 incorporate features that allow data to be stored on floppy disk. The “OFFLINE FLOPPY DATA OUTPUT” menu stores data in a form that can be used offline for functions such as spreadsheet applications. When performing the “OFFLINE FLOPPY DATA OUTPUT” function using a Data Floppy Disk initialized after January 1, 2000, program execution will be interrupted. As a result, program status information may appear on the PC monitor. Patient data residing in the system hard drive is not affected and operation can be easily resumed by re-booting the system. It is recommended that a sufficient quantity of Data Floppy Disks be initialized prior to January 1, 2000 in order to support offline floppy data output for a period of one month. In the event DSD/00001/7194.5 2 that there are no initialized Data Floppy Disks available upon transition to January 1, 2000, the system date can be set to a date prior to January 1, 2000 in the “AUXILIARY/CURRENT DATE AND TIME” menu. Disks can then be initialized using the “FLOPPY INITIALIZE” menu. Should this procedure be required, the date must be returned to the then-current date and time prior to analysis in the “AUXILIARY/CURRENT DATE AND TIME” menu. In addition, pre-initialized Data Floppy Disks will be available from Olympus after January 15, 2000. An updated version of software will be provided at no charge by June 1, 2000. - Re-using a Data Floppy Disk containing data stored after December 31, 1999 will result in an interruption in program execution. As a result, program status information may appear on the PC monitor. Patient data residing in the system hard drive is NOT affected. Furthermore, operation can be easily resumed by re-booting the system. Disks can be re-used; however, disks containing data stored after December 31, 1999 must be initialized using the “FLOPPY INITIALIZE” menu and using a system date earlier than January 1, 2000. An updated version of software will be provided at no charge by June 1, 2000. ® The “DATA DOWN LOAD TO FD” menu saves data onto a floppy disk in a form that will allow review or editing on the OLYMPUS AU800 and OLYMPUS AU1000 systems. This method will function using disks initialized before and after January 1, 2000. This is the recommended action for data archive purposes. ¯ Floppy disk file date stamps will be recorded on the disk as “53” during the year 2000. In addition, years subsequent to 2000 will be displayed as “54”, “55”, etc. Information stored on the disks will not be affected. File date stamps are displayed only when viewed outside the AU800/AU1000 application. There will be no software update available to resolve this condition; however, this condition has no impact on system functionality. ° The impact of the aforementioned conditions on overall system operation is limited and only applies to the operating conditions described above. • OLYMPUS AU600 Automated Chemistry Analyzer: Much of the information contained in the following paragraph has been gleaned from HewlettPackard and certain independent test laboratories. Olympus has relied upon the information provided by Hewlett-Packard and these independent test laboratories. The OLYMPUS AU600 utilizes a number of different Hewlett-Packard personal computers. If the computer installed with a system is a Hewlett-Packard Vectra VL 5/133 or higher clock speed unit, no corrective action will be required. OLYMPUS AU600 units which utilize these higher clock speed computers are year 2000 compliant. Within the OLYMPUS AU600 software program, on systems utilizing Hewlett-Packard computers with slower clock speeds (5/75 and 5/120 units), the display date with two-digit year code located in the upper right-hand portion of the screen changes from “12/31/99” to “01/01/00”. The date display is for convenience purposes only and does not affect the system’s functionality. However, the data index and printout dates within the system program software contain a four-digit year code. Consequently, upon powering off, the computer’s internal clock will revert to 1980 when the system is next powered on. Therefore, those Hewlett-Packard computers with slower clock speeds will require manual updating of the current date by using the MSDOS “DATE” command to set the date to 2000 upon initial use AFTER 12:00 a.m. on January 1, 2000. No action should be taken prior to 12:00 a.m. on January 1, 2000. Please follow the Year 2000 Conversion Instructions and Test Procedures attached to this Year 2000 Readiness Disclosure Statement. This update MUST be performed on all Hewlett-Packard computers with clock speed slower than the Hewlett-Packard Vectra VL 5/133. SUPPLEMENTAL INFORMATION: DSD/00001/7194.5 3 • Offline Output and Data floppy disk file date stamps will be recorded on the disks as “53” during the year 2000. In addition, years subsequent to 2000 will be displayed as “54”, “55”, etc. Information stored on the disks will not be affected. File date stamps are displayed only when viewed outside the AU600 application. This condition has no impact on system functionality. ‚ In the “Periodic Maintenance” menu, the “Next” date, indicating the next scheduled due date for a maintenance item, will be displayed one day late when February 29, 2000 falls between the “Executed” date (i.e., the date periodic maintenance was last performed) and the “Next” date (i.e., the calculated date the next periodic maintenance is due). Manual tracking of periodic maintenance must be conducted under these conditions. The “Periodic Maintenance” function is provided as a convenience and, therefore, in no way impacts system functionality except as described above. ƒ Integrity of patient data is not affected by the aforementioned conditions. An updated version of software will be provided at no charge by June 1, 2000. • OLYMPUS AU400 and OLYMPUS AU640 Automated Chemistry Analyzers: REVISED STATUS: • The “Consumable Management” menu displays an interval of time (i.e., days, weeks, months, years) since a consumable was last changed. In cases where the unit of time has been defined as “Day” or “Week” and February 29 falls between the then-current date and the next consumable change date, the indicated number of days or weeks since the last consumable change date will be reduced by one unit (i.e., day or week). Manual tracking of consumable management must be conducted under these conditions. The “Consumable Management” function is provided as a convenience and, therefore, in no way impacts system functionality except as described above. - In the “Periodic Maintenance” menu, the color of maintenance items should change to yellow when the then-current date coincides with the “Next” maintenance due date. The color should change to red when the current date exceeds the “Next” maintenance due date. However, when the “Next” maintenance due date is February 29, the “Next” maintenance due date will be displayed in yellow on March 1 and red on March 2. Manual tracking of periodic maintenance must be conducted under these conditions. The “Periodic Maintenance” function is provided as a convenience and, therefore, in no way impacts system functionality except as described above. ® In the “Periodic Maintenance” menu, the grid corresponding to the date when maintenance was last performed should be marked with an “o” symbol and the “Next” maintenance due date should be displayed in yellow in the “Grid Display” menu. However, symbols indicating last performed (“o”) and “Next” due (yellow) dates for the month of January will not be displayed in the “Grid Display” menu from December 1 through December 30. Manual tracking of periodic maintenance must be conducted under these conditions. The “Periodic Maintenance” function is provided as a convenience and, therefore, in no way impacts system functionality except as described above. ¯ In the “Grid Display” menu, the color of grids for maintenance items should change to yellow when the then-current date coincides with the “Next” maintenance due date. However, when the “Next” maintenance due date is February 29, the grids for both February 29 and March 1 will be displayed in yellow. In addition, printing of the “Grid Display” using the “Report/Schedule” menu will assign an “*” mark (indicating maintenance due date) for both February 29 and March 1. Manual tracking of periodic maintenance must be conducted under these conditions. The “Grid Display” function is provided as a convenience and, therefore, in no way impacts system functionality except as described above. DSD/00001/7194.5 4 ° The “Cuvette Status” menu displays a yellow color to alert the operator when 8 or more days have elapsed since the last W2/Photocal operation was performed. When a W2/Photocal is performed between February 22 and February 29, the yellow color alert will not be displayed until 9 days following the date of such W2/Photocal operation. The scheduling of W2/Photocal operations during this period must be manually tracked. ± The printout generated by the “Report/Schedule” menu should include the “o” and “*” symbols for the “Executed” maintenance date and the “Next” maintenance due date, respectively. However, from December 31 through January 30, the printout generated by the “Report/Schedule” menu will not include the “o” and “*” symbols for the portion of the month of January after the then-current date. Information prior to and including the then-current date will be printed. Manual tracking of periodic maintenance must be conducted under these conditions. The “Report/Schedule” function is provided as a convenience and, therefore, in no way impacts system functionality except as described above. ² The print function for maintenance activities will indicate a status of 31 days in all months. Please disregard maintenance marks for all dates that do not exist (e.g., February 30, April 31). This print function is provided as a convenience and, therefore, in no way impacts system functionality except as described above. ³ An updated version of software will be provided at no charge by June 1, 2000. • OLYMPUS PK7100 Automated Microplate System: REVISED STATUS: When a single digit (“0” – “9”) or two-digit (“00” – “09”) year is entered in the date, dates contained in printed reports and on monitor screens will indicate a one-digit year, “0” to “9”, for the 2000 to 2009 year period. A four-digit year, 2000 – 2009, must be entered in the date. • OLYMPUS PK7200 Automated Microplate Systems: The OLYMPUS PK7200 program only updates the last two digits of the displayed year. Therefore, the OLYMPUS PK7200 will display “01/01/1900” upon transition to January 1, 2000. Manual resetting of the date and time utilizing the “Maintenance” software menu of the system will be required. To ensure year 2000 compliance, the date and time fields MUST be updated upon initial use of the system AFTER 12:00 A.M. on January 1, 2000. No action should be taken prior to 12:00 a.m. on January 1, 2000. Please follow the Year 2000 Conversion Instructions and Test Procedures attached to this Year 2000 Readiness Disclosure Statement. • OLYMPUS Aliquotting System (OASYS): The OLYMPUS Aliquotting System (OASYS) uses the date stamp for internal error log display only. The year will be displayed as “00” upon transition to January 1, 2000. The date is not associated with any instrument functions other than the error log display. The OASYS is year 2000 compliant. *** Included with this Year 2000 Readiness Disclosure Statement are Year 2000 Conversion Instructions and Test Procedure documents for the REPLY, AU560, AU600, AU800, AU1000, AU5200, and PK7200 systems. If you have any questions, please do not hesitate to contact Olympus’s Technical Services Department at (800) 223-0130. *** Olympus appreciates your continued patronage and support, and we look forward to serving you in the future. Glenn Mann DSD/00001/7194.5 5 Director of Service Olympus America Inc. Diagnostic Systems Division Notice: This Statement contains proprietary information that is protected by copyright. All rights are reserved. No part of this document may be photocopied, reproduced, or translated to another language without the prior written consent of Olympus America Inc. MS-DOS is a U.S. registered trademark of Microsoft Corporation. DSD/00001/7194.5 6 YEAR 2000 COMPLIANCE LIMITED WARRANTY OF OLYMPUS AMERICA INC. DIAGNOSTIC SYSTEMS DIVISION EXCEPT AS DESCRIBED IN THE YEAR 2000 READINESS DISCLOSURE STATEMENT TO WHICH THIS LIMITED WARRANTY IS ATTACHED, Olympus America Inc.’s Diagnostic Systems Division (“OAI-DSD”) warrants that it will deliver either (a) products that do not process date information or (b) 21st century compliant products that, provided that all other products used with the OAI-DSD products properly exchange accurate data, (i) will function and operate in accordance with applicable product specifications and logic in the year 2000, (ii) correctly process date fields and internal date field dependent logic to accurately process and utilize dates beyond December 31, 1999, (iii) store and represent dates in a manner which allows for identification or use of the century portion of any date fields without any special processing, and (iv) correctly process dates for leap years. OAI-DSD’s sole responsibility and your exclusive remedy for breach of this Limited Warranty shall be the offer of an update for or the repair or replacement of such products. Notwithstanding the foregoing, certain products listed on the Year 2000 Readiness Disclosure Statement (to which this Limited Warranty is attached) may require corrective action to ensure full year 2000 compliance. EXCEPT FOR THE LIMITED WARRANTY SET FORTH ABOVE, OAI-DSD MAKES NO AND DISCLAIMS ALL OTHER REPRESENTATIONS AND WARRANTIES, WHETHER EXPRESS OR IMPLIED, INCLUDING BUT NOT LIMITED TO ANY IMPLIED WARRANTIES OF MERCHANTABILITY OR FITNESS FOR A PARTICULAR PURPOSE, OR CONCERNING ANY PATENTS OR TECHNOLOGY. OAI-DSD DOES NOT WARRANT THAT SOFTWARE WILL BE ERROR-FREE AND/OR UNINTERRUPTED. MOREOVER, OAI-DSD DOES NOT WARRANT THE YEAR 2000 COMPLIANCE OF PRODUCTS MANUFACTURED BY THIRD PARTIES OR PRODUCTS NOT SHIPPED FROM OAI-DSD INVENTORY. OAI-DSD DISCLAIMS RESPONSIBILITY AND LIABILITY FOR ENSURING THE YEAR 2000 COMPLIANCE OF INTEGRATED SYSTEMS COMPRISED OF OLYMPUS AND NON-OLYMPUS PRODUCTS. ALL GUARANTIES, WARRANTIES, CONDITIONS, AND REPRESENTATIONS WHATSOEVER, EITHER EXPRESS OR IMPLIED, WHETHER ARISING UNDER ANY STATUTE, LAW, COMMERCIAL USAGE OR OTHERWISE, ARE HEREBY EXPRESS EXCLUDED. IN NO EVENT SHALL OAI-DSD BE LIABLE FOR ANY INDIRECT, INCIDENTAL, CONSEQUENTIAL OR SPECIAL DAMAGES OF ANY KIND (INCLUDING WITHOUT LIMITATION LOSS OF PROFITS OR LOSS OF USE), WHETHER OR NOT OAI-DSD SHALL BE OR SHOULD BE AWARE OF THE POSSIBILITY OF SUCH POTENTIAL LOSS OR DAMAGE. Representations and warranties made by any person, including dealers and representatives of OAI-DSD, which are inconsistent with, in conflict with, or in addition to, the terms of this DSD/00001/7194.5 Limited Warranty, shall not be binding upon OAI-DSD unless reduced to writing and approved by an expressly authorized officer of Olympus America Inc. DSD/00001/7194.5 2 Year 2000 Conversion Instructions and Test Procedure OLYMPUS REPLYand OLYMPUS AU560 Automated Chemistry Analyzers Year 2000 Conversion Instructions: Note: If you wish to do a year 2000 test of the instrument please see page 5. The following items are required to perform this procedure on the Reply/AU560. Program Floppy Disk 1/3 MU5907 SPECIAL TOOL for YEAR 2000 diskette 1. Confirm that POWER ON switch on the front of the DPR is not illuminated and the analyzer and DPR are off. 2. Move the BOOT switch on the rear side of the DPR from “WD” to “FD”. When moving the switch, please pull out on the switch. If the switch is not pulled, it cannot be moved (FIG.12¬-). 3. Switch ON the LOCAL POWER switch on the rear side of the DPR (FIG.12-¯). Wait until the DPR displays the message ”Please insert system floppy disk & hit any key then restart disk mount”. 4. Confirm that Write Protect is off on the Program Floppy Disk 1/3, insert it into the FD drive and press the Enter ↵ key. 5. Wait until the DPR displays the following menu (FIG.1). *** SYSTEM MAINTENANCE *** # SELECT No.> --------------------------------------------------------------------1 INITIALIZE MEDIA 2 PASSWORD SET 3 COMMUNICATION 4 MAINTENANCE 5 HISTORY 6 COPY FILES 7 SYSTEM UP 1: 2: 3: 4: 5: 6: 7: 8:EXIT FIG.1 6. Type 7 and the Enter ↵ key on the keyboard. 7. Wait until the DPR displays the following menu (FIG.2). Only Item 1 displays at this time. DSD/00001/7194.5 3 *** SYSTEM UP *** # SELECT No.> --------------------------------------------------------------------1 DATE & TIME SET (2 SYSTEM PARAMETERS ) (3 OPTION UNIT ) (4 DATA FILE INITIALIZE ) (5 PARAMETER INITIALIZE ) 1: 2: 3: 4: 5: 6: 7: 8:PRINT FIG.2 8. Type S and the Enter ↵ key, B and the Enter ↵ key and M and the Enter ↵ key on the keyboard. Items 2 through 5 will now be displayed on the above menu.(FIG.2) 9. Type 2 and the Enter ↵ key on the keyboard. Wait until the DPR displays the following menu (FIG.3). *** SYSTEM PARAMETER *** # SELECT No.> --------------------------------------------------------------------1 DATE MARK 19 2 AREA AMERICA 3 CYCLE 60 4 PERIOD ROUND-1 9 SEC. ROUND-2 9 SEC. ROUND-3 9 SEC. ROUND-4 9 SEC. 5 INQUIRY ROUTINE & EMERGENCY BARCODE ACAL SEQUENCE QC SEQUENCE 6 SYSTEM PASSWORD 1: 10. 11. 12. 13. 2: 3: 4: 5: 6: FIG.3 7: 8:PRINT Type 1 and the Enter ↵ key on the keyboard. Type 20 and the Enter ↵ key on the keyboard. Press the OPS Menu key on the keyboard. The DPR displays the menu shown in FIG.1. Type 6 and the Enter ↵ key on the keyboard. Wait until the DPR displays the following menu (FIG.4). DSD/00001/7194.5 4 *** COPY FILES *** # SELECT No.> --------------------------------------------------------------------1. FILE COPY 2. FILE CREATE 1: 2: 3: 4: 5: 6: FIG.4 7: 8:PRINT 14. Type 1 and the Enter ↵ key on the keyboard. Wait until the DPR displays the menu shown in FIG.5. *** FILE COPY *** # SELECT No.> --------------------------------------------------------------------DEV. FILE NAME DEV. FILE NAME DEV. FILE NAME 1.MKP.SYS 2.M510SYS.FIL : : : : : : : : : : 1:ALL 2:FROM 3:BACK 4:NEXT 5: 6:CHANGE 7: 8:PRINT FIG.5 15. Type 2 and the Enter ↵ key on the keyboard. Wait until file number 2 (M510SYS.FIL) has been copied. 16. Press the OPS. Menu on the keyboard. The DPR displays the menu shown in FIG.1. 17. Press the function key F8 (Exit) on the keyboard. Wait until the DPR displays the message ”BE SURE TO SET BOOT SWITCH ON WD SIDE AND PRESS RESET SWITCH”. 18. Remove the Program Floppy Disk 1/3. 19. Switch OFF the LOCAL POWER switch on the rear side of the DPR (FIG12- ¯). 20. Wait 10 seconds and switch ON the LOCAL POWER button on the rear side of the DPR (FIG12- ¯). Wait until the DPR displays the message ”Please insert system floppy disk & hit any key then restart disk mount”. 21. Insert the MU5907 SPECIAL TOOL for YEAR 2000 floppy disk into the FD drive and press the Enter ↵ key on the keyboard. Wait until the DPR displays the following messages (FIG.6). DSD/00001/7194.5 5 CP/M-86 Version 1.0 Segment Address = F000 Last Offset = 317F CP/M86=Version 1.0 A> FIG.6 22. Type GO2000 and press the Enter ↵ key on the keyboard. (see FIG.7) A>GO2000 FIG.7 23. Wait until the DPR displays the following messages (Fig.8). A>GO2000 Transformation 2000 program for OLYMPUS Data Processor Ver.1.0 Copyright OLYMPUS OPTICAL CO.,LTD All rights reserved Translation normal end. A> FIG.8 Note: If any errors are displayed during steps 21 to 23, refer to the Appendix Error List. 24. Remove the MU5907 SPECIAL TOOL for YEAR 2000 floppy disk. 25. Move the BOOT switch on the rear side of the DPR from “FD” to “WD”. When moving the switch, please pull out on the switch. If the switch is not pulled, it cannot be moved (FIG.12¬®). 26. Switch OFF the LOCAL POWER button on the rear side of the DPR (FIG12- ¯). 27. Power on the equipment using the POWER ON switch on the front of the DPR. 28. Execute preparation check after program loading completes. The Start Condition menu is displayed. 29. In the Start Condition menu, check the following: a. Check that the date and time displayed on the top right of the screen is correct. b. Execute data index change entering = for date. Check that the date of the new index indicates the correct date. DSD/00001/7194.5 6 30. No further action is required. Year 2000 Test Procedure: Use the following steps to test the change to the year 2000 and then reset to the current date. The following items are required to perform this procedure on the Reply/AU560. Program Floppy Disk 1/3 MU5907 SPECIAL TOOL for YEAR 2000 diskette 31. Confirm that POWER ON switch on the front of the DPR is not illuminated and the analyzer and DPR are off. 32. Move the BOOT switch on the rear side of the DPR from “WD” to “FD”. When moving the switch, please pull out on the switch. If the switch is not pulled, it cannot be moved (FIG.12¬-). 33. Switch ON the LOCAL POWER switch on the rear side of the DPR (FIG.12-¯). Wait until the DPR displays the message ”Please insert system floppy disk & hit any key then restart disk mount”. 34. Confirm that Write Protect is off on the Program Floppy Disk 1/3, insert it into the FD drive and press the Enter ↵ key. 35. Wait until the DPR displays the (FIG.1) menu. 36. Type 7 and the Enter ↵ key on the keyboard. 37. Wait until the DPR displays the (FIG.2) menu. Only Item 1 displays at this time. 38. Type S and the Enter ↵ key, B and the Enter ↵ key and M and the Enter ↵ key on the keyboard. Items 2 through 5 will now be displayed on the (FIG.2) menu. 39. Type 2 and the Enter ↵ key on the keyboard. Wait until the DPR displays the (FIG.3) menu. 40. Type 1 and the Enter ↵ key on the keyboard. 41. Type 20 and the Enter ↵ key on the keyboard. 42. Press the Menu key. The DPR displays the menu shown in FIG.2. 43. Type 1 and the Enter ↵ key on the keyboard. The DPR displays the following menu (FIG.9). *** DATE & TIME SET *** # SELECT No.> --------------------------------------------------------------------1 YEAR XX 2 MONTH XX 3 DAY XX 4 HOUR XX 5 MINUTE XX 6 SECOND XX 1: 2: 3: 4:SET 5: 6: 7: 8: FIG.9 44. Type 1 and the Enter ↵ key on the keyboard. 45. Type 00 for the year and the Enter ↵ key on the keyboard. DSD/00001/7194.5 7 46. 47. 48. 49. 50. 51. 52. 53. 54. 55. 56. 57. 58. 59. 60. 61. 62. Type 2 and the Enter ↵ key on the keyboard. Type 01 for the month and the Enter ↵ key on the keyboard. Type 3 and the Enter ↵ key on the keyboard. Type 01 for the day and the Enter ↵ key on the keyboard. Press F4 (Set) to set the date and time. The date and time displayed in the upper right hand corner of the screen will reflect your changes. Press the OPS Menu key on the keyboard. The DPR displays the menu shown in FIG.1. Type 6 and the Enter ↵ key on the keyboard. Wait until the DPR displays the (FIG.4) menu. Type 1 and the Enter ↵ key on the keyboard. Wait until the DPR displays the (FIG.5) menu. Type 2 and the Enter ↵ key on the keyboard. Wait until file number 2 (M510SYS.FIL) has been copied. Press the OPS. Menu on the keyboard. The DPR displays the menu shown in FIG.1. Press the function key F8 (Exit) on the keyboard. Wait until the DPR displays the message ”BE SURE TO SET BOOT SWITCH ON WD SIDE AND PRESS RESET SWITCH”. Remove the Program Floppy Disk 1/3. Switch OFF the LOCAL POWER switch on the rear side of the DPR (FIG12- ¯). Wait 10 seconds and switch ON the LOCAL POWER button on the rear side of the DPR (FIG12- ¯). Wait until the DPR displays the message ”Please insert system floppy disk & hit any key then restart disk mount”. Insert the MU5907 SPECIAL TOOL for YEAR 2000 floppy disk into the FD drive and press the Enter ↵ key on the keyboard. Wait until the DPR displays the message from FIG.6. Type GO2000 and press the Enter ↵ key on the keyboard. (see FIG.7) Wait until the DPR displays the message from Fig.8. Note: If any errors are displayed during steps 60 to 62, refer to the Appendix Error List. 63. Remove the MU5907 SPECIAL TOOL for YEAR 2000 floppy disk. 64. Move the BOOT switch on the rear side of the DPR from “FD” to “WD”. When moving the switch, please pull out on the switch. If the switch is not pulled, it cannot be moved (FIG.12¬®). 65. Switch OFF the LOCAL POWER button on the rear side of the DPR (FIG12- ¯). 66. Power on the equipment using the POWER ON switch on the front of the DPR. 67. Execute preparation check after program loading completes. The Start Condition menu is displayed. 68. In the Start Condition menu, check the following: a. Check that the date and time displayed on the top right of the screen is correct. b. Execute data index change entering = for date. Check that the date of the new index indicates the correct date. Note: Measurement done in the current index with the year set to 2000 will remain on the hard drive and may cause some confusion. When testing is complete use the following steps to return to the current date. 69. Perform an End Process on the instrument. 70. Move the BOOT switch on the rear side of the DPR from “WD” to “FD”. When moving the switch, please pull out on the switch. If the switch is not pulled, it cannot be moved (FIG.12¬-). 71. Switch ON the LOCAL POWER switch on the rear side of the DPR (FIG.12-¯). Wait until the DPR displays the message ”Please insert system floppy disk & hit any key then restart disk mount”. 72. Confirm that Write Protect is off on the Program Floppy Disk 1/3, insert it into the FD drive and press the Enter ↵ key. DSD/00001/7194.5 8 73. 74. 75. 76. 77. 78. 79. 80. 81. 82. 83. 84. 85. 86. 87. 88. 89. 90. 91. 92. 93. 94. 95. 96. 97. 98. 99. Wait until the DPR displays the (FIG.1) menu. Type 7 and the Enter ↵ key on the keyboard. Wait until the DPR displays the (FIG.2) menu. Only Item 1 displays at this time. Type S and the Enter ↵ key, B and the Enter ↵ key and M and the Enter ↵ key on the keyboard. Items 2 through 5 will now be displayed on the (FIG.2) menu. Type 2 and the Enter ↵ key on the keyboard. Wait until the DPR displays the (FIG.3) menu. Type 1 and the Enter ↵ key on the keyboard. Type 19 and the Enter ↵ key on the keyboard. Press the Menu key. The DPR displays the menu shown in FIG.2. Type 1 and the Enter ↵ key on the keyboard. The DPR displays the (FIG.9) menu. Type 1 and the Enter ↵ key on the keyboard. Type the current year and the Enter ↵ key on the keyboard. Type 2 and the Enter ↵ key on the keyboard. Type the current month and the Enter ↵ key on the keyboard. Type 3 and the Enter ↵ key on the keyboard. Type the current day and the Enter ↵ key on the keyboard. Press F4 (Set) to set the date and time. The date and time displayed in the upper right hand corner of the screen will reflect your changes. Press the OPS Menu key on the keyboard. The DPR displays the menu shown in FIG.1. Type 6 and the Enter ↵ key on the keyboard. Wait until the DPR displays the (FIG.4) menu. Type 1 and the Enter ↵ key on the keyboard. Wait until the DPR displays the (FIG.5) menu. Type 2 and the Enter ↵ key on the keyboard. Wait until file number 2 (M510SYS.FIL) has been copied. Press the OPS. Menu on the keyboard. The DPR displays the menu shown in FIG.1. Press the function key F8 (Exit) on the keyboard. Wait until the DPR displays the message ”BE SURE TO SET BOOT SWITCH ON WD SIDE AND PRESS RESET SWITCH”. Remove the Program Floppy Disk 1/3. Switch OFF the LOCAL POWER switch on the rear side of the DPR (FIG12- ¯). Wait 10 seconds and switch ON the LOCAL POWER button on the rear side of the DPR (FIG12- ¯). Wait until the DPR displays the message ”Please insert system floppy disk & hit any key then restart disk mount”. Insert the MU5907 SPECIAL TOOL for YEAR 2000 floppy disk into the FD drive and press the Enter ↵ key on the keyboard. Wait until the DPR displays the message from FIG.6. Type GO2000 BACK and press the Enter ↵ key on the keyboard. (see FIG.10) Note: A space exists between “GO2000” and “BACK” A>GO2000 BACK FIG.10 100. The DPR will display the following message (Fig.11.) DSD/00001/7194.5 9 A>GO2000 BACK Transformation 2000 program for OLYMPUS Data Processor Ver.1.0 Copyright OLYMPUS OPTICAL CO.,LTD All rights reserved Restore translation normal end. A> FIG.11 Note: If any errors are displayed during steps 98 to 100, refer to the Appendix Error List. 100. Remove the MU5907 SPECIAL TOOL for YEAR 2000 floppy disk. 101. Move the BOOT switch on the rear side of the DPR from “FD” to “WD”. When moving the switch, please pull out on the switch. If the switch is not pulled, it cannot be moved (FIG.12-¬®). 102. Switch OFF the LOCAL POWER button on the rear side of the DPR (FIG12- ¯). 103. Power on the equipment using the POWER ON switch on the front of the DPR. 104. Execute preparation check after program loading completes. The Start Condition menu is displayed. In the Start Condition menu, check the following: a. Check that the date and time displayed on the top right of the screen is correct. b. Execute data index change entering = for date. Check that the date of the new index indicates the correct date (19xx). 105. No further action is required. DSD/00001/7194.5 10 Rear side of the DPR WD ‡A  BOO ‡@ BOOT À WD ,eD FD Á FD FUSE DPR 5A ON ‡B LOCAL POWER OFF ‡C à FIG.9 FIG.12 Appendix: Error List Error No. Error Message 1 Parameter Error 2 or 4 Patch file [ B:INIT00.TSK] not found. 3 This system is already translated to 20xx. 5 Can't create new file [ B:INIT00.20 ]. 6 Patch strings [ 1900 ] not found in this file [B:INIT00.TSK ]. 7 This system is not translated to 20xx yet. DSD/00001/7194.5 Cause and Corrective Action The command typed was not correct. Re-type command. The file on the DPR might be corrupted. Contact Technical Support. The date on the system is already converted to the year 20xx. Power the DPR on again. If the year does not display as 20xx, contact Technical Support. The conversion to the year 2000 has failed. Contact Technical Support. The conversion to the year 2000 has failed. Contact Technical Support. "GO2000" was not executed. Execute “GO2000” before executing "GO2000 BACK". 11 Year 2000 Conversion Instructions and Test Procedure OLYMPUS AU1000 Automated Chemistry Analyzer Year 2000 Conversion Instructions: 1. Press the Power switch on the analyzer and then press the “Q” key while the * is displayed in the upper left hand corner of the screen. The Dos C:> prompt will be displayed. 2. Type “date” and press enter↵. Follow the prompts to enter the correct date within the year 2000 and press enter↵. 3. Press the Em. Stop switch to remove power from the analyzer. 4. Press the Power On switch and then the Warm Up switch to restore power and load the program on the analyzer. Check that the correct date is displayed in the upper right corner of the screen. No further action is required. Year 2000 Test Procedure: Use the following steps to test for the change to the year 2000 and then reset to the current date. 5. Press the Power switch on the analyzer and then press the “Q” key while the * is displayed in the upper left hand corner of the screen. The Dos C:> prompt will be displayed. 6. Type “date” and press enter↵. Follow the prompts to enter the date you wish within the year 2000 and press enter↵. 7. Press the Em. Stop switch to remove power from the analyzer. Press the Power On switch and then the Warm Up switch to restore power and load the program on the analyzer. Check that the date you entered is displayed in the upper right corner of the screen. When testing is complete, use the following steps to return to the current date. 8. Perform an end process and wait 15 seconds. 9. Press the Power switch on the analyzer and then press the “Q” key while the * is displayed in the upper left hand corner of the screen. The Dos C:> prompt will be displayed. 10. Type “date” and press enter↵. Follow the prompts to enter the current date and press enter↵. 11. Press the Em. Stop switch to remove power from the analyzer. Press the Power On switch and then the Warm Up switch to restore power and load the program on the analyzer. Check that the current date is displayed in the upper right corner of the screen. No further action is required. DSD/00001/7194.5 12 Year 2000 Conversion Instructions and Test Procedure OLYMPUS AU5200 Automated Chemistry Analyzer Year 2000 Conversion Instructions: 1. From the Ops Menu select 21. Auxilliary Menu then select 8. Current Date and Time. 2. In this menu press the Enter key for the Year, Month, Day, Hour, Minute and Day of Week. This menu will have the updated date already. 3. Press the Yes key at the # All Ok ? (Yes,No) > __ prompt. The display will now be correct. No further action is required. Year 2000 Test Procedure: Use the following steps to test for the change to the year 2000 and then reset to the current date. 4. From the Ops Menu select 21. Auxilliary Menu then select 8. Current Date and Time. 5. In this menu type 1999 for the Year, 12 for the Month, 31 for the Day, 23 for the Hour, 59 for the Minute and Friday for the Day of Week. 6. Press the Yes key at the # All Ok ? (Yes,No) > __ prompt. 7. The date in the upper right hand corner of the screen will switch to 01/01/1900. 8. Select 8. Current Date and Time. 9. In this menu press the Enter key for the Year, Month, Day, Hour, Minute and Day of Week. This menu will have the updated date already. 10. Press the Yes key at the # All Ok ? (Yes,No) correct. > __ prompt. The display will now be When testing is complete use the following steps to return to the current date. 11. Select 8. Current Date and Time. 12. In this menu type the current date, time, hour, minute and day of the week for the Year, Month, Day, Hour, Minute and Day of Week prompts. 13. Press the Yes key at the # All Ok ? (Yes,No) > __ prompt. Confirm the correct date and time is displayed in the upper right hand corner of the display. No further action is required. DSD/00001/7194.5 13 Year 2000 Conversion Instructions and Test Procedure OLYMPUS AU600 Automated Chemistry Analyzer Year 2000 Conversion Instructions: 12. Press the Power switch on the analyzer and then press the “Q” key while the * is displayed in the upper left hand corner of the screen. The System Maintenance Menu will be displayed. 13. Type “14” and press enter↵ to select option 14. Go to DOS. 14. Type “date” and press enter↵. Follow the prompts to enter the correct date within the year 2000 and press enter↵. 15. Press the Em. Stop switch to remove power from the analyzer. Press the Reset switch and then the Power switch to restore power and load the program on the analyzer. Check that the correct date is displayed in the upper right corner of the screen. No further action is required. Year 2000 Test Procedure: Use the following steps to test for the change to the year 2000 and then reset to the current date. 16. Press the Power switch on the analyzer and then press the “Q” key while the * is displayed in the upper left hand corner of the screen. The System Maintenance Menu will be displayed. 17. Type “14” and press enter↵ to select option 14. Go to DOS. 18. Type “date” and press enter↵. Follow the prompts to enter the date you wish within the year 2000 and press enter↵. 19. Press the Em. Stop switch to remove power from the analyzer. Press the Reset switch and then the Power switch to restore power and load the program on the analyzer. Check that the date you entered is displayed in the upper right corner of the screen. When testing is complete, use the following steps to return to the current date. 20. Perform an end process and wait 15 seconds. 21. Press the Power switch on the analyzer and then press the “Q” key while the * is displayed in the upper left hand corner of the screen. The System Maintenance Menu will be displayed. 22. Type “14” and press enter↵ to select option 14. Go to DOS. 23. Type “date” and press enter↵. Follow the prompts to enter the current date and press enter↵. DSD/00001/7194.5 14 24. Press the Em. Stop switch to remove power from the analyzer. Press the Reset switch and then the Power switch to restore power and load the program on the analyzer. Check that the current date is displayed in the upper right corner of the screen. No further action is required. DSD/00001/7194.5 15 Year 2000 Conversion Instructions and Test Procedure OLYMPUS PK7200 Automated Microplate System Year 2000 Conversion Instructions: 14. Power on the instrument using the Power On switch on the front of the DPR. ***OPERATION MENU*** # SELECT No.> _____________________________________________________________ 1 START CONDITION 2 TEST REQUISITION 3 TEST DATA DISPLAY 4 ANALYZER STATUS 5.SAMPLE LIST 6 DATA MANAGEMENT 7 REPORT 1: 2: 3:WARM 4: 8 DATA…… 9 QC 5:DIAG 6: 21…… 22…… 7:END 8: 15. From the Operation Menu select F5: DIAG then press the Yes key at the DIAG ? Yes or No prompt. ***OPERATION MENU*** # SELECT No.> _____________________________________________________________ 1 DIAGNOSTIC (DPR) 2 DIAGNOSTIC (DPR) 3 DIAGNOSTIC (DPR) 4 DIAGNOSTIC (DPR) 5 MAINTENANCE (DPR) 6 MAINTENANCE (ANL) 7 MANUAL MEASURE 1: 2: 3:WARM 4: 5: 6: 7:END 8: 16. Select 5, Maintenance (DPR) and press enter ↵. *** 5 MAINTENANCE (DPR) *** # SELECT No.> DSD/00001/7194.5 16 _____________________________________________________________ 1 DATE MARK 19 2 DATE & TIME SET 3 CLEANING DRIVE 1: 2: 3: 4: 5: 6: 7: 8: 17. In the Maintenance (DPR) menu select 1, Date Mark, then press enter ↵. 18. Type 20 and press enter↵. 19. The date and time will be properly displayed and updated in the upper right corner of the CRT. No further action is required. Year 2000 Test Procedure: Use the following steps to test for the change to the year 2000 and then reset to the current date. 20. Power on the instrument using the Power On switch on the front of the DPR. ***OPERATION MENU*** # SELECT No.> _____________________________________________________________ 1 START CONDITION 2 TEST REQUISITION 3 TEST DATA DISPLAY 4 ANALYZER STATUS 5.SAMPLE LIST 6 DATA MANAGEMENT 7 REPORT 1: 2: 3:WARM 4: 8 DATA…… 9 QC 5:DIAG 6: 21…… 22…… 7:END 8: 21. From the Operation Menu select F5: DIAG then press the Yes key at the DIAG ? Yes or No prompt. ***OPERATION MENU*** # SELECT No.> _____________________________________________________________ DSD/00001/7194.5 17 1 DIAGNOSTIC (DPR) 2 DIAGNOSTIC (DPR) 3 DIAGNOSTIC (DPR) 4 DIAGNOSTIC (DPR) 5 MAINTENANCE (DPR) 6 MAINTENANCE (ANL) 7 MANUAL MEASURE 1: 2: 3:WARM 4: 5: 6: 7:END 8: 22. Select 5, Maintenance (DPR) and press enter ↵. *** 5 MAINTENANCE (DPR) *** # SELECT No.> _____________________________________________________________ 1 DATE MARK 19 2 DATE & TIME SET 3 CLEANING DRIVE 1: 2: 3: 4: 5: 6: 7: 8: 23. In the Maintenance (DPR) menu select 1, Date Mark, then press enter ↵. 24. Type 20 and press enter↵. 25. Select 2, Date & Time Set, then press enter ↵. 26. Enter the Year, Month, Date, Hour, Minute, and Second you wish within the year 2000. Press the F4, Set, key. The date and time you entered will be displayed in the upper right corner of the CRT. When testing is complete, use the following steps to return to the current date. 27. From the Operation Menu select F5: DIAG then press the Yes key at the DIAG ? Yes or No prompt. ***OPERATION MENU*** # SELECT No.> _____________________________________________________________ 1 DIAGNOSTIC (DPR) DSD/00001/7194.5 18 2 DIAGNOSTIC (DPR) 3 DIAGNOSTIC (DPR) 4 DIAGNOSTIC (DPR) 5 MAINTENANCE (DPR) 6 MAINTENANCE (ANL) 7 MANUAL MEASURE 1: 2: 3:WARM 4: 5: 6: 7:END 8: 28. Select 5, Maintenance (DPR) and press enter ↵. *** 5 MAINTENANCE (DPR) *** # SELECT No.> _____________________________________________________________ 1 DATE MARK 19 2 DATE & TIME SET 3 CLEANING DRIVE 1: 2: 3: 4: 5: 6: 7: 8: 29. In the Maintenance (DPR) menu select 1, Date Mark, then press enter ↵. 30. Type 19 and press enter↵. 31. Select 2, Date & Time Set, then press enter ↵. 32. Enter the current Year, Month, Date, Hour, Minute, and Second. Press the F4, Set key. The date and time you entered will be displayed in the upper right corner of the CRT. No further action is required. DSD/00001/7194.5 19 Year 2000 Conversion Instructions and Test Procedure OLYMPUS AU800 Automated Chemistry Analyzer Year 2000 Conversion Instructions: 25. Press the Power switch on the analyzer and then press the “Q” key while the * is displayed in the upper left hand corner of the screen. The Dos C:> prompt will be displayed. 26. Type “date” and press enter↵. Follow the prompts to enter the correct date within the year 2000 and press enter↵. 27. Press the Em. Stop switch to remove power from the analyzer. 28. Press the Power On switch and then the Warm Up switch to restore power and load the program on the analyzer. Check that the correct date is displayed in the upper right corner of the screen. No further action is required. Year 2000 Test Procedure: Use the following steps to test for the change to the year 2000 and then reset to the current date. 29. Press the Power switch on the analyzer and then press the “Q” key while the * is displayed in the upper left hand corner of the screen. The Dos C:> prompt will be displayed. 30. Type “date” and press enter↵. Follow the prompts to enter the date you wish within the year 2000 and press enter↵. 31. Press the Em. Stop switch to remove power from the analyzer. Press the Power On switch and then the Warm Up switch to restore power and load the program on the analyzer. Check that the date you entered is displayed in the upper right corner of the screen. When testing is complete, use the following steps to return to the current date. 32. Perform an end process and wait 15 seconds. 33. Press the Power switch on the analyzer and then press the “Q” key while the * is displayed in the upper left hand corner of the screen. The Dos C:> prompt will be displayed. 34. Type “date” and press enter↵. Follow the prompts to enter the current date and press enter↵. 35. Press the Em. Stop switch to remove power from the analyzer. Press the Power On switch and then the Warm Up switch to restore power and load the program on the analyzer. Check that the current date is displayed in the upper right corner of the screen. No further action is required. DSD/00001/7194.5 20