1
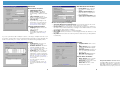
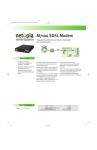
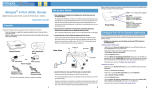
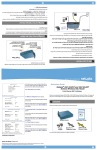
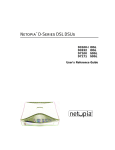
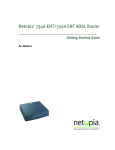
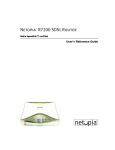
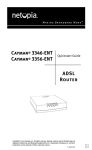
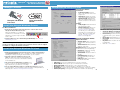
BROADBAND WITHOUT BOUNDARIES™
Netopia® 3-D Reach™ Wireless
PC Card Installation
Package Contents
Available Networks:
Netopia WLAN Utility Screens
•
Connection Status
Connection
•
•
Netopia 3-D Reach
PC Card
Connection Status: Tells the
name of the wireless network currently in use.
• Link Speed: Displays the speed
of the current wireless link in bps.
• Signal Strength: Graphical display of the signal strength on the
current connection to the Access
Point.
Activity
CD & Quickstart
Guide
Install the Netopia Wireless Drivers
•
For Microsoft Windows
•
1. Insert the CD and double-click the Setup icon to load the driver for the
•
Netopia 3-D Reach Wireless PC Card.
When the installation is complete, a
new Wireless communication icon will
appear in your system tray in the Windows toolbar.
Sent (TX) bps: Data transmission
rate (upstream) in bps.
Received (Rx) bps: Data reception rate (downstream) in bps.
Current Connection Status button: Allows you to view detailed
information for your wireless connection. When you click this button, the “Current Connection
Status” screen appears.
•
•
Adapter Information
WLAN Utility Screens”.
•
Adapter Name: Name of the wireless PC card to which the driver is
bound.
• Station Address: MAC (hardware)
address of this card.
Internet Protocol (served to this PC by
the Wireless Access Point/Gateway)
Note:
The Netopia WLAN Utility is not installed on Windows XP. Windows XP users
should use the Windows XP operating system automatic wireless network configuration feature to configure the wireless connection.
Install the Netopia Wireless PC Card
•
1. Install the Netopia Wireless PC Card in your PC or laptop as appropriate to
•
your particular hardware. Be sure to discharge any static electricity before
handling the card by touching the metal chassis of your computer.
•
2.Insert the card in the Cardbus slot in your computer. The label side should be facing upward, and
the pin connector end of the card should seat firmly
in the Cardbus slot.
•
•
•
Automatic Wireless Security Password: Leave this box unchecked if you are
using a Netopia Wireless Gateway.
Password key: Transfer the Encryption key from your Netopia Wireless Gateway
to this field. Once you do this the following fields will automatically adjust to your
entry.
Key Format: ASCII Characters or Hexadecimal digits.
Key Length: 40 bits (5 characters or 10 hex digits; 104 bits (13 characters or 26
hex digits)
Key Index: This should be the same key index as that used in your Netopia Wireless Gateway.
Click the Connect button.
IP Address: IP Address currently
being served to this PC.
Subnet Mask: IP subnet mask for
this PC.
Default Gateway: IP Address of
the router/gateway for this wireless LAN.
DNS Server: DNS server address
for this wireless LAN.
Connection Information
3.The card should be immediately recognized. If necessary, you can use the Netopia WLAN Utility to configure and monitor your wireless connectivity.
4.You can enable Wireless Security on your Wireless network by using the
security features of your PC Card in conjunction with your Netopia Wireless
Gateway. (See “Wireless Security Password Setting”)
Wireless Security Password Setting
•
•
Current Connection Status
2.Click the Wireless icon to start the Netopia WLAN Utility. See “Netopia
•
Wireless Network Name: Network to which you are currently
connected.
Network Operating Mode: Automatic, Device-to-device, or Base
Station Mode.
Available Networks: Scans for
available wireless networks within
range. If you select a different
one, click the Connect button. To
scan for others as you change
location, click the Refresh button.
1
•
•
•
•
•
•
Link Status: Connected to (MAC Address of the Access Point).
Network Mode: Ad Hoc (peer-to-peer) or Infrastructure (network).
Network ID (SSID): Workgroup name or ID of this wireless LAN.
Encryption: Wireless encryption Enabled or Disabled on your network.
Power Mode: Continuos Access, Maximum Power Saving, or Fast Power Saving.
Channel/Frequency: (1 through 11) on which the network is broadcasting.
2
3
Advanced
New Wireless LAN Profile
Wireless Network Options
•
•
•
•
•
•
Authentication Mode:
Power Saving: Power Mode:
Continuos Access, Maximum
Power Saving, or Fast Power Saving.
Short Preamble: Disable or
Enable. Long Preamble is default
if Short Preamble is disabled.
Transmit rate
If you make any changes to the
items above, you must click the
Apply Changes button and the
Restart Network Driver button.
Language and Region Options
•
•
•
•
•
Wireless Security Password Setting
•
•
Language: English, French, German, or Korean.
Country: N/A
If you make any changes to the
items above, click the Change
button
Profile Name: Enter a descriptive name, for example Home
Office.
Wireless Network Name: The
Network name as it appears in
the scanning list.
Network Operating Mode: Base
Station Mode or Device-to-Device.
•
•
•
Automatic Wireless Security Password: If your network supports this, check
this box, and click the OK button. No further entries are required.
Password Key field: If your network is secured by an encryption key, transfer it to
this field from your wireless Gateway’s settings in either ASCII characters or hexadecimal digits. Then click the OK button.
Key Format: ASCII Characters or Hexadecimal digits.
Key Length: 40 bits (5 characters or 10 hex digits; 104 bits (13 characters or 26
hex digits)
Key Index: This should be the same key index as that used in your Netopia Wireless Gateway.
If you use your wireless PC in multiple locations, connecting to multiple networks, it can
be useful to create profiles of the security and password settings for easy switching. The
Profile screens allow you to create, edit, delete, and switch among multiple profiles.
Profile
Version
•
•
•
•
•
•
•
Profile in Use: Shows the current profile you are using.
Available Networks: Shows the
networks available in range.
Refresh button: Allows you to rescan for available networks.
Profile List: A list of profiles you
have configured, for convenient
switching. To create a new profile,
click the New button. This will display the “New Wireless LAN Profile” screen, where you can Add or
Edit a profile.
To delete a profile, click the
Delete button.
To activate a profile, select one
from the list and click the Apply
button.
4
•
•
•
Computer Name: Name of this
PC.
Utility Version: Version number
of this Netopia WLAN Configuration Utility.
Firmware Version: Firmware version of your Netopia 3-D Reach
wireless card.
EEP ROM Version: Manufacturing version of the ROM chip.
Network Driver Information
•
•
•
Driver Version: Version number
of this wireless device driver.
Driver Date: Release date of this
wireless device driver.
Driver File: File name of this
wireless device driver.
5
Netopia Part Number: 6180087-00-01
Copyright 2003, Netopia, Inc. Netopia and the Netopia logo are registered trademarks
belonging to Netopia, Inc., registered U.S. Patent and Trademark Office. Broadband
Without Boundaries and 3-D Reach are trademarks belonging to Netopia, Inc. All other
trademarks are the property of their respective owners. All rights reserved.
6