1
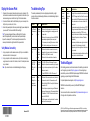
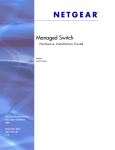
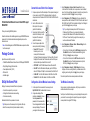
Connect the Access Point to Your Computer
Installation Guide
1.
Prepare a computer with an Ethernet adapter. If this computer is already part
of your network, record its TCP/IP configuration settings. Configure the
computer with a static IP address of 192.168.0.210 and 255.255.255.0 as the
subnet mask.
ProSafe® Dual Band Wireless-N Access Point with RFID support
WNDAP380R
2.
Insert an Ethernet cable in the
Ethernet port of the computer
(point A in the illustration).
Thank you for selecting NETGEAR products.
3.
Securely insert the other end of the
cable into the Ethernet port on the
back panel of the access point
(point B in the illustration).
4.
Connect the power adapter to the
access point and verify the following:
Follow the instructions in this installation guide to set up your WNDAP380R wireless
access point. For information about advanced configuration options, see the
reference manual.
Note: In this installation guide, the WNDAP380R wireless access point is referred
to as the access point.
•
Package Contents
Unpack the box and verify the contents:
•
•
•
•
•
ProSafe® Dual Band Wireless-N Access Point with RFID support WNDAP380R
Straight through Category 5 Ethernet cable
Power adapter and cord (12V, 1A)
Wall-mount kit
Installation guide
Set Up the Access Point
Setting up the access point consists of three short procedures:
•
•
•
Connect the access point to your computer.
Configure the LAN and wireless access settings.
Test wireless connectivity.
Estimated total time for these procedures: 5 minutes.
Tip: Before you mount the access point in a high location, first set up
and test the access point to verify wireless network connectivity.
•
•
•
•
3.
Select Configuration > System > Basic > General from the menu.
In the Access Point Name field, enter a unique name or leave the default
name. From the Country/Region drop-down list, select the country where the
access point is installed. Click Apply to save your changes.
4.
Select Configuration > IP > IP Settings from the menu. By default, the
access point has a static IP address of 192.168.0.100 with a subnet mask of
255.255.255.0 and the DHCP client is disabled. Configure the IP settings for
your LAN. Click Apply to save your changes.
A
B
Power LED. The Power LED
blinks when you turn on the
access point. After a few seconds,
the Power LED should turn steady green. If the Power LED is off or is still
blinking after 30 seconds, check the connections, and check if the power
outlet is controlled by a wall switch that is turned off.
ACTIVE LED. The ACTIVE LED blinks when there is Ethernet traffic.
LAN LED. The LAN LED indicates LAN speeds: green for 1000 Mbps,
amber for 100 Mbps or 10 Mbps. If no link is detected, the LAN LED is off.
2.4 GHz LED. The 2.4 GHz LED indicates 2.4 GHz traffic on the WLAN.
5 GHz LED. The 5 GHz LED indicates 5 GHz traffic on the WLAN.
Tip: If you configure the access point as a DHCP client, reserve an
IP address on the DHCP server in your network by binding the
access point’s MAC address to the IP address that is issued by the
DHCP server. The next time that you log in to the access point, you
need to use the reserved IP address.
5.
Select Configuration > Wireless > Basic > Wireless Settings from the
menu. Enable one or both radios:
•
•
6.
To turn on the 2.4 GHz radio, click the 802.11b/bg/ng tab and select the
Turn Radio On check box. The default wireless mode is ng (that is,
802.11ng). Click Apply to save your changes.
To turn on the 5 GHz radio, click the 802.11a/na tab and select the
Turn Radio On check box. The default wireless mode is na (that is,
802.11na). Click Apply to save your changes.
Select Configuration > Security > Profile Settings from the menu.
Configure one or more security profiles for your wireless network. After
configuring each security profile, click Apply to save your changes.
The online help and the reference manual provide more information.
Configure the LAN and Wireless Access Settings
Test Wireless Connectivity
1.
On the computer that is connected to the access point, enter
http://192.168.0.100 in the address field of a browser.
Using a computer or another wireless device, verify that you can establish a
wireless connection to the access point.
2.
A login window displays. When
prompted, enter admin for the user
name and password for the
password, both in lowercase letters.
Now that you have finished the setup, you are ready to deploy the access point in
your network. You can reconfigure the computer that you used to configure the
access point back to its original TCP/IP settings.
The web management interface of the
access point displays. The menu lets
you navigate to the various screens.
Deploy the Access Point
Troubleshooting Tips
1.
Disconnect the access point and position it where you plan to deploy it. The
best location is elevated such as wall or ceiling mounted, at the center of your
wireless coverage area, and within line of sight of all wireless devices.
This section provides some tips for correcting simple problems that you might
encounter. For more troubleshooting information, see the troubleshooting chapter in
the reference manual.
2.
Connect an Ethernet cable from the Ethernet port on your access point to a
LAN port on your router, switch, or hub.
3. Connect the power adapter to the access point and plug the power adapter into
a power outlet. The Power and LAN LEDs should light.
Tip: The access point supports Power over Ethernet (PoE). If you have
a switch that provides PoE, you do not need to use the power adapter
to power the access point. This can be especially convenient when the
access point is installed in a high location far from a power outlet.
Verify Wireless Connectivity
1.
Using a computer or another wireless device, verify that you can establish a
wireless connection to the access point.
2.
Using a computer or another wireless device, verify Internet connectivity by
using a browser to connect to the Internet, or check for file and printer access
on your network.
Note: If you cannot connect, see the troubleshooting tips on this page.
Problem
Cause
Possible Solution
No LEDs are lit
on the access
point.
The access
point has no
power.
• Make sure that the power cord is connected to the
access point and plugged in to a working power outlet
or power strip.
• Make sure that you are using the correct NETGEAR
power adapter supplied with your access point.
• If the access point is using PoE, make sure that the
PoE switch is providing power to the access point.
The LAN LED is There is a
off.
hardware
connection
problem.
The 2.4 GHz
LED, 5 GHz
LED, or both
are off.
The wireless
• If a WLAN LED stays off, disconnect the power
connection
adapter from its power source and then plug it in again.
does not work. • Log in to the access point and verify that the radio or
radios are turned on.
• Contact NETGEAR if a WLAN LED remains off.
You cannot
Multiple
configure the
causes.
access point
from a browser.
December 2012
• Make sure that the cable connectors are securely
plugged in to the access point and to the network
device (hub, [PoE] switch, or router).
• Make sure that the network device is turned on.
• Make sure that the access point is correctly installed, it
is powered on, and the LAN connections are OK.
Check that the LAN LED is lit to verify that the Ethernet
connection is OK.
• Ensure that your computer is using an IP address in
the range of the access point. The access point default
IP address is 192.168.0.100 and the default subnet
mask is 255.255.255.0.
• Quit the browser, clear the cache, delete the cookies,
and launch the browser again.
Problem
Cause
You cannot
There is a
access the
configuration
Internet or the
problem.
LAN from a
wireless device.
Possible Solution
• You might not have restarted the wireless device to let
the TCP/IP changes take effect. Restart the computer.
• Make sure that the SSID and wireless security settings
of the wireless device are the same as those of the
access point.
• The wireless device might not have the correct TCP/IP
settings to communicate with the network. Restart the
wireless device and check that TCP/IP is set up
correctly for that network. In Windows, the usual setting
for Network Properties is to obtain an IP address
automatically.
• The access point default values might not work with
your network. Check the access point default
configuration against the configuration of other devices
in your network.
For information about changing the default values of the
access point, see the reference manual.
Technical Support
After installing your device, locate the serial number on the label of your product and
use it to register your product at https://my.netgear.com. You must register your
product before you can use NETGEAR telephone support. NETGEAR recommends
registering your product through the NETGEAR website.
For product updates and web support, visit http://support.netgear.com.
NETGEAR recommends that you use only the official NETGEAR support
resources.
You can access the reference manual online at http://downloadcenter.netgear.com
or through a link in the product’s user interface.
NETGEAR, the NETGEAR logo, and ProSafe® are registered trademarks of NETGEAR, Inc. in the United
States and/or other countries. Other brand and product names are trademarks or registered trademarks of their
respective holders. Information is subject to change without notice. © NETGEAR, Inc. All rights reserved.