1
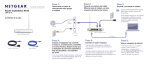
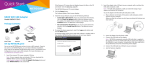
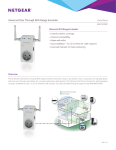
N150 Wireless Micro USB Adapter
WNA1000M Installation Guide
N150 Wireless Micro USB Adapter
Resource CD
Trademarks
NETGEAR, the NETGEAR logo, and Connect with Innovation are
trademarks and/or registered trademarks of NETGEAR, Inc. and/or its
subsidiaries in the United States and/or other countries. Information is
subject to change without notice. Other brand and product names are
trademarks and/or registered trademarks of their respective holders.
© 2012 NETGEAR, Inc. All rights reserved
Statement of Conditions
In the interest of improving internal design, operational function, and/or
reliability, NETGEAR reserves the right to make changes to the
products described in this document without notice. NETGEAR does
not assume any liability that may occur due to the use or application of
the product(s) or circuit layout(s) described herein.
This symbol is placed in accordance with the European
Union Directive 2002/96 on the Waste Electrical and
Electronic Equipment (the WEEE Directive). If disposed
of within the European Union, this product should be
treated and recycled in accordance with the laws of your
jurisdiction implementing the WEEE Directive.
2
Installation
1.
Insert the Resource CD in your computer’s CD
drive. If the CD main screen does not display,
browse the files on the CD and double-click
Autorun.exe.
2.
Click Setup. The Software Update Check screen
displays.
3.
If you are connected to the Internet, click Check
for Updates. If not, then click Install from CD.
4.
Accept the license agreement.
A message displays asking you to wait while
software is installed. Then you are prompted to
insert your adapter.
3
5.
Either insert the adapter into a USB port on your
computer, or use a USB cable to connect the
adapter.
Note: For best results, put the wireless adapter at
least 4 feet (1 meter) away from your router.
6.
Click Next.
NETGEAR Genie displays a list of wireless
networks in your area.
4
Join a Wireless Network
You can join a wireless network from this NETGEAR
Genie screen, or you can use Wi-Fi Protected Setup
(WPS) if your wireless network supports it.
• NETGEAR Genie: Click your wireless network
to select it from the list, and then click Connect.
If the network is secure, enter its password or
network key.
• WPS: Press and hold the WPS button on the side
of the adapter for 2 seconds.
Within 2 minutes, press the WPS button on your
wireless router or gateway.
5
NETGEAR Genie Icon
When you install your adapter, the NETGEAR Genie
icon displays in the Windows taskbar and on the
desktop. You can click this icon to open NETGEAR
Genie to make changes or connect to a different
wireless network. The color of the icon indicates the
strength of your wireless connection from 0 (zero) to
5 bars.
Green: 3 to 5 bars
Yellow: 1 or 2 bars
Red: 0 (zero) bars, indicating no connection
If you remove your adapter, NETGEAR Genie is not
available, so the icon does not display. If you insert
the adapter again, the icon returns.
6
Technical Support
Thank you for selecting NETGEAR products.
After installing your device, locate the serial number
on the label of your product and use it to register your
product at http://www.NETGEAR.com/register.
Registration is required before you can use the
telephone support service. Registration at the
NETGEAR website is strongly recommended.
Go to http://support.netgear.com for product
updates and Web support.
For complete DoC, visit the NETGEAR EU
Declarations of Conformity website at:
http://support.netgear.com/app/answers/
detail/a_id/11621.
For GNU General Public License (GPL) related
information, visit http://support.netgear.com/
app/answers/detail/a_id/2649.
7
NETGEAR, Inc.
350 East Plumeria Drive
San Jose, CA 95134 USA
February 2012