1
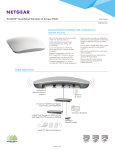
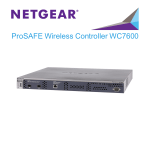
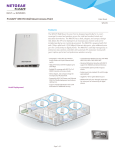
Installation Guide
ProSAFE® Wall Mount Access Point WN370
2. Run the Ethernet cable through the junction box with enough slack to reach
the access point.
3. Run the Ethernet cables through the mounting bracket.
4. Align the mounting bracket with the holes on the junction box.
5. Attach the mounting bracket to the junction box using the included Phillips
head screws.
7. (Optional) Connect the Ethernet cable providing pass through support to the
pass through port on the back of the access point.
8. Mount the access point to the mounting bracket using the included T8
screws.
Package Contents
Unpack the box and verify the contents:
•
•
•
•
•
•
ProSAFE® Wall Mount Access Point WN370
Mounting bracket with four mounting screws
Warranty card
Software license agreement
Regulatory flyer
Installation Guide
Installation Requirements
You must have the following items to successfully install your access point:
•
•
•
•
•
A 6mm Phillips screwdriver
A T8 screwdriver
A computer running Windows XP or Windows 7
A Standard EU or US wall outlet junction box with an ethernet cable routed
through the wall from your LAN to the junction box
An IEEE 802.3af/at compliant PoE switch or IEEE 802.3af/at compliant PoE
injector
Mount the Access Point
The access point requires an electrical outlet junction box mounted in a wall.
To mount the access point to the wall:
1. Remove the faceplate from the outlet junction box.
6. Connect the Ethernet cable providing PoE and network connectivity to the PoE
port on the back of the access point.
Set Up the Access Point
The WN370 access point can only be deployed in a network managed by a
ProSAFE WC7600 wireless controller. If you have a DHCP server in your network,
option 43 must be enabled pointing towards the IP address of the WC7600.
To discover and configure the access point using the WC7600 wireless
controller:
1. Access the wireless controller at the network IP address that you configured.
2. Select Access Point > Discovery > Discovery Wizard.
3. Follow the steps onscreen to discover the access point and review the discovery
results.
4. Select Access Point > Discovery > Managed AP List. Add the access points
that you want to be managed by the wireless controller to the Managed AP
List.
Note: For extensive information about the Discovery Wizard and the discovery
process, see the WC7600 reference manual.
Verify Wireless Connectivity
Using a computer with an 802.11b/g/n wireless adapter, verify connectivity by using
a browser to connect to the Internet, or check for file and printer access on your
network.
You can also check the access point LEDs to verify a successful installation and
connection.
Troubleshooting Tips
Here are some tips for correcting simple problems you might have.
The WC7600 Cannot Discover or Manage the Access
Point
If the WC7600 cannot discover or manage the access point, you can log in to the
access point to troubleshoot and download the system log. NETGEAR support will
use the system log to help diagnose any problems with the access point.
Note: The WN370 has DHCP enabled by default and receives an IP address if you
have a DHCP server in your network. If you have a DHCP server in your network,
use the address assigned to the WN370 to log in to the access point.
LED
Description
To log in to the access point and download the system log:
Power
Solid amber. The access point is booting.
Slow blinking amber. The access point is not
managed by a wireless controller.
Green.The access point has successfully booted
and is managed by a wireless controller.
1. Configure a computer with the following IP options:
• IP address. 192.168.0.22
• Subnet mask. 255.255.255.0
• Default gateway. 192.168.0.1
2. Enter http://192.168.0.160 or your access point’s assigned IP address into a
browser.
3. Log in to the access point using the following default credentials:
• ID. admin
• Password. password.
4. Click Monitoring > Logs.
5. Click the Save As button.
6. Send the log to NETGEAR support.
Activity
Blinking Green. There is network traffic through the
access point.
Off. There is not network traffic through the access
point.
WiFi On/Off
Solid Green. The access point’s WiFi is active.
Off. The access point’s WiFi is off.
Note: If you cannot connect, see Troubleshooting Tips in this guide.
NETGEAR, the NETGEAR logo, and Connect with Innovation are trademarks and/or registered trademarks of
NETGEAR, Inc. and/or its subsidiaries in the United States and/or other countries. Information is subject to
change without notice. © NETGEAR, Inc. All rights reserved.
For indoor use only. Valid in all EU member states, EFTA states, and Switzerland.
The Power LED is Solid Amber After Five Minutes
There has been a boot up error and the access point needs to be reset.
To reset the access point:
January 2014
NETGEAR, Inc.
350 East Plumeria Drive
San Jose, CA 95134 USA
1. Remove the access point from the wall without disconnecting the Ethernet
cable.
2. Press the reset button on the back of the access point for at least five
seconds.
3. Mount the access point to the wall.
4. Follow the procedure for discovering the access point.
Support
Thank you for selecting NETGEAR products.
After installing your device, locate the serial number on the label of your product and
use it to register your product at https://my.netgear.com.
NETGEAR recommends that you use only the official NETGEAR support
resources. You can contact NETGEAR tech support representatives via chat, e-mail
or phone support at http://support.netgear.com/general/contact/default.aspx.
For the current EU Declaration of Conformity, visit
http://support.netgear.com/app/answers/detail/a_id/11621/.
For regulatory compliance information, visit http://www.netgear.com/about/
regulatory/.