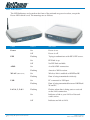
1
Legal & Regulatory Information
This manual is copyright. Apart from any fair dealing for the purposes of private study, research, criticism or review,
as permitted under the Copyright Act, no part may be reproduced, stored in a retrieval system or transmitted in any
form, by any means, be it electronic, mechanical, recording or otherwise, without the prior written permission of
NetComm Limited. NetComm Limited accepts no liability or responsibility, for consequences arising from the use of
this product.
NetComm Limited reserves the right to change the specifications and operating details of this product without notice.
NetComm is a registered trademark of NetComm Limited.
All other trademarks are acknowledged the property of their respective owners.
Customer Information
ACA (Australian Communications Authority) requires you to be aware of the following information and warnings:
(1) This unit shall be connected to the Telecommunication Network through a line cord which neets the requirements
of the ACA TS008 Standard.
(2) This equipment has been tested and found to comply with the Standards for C-Tick and or A-Tick as set by
the ACA. These standards are designed to provide reasonable protection against harmful interference in
a residential installation. This equipment generates, uses, and can radiate radio noise and, if not installed
and used in accordance with the instructions detailed within this manual, may cause interference to radio
communications. However, there is no guarantee that interference will not occur with the installation of this
product in your home or office. If this equipment does cause some degree of interference to radio or television
reception, which can be determined by turning the equipment off and on, we encourage the user to try to correct
the interference by one or more of the following measures:
•
Change the direction or relocate the receiving antenna.
•
Increase the separation between this equipment and the receiver.
•
Connect the equipment to an alternate power outlet on a different power circuit from that to which the
receiver/TV is connected.
•
Consult an experienced radio/TV technician for help.
(3) The power supply that is provided with this unit is only intented for use with this product. Do not use this power
supply with any other product or do not use any other power supply that is not approved for use with this product
by NetComm. Failure to do so may cause damage to this product, fire or result in personal injury.
This Quick Start Guide covers both the NB5Plus4 and NB5Plus4W ADSL2+
Modem Router.Features and functions dedicated to the NB5Plus4W - Wireless
model are included in the User Guide on the supplied CD-ROM separately.
This Quick Start Guide assumes that you have already established an ADSL service with your Internet service provider (ISP). These instructions provide a basic
configuration that should be compatible with your home or small office setup.
NetComm Technical Support for this product only covers the basic installation and features outlined in this Quick Start Guide. For detailed information
regarding the advanced features of this product, please refer to the configuring
sections in the NB5Plus4/W User Guide on the supplied CD-ROM.
NB5Plus4/W Quick Start Guide
2
YML755Rev1
www.netcomm.com.au
Contents
Overview .......................................................................................................................................4
NB5Plus4/W Package Contents ..............................................................................................5
Minimum System Requirements .............................................................................................6
Do I need a Micro filter? ........................................................................................................7
LED Indicators .........................................................................................................................8
Back Panel Ports .....................................................................................................................9
Restoring Factory Defaults.................................................................................................... 10
Default Settings .....................................................................................................................11
Connecting your NB5Plus4/W .................................................................................................... 12
Connecting your NB5Plus4/W ADSL Modem via ETHERNET................................................. 12
Connecting your NB5Plus4/W ADSL Modem via USB ........................................................... 13
NB5Plus4W Antenna Instructions ......................................................................................... 14
Configuring your NB5Plus4/W .................................................................................................... 15
Computer Hardware Configuration ............................................................................................ 17
Windows® XP PCs ................................................................................................................ 17
Windows 2000 PCs ............................................................................................................... 17
Windows Me PCs .................................................................................................................. 17
Windows 95, 98 PCs ............................................................................................................. 18
Appendix A: Troubleshooting ..................................................................................................... 19
The ADSL Router is not functional ........................................................................................ 19
I can’t connect to the ADSL Router........................................................................................ 19
The DSL Link LED continues to blink but does not go solid................................................... 19
The ADSL Link LED is always off............................................................................................20
Appendix B: ADSL Router terms.................................................................................................. 21
What is a firewall?................................................................................................................. 21
What is NAT? ......................................................................................................................... 21
What is a DMZ? ..................................................................................................................... 21
What is a Gateway? ...............................................................................................................22
Appendix C: Cable Connections ..................................................................................................23
RJ-45 Network Ports .............................................................................................................23
Straight and crossover cable configuration .........................................................................24
RJ11 connector and cable ......................................................................................................25
605 to RJ-11 adapter ..............................................................................................................25
USB cable .............................................................................................................................25
Appendix D: Registering your NetComm Product .......................................................................26
Contact Information ..............................................................................................................26
Legal & Regulatory Information ............................................................................................26
Customer Information ...........................................................................................................26
Product Warranty ..................................................................................................................27
Limitations of Warranty ........................................................................................................27
YML755 Rev1
www.netcomm.com.au
NB5Plus4/W Quick Start Guide
3
Overview
Thank you for purchasing the NetComm NB5Plus4/W ADSL/ADSL2 Modem Router. NetComm brings you the Next Generation of ADSL technology with ADSL-2*, which boosts
ADSL’s performance, improves interoperability, and supports new applications, services and
deployment conditions.
NetComm’s implementation of ADSL-2* and ADSL-2+* ensures that the NB5Plus4/W
operates with existing ADSL services while delivering optimal performance in all modes of
operation. Powered by the latest ADSL-2* TI chipset, NetComm’s NB5Plus4/W increases
downstream data rates by up to 50% (12Mbps) and 100% (25Mbps) for ADSL2 Plus* mode
ensuring that you can surf the net or download your files quicker than ever before.
Security is a key issue with Broadband users and NetComm’s NB5Plus4/W does not leave
you exposed. Employing the latest Active Firewall technology, the NB5Plus4/W checks every
packet of data that comes in ensuring your defences are rock-solid against hackers, unauthorised entries, probes and even Denial of Service attacks. What’s more, the NB5Plus4/W
is equipped with a VPN pass-through feature allowing you to use a standard VPN client for
Point-to-Point communication even while your Firewall is active.
The NB5Plus4/W delivers the connection versatility needed to cater for today’s ADSL users.
You can simply attach the NB5Plus4/W to a single PC by using the USB port or Ethernet port.
Alternatively, should you wish to share your Internet connection, the NB5Plus4/W is equipped
with an in-built Router and four 10/100 Ethernet ports for connection to a network. If you
have the NB5Plus4W modem, you can share your Internet connection wirelessly.
The NB5Plus4/W’s Port Forwarding and UPnP functions have made it easier for today’s
Internet users to configure and setup the myriad of Network Port Rules needed by Internet
applications such as On-Line Gaming, Peer-To-Peer file sharing and Messenger services to
operate. NB5Plus4/W has a number of pre-configured rules for several games, just click on the
game you wish to play on-line and the rest is done for you.
Added to this, the NB5Plus4/W introduces a QoS (Quality of Service) feature that gives you
control over which types of outgoing data are given priority by the router. With QoS you can
tailor your router settings to ensure that you can keep gaming or browsing even though your
upstream bandwidth may be saturated by applications such as Peer-To-Peer file sharing.
* Your ISP must support and provide you with an ADSL-2 or ADSL-2+ service for these features to be available. This
product will operate as a standard ADSL Modem Router when an ADSL-2 service is not available.
This reference manual assumes that the reader has an installed Ethernet card in the computer to be connected and
has basic to intermediate computer and Internet skills. However, basic Computer Networking, Internet, and Firewall
technology information is available from the NetComm Web site. See www.netcomm.com.au.
NB5Plus4/W Quick Start Guide
4
YML755Rev1
www.netcomm.com.au
NB5Plus4/W Package Contents
Your NB5Plus4/W Package contains the following items:
•
•
•
The NB5Plus4 or NB5Plus4/W Modem
Router (both models shown above)
•
Telephone Cable (RJ-11)
•
RJ11 to 605 Adaptor
•
USB Cable
•
CAT-5 UTP Straight Ethernet
Network Cable (RJ-45)
•
Power Adaptor (AC 15V)
Driver and Manual CD
NB5Plus4/W Quick Start Guide
and Package Contents Note
If any of the above items are damaged or missing, please contact your dealer immediately.
YML755 Rev1
www.netcomm.com.au
NB5Plus4/W Quick Start Guide
5
Minimum System Requirements
Before continuing with the installation of your NB5Plus4/W, please confirm that you comply
with the minimum system requirements.
•
Pentium® MMX 233MHz
•
A CD-ROM Drive
•
Ethernet card installed with TCP/IP Protocol (required only if you are connecting to the
ETHERNET port of your ADSL Router)
•
USB Port (required only if you are connecting to the USB Port of your ADSL Router)
•
Host Operating Systems support for USB:
•
Windows® 98 Second Edition
•
Windows® 2000
•
Windows® Me
•
Windows® XP (recommended)
•
OS independent for Ethernet
•
Web Browser support:
•
Microsoft Internet Explorer 5.0 (or later versions)
•
Netscape® Navigator 4.0 (or later versions)
•
Most popular browsers
NB5Plus4/W Quick Start Guide
6
YML755Rev1
www.netcomm.com.au
Do I need a Micro filter?
Micro filters are used to prevent common telephone equipment, such as phones, answering
machines and fax machines, from interfering with your ADSL service. If your ADSL enabled
phone line is being used with any other equipment other than your ADSL Modem then you
will need to use one Micro filter for each phone device.
Splitters may be installed when your ADSL line is installed or when your current phone line is
upgraded to ADSL. If your telephone line is already split you will not need to use a Microfilter - check with your ADSL service provider if you are unsure.
Each micro filter is connected in-line with your telephone or fax machine so that all signals
pass through it. Telephones and/or facsimiles in other rooms that are using the same extension will also require Microfilters. The following diagram gives an example of connecting
your ADSL Modem/Router using a Microfilter.
YML755 Rev1
www.netcomm.com.au
NB5Plus4/W Quick Start Guide
7
LED Indicators
The LED Indicators are located on the front of the unit and are green in colour, except the
Power LED which is red. The meanings are as follows:
Label
Status
Indicates
Power
On
Power is on.
Off
Power is off.
Flashing
Trying to authenticate with ISP’s PPP server.
On
PPP link is up.
Off
No PPP link available.
On
A valid ADSL connection.
Flashing
An active WAN session.
On
Wireless link is enabled on NB5Plus4W.
Flashing
Data is being transmitted wirelessly.
On
PC connected to USB port.
Flashing
Data is being transmitted between NB5Plus4/
W and PC.
Flashing
Flashes when data is being sent or received
on the LAN connection.
On
Indicates a link to your LAN or Network
card is active.
Off
Indicates no link to LAN.
PPP
ADSL
WLAN (NB5Plus4W)
USB
LAN 4, 3, 2 & 1
NB5Plus4/W Quick Start Guide
8
YML755Rev1
www.netcomm.com.au
Back Panel Ports
Power jack
for AC power
adaptor
4 x RJ45 Ports for
10/100 Ethernet
LAN connection
Reset
factory
defaults
USB
Port
RJ11 for ADSL
connection to
telephone line
Rear Panel of the NB5Plus4
Power
Connect the Power Adaptor that comes with your package.
1, 2, 3, 4
4 x 10/100 Base-T Ethernet jack (RJ-45) to connect to your Ethernet Network card or Ethernet Hub / Switch.
Reset
To reset your ADSL Router to factory default settings. (All customised settings that you have saved will be lost!)
Please refer to the section below on how to use the
reset function.
USB
USB Port (requires Drivers from accompanying CD).
Line
Telephone jack (RJ-11) to connect to your
Telephone Wall Socket (ADSL line).
NB5Plus4W
antenna
Power jack
for AC power
adaptor
4 x RJ45 Ports for
10/100 Ethernet
LAN connection
Reset
factory
defaults
USB
Port
RJ11 for ADSL
connection to
telephone line
Rear Panel of the NB5Plus4W
YML755 Rev1
www.netcomm.com.au
NB5Plus4/W Quick Start Guide
9
Restoring Factory Defaults
This feature will reset the Modem to its factory default configuration. Occasions may present
themselves where you need to restore the factory defaults on your modem. Typical situations
are:
•
You have lost your username and password and are unable to login to the modem.
•
You have purchased the modem from someone else and need to reconfigure the device to
work with your ISP.
•
You are asked to perform a factory reset by a member of the NetComm Support staff.
In order to restore your modem to its factory default settings, please follow these steps:
•
Ensure that your Modem is powered on (for at least 10 seconds).
•
Use a paper clip or a pencil tip to depress the reset button for ten seconds and release. At
this point, the reset is in progress. Do not power off the unit at this point.
•
When indicator lights return to steady green, reset is complete. The default settings are
now restored. The entire process takes about 45 seconds to complete.
•
Once you have reset the modem to its default settings you will be able to access the
device's configuration web interface using http://192.168.1.1 with username 'admin' and
password 'admin'.
NB5Plus4/W Quick Start Guide
10
YML755Rev1
www.netcomm.com.au
Default Settings
LAN (Management)
Field
Setting Details
Static IP Address:
192.168.1.1 *
Subnet Mask:
255.255.255.0 *
Default Gateway:
blank
WAN (Internet)
Field
Setting Details
User Name:
username@isp
Password:
****
Protocol:
PPPoE
VPI:
8*
VCI:
35 *
IP Address:
192.168.1.1 *
Subnet Mask:
255.255.255.0 *
Default Gateway:
0.0.0.0 *
Modem Access
Field
Setting Details
User Name:
admin
Password:
admin
*
Default Setting. Although in most cases you will not be required to alter these
default settings for your NB5Plus4/W, your ISP may identify specific settings to
enable connection to their service. Please refer to your ISP or Network Administrator for further information.
YML755 Rev1
www.netcomm.com.au
NB5Plus4/W Quick Start Guide
11
Connecting your NB5Plus4/W
The NB5Plus4/W can be connected via a USB cable or an Ethernet cable or both. The USB
connection is simply an ethernet simulation. As far as your computer is concerned the USB
connection is an Ethernet connection, hence DHCP and other protocols will work the same as for
Ethernet.
To connect to your ADSL Router, you need to have either an Ethernet Port or a USB Port present on your Computer/Notebook.
Connecting your NB5Plus4/W ADSL Modem via ETHERNET
1. Connect your NB5Plus4/W to either a computer directly or a network hub or switch using
CAT5 ethernet cables.
2. Connect the power pack to the ADSL Modem and switch on the power switch.
3. Ensure that there is a LAN link light on the NB5Plus4/W.
4. Ensure that the computer you intend to use has an IP address in the same subnet as the
NB5Plus4/W ADSL Modem. (e.g. the NB5Plus4/W’s default IP is 192.168.1.1 - your
computer should be on 192.168.1.100 or similar.) If you have DHCP enabled on your
computer, the NB5Plus4/W will assign your computer a suitable IP address.
5. Ensure that your computer has a LAN link light.
6. Connect one end of the ADSL phone line to the NB5Plus4/W ADSL Modem and the
other end to the wall socket.
NB5Plus4/W Quick Start Guide
12
YML755Rev1
www.netcomm.com.au
Connecting your NB5Plus4/W ADSL Modem via USB
1. Connect the power pack to the NB5Plus4/W ADSL Modem and switch on the power
switch.
2. Connect your NB5Plus4/W to a computer directly via USB cable.
3. When the computer is booted, the Add New Hardware Wizard will launch and prompt you
to provide a driver for your NB5Plus4/W ADSL Modem. Insert the CD provided.
4. Follow the on-screen prompts to load the driver. Refer to the section below for more
detailed information. (You may need to restart your computer).
5. Connect one end of the ADSL phone line to the NB5Plus4/W ADSL Modem and the other
end to the wall socket.
Installing the USB driver (Windows 98/Me/2000/XP only)
When you install the USB driver on your computer it creates a Virtual Ethernet Adapter,
which can be configured in the same way as a Network Interface card with DHCP or static IP
address. To install the USB driver please follow the steps below:
1. Boot your machine into Windows 98/Me/2000/XP.
2. Insert your NetComm NB5Plus4/W CD into your CD-ROM drive.
3. Plug power up to your NB5Plus4/W and switch ON.
4. Plug a USB cable from the back of the unit into a spare USB socket on your computer.
5. The Windows “Add New Hardware Wizard” should appear. Click Next to continue.
6. Ensure the option “Search for the best driver….” is chosen and click Next.
7. Choose “Specify location”, untick any other boxes and click on the Browse button. Open
the CD-ROM drive location of your NetComm NB5Plus4/W CD and then select the
‘USBdriver’ folder. The USB driver will be installed.
YML755 Rev1
www.netcomm.com.au
NB5Plus4/W Quick Start Guide
13
NB5Plus4W Antenna Instructions
Before continuing with the Hardware installation, you may need to connect the Antenna
1. The antenna has a retaining nut which must be screwed into the SMA connector on the
back of the modem. Place the screw retaining nut over the antenna connection on the rear
of the NB5Plus4W and turn it clockwise.
Note:
Do not over-tighten the attaching nut - but do make sure that you have
screwed it all the way to its end.
Screw retaining
nut clockwise
over the antenna
connection
Bend antenna
to a 90o angle
2.
Bend the antenna to a 90o angle.
Note:
Please note that you may have to rotate the complete antenna assembly to
do this and have the antenna pointing vertically.
NB5Plus4/W Quick Start Guide
14
YML755Rev1
www.netcomm.com.au
Configuring your NB5Plus4/W
You will need to log directly into the configuration page of the modem and configure the basic
settings for your Internet connection. Your ISP should provide you with the necessary information to
complete this step.
The settings that you most likely need to change to access the Internet are grouped onto a single
EasyConfig page.
To configure your modem follow the steps below:
Note:
Ensure that your PC is setup as a DHCP client. Refer to the Computer Hardware
Configuration section for instructions on how to set this up with different Operating Systems.
1. Insert the CD into your CD-ROM drive. An autorun screen will appear. Click on Configure Modem.
(Alternatively, if the CD-ROM is not available, you can open a web browser and type
http://192.168.1.1 in the location bar to access the modem’s EasyConfig setup screen
directly.)
2. The login page will be displayed. Enter the modem’s username and password.
The default username is admin.
The default password is admin.
Click on Log In.
3. The EasyConfig page will be displayed.
YML755 Rev1
www.netcomm.com.au
NB5Plus4/W Quick Start Guide
15
4. Check with your ISP what Protocol your modem needs to use to connect to the Internet. If
unsure, leave the default selection of PPPoE.
5. In the User ID field, enter the Username that your ISP has provided. In the password field,
enter the password that your ISP has given you.
Note:
If your ISP has provided you with Static addressing details you will need to access the Advanced Settings of your modem to configure these. Please refer to
the section on Advanced Settings in the NB5Plus4/W User Manual on the CD for
instructions.
6. The default VPI / VCI settings for most connections is 8 / 35 in Australia. Do not change
these unless your ISP has instructed you to do so.
7. Click on the Apply button to save the settings you have entered. The modem will automatically reboot. Refresh the web page after 20 seconds.
8. If the settings you entered were correct and you have an ADSL connection established the
Status light will change to green.
9. You should now be able to access the Internet with a web browser, email client or other
Internet application.
10. If the status light remains red after 45 seconds and you have refreshed your web page
several times, check the following:
•
ADSL Link light on your modem is solid green; If not, you do not have a connection
established with your local DSLAM. Please call your ISP who will assist in resolving
this.
•
If you have a solid green light on your modem for the ADSL Link, check that the username / password you entered are correct and try again;
•
If the above two suggestions don’t resolve the issue, please contact your ISP;
TIP:
To test your Internet connection while the modem is attempting to apply the
settings, you can open a DOS prompt (Start > Run > cmd) and execute a continual ping command to a public server’s IP address on the Internet. Once you
receive a reply from the server you know that you are connected. This can take
up to 30 seconds. e.g: c:/ ping 210.0.111.111 -t
NB5Plus4/W Quick Start Guide
16
YML755Rev1
www.netcomm.com.au
Computer Hardware Configuration
This section provides instructions for configuring the TCP/IP (Network) settings on your computer
to work with your Modem. These steps are only required if you are having trouble accessing your
Modem.
Windows® XP PCs
1.
2.
3.
4.
In the Windows task bar, click the Start button, and then click Control Panel.
Click on Network & Internet Connections icon. (Category mode only).
Click the Network Connections icon.
In the LAN or High-Speed Internet window, right-click on the icon corresponding to your
network interface card (NIC) and select Properties. (Often, this icon is labelled Local
Area Connection).
5. The Local Area Connection dialog box displays with a list of currently installed network
items. Ensure that the check box to the left of the item labelled Internet Protocol (TCP/
IP) is checked. Select Internet Protocol TCP/IP and click on Properties.
6. In the Internet Protocol (TCP/IP) Properties dialog box, click the radio button labelled
Obtain an IP address automatically. Also click the radio button labelled Obtain DNS
server address automatically.
7. Click OK twice to confirm your changes, and close the Control Panel.
Windows 2000 PCs
First, check for the IP protocol and, if necessary, install it:
1. In the Windows task bar, click the Start button, point to Settings, and then click Control
Panel.
2. Double-click the Network and Dial-up Connections icon.
3. In the Network and Dial-up Connections window, right-click the Local Area Connection icon, and then select Properties.
4. In the Local Area Connection Properties dialog box, select Internet Protocol (TCP/IP),
and then click Properties
5. In the Internet Protocol (TCP/IP) Properties dialog box, click the radio button labelled
Obtain an IP address automatically. Also click the radio button labelled Obtain DNS server
address automatically.
6. Click OK twice to confirm and save your changes, and then close the Control Panel.
Windows Me PCs
1.
2.
3.
4.
5.
In the Windows task bar, click the Start button, point to Settings, and then click Control
Panel.
Click on View All Control Panel Options.
Double-click the Network icon.
The Network Properties dialog box displays with a list of currently installed network
components. If the list includes Internet Protocol (TCP/IP), then the protocol has already
been enabled. Skip to step 10.
If Internet Protocol (TCP/IP) does not display as an installed component, click Add…
YML755 Rev1
www.netcomm.com.au
NB5Plus4/W Quick Start Guide
17
6. In the Select Network Component Type dialog box, select Protocol, and then click
Add…
7. Select Microsoft in the Manufacturers box.
8. Select Internet Protocol (TCP/IP) in the Network Protocols list, and then click OK. You
may be prompted to install files from your Windows ME installation CD or other media.
Follow the instructions to install the files. If prompted, click OK to restart your computer
with the new settings.
Next, configure the PC to accept IP information assigned by the modem:
9. Follow steps 1 – 4 above..
10. In the Network Properties dialog box, select TCP/IP, and then click Properties.
If you have multiple TCP/IP listings, select the listing associated with your network card
or adapter.
11. In the TCP/IP Settings dialog box, click the radio button labelled Obtain an IP address
automatically.
12. Click OK twice to confirm and save your changes, and then close the Control Panel.
Windows 95, 98 PCs
First, check for the IP protocol and, if necessary, install it:
1. In the Windows task bar, click the Start button, point to Settings, and then click Control
Panel.
2. Double-click the Network icon.
3. The Network dialog box displays with a list of currently installed network components. If
the list includes TCP/IP, and then the protocol has already been enabled. Skip to step 9.
4. If TCP/IP does not display as an installed component, click Add… The Select Network
Component Type dialog box displays.
5. Select Protocol, and then click Add… The Select Network Protocol dialog box displays.
6. Click on Microsoft in the Manufacturers list box, and then click TCP/IP in the Network
Protocols list box.
7. Click OK to return to the Network dialog box, and then click OK again. You may be
prompted to install files from your Windows 95/98 installation CD. Follow the instructions
to install the files.
8. Click OK to restart the PC and complete the TCP/IP installation.
Next, configure the PCs to accept IP information assigned by the Modem:
9. Follow steps 1 – 3 above.
10. Select the network component labelled TCP/IP, and then click Properties. If you have
multiple TCP/IP listings, select the listing associated with your network card or adapter.
11. In the TCP/IP Properties dialog box, click the IP Address tab.
12. Click the radio button labelled Obtain an IP address automatically.
13. Click OK twice to confirm and save your changes. You will be prompted to restart Windows.
14. Click Yes.
NOTE:
For detailed information regarding the advanced features of this product,
please refer to the configuring sections in the NB5Plus4/W User Guide on the
supplied CD-ROM.
NB5Plus4/W Quick Start Guide
18
YML755Rev1
www.netcomm.com.au
Appendix A: Troubleshooting
Below is a list of commonly asked questions. Before calling technical support, please look
through these issues to see if they help to solve your problem.
The ADSL Router is not functional
1. Check to see that the power LED is red and than the network cables are installed correctly.
2. Check to see that the ETH/LAN, ADSL and PPP LEDs are green.
3. Check to see that the ADSL LED is green
4. Check the settings on your PC.
5. From your PC, can you PING the ADSL Router? Assuming that the ADSL Router has
DHCP enabled and your PC is on the same subnet as the gateway, you should be able to
PING the gateway.
6. Can you PING the WAN IP? Your ISP should have provided the IP address of their server.
If you can ping the ADSL Router and your protocols are configured correctly, you should
be able to ping the ISPs network. If you cannot PING the ISPs network, make sure you
are using the correct protocols with the correct VPI/VCI values.
7. Make sure NAT is enabled for your connection. If NAT is disabled the ADSL Router will
not route frames correctly (except in Bridge connection).
I can’t connect to the ADSL Router.
1. Check to see that the power LED is red and that the network cables are installed correctly.
2. Make sure that your PC and the ADSL Router is on the same network segment. The
ADSL Router’s default IP address is 192.168.1.1. If you are running a Windows based
PC, you can open a DOS window and type IPCONFIG; make sure that the network adapter that is connected to the gateway is within the same 192.168.1.x subnet. For Windows
98 SE computers you need to run ‘winipcfg’ (Start>Run>winipcfg).
3. Also, your PC’s Subnet Mask should match the gateways subnet mask. The gateway has a
default subnet mask of 255.255.255.0.
4. If this still does not work, press the reset button for 10 seconds. This will place the gateway into its factory default state. Go through the above procedures again.
5. Make sure NAT is enabled for your connection. If NAT is disabled the ADSL Router will
not route frames correctly (except in Bridge connection).
The DSL Link LED continues to blink but does not go solid
1. This means that the DSL line is trying to train but for some reason it cannot establish a
valid connection. The main cause of this is that you are too far away from the central office. Contact your DSL service provider for further assistance.
2. Verify that the phone line is connected directly to the wall and to the line input on the
ADSL Router.
3. Make sure that for every parallel phone line connected to telephone or fax to install with a
micro filter.
YML755 Rev1
www.netcomm.com.au
NB5Plus4/W Quick Start Guide
19
The ADSL Link LED is always off
1. Make sure you have ADSL service. You should get some kind of information from your
ISP that states that the ADSL service is installed. You can usually tell if the service is
installed by listening to the phone line; you will hear some high-pitched noise. If you do
not hear high-pitched noise, contact your ISP.
2. Verify that the phone line is connected directly to the wall and to the line input on the
ADSL Router. If the phone line is connected to the phone side of the ADSL Router or you
have a splitter installed on the phone line, the ADSL light will not come on.
NB5Plus4/W Quick Start Guide
20
YML755Rev1
www.netcomm.com.au
Appendix B: ADSL Router terms
What is a firewall?
A firewall is protection between the Internet and your local network. It acts similarly to the
firewall in your car, protecting the interior of the car from the engine. Your car’s firewall has
very small opening that allow desired connections from the engine into the cabin (gas pedal
connection, etc), but if something happens to your engine, you are protected.
The firewall in the ADSL Router is very similar. Only the desired connections that you allow
are passed through the firewall. These connections are normally originating from the local
network; such as web browsing, checking your email, downloading a file, and playing a game.
However, in some cases, you can allow incoming connections so that you can run programs
like a web server.
What is NAT?
NAT stands for Network Address Translation. Another name for it is Connection Sharing.
What does this mean? Your ISP provides you with a single network address for you to access
the Internet through. However, you may have several machines on your local network that
want to access the Internet at the same time. The ADSL Router provides NAT functionality
that converts your local network addresses to the single network address provided by your ISP.
It keeps track of all these connections and makes sure that the correct information gets to the
correct local machine.
Occasionally, there are certain programs that don’t work well through NAT. Some games, and
some applications have a bit of trouble. The ADSL Router contains special functionality to
handle the vast majority of these troublesome programs and games. NAT does cause problems
when you want to run a SERVER though. When running a server, please see the DMZ section
below.
What is a DMZ?
DMZ really stands for Demilitarized Zone. It is a way of separating out part of your local
network so that is more open to the Internet. Suppose that you want to run a web-server, or a
game server. Normal servers like these are blocked from working by the NAT functionality.
The solution is to “isolate” the single local computer into a DMZ. This makes the single computer look like it is directly on the Internet, and others can access this machine.
Your machine isn’t really directly connected to the Internet, and it really has an internal local
network address. When you provide the servers network address to others, you must provide
the address of the ADSL Router. The ADSL Router “fakes” the connection to your machine.
You should use the DMZ when you want to run a server that others will access from the
Internet. Internal programs and servers (like print servers, etc) should NOT be connected to
the DMZ
YML755 Rev1
www.netcomm.com.au
NB5Plus4/W Quick Start Guide
21
What is a Gateway?
The Internet is so large that a single network cannot handle all of the traffic and still deliver
a reasonable level of service. To overcome this limitation, the network is broken down into
smaller segments or subnets that can deliver good performance for the stations attached to that
segment. This segmentation solves the problem of supporting a large number of stations, but
introduces the problem of getting traffic from one subnet to another.
To accomplish this, devices called routers or gateways are placed between segments. If a
machine wishes to contact another device on the same segment, it transmits to that station
directly using a simple discovery technique. If the target station does not exist on the same
segment as the source station, then the source actually has no idea how to get to the target.
One of the configuration parameters transmitted to each network device is its default gateway.
This address is configured by the network administrators and it informs each personal computer or other network device where to send data if the target station does not reside on the
same subnet as the source. If your machine can reach all stations on the same subnet (usually
a building or a sector within a building), but cannot communicate outside of this area, it is usually because of an incorrectly configured default gateway.
NB5Plus4/W Quick Start Guide
22
YML755Rev1
www.netcomm.com.au
Appendix C: Cable Connections
This cable information is provided for your reference only. Please ensure you only connect the
appropriate cable into the correct socket on either this product or your computer.
If you are unsure about which cable to use or which socket to connect it to, please refer to the
hardware installation section in this manual. If you are still not sure about cable connections, please
contact a professional computer technician or NetComm for further advice.
RJ-45 Network Ports
RJ-45 Network Ports can connect any networking devices that use a standard LAN interface, such as
a Hub/Switch Hub or Router. Use unshielded twisted-pair (UTP) or shield twisted-pair (STP) cable
to connect the networking device to the RJ-45 Ethernet port. Depending on the type of connection,
10Mbps or 100Mbps, use the following Ethernet cable, as prescribed.
10Mbps: Use EIA/TIA-568-100-Category 3, 4 or 5 cable.
100Mbps: Use EIA/TIA-568-100-Category 5 cable.
Note:
To prevent loss of signal, make sure that the length of any twisted-pair connection does not exceed 100 metres.
RJ-45 Connector
Pin Assignment
1
2
3
6
4,5,7,8
Normal Assignment
Input Receive Data +
Input Receive Data Output Transmit Data +
Output Transmit Data Not used
Figure 1
RJ-45 plug
attached to cable
Figure 2
YML755 Rev1
www.netcomm.com.au
NB5Plus4/W Quick Start Guide
23
Straight and crossover cable configuration
There are two types of the wiring: Straight-Through Cables and Crossover Cables. Category 5
UTP/STP cable has eight wires inside the sheath. The wires form four pairs. Straight-Through
Cables has same pinouts at both ends while Crossover Cables has a different pin arrangement
at each end.
In a straight-through cable, wires 1,2,3,4,5,6,7 and 8 at one end of the cable are still wires 1~8
at the other end. In a crossover cable, the wires of 1,2,3,6 are reversed so that wire 1 become 3
at the other end of the cable, 2 becomes 6, and so forth.
To determine which wire is wire 1, hold the RJ-45 cable tip with the spring clip facing towards
the ground and the end pointing away from you. The copper wires exposed upwards to your
view. The first wire on the far left is wire 1. You can also refer to the illustrations and charts of
the internal wiring on the following page.
Straight-Through Cabling
Figure 3
Wire
1
2
3
6
Becomes
1
2
3
6
Cross-Over Cabling
Figure 4
Wire
1
2
3
6
Note:
Becomes
3
6
1
2
To prevent loss of signal, make sure that the length of any twisted-pair connection does not exceed 100 metres.
NB5Plus4/W Quick Start Guide
24
YML755Rev1
www.netcomm.com.au
RJ11 connector and cable
An RJ-11 connector is the small, modular plug used for most analog telephones. It has six pin slots
in the head, but usually only two or four of them are used.
RJ-11 Connector
Pin Assignment
1
2
3
4
5
6
Normal Assignment
Not Connected
Not connected
Line
Line
Not Connected
Not Connected
Figure 5
605 to RJ-11 adapter
The 605 to RJ-11 adaptor is provided to comply with the older 610 Telstra wall
socket. The 605 to RJ-11 adapter may be used to convert the supplied RJ-11
cable, if the older connection is required.
USB cable
A typical USB cord has an “A” connection (“upstream” to plug into the computer) and a “B”
connection (“downstream” to plug into the device).
“B” Connection
“A” Connection
By using different connectors on the upstream and downstream ends, cable connection is simplified.
The “B” connection will fit a into the “B” socket of any USB device. Similarly, any “A” connector
can be plugged into any “A” socket, such as on a computer.
If it is a new device, the operating system auto-detects it and asks for the driver disk. If the device
has already been installed, the computer activates it and starts talking to it. USB devices can be
connected and disconnected at any time.
YML755 Rev1
www.netcomm.com.au
NB5Plus4/W Quick Start Guide
25
Appendix D: Registering your NetComm Product
All NetComm Limited (“NetComm”) products have a standard 12 month warranty from date of
purchase against defects in manufacturing and that the products will operate in accordance with the
specifications outlined in the User Guide. However some products have an extended warranty option
(please refer to packaging). To be eligible for the extended warranty you must supply the requested
warranty information to NetComm within 30 days of the original purchase by registering on-line via
the NetComm web site at: www.netcomm.com.au
Contact Information
If you have any technical difficulties with your product, please do not hesitate to contact
NetComm’s Customer Support Department.
Email:
[email protected]
Fax:
(+612) 9424-2010
Web:
www.netcomm.com.au
Legal & Regulatory Information
This manual is copyright. Apart from any fair dealing for the purposes of private study, research, criticism or review,
as permitted under the Copyright Act, no part may be reproduced, stored in a retrieval system or transmitted in any
form, by any means, be it electronic, mechanical, recording or otherwise, without the prior written permission of
NetComm Limited. NetComm Limited accepts no liability or responsibility, for consequences arising from the use of
this product.
NetComm Limited reserves the right to change the specifications and operating details of this product without notice.
NetComm is a registered trademark of NetComm Limited. All other trademarks are acknowledged the property of
their respective owners.
Customer Information
ACA (Australian Communications Authority) requires you to be aware of the following information and warnings:
(1) This unit shall be connected to the Telecommunication Network through a line cord which meets the
requirements of the ACA TS008 Standard.
(2) This equipment has been tested and found to comply with the Standards for C-Tick and or A-Tick as set by
the ACA . These standards are designed to provide reasonable protection against harmful interference in
a residential installation. This equipment generates, uses, and can radiate radio noise and, if not installed
and used in accordance with the instructions detailed within this manual, may cause interference to radio
communications. However, there is no guarantee that interference will not occur with the installation of this
product in your home or office. If this equipment does cause some degree of interference to radio or television
reception, which can be determined by turning the equipment off and on, we encourage the user to try to correct
the interference by one or more of the following measures:
•
Change the direction or relocate the receiving antenna.
•
Increase the separation between this equipment and the receiver.
•
Connect the equipment to an alternate power outlet on a different power circuit from that to which the
receiver/TV is connected.
•
Consult an experienced radio/TV technician for help.
(3) The power supply that is provided with this unit is only intended for use with this product. Do not use this power
supply with any other product or do not use any other power supply that is not approved for use with this product
by NetComm. Failure to do so may cause damage to this product, fire or result in personal injury.
NB5Plus4/W Quick Start Guide
26
YML755Rev1
www.netcomm.com.au
Product Warranty
The warranty is granted on the following conditions:
1.
This warranty extends to the original purchaser (you) and is not transferable;
2.
This warranty shall not apply to software programs, batteries, power supplies, cables or other accessories
supplied in or with the product;
3.
The customer complies with all of the terms of any relevant agreement with NetComm and any other reasonable
requirements of NetComm including producing such evidence of purchase as NetComm may require;
4.
The cost of transporting product to and from NetComm’s nominated premises is your responsibility; and,
5.
NetComm does not have any liability or responsibility under this warranty where any cost, loss, injury or
damage of any kind, whether direct, indirect, consequential, incidental or otherwise arises out of events beyond
NetComm’s reasonable control. This includes but is not limited to: acts of God, war, riot, embargoes, acts of civil
or military authorities, fire, floods, electricity outages, lightning, power surges, or shortages of materials or labour.
6.
The customer is responsible for the security of their computer and network at all times. Security features may be
disabled within the factory default settings. NetComm recommends that you enable these features to enhance
your security.
The warranty is automatically voided if:
1.
You, or someone else, use the product, or attempts to use it, other than as specified by NetComm;
2.
The fault or defect in your product is the result of a voltage surge subjected to the product either by the way of
power supply or communication line, whether caused by thunderstorm activity or any other cause(s);
3.
The fault is the result of accidental damage or damage in transit, including but not limited to liquid spillage;
4.
Your product has been used for any purposes other than that for which it is sold, or in any way other than in strict
accordance with the user manual supplied;
5.
Your product has been repaired or modified or attempted to be repaired or modified, other than by a qualified
person at a service centre authorised by NetComm; and,
6.
The serial number has been defaced or altered in any way or if the serial number plate has been removed.
Limitations of Warranty
The Trade Practices Act 1974 and corresponding State and Territory Fair Trading Acts or legalisation of another
Government (“the relevant acts”) in certain circumstances imply mandatory conditions and warranties which cannot
be excluded. This warranty is in addition to and not in replacement for such conditions and warranties.
To the extent permitted by the Relevant Acts, in relation to your product and any other materials provided with the
product (“the Goods”) the liability of NetComm under the Relevant Acts is limited at the option of NetComm to:
•
Replacement of the Goods; or
•
Repair of the Goods; or
•
Payment of the cost of replacing the Goods; or
•
Payment of the cost of having the Goods repaired.
All NetComm ACN 002 490 486 products have a standard 12 months warranty from date of purchase. However
some products have an extended warranty option (refer to packaging). To be eligible for the extended warranty you
must supply the requested warranty information to NetComm within 30 days of the original purchase by registering
on-line via the NetComm web site at www.netcomm.com.au.
NetComm reserves the right to request proof of purchase upon any warranty claim.
YML755 Rev1
www.netcomm.com.au
NB5Plus4/W Quick Start Guide
27