1
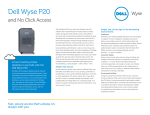
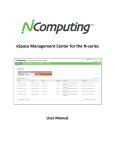
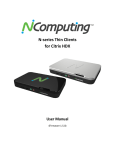
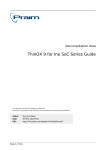
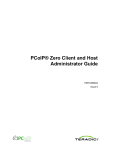
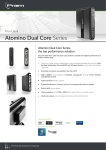
EVALUATION GUIDE N-series Thin Clients. Citrix Ready HDX Verified. N-series Evaluation Guide This guide will help you complete an evaluation of NComputing’s N-series line of thin clients which have been built to support any Citrix® XenDesktop®, XenApp®, or VDI-in-a-Box™ deployment. The N-series’ unique combination of performance and affordability, and its purpose-built design for Citrix, deliver the premiere endpoint solution for delivering Citrix virtual applications and desktops to your task worker end users. The N-series has three models to support a wide range of task workers: • N400 – The entry level N-series thin client supports standard day-to-day tasks and application usage. • N500 - With increased computing capabilities, the N500 provides additional multi-tasking power and enhanced multimedia capabilities. • N500w – The N500 unit with a wifi antenna for any users who do not have access to a hard-wired Ethernet jack or require additional mobility. All N-series thin clients are Citrix Ready HDX Verified and Citrix Ready SoC Verified, and are also officially certified with the Imprivata OneSign proximity card reader solutions for easy tap-in, tap-out access. For more information about the NComputing N-series thin clients, please visit the product information page. http://www.ncomputing.com/products/nseries N400 N500 Network Bandwidth Onboard Memory Video Playback 4x USB 2.0 Ports DVI Video Output Optional Dual Monitor Support Wireless Network Connectivity N500w N400 N500 N500w 10/100/1000 512 MB 720p ü ü 10/100/1000 1 GB 1080p ü ü ü 10/100/1000 1 GB 1080p ü ü ü ü NComputing Evaluation Guide EVALUATION GUIDE N-series Thin Clients. Citrix Ready HDX Verified. Set Up Steps 1. Citrix Virtualization Environment You will need a complete Citrix environment ready for the evaluation. System requirements are any of the Citrix products below: • • • XenDesktop versions 5.0, 5.5 or 5.6 XenApp versions 6.0 or 6.5 VDI-in-a-box version 5.0, 5.1 or 5.2 Also, you will need to have established standard Citrix user accounts to connect to later. 2. Initial screen of N-series device When you first start up the device, the first screen you will see is the Log-In screen. NComputing Evaluation Guide EVALUATION GUIDE N-series Thin Clients. Citrix Ready HDX Verified. 3. Setup your N-series device Log In screen • Click the ‘gear’ icon, bottom-left, to reach the configuration screen XenDesktop Tab: Citrix Connection Options • Auto-configure: Uncheck § Alternatively, check this box if you have configured your DHCP server to automatically provide the address of the Citrix environment using DHCP option tag 181. • Name/URL: Enter the server name, IP address, URL or FQDN of your Citrix environment § Can be used for a XenDesktop Server, a XenApp services site or a VDI-in-a-Box grid server. • Auto-launch: Uncheck § If the user receives only a single virtual desktop or published application icon, enable to automatically launch the desktop/application upon login to the N-series • Auto-logoff: Uncheck § This security feature enables the N-series to log the user out from the Receiver if all applications/desktops are closed • Password required upon device wakeup: Uncheck § Check this box, if want to force end users to enter a password when the device wakes up Preferences Tab: • Display: § Adjust the desired resolution depending on monitor capabilities § Adjust device sleep timer if no activity is observed for certain time duration • Date/Time: Configure timezone and NTP § Select appropriate timezone in which the device will be residing and enter the date and time § If a NTP (Network Time Protocol) server is present on the network, Check the “Set date/time automatically” box and enter the NTP servers IP address or reachable ID • Keyboard: Select the default language of the keyboard § Enable NUMLOCK – If not desired, uncheck this box NComputing Evaluation Guide EVALUATION GUIDE N-series Thin Clients. Citrix Ready HDX Verified. NComputing Evaluation Guide Network Tab: • Select the method by which your device will obtain its IP address from your network § Automatically: via DHCP (default) § Manually: enter the appropriate network settings § PING – Enter a reachable IP address or Hostname and click on to verify the network connection is working Security Tab: • Per-Tab Access: § IT administrators can control access to device setting tab’s such as Citrix, Network, Security , etc depending on user access level (Default – Uncheck all ) • Certificates: Manually add or remove certificates § Manage Root CA certificates issued by local or authorized legal entities • Imprivata: Configure single sign on with Imprivata integration § Default – Uncheck (If you have Imprivata integration with LDAP, you can utilize this feature) • Device Shadowing: Enable/Disable VNC § Default – Uncheck Management Tab: • Device Name: § IT administrators can configure a unique device name , Default – “Model no - last 8 digits of serial no” • Firmware/Wallpaper Update: § Update device firmware using “ Automatic (DHCP or URL) or Manual (URL or USB) methods § Users can also change the background image of NSeries device using the same method (supported image format is – JPEG ) • vSpace Management Center: § Enable auto-discover– Uncheck (If you have DHCP tag 171 configured with VMC server address check this box) § Enter vSpace Management Centers IP address or Hostname with port:1284 § Reset zone membership – Uncheck (If you are having difficulty in connecting to VMC server, check this box and save the settings to possibly resolve the issue ) EVALUATION GUIDE N-series Thin Clients. Citrix Ready HDX Verified. Peripherals Tab: • Redirection Policy: § Audio (default) – Uncheck § Printer (default) – Uncheck • Audio: On-board audio: § Enable speakers – Checked § Enable microphone – Checked • Printers: § Configure printer: Choose connection type between directly attached USB, network, serial or SMB and appropriate model /port information • Scanners: § Configure scanner: Choose connection type between directly attached USB or network, and appropriate model / port information • Serial Devices: § Configure Serial Devices: Default – None (If you have a serial device connected using a USB to Serial adapter, then configure these settings with respect to serial device) • USB Serial: § USB Serial Devices: Default – None (If you have a custom USB device connected then configure these settings with respect to the USB device) Information Tab: • Device information: Name, Model and Serial number • Network information: IP address, NetMask, Gateway and Mac address of the device • Firmware information: Device FW version, Citrix receiver • vSpace Management Center : Status, Hostname or IP Note: Make sure you hit after changing any configuration and going back to home screen NComputing Evaluation Guide EVALUATION GUIDE N-series Thin Clients. Citrix Ready HDX Verified. Sample Key Use Cases using the N-series The following test cases demonstrate the user experience for the XenDesktop, XenApp or VDI-in-a-Box environments when accessed from our N400 or N500 N-series devices. 1. Productivity applications § Open Microsoft Word, PowerPoint or Adobe Acrobat documents. § Test viewing, editing and scrolling of documents 2. Web-browsing and web-based video and multimedia § Open your browser and navigate to www.ncomputing.com or other preferred site. § Navigate to YouTube or similar multimedia sites to internet-based video. 3. Local video performance The N400 features the decompression of video content on the server that is being accessed, combined with hardware acceleration on the device. Further, it features playback at full screen for HD video up to 720p resolution encoded at any frame rate. § Open Windows Media Player § Open a video file encoded at 720p and view in both floating screen sizes and full-screen resolution. The N500 features the decompression of video content and hardware acceleration on the device itself. It is also capable of playback at full screen for HD video up to 1080p resolution § Open Windows Media Player § Open a video file encoded at 1080p and view in both floating screen sizes and full-screen resolution. NComputing Evaluation Guide EVALUATION GUIDE N-series Thin Clients. Citrix Ready HDX Verified. Device Management: This section of the guide will walk you through the installation and registration process for vSpace Management Center version 3.3.0 For the latest NComputing software version please visit the NComputing software download site at http://www.ncomputing.com/support/software-downloads Software Installation § Run the vSpace Management Center installation (vSpace Management Center Installer.msi) and proceed as directed through the installation process. § You will be given the option to perform a “Default” or “Advanced” installation. Choose Default to automatically install all components necessary to run vSpace Management Center. This includes Java and Apache Server. § Proceed as directed through the installation process until you are notified that the process is complete. § At this point a system restart will be required. Registration § Automatic. Each new install of vSpace Management Center includes a trial license for 30 days with up to 100 managed devices. Starting vSpace Management Center § Open the vSpace Management Center folder in the Windows Start menu (on the server you installed on). § Click “Open vSpace Management Center” to launch the user interface within your default web browser. § You can also access the interface from other computers on your network by opening a browser and entering the IP address of your server followed by: “:8080/vmc” § For example, if your vSpace Management Center server’s IP address is: 192.168.1.10, then enter: “192.168.1.10:8080/vmc” in your browser. § When you start vSpace Management Center for the first time, enter the default User ID (“vmcadmin”) and Password (“vmcadmin”) and click “Submit.” Note: It is recommended that you clear your browser’s cache prior to using vSpace Management Center for the first time and between updates. NComputing Evaluation Guide Sample Management Use Cases EVALUATION GUIDE N-series Thin Clients. Citrix Ready HDX Verified. 1. Create a Management Group The Group Management module of vSpace Management Center allows administrators to create and maintain Device and Server Groups. This allows administrators to create logical groupings that correspond to device models, geographical locations, or usage needs. § § § § § § § § § NComputing Evaluation Guide Select “Add Group” from the Group Management menu. § Define the group you wish to create by selecting a Group Name and Description. Select whether the group will contain devices, management servers, or a combination of both (a Mixed Group). Click “Next”. Click the checkbox next to the device(s) you wish to include in your group. Click “Next” to add these to your group. If you wish to include Management Servers in your Group, you may do so at this stage. Click the check box next to the Server(s) you wish to add and click “Add Management Servers”. Click “Next” when you are satisfied with your selections. To complete the group creation process, click the “Save” button to the bottom right of the screen. EVALUATION GUIDE N-series Thin Clients. Citrix Ready HDX Verified. 2. Configuring devices using device profiles In this scenario we’ll describe the process of creating, managing, and pushing device profiles to your NComputing devices. A device profile can be created from scratch or imported from any device in your deployment. For the purpose of this scenario, we’ll import a profile, save it as a preset, and then push that profile out to additional devices. § From the Device Management module within vSpace Management Center, open the Manage Devices screen. § Select the device whose profile you wish to store by checking the checkbox to its left. Click the “Store Profile” button to the top right of the screen to proceed through the profile storing dialog. § § (Optional): You can review and make alterations to the profile you have just created from the Manage and Apply Profiles screen within the Device Management module. § From the Manage Devices screen, select the device(s) you wish to push your new profile using the checkboxes as in step 2. Once you are satisfied with your selection, click the “Apply Profile” button to apply your new profile to the selected device(s). § ©Copyright 2015 ZeroDesktop, Inc. All rights reserved. NComputing® is a division of ZeroDesktop. Citrix and HDX Ready are registered trademarks of Citrix Inc. Other trademarks and trade names are the property of their respective owners. Preliminary beta specifications subject to change without notice. Performance may vary, depending on the configuration of the shared computer. NComputing Evaluation Guide