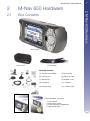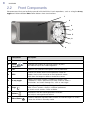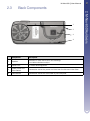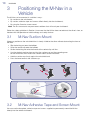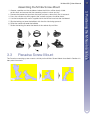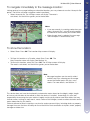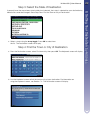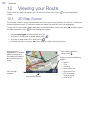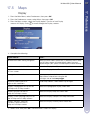
1
M-Nav 650 User Manual English - Europe / Australia / New Zealand 2 NAVMAN M-Nav 650 || User Manual 1 Introduction____________________________________________________ 5 1.1 1.2 2 M-Nav Suction-Mount M-Nav Adhesive Tape and Screw-Mount Panavise Screw-Mount Inserting the M-Nav into the Clip Main Menu Screen To put the M-Nav in Standby Mode GPS Modem Signal Strength 16 16 17 17 18 18 19 Destination Screen Keyboard Screen Preview Screen Address Search Rules 20 21 22 23 Setting Your Destination by Address _____________________________ 24 8.1 8.2 9 15 15 Setting Your Destination ________________________________________ 20 7.1 7.2 7.3 7.4 8 14 14 Messaging____________________________________________________ 16 6.1 The Message List 6.2 Receiving Messages 6.3 Sending a Message 6.4 Reading Messages 6.5 Reading / Editing Sent Messages 6.6 Going to a Message Location To navigate immediately to the message location: 7 10 10 11 12 Modem Status ________________________________________________ 15 5.1 5.2 6 7 8 9 Getting Started ________________________________________________ 13 4.1 4.2 5 Box Contents Front Components Back Components Positioning the M-Nav in a Vehicle ________________________________10 3.1 3.2 3.3 3.4 4 5 5 M-Nav 650 Hardware ___________________________________________ 7 2.1 2.2 2.3 3 GPS and GPS Signals Safety Notice Case Study 1: Europe and New Zealand Case Study 2: Australia, Canada and USA 24 28 Setting Your Destination by POI _________________________________ 32 9.1 9.2 Case Study 1: Europe and New Zealand Case Study 2: Australia, Canada and USA 32 35 10 Using the 2D Map screen to Plan a Route ________________________ 38 11 Multi-stop Trips _______________________________________________ 39 11.1 11.2 11.3 11.4 Case Study 1: Europe and New Zealand Case Study 2: Australia, Canada and USA Skipping a Destination Point Adding Message Locations to Multi-stop Trips 39 44 49 49 Contents Contents 3 4 NAVMAN 12 Viewing your Route ____________________________________________ 50 12.1 12.2 12.3 12.4 12.5 12.6 12.7 2D Map Screen 3D Map Screen Message and Look Screen Next Turn Screen Next 4 Turns Screen Back-On-Track™ Automatic Rerouting Route Information Screen 50 51 51 52 52 53 53 13 The 2D Map Screen Pop-up Menu_______________________________ 55 14 Avoiding an Area ______________________________________________ 56 15 Route Demonstrator ___________________________________________ 57 15.1 15.2 15.3 15.4 Select Departure Point Select Destination Point Activate Route Demonstrator To Deactivate Route Demonstrator 57 57 57 58 16 Favourites and My Home _______________________________________ 59 16.1 16.2 16.3 16.4 16.5 16.6 Saving a Favourite Saving a Favourite from the 2D Map Screen Editing the Name of the Favourite Deleting a Favourite Navigating to a Favourite Navigating to My Home 59 60 61 62 63 63 17 Preferences ___________________________________________________ 64 17.1 17.2 17.3 17.4 17.5 17.6 17.7 17.8 Screen Brightness Volume Routing Language Maps Display Internal Memory Points of Interest (POIs) Alerts Active POIs Speed My Data More Preferences GPS Status Measurements Startup 64 64 64 66 67 67 68 68 69 69 70 71 72 72 73 74 Appendix A: Power Management ___________________________________ 75 Powering Up from Off Powering Up from Standby Powering Down from On 75 75 75 Appendix B: Street Types __________________________________________ 76 Contacts ________________________________________________________ 79 M-Nav 650 || User Manual Introduction Thank you for purchasing this Navman M-Nav 650. We hope you enjoy your new GPS messaging and navigation system. Whether your fleet operates in your own city, across a country or a continent, the M-Nav will direct your fleet operators to their destination without the need for map books or second hand directions. With destinations provided from the OnlineAVL client by the Fleet Manager you can rest assured that your fleet operators are taking the fastest route to the correct destination all the time, every time. The Global Positioning System (GPS) is available free of charge, at any time, and is usually accurate to within 5 m (15 ft). Your M-Nav map provides street-level detail for door-to-door navigation, including Points of Interest (POIs) such as accommodation, petrol stations, railway stations and airports. Navman welcomes your feedback. To contact us or visit our website, see Support Information in the Contacts section. 1.1 GPS and GPS Signals The GPS is a network of satellites that transmit accurate time and position information worldwide. GPS receivers receive signals from these satellites and use the information to determine an exact location. Satellites orbit the earth at around 12,000 miles. While a GPS receiver can detect signals from up to 12 satellites at any time, only three signals are needed to provide a position or “GPS fix” (latitude and longitude) for vehicle navigation systems. The GPS receiver, such as the Navman Halo or Qube, receives GPS signals. To receive GPS signals, ensure that the the receiver is outdoors, or in a vehicle outdoors, and the GPS antenna has an unobstructed view of the sky. For more information about GPS and your M-Nav, see Section 5. 1.2 Safety Notice WARNING: In a vehicle, it is your sole responsibility to place, secure and use the M-Nav in a manner that will not cause accidents, personal injury or property damage. The user of this product is solely responsible for observing safe driving practices and for all use of this device. It is your responsibility to read and follow the vehicle mount installation instructions and to use the product consistent with your government’s laws/regulations. Consult the vehicle manual to ensure the mounting location is safe. It is your sole responsibility to adhere to the following safety instructions at all times: • Do not operate the M-Nav while driving or place the M-Nav in a position that obstructs the driver’s view. • Do not mount the M-Nav in a way that may be distracting or interfere with the safe operation of the vehicle, the deployment of airbags or other safety equipment. • Do not leave the M-Nav in view while your vehicle is unattended, especially in strong or direct sunlight. • Do not use or handle the M-Nav when it is hot; leave it to cool, out of direct sunlight. This device does not have the functionality to determine routes based on the height, weight, length or Hazmat classification of the vehicle in which the device is installed. Accordingly it is your sole responsibility for ensuring that your vehicle is legally and physically able to travel over routes that may include narrow, twisting or steep roads, weak, narrow or low bridges, tunnels or other obstacles on the routes determined by this device. Failure to adhere to these instructions may lead to serious personal injury, including death, or property damage. Navman disclaims all liability for use of the M-Nav that contributes to injuries, death, property damage or violates law. 1. Introduction 1 5 6 NAVMAN M-Nav 650 || User Manual M-Nav 650 Hardware 2.1 Box Contents M-Nav 650 Carry Case RJ-45 cable Mounting brackets: (a) Suction-cup/ballfoot (f) Screw plate (b) Locking-nut (g) Adhesive tape (c) Socket-clip (h) Alcohol swab (d) Baseplate (i) 3 x Screws (e) Retainer ring (j) 3 x Screw caps Documentation, including: • User Manual • Quick Start Guide • Limited Warranty Agreement • Registration Card 2. M-Nav 650 Hardware 2 7 8 NAVMAN 2.2 Front Components We recommend that you familiarize yourself with the M-Nav’s basic operations, such as using the 8-way toggle and Volume button. Note: Some buttons have two functions. 1 2 3 4 5 6 7 8 Component Description 1 Screen Displays maps and menu options 2 Zoom /Brightness Changes the amount of map area shown, or press and hold to adjust the screen brightness 3 OK Confirms the selected menu option, text or preference 4 ESC Cancels an action, returns to the previous screen or deletes the last text character on the Keyboard screen; hold down for longer to delete a whole line at once. 5 8-way toggle Selects Main Menu options, keyboard characters and Preferences, moves around the 2D Map screen to select a destination, and scrolls through lists, such as messages. 6 Page Cycles through the 2D Map, 3D Map, Next Turn and Next 4 Turns screens; displays additional preference or search-result screens, when available. 7 Volume Broadcasts the next voice-guidance instruction and adjusts voice-guidance volume. 8 Menu/Power Switches between the Main Menu screen and the Message List screen Places the M-Nav in Standby mode. M-Nav 650 || User Manual 2.3 9 Back Components 2 3 4 Component Description 1 Speaker Broadcasts voice commands and warnings; Use Volume button to adjust 2 Power LED Lit when receiving power 3 Qube Power and Data Socket Connection socket for power and data from the Navman Halo Qube 4 USB Socket Connection socket for USB cable to your computer 2. M-Nav 650 Hardware 1 10 NAVMAN 3 Positioning the M-Nav in a Vehicle The M-Nav can be mounted in a vehicle 3 ways: • By suction on the windscreen; • By suction, adhesive tape and screws drilled directly into the dashboard; • By using the Panavise screw mount. Note: The last two mounts are permanent solutions that will mark your dashboard. Follow the safety guidelines in Section 1 to ensure that the M-Nav does not obstruct the driver’s view, or interfere with the operation of vehicle airbags and safety devices. 3.1 M-Nav Suction-Mount Choose a position on the windshield that is clearly visible to the driver without obstructing the view of the road. • • • • Slip the locking-nut over the ballfoot. Snap the socket-clip onto the ballfoot. Screw the locking-nut onto the thread of the socket-clip until firm. Use the alcohol swab to clean and dry the suction-cup and the mounting-area on the windshield, then attach the suction-mount to the windshield: • Hold the suction-cup firmly against the windshield and • Press the lever towards the suction-cup. Click 3.2 M-Nav Adhesive Tape and Screw-Mount You can use the baseplate, adhesive tape and screws supplied to permanently mount the M-Nav directly into the vehicle dashboard. M-Nav 650 || User Manual 11 Assembling the M-Nav Screw-Mount 3.3 Panavise Screw-Mount The Panavise mounting system mounts similarly to the M-Nav Screw-Mount described in Section 3.2, from point 4 onwards. 3. Positioning the M-Nav in a Vehicle 1 Choose a position on the dashboard where the M-Nav will be clearly visible to the driver, and ensure that the mounting surface is clean and dry. 2 Remove the protective layer from the tape and press down firmly for 30 seconds. 3 Press the suction-cup firmly against the surface and press the lever down. 4 Use the baseplate and screws supplied to fix the M-Nav base into the dashboard. 5 Slip the locking-nut over the ballfoot, with the flat side facing upwards. 6 Snap the socket-clip onto the ballfoot. 7 Screw the locking-nut onto the thread of the socket-clip until firm. 12 NAVMAN 3.4 Inserting the M-Nav into the Clip • Position the two locating-tabs on the underside of the M-Nav into the corresponding slots on the clip. • Snap the upper side of the M-Nav into the clip. • Connect the M-Nav to your Halo Qube GPS device with the RJ-45 cable. The M-Nav will turn on. M-Nav 650 || User Manual Getting Started Step 1: Language • Use the 8-way toggle to choose your language, then press OK. • To prevent the Language screen from displaying on each startup, use the 8-way toggle to select the Do not show on startup check box, then press OK. • Press to go to the next screen. The Warning screen will display. Step 2: Warning Screen • Read the warning message. • Select Accept, then press OK to confirm that you understand. The first Tutorial screen will display. Step 3: Tutorial Screens • Read the Tutorial screen. • To prevent the Tutorial from displaying on startup, use the 8-way toggle to select the Do not show Tutorial on startup check box, then press OK. • Press to move through each Tutorial screen. The Main Menu screen will display. 4. Getting Started 4 13 14 NAVMAN 4.1 Main Menu Screen • Use the 8-way toggle to select a Main Menu option; confirm a selection by pressing OK. • The Route Information option is only available when a route has been calculated. See Section 12.6 for more information. 4.2 To put the M-Nav in Standby Mode • Press for three seconds until the screen turns off. For more information on power management, see Appendix A. M-Nav 650 || User Manual GPS and Modem Status 5.1 GPS Signals are transmitted by Global Positioning System (GPS) satellites orbiting the Earth. You can view your GPS status at any time from the 2D Map, 3D Map, Next Turn and Next 4 Turns screens. The GPS Strength Indicator is available. will display green when there is a valid fix (2D or 3D), or red when no fix For more detailed information on your current GPS fix, see Section 17.8. 5.2 Modem Signal Strength The lower left corner of the display also indicates the Qube modem signal strength. No Signal The M-Nav is unable to contact the server. This may be due to the server being off, a connection problem, heavy signal interference or coverage is not available in the current location. Intermittent Signal The M-Nav is having trouble communicating with the server. If the problem persists, try starting again, or check the connections. Good Signal The M-Nav is receiving reliable data from the server. 5. GPS Status 5 15 16 NAVMAN 6 Messaging The M-Nav is a mobile data terminal that receives text messages from the OnlineAVL client in your office and is capable of sending preset or user entered replies or outbound messages back to your fleet operator. 6.1 The Message List The Message List is used for all messaging related tasks, such as reading new messages, replying to messages, or creating new messages. New and Unread Read Read and Replied 6.2 Receiving Messages When a text message is sent to you, a New Message alert will be displayed, no matter what screen you are currently viewing. Using the 8-way toggle select EITHER: • Cancel to remove this screen, then press OK. The alert will disappear. (You may view the message later in the Message List screen). • Read to view the entire message, then press OK. The Read message screen will display. From the Read Message screen, use the 8-way toggle to select Message List, Reply, Show, Delete or Accept & Go, then press OK. Note: The M-Nav stores up to 100 incoming messages. M-Nav 650 || User Manual 6.3 Sending a Message Note: Message templates and template folders are set up by your fleet operator. From any screen, press . The Message List screen will display. • To Reply: Using the 8-way toggle, select the message you wish to reply to. Press OK. The Read Message screen will display. • Select Reply. Press OK. The Select Message screen will display. • To Send a New Message: Using the 8-way toggle, select Send. Press OK. The Select Message screen will display. 2. Select a message template from the list provided. Press to see more templates, as well as <New Message>. Press OK. The Edit Message screen will display. 3. Using the 8-way toggle, either modify an existing template or compose a new message. For details on how to use the Keyboard screen, see Section 7.2. 4. Select Send. Press OK. The message will be sent, and you return to the Message List screen. 5. Press 6.4 to return to the Main Menu. Reading Messages To read a message and any replies that have been sent, select the message from the Message List screen. The menu options along the bottom of the screen perform the following actions: Msg List Returns you to the Message List display Reply Allows you to reply to the message, using either Canned Messages or a user created message Show * Provides a map display of the location associated with the message. See Section 6.6 Delete Deletes the selected message and any replies that were sent. Accept & Go * Takes you directly to Navigation Mode. * Only available when a message has a location from the OnlineAVL 6. Messaging You can send a message by replying to an incoming message or sending your own original message. 1. 17 18 NAVMAN 6.5 Reading / Editing Sent Messages You are able to read, edit and re-send one of the last 100 messages composed. To access your sent messages: • • • • Press . The Message List screen will display. Select Send. The Select Message screen will display. Press repeatedly until the last Select Message screen displays. Select Recent Messages. A new Select Message screen will display, listing the last messages sent, with the most recent at the top of the screen. • Select the message you wish to read or re-send. Press OK. The Create Message screen will display. You may re-send this message or edit it. • For details on how to use the Keyboard screen, see Section 7.2. • If you wish to send this message, select Send and press OK. • To exit the Edit Message screen without sending, press and hold down the ESC button to clear the message. Then press ESC twice. The Main Menu screen will display. 6.6 Going to a Message Location Messages may contain an embedded GPS location, sent from the OnlineAVL system. • From the Message List screen, select a location-enabled message. Press OK. The Read Message screen will display. The Accept & Go and Show buttons will be available to use. M-Nav 650 || User Manual 19 To navigate immediately to the message location: • Select Accept & Go. The 2D Map screen will display. The route is calculated, and the M-Nav guides you to the location. Notes: • If you are currently in a routing mode when you select “Accept & Go”, you will have the option of whether or not to cancel your current route. • When Accept & go is selected, the message “Job Accepted” is automatically sent. To show the location: • Select Show. Press OK. The Location Map screen will display. • To Save this location as a Favorite, select Save. Press OK. The New Favourite screen will display. See Section 16. • To Go to this location, select Go. Press OK. The 2D Map screen will display. The route is calculated, and the M-Nav guides you to the location. Note: • Message Locations are also easily added to Multi-stop Trips, allowing you to arrange several destination points for days, even weeks. For more details, see Section 11. This device does not have the functionality to determine routes based on the height, weight, length or Hazmat classification of the vehicle in which the device is installed. Accordingly it is your sole responsibility for ensuring that your vehicle is legally and physically able to travel over routes that may include narrow, twisting or steep roads, weak, narrow or low bridges, tunnels or other obstacles on the routes determined by this device. Failure to adhere to these instructions may lead to serious personal injury, including death, or property damage. Navman disclaims all liability for use of the M-Nav that contributes to injuries, death, property damage or violates law. 6. Messaging Having received a message holding an embedded location, you may choose to use the “Accept & Go” option. The M-Nav will enter navigation mode immediately. 20 NAVMAN 7 Setting Your Destination For your safety, enter destination information before you start a journey. Do not operate the M-Nav while driving. Select a destination using the Destination, Keyboard and Preview screens, which used together form a destination wizard. This section describes how to use each of these screens and provides two case studies to help guide you through setting your destination. 7.1 Destination Screen The Destination screen is used to select your destination by area, street, postal code/ZIP code, Point of Interest (POI), intersection, city, town, country or state. As you specify each part of the address, it will display in the You are going to field at the top of the screen. The available options will change to reflect the parts of the address still to be completed. • Use the 8-way toggle to move around the Destination screen. • To select an option, press OK. M-Nav 650 || User Manual 7.2 21 Keyboard Screen The Keyboard screen toggles between 4 character sets: Uppercase, lowercase, Alternate and Number/ symbol. (To change between Alphabet and Qwerty layouts, see Section 17.) As you select each character, the first two results will display. Press to see more search results. • Use the 8-way toggle to move around the Keyboard screen. • To select a character or a search result, press OK. To cycle through uppercase, lowercase and alternate letters on the Keyboard screen: • Select the ABC/abc/Alt key. • Press OK repeatedly to switch between the 3 layouts. To display the number/symbol Keyboard screen: • Select the 123 key, then press OK. Editing Text • To delete a character, press ESC or select , then press OK.; hold ESC to delete the line. • To re-position the cursor, select the text box, then use left/ right on the 8-way toggle to move the cursor. 7. Setting Your Destination The Keyboard screen will display when you are required to enter text, such as when searching for a street name. As you select each character, the first two results will display. Press to see more search results. Search results will be listed in matching order, with the closest matches appearing at the top of the list. 22 NAVMAN 7.3 Preview Screen The Preview screen is used to display a preview of your destination before navigating to it, saving it as a Favourite or displaying it on the 2D Map screen. Use the 8-way toggle to move around the Preview screen. To display a smaller area in greater detail, press . . To display a larger area in less detail, press To display your destination on the 2D Map screen, select the preview map, then press OK. The 2D Map screen will display. • To save your destination as a Favourite, select Save, then press OK. The New Favourite screen will display. See Section 16. • To calculate the route and open the 3D Map screen, select Go, then press OK. The 3D Map screen will display. • To view Point of Interest (POI) details when your destination is a POI, select , then press OK. The POI Detail screen will display. • • • • M-Nav 650 || User Manual 7.4 23 Address Search Rules Street Names with Dates If a street name contains a date or a number, search by the first number: Example 1: If searching for “Faubourg du 13 Juillet 1920”, search by “13”. Example 2: If searching for “Avenue du 14 Avril 1914”, search by “14”. Example 3: If searching for “Rue de la 1 ere Armée”, search by “1”. Streets Named After People (excluding Italy) If a street name is a person’s name (including at least a first and last name), search by the first name: Example 1: If searching for “Rue Albert Mathieu”, search by “Albert”. Example 2: If searching for “Fred Archer Way”, search by “Fred”. Example 3: If searching for “Franz Grillparzer-Strasse”, search by “Franz”. Streets Named After People - Italy In Italy, if a street name is a person’s name (including at least a first and last name), search by the last name: Example 1: If searching for “Via de Angelo de Thomasis”, search by “Thomasis”. Example 2: If searching for “Via Placido Giovanella”, search by “Giovanella”. Example 3: If searching for “Via della Giacomo Marca”, search by “Marca”. Postcodes in United Kingdom and Netherlands When searching by postcode in United Kingdom or Netherlands, type the postcode with spaces and without the last two letters. Example 1: If searching for “RH6 9ST”, search by “RH6 9”. Example 2: If searching for “3514 BN”, search by “3514”. For exact European street type abbreviations, see Appendix A. 7. Setting Your Destination The following rules apply when searching for a destination in Europe: 24 NAVMAN 8 Setting Your Destination by Address 8.1 Case Study 1: Europe and New Zealand This case study will show you how to set your destination by selecting your country, then area, then street, then house number. Note: This case study applies to Europe and New Zealand only. For navigating in Australia, Canada and USA, see Section 8.2. Step 1: Open the Destination screen • From the Main Menu, select Go To, then press OK. • From the Go To screen, select Address or POI, then press OK. The Destination screen will display. Important Note: If this is the first time you are setting your destination and you have maps from more than one country installed and selected, then the Select Country screen will display instead of the Destination screen. Go directly to Step 2.b. The next time you perform this procedure, the Destination screen will open as expected. Step 2: Select the Country of Destination If you only have the map of one country installed and selected, that country is selected for your destination by default and cannot be changed. Go to Step 3. a. From the Destination screen, select Change country, then press OK. The Select country screen will display. b. Select a country using the 8-way toggle. Press OK to select from the list. The Destination screen will display. M-Nav 650 || User Manual 25 Step 3: Find the Area of Destination b. Use the Keyboard screen to find the area of your destination. For information on using the Keyboard screen, see Section 7.2. The Destination screen will display. Step 4: Find the Street of Destination a. From the Destination screen, select Find street, then press OK. The Keyboard screen will display. 8. Setting Your Destination by Address a. From the Destination screen, select Find area, then press OK. The Keyboard screen will display. 26 NAVMAN b. Use the Keyboard screen to find the street of your destination. For information on using the Keyboard screen, see Section 7.2. The Destination screen will display. Step 5: Find the House Number of Destination a. From the Destination screen, select Enter house number, then press OK. The Keyboard screen will display. Note: If Enter house number option is not displayed, house numbers are not available for your selected street. Select Go to centre of street, then press OK to display the Preview screen. Go to step 5.c. b. Use the Keyboard screen to find the house number of your destination. For information on using the Keyboard screen, see Section 7.2. The Preview screen will display. c. Complete one of the following: • To calculate the route and open the 3D Map screen, select Go, then press OK. The 3D Map screen will display. M-Nav 650 || User Manual To return to the Main Menu, press . 8. Setting Your Destination by Address • To display the destination on the 2D Map screen, select the preview map, then press OK. The 2D Map screen will display. • To save the destination as a Favourite, select Save, then press OK. The New Favourite screen will display. See Section 16. • To change your destination, press ESC. The Destination screen will display. 27 28 NAVMAN 8.2 Case Study 2: Australia, Canada and USA This case study will show you how to set your destination by selecting your country, then state, then town or city, then street, then house number. Note: This case study applies to Australia, Canada and USA only. For navigating in Europe and New Zealand, see Section 8.1. Step 1: Open the Destination screen a. From the Main Menu, select Go To, then press OK. b. From the Go To screen, select Address or POI, then press OK. The Destination screen will display. Important Note: i. If this is the first time you are setting your destination and you have maps from more than one country installed and selected, then the Select Country screen will display instead of the Destination screen. Go directly to Step 2.b. The next time you perform this procedure, the Destination screen will open as expected. ii. If this is the first time you are setting your destination and you have maps from only one country, but more than one state installed and selected, then the Select State screen will display instead of the Destination screen. Go directly to Step 3. The next time you perform this procedure, the Destination screen will open as expected. Step 2: Select the Country of Destination If you only have the map of one country installed and selected, that country is selected for your destination by default and cannot be changed. Go to Step 3. a. From the Destination screen, select Change country or Change country or state then press OK. The Select country screen will display. b. Select a country using the 8-way toggle. Press OK to select from the list. The Select state screen will display. If you only have the map of one state installed and selected, that state is selected for your destination by default. Go to Step 4. M-Nav 650 || User Manual 29 Step 3: Select the State of Destination a. Select a state using the 8-way toggle. Press OK to select from the list. The Destination screen will display. Step 4: Find the Town or City of Destination a. From the Destination screen, select Find town/city, then press OK. The Keyboard screen will display. b. Use the Keyboard screen to find the town or city of your destination. For information on using the Keyboard screen, see Section 7.2. The Destination screen will display. 8. Setting Your Destination by Address If you only have the map of one state installed and selected, that state is selected for your destination by default and cannot be changed. Go to Step Four: Find the Town or City of Destination. 30 NAVMAN Step 5: Find the Street of Destination a. From the Destination screen, select Find street, then press OK. The Keyboard screen will display. b. Use the Keyboard screen to find the street of your destination. For information on using the Keyboard screen, see Section 7.2. The Destination screen will display. Step 6: Find the House Number of Destination a. From the Destination screen, select Enter house number, then press OK. The Keyboard screen will display. Note: If Enter house number option is not displayed, house numbers are not available for your selected street. Select Go to centre of street, then press OK to display the Preview screen. Go to step 6.c. M-Nav 650 || User Manual 31 b. Use the Keyboard screen to find the house number of your destination. For information on using the Keyboard screen, see Section 7.2. The Preview screen will display. To return to the Main Menu, press . 8. Setting Your Destination by Address c. Complete one of the following: • To calculate the route and open the 3D Map screen, select Go, then press OK. The 3D Map screen will display. • To display the destination on the 2D Map screen, select the preview map, then press OK. The 2D Map screen will display. • To save the destination as a Favourite, select Save, then press OK. The New Favourite screen will display. See Section 16. • To change your destination, press ESC. The Desintation screen will display. 32 NAVMAN 9 Setting Your Destination by POI 9.1 Case Study 1: Europe and New Zealand This case study will show you how to set your destination by selecting a Point of Interest (POI). A POI is a named site, feature, landmark or public venue which can be displayed as an icon on the map. POIs are grouped by type, such as parks and museums. Note: This case study applies to Europe and New Zealand only. For navigating in Australia, Canada and USA, see Section 9.2. Step 1: Open the Destination screen a. From the Main Menu, select Go To, then press OK. b. From the Go To screen, select Address or POI, then press OK. The Destination screen will display. Important Note: If this is the first time you are setting your destination and you have maps from more than one country installed and selected, then the Select Country screen will display instead of the Destination screen. Go directly to Step 2.b. The next time you perform this procedure, the Destination screen will open as expected. Step 2: Select the Country of Destination If you only have the map of one country installed and selected, that country is selected for your destination by default and cannot be changed. Go to Step Three: Select the Type of POI. a. From the Destination screen, select Change country, then press OK. The Select country screen will display. b. Select a country using the 8-way toggle. Press OK to select from the list. The Destination screen will display. M-Nav 650 || User Manual 33 Step 3: Select the Type of POI b. Select a POI type using the 8-way toggle. Press OK to select from the list. The Keyboard screen will display. c. Use the Keyboard screen to find the POI. For information on using the Keyboard screen, see Section 7.2. The Preview screen will display. 9. Setting Your Destination by POI Note: To narrow the search for a type of POI, you can first search by Area. a. From the Destination screen, select Find Point of Interest, then press OK. The Select POI screen will display. 34 NAVMAN d. Complete one of the following: • To calculate the route and open the 3D Map screen, select Go, then press OK. The 3D Map screen will display. • To display the destination on the 2D Map screen, select the preview map, then press OK. The 2D Map screen will display. • To save the destination as a Favourite, select Save, then press OK. The New Favourite screen will display. See Section 16. • To change your destination, press ESC. The Desintation screen will display. • To view Point of Interest (POI) details when your destination is a POI, , then press OK. The POI Detail screen will display. select To return to the Main Menu, press . M-Nav 650 || User Manual 9.2 35 Case Study 2: Australia, Canada and USA A POI is a named site, feature, landmark or public venue which can be displayed as an icon on the map. POIs are grouped by type, such as parks and museums. Note: This case study applies to Australia, Canada and USA only. For navigating in Europe and New Zealand, see Section 9.1. Step 1: Open the Destination screen a. From the Main Menu, select Go To, then press OK. b. From the Go To screen, select Address or POI, then press OK. The Destination screen will display. Important Note: i. If this is the first time you are setting your destination and you have maps from more than one country installed and selected, then the Select Country screen will display instead of the Destination screen. Go directly to Step 2.b. The next time you perform this procedure, the Destination screen will open as expected. ii. If this is the first time you are setting your destination and you have maps from only one country, but more than one state installed and selected, then the Select State screen will display instead of the Destination screen. Go directly to Step 3. The next time you perform this procedure, the Destination screen will open as expected. Step 2: Select the Country of Destination If you only have the map of one country installed and selected, that country is selected for your destination by default and cannot be changed. Go to Step Three: Select the State of Destination. a. From the Destination screen, select Change country or Change country or state then press OK. The Select country screen will display. b. Select a country using the 8-way toggle. Press OK to select from the list. The Select state screen will display. • If you only have the map of one state installed and selected, that state is selected for your destination by default. Go to Step Four: Select the Type of POI. 9. Setting Your Destination by POI This case study will show you how to set your destination by selecting a Point of Interest (POI). 36 NAVMAN Step 3: Select the State of Destination If you only have the map of one state installed and selected, that state is selected for your destination by default and cannot be changed. Go to Step 4. a. Select a state using the 8-way toggle. Press OK to select from the list. The Destination screen will display. Step 4: Select the Type of POI Note: To narrow the search for a type of POI, you can first search by Town or City. a. From the Destination screen, select Find Point of Interest, then press OK. The Select POI screen will display. M-Nav 650 || User Manual 37 b. Select a POI type using the 8-way toggle. Press OK to select from the list. The Keyboard screen will display. d. Complete one of the following: • To calculate the route and open the 3D Map screen, select Go, then press OK. The 3D Map screen will display. • To display the destination on the 2D Map screen, select the preview map, then press OK. The 2D Map screen will display. • To save the destination as a Favourite, select Save, then press OK. The New Favourite screen will display. See Section 16. • To change your destination, press ESC. The Desintation screen will display. • To view Point of Interest (POI) details when your destination is a POI, select , then press OK. The POI Detail screen will display. To return to the Main Menu, press . 9. Setting Your Destination by POI c. Use the Keyboard screen to find the POI. For information on using the Keyboard screen, see Section 7.2. The Preview screen will display. 38 NAVMAN 10 Using the 2D Map screen to Plan a Route You can plan a route directly from the 2D Map screen using the Pop-up menu. 1. From the Main Menu, select Map, then press OK. The 2D Map screen will display. • Move around the 2D Map screen using the 8-way toggle. • To display a smaller area in greater detail, press • To display a larger area in less detail, press . . 2. Press OK to display cross-hair on the 2D Map screen. To remove the cross-hair press ESC. 3. Use the 8-way toggle to place the intersection of the cross-hair on a destination; the street will highlight and the street name will display. 4. Press OK to select the street as your destination. The Pop-up menu will display 5. Select Navigate To. The route is calculated and displayed on the 3D Map screen. M-Nav 650 || User Manual Multi-stop Trips You can use the Multi-stop Trip screen to set multiple destination points for your trip. Your route will be calculated to go via each of these points in the specified order. Destination points can be added via the Multi-stop Trip screen or by selecting Show Details from the pop-up menu on the 2D Map screen, then Add to Trip. You can save up to 200 multi-stop trips, each with up to 14 destination points. 11.1 Case Study 1: Europe and New Zealand This case study will show you how to set a multi-stop trip by selecting your country, then area, then street, then house number for each destination point. Note: This case study applies to Europe and New Zealand only. For navigating in Australia, Canada and USA, see Section 11.2. Step 1: Start Your Multi-stop Trip a. From the Main Menu, select the Multi-stop Trip option. The Multi-stop Trip screen will display. b. Select Add, then press OK. The Add to Trip screen will display. 10. Planning A Route / 11. Multi-stopTrips 11 39 40 NAVMAN c. Select Address, then press OK. The Destination screen will open. Note: You can also add destination points using Favourites, Recent destinations and Messages with a destination attachded. Step 2: Select the Country of Your Destination Point If you only have the map of one country installed and selected, that country is selected for your destination point by default and cannot be changed. Go to Step 3. a. From the Destination screen, select Change country, then press OK. The Select Country screen will display. b. Select a country using the 8-way toggle. Press OK to select from the list. The Destination screen will display. M-Nav 650 || User Manual 41 Step 3: Find the Area of Your Destination Point b. Use the Keyboard screen to find the area of your destination point. For information on using the Keyboard screen, see Section 7.2. The Destination screen will display. Step 4: Find the Street of Your Destination Point a. From the Destination screen, select Find street, then press OK. The Keyboard screen will display. 11. Multi-stopTrips a. From the Destination screen, select Find area, then press OK. The Keyboard screen will display. 42 NAVMAN b. Use the Keyboard screen to find the street of your destination point. For information on using the Keyboard screen, see Section 7.2. The Destination screen will display. Step 5: Find the House Number of Your Destination Point a. From the Destination screen, select Enter house number, then press OK. The Keyboard screen will display. Note: If Enter house number option is not displayed, house numbers are not available for your selected street. Select Go to centre of street, then press OK to display the Preview screen. Go to step 5.c. b. Use the Keyboard screen to find the house number of your destination point. For information on using the Keyboard screen, see Section 7.2. The Preview screen will display. M-Nav 650 || User Manual 43 c. Select Add to Trip, then press OK.The Multi-stop Trip screen will display, listing your destination point. If you want to ... add another destination point Note: Destination points added after a multi-stop trip has commenced will not be included in the current route. change the order of your destination points calculate the route delete all destination points Then ... - Select Add, then press OK. The Add to Trip screen will display. - Select Address, then press OK. The Destination screen will display. - Go to step 3. - Select a destination point to move using the 8-way toggle. Press OK to select from the list. The Preview screen will display. - Select Move, then press OK. The Multistop Trip screen will display. - Use the 8-way toggle to move the selected destination point to the correct position, then press OK. select Go, then press OK. The 3D Map screen will display the calculated route. select Clear, then press OK. delete one destination point - Select a destination point to delete using the 8-way toggle. Press OK to select from the list. The Preview screen will display. - Select Delete From Trip, then press OK. The Multi-stop Trip screen will display. save the multi-stop trip as a Favourite - Select Save, then press OK. The New Favourite screen will display. - Select Save, then press OK. The Favourite will save and the Multi-stop Trip screen will display. To return to the Main Menu screen, press . 11. Multi-stopTrips d. Complete one of the following: Note: Destination points added, updated or deleted after a multi-stop trip has commenced will not affect the current route until the Go button is pressed. 44 NAVMAN 11.2 Case Study 2: Australia, Canada and USA This case study will show you how to set a multi-stop trip by selecting your country, then area, then street, then house number for each destination point. Note: This case study applies to Australia, Canada and USA only. For navigating in Europe and New Zealand, see Section 11.1. Step 1: Start Your Multi-stop Trip a. From the Main Menu, select the Multi-stop Trip option. The Multi-stop Trip screen will display. b. Select Add, then press OK. The Add to Trip screen will display. c. Select Address or POI, then press OK. The Destination screen will open. Note: You can also add destination points using Favourites, recent destinations and nearest Point of Interest. M-Nav 650 || User Manual 45 Step 2: Select the Country of Your Destination Point a. From the Destination screen, select Change country or Change country or state, then press OK. The Select Country screen will display. b. Select a country using the 8-way toggle. Press OK to select from the list. The Destination screen will display. • If you only have the map of one state installed and selected, that state is selected for your destination by default. Go to Step 4. Step 3: Select the State of Your Destination Point If you only have the map of one state installed and selected, that state is selected for your destination by default and cannot be changed. Go to Step Four: Find the Town or City of Destination. a. Select a state using the 8-way toggle. Press OK to select from the list. The Destination screen will display. 11. Multi-stopTrips If you only have the map of one country installed and selected, that country is selected for your destination point by default and cannot be changed. Go to Step Three: Select the State of Your Destination Point. 46 NAVMAN Step 4: Find the Town or City of Your Destination Point a. From the Destination screen, select Find town/city, then press OK. The Keyboard screen will display. b. Use the Keyboard screen to find the town or city of your destination. For information on using the Keyboard screen, see Section 7.2. The Destination screen will display. Step 5: Find the Street of Your Destination Point a. From the Destination screen, select Find street, then press OK. The Keyboard screen will display. M-Nav 650 || User Manual 47 b. Use the Keyboard screen to find the street of your destination point. For information on using the Keyboard screen, see Section 7.2. The Destination screen will display. b. Use the Keyboard screen to find the house number of your destination point. For information on using the Keyboard screen, see Section 7.2. The Preview screen will display. 11. Multi-stopTrips Step 6: Find the House Number of Your Destination Point a. From the Destination screen, select Enter house number, then press OK. The Keyboard screen will display. Note: If Enter house number option is not displayed, house numbers are not available for your selected street. Select Go to centre of street, then press OK to display the Preview screen. Go to step 6.c. 48 NAVMAN c. Select Add to Trip, then press OK. The Multi-stop Trip screen will display, listing your destination point. d. Complete one of the following: Note: Destination points added, updated or deleted after a multi-stop trip has commenced will not affect the current route until the Go button is pressed. If you want to ... Then ... add another destination point Select Add, then press OK. The Add to Trip screen will display. Note: Destination points added after a multi-stop trip has commenced will not be included in the current route. Select Address, then press OK. The Destination screen will display. change the order of your destination points Select a destination point to move using the 8-way toggle. Press OK to select from the list. The Preview screen will display. Go to Step Three: Find the Area of Your Destination Point. Select Move, then press OK. The Multistop Trip screen will display. Use the 8-way toggle to move the selected destination point to the correct position, then press OK. calculate the route Select Go, then press OK. The 3D Map screen will display the calculated route. delete all destination points select Clear, then press OK. delete one destination point Select a destination point to delete using the 8-way toggle. Press OK to select from the list. The Preview screen will display. Select Delete From Trip, then press OK. The Multi-stop Trip screen will display. save the multi-stop trip as a Favourite Select Save, then press OK. The New Favourite screen will display. Select Save, then press OK. The Favourite will save and the Multi-stop Trip screen will display. To return to the Main Menu screen, press . M-Nav 650 || User Manual 11.3 Skipping a Destination Point Main Menu > Multi-stop Trip To skip a destination point during a multi-stop trip, complete the following: 1. Press to return to the Main Menu screen. The Main Menu screen will display. 2. Select Route Information, then press OK. The Route Information screen will display. 3. Select Skip Next Dest., then press OK. The next destination point will be skipped and the route recalculated to the following destination point. Adding Message Locations to Multi-stop Trips Message Locations are easily added to Multi-stop Trips for planning days, even weeks, of destination points. For more details on Message Locations, see Section 6.6. • • • • From the Main Menu select Multistop Trip. To create a New Multistop Trip select Clear. Select Add to add locations to the Multistop Trip. Selecting Messages will display the Message List, highlight a message, select OK | Map | Add to Trip to add the message location to a trip. • Repeat steps 3 & 4 until the entire Multistop Trip has been planned. 11. Multi-stopTrips You can modify a multi-stop trip at any time from the Multi-stop Trip screen, however if you have already commenced a trip, changes will not affect the current route: 11.4 49 50 NAVMAN 12 Viewing your Route Once a route has been calculated, you can view it in several ways. Press screens. 12.1 to cycle through the 2D Map Screen The 2D Map screen is always oriented North and shows your current position (if a GPS fix is active) and surrounding street names. If a route has been calculated, the route and turns are highlighted. To view the 2D Map screen, either select Map on the Main Menu screen then press OK, or when a route to cycle through the screens. has been calculated, press • Use the 8-way toggle to move around the map. • To display a smaller area in greater detail, press . • To display a larger area in less detail, press . • To display the cross-hair press OK. Press again to display the Pop-up menu. Your next turn is highlighted in a different colour to future turns. The colour will depend on the theme you are using. Your current position is marked with . Displays one of the following options: • • • • • • GPS strength indicator. Your current location Speed Time Heading Distance to Turn Distance to Go ETA (Estimated Time of Arrival) • Time to Go M-Nav 650 || User Manual 12.2 3D Map Screen To view the 3D Map screen when a route has been calculated, press to cycle through the screens. Direction of the next turn North oriented compass Additional information can display here. Press the 8-way toggle left or right to scroll the options: • • • • • • Speed Time Heading Distance to Turn Distance to Go ETA (Estimated Time of Arrival) • Time to Go GPS strength indicator Your current location • To adjust the viewing angle, press the 8-way toggle up or down. • To display a smaller area in greater detail, press . • To display a larger area in less detail, press . • To display the Go To Pop-up summary, press OK. Message and Look Screen The Message and Look screen allows you to skip through your messages while providing guidance feedback. • When a route has been calculated, press from the 3D Map screen. • To cycle through the messages in your Message List, press the 8-way toggle up or down. • Follow similar instructions in Section 12.2 to display additional information. 12. Viewing Your Route The 3D Map screen displays when a route is calculated, oriented to the travelling direction with an adjustable horizon. 12.3 51 52 NAVMAN 12.4 Next Turn Screen The Next Turn screen displays information that you need for the next turn, the direction of the turn and the distance to the turn. A route must have been calculated for this screen to be able to display. Access to this screen is controlled by the Settings - Display screen. To view the Next Turn screen when a route has been calculated, press to cycle through the screens. The next instruction Map of the next turn Direction of next turn Additional information can display here. Press the 8-way toggle left or right to scroll the options: Distance to the next turn • • • • • • Speed Time Heading Distance to Turn Distance to Go ETA (Estimated Time of Arrival) • Time to Go GPS strength indicator Your current location 12.5 Next 4 Turns Screen The Next 4 Turns screen displays the next four turns of your route, the turn direction, the street name and the distance to the turn. A route must have been calculated for this screen to be able to display. Access to this screen is controlled by the Settings - Display screen. The next turn is highlighted at the top of the list. Your current location GPS strength indicator. Distance to the next turn Additional information can display here. Press the 8-way toggle left or right to scroll the options: • • • • • • • Speed Time Heading Distance to Turn Distance to Go ETA (Estimated Time of Arrival) Time to Go To view the Next 4 Turns screen when a route has been calculated, press screens. to cycle through the M-Nav 650 || User Manual 12.6 Back-On-Track™ Automatic Rerouting Route Information Screen The Route Information screen provides information about your current route and lets you skip a trip destination point or cancel a route. The screen is only available from the Main Menu when you are navigating a route: Main Menu > Route Information Show Route Select Show Route, then press OK to display your entire route on the 2D Map screen. Instruction List Select Instruction list, then press OK to display the Instruction List screen. The Instruction List screen is similar to the Next 4 Turns screen except that it displays your entire route. Use to cycle through the instruction list. 12. Viewing Your Route Your route is re-directed if you make a wrong turn. The ? symbol will display upper left of the 3D Map and Next Turn screens while the route re-calculates. 12.7 53 54 NAVMAN Summary Select Summary, then press OK to display the Route Summary screen containing your From and To addresses, Estimated Time to arrival and the Distance remaining to your destination. If you are navigating a multiple destination trip, the information displayed will relate to your next destination point. Skip Next Destination Select Skip Next Dest., then press OK to skip the next destination point of your trip. Only available when navigating a multi-stop trip. Cancel Route Select Cancel Route, then press OK to cancel the route. M-Nav 650 || User Manual The 2D Map Screen Pop-up Menu The Pop-up menu allows you to access navigational functions from the 2D Map screen. To display the Pop-up menu complete the following: 1. From the Main Menu, select Map, then press OK. The 2D Map screen will display. 2. Use the 8-way toggle to move around the 2D Map screen. • To display a smaller area in greater detail, press . • To display a larger area in less detail, press . 3. Press OK to display the cross-hair on the 2D Map screen. • To remove the cross-hair press ESC. 4. Position the intersection of the cross-hair using the 8-way toggle. Where the cross-hair intersects with a street, the street name will display at the bottom of the 2D Map screen. 5. Press OK. The Pop-up menu will display. 6. You can choose one of the following options: Menu Option Description Navigate To Calculates a route from your current location. Set as Start Location Sets the selected point as your departure point. Add to Favourites Displays the New Favourite screen for you to add the selected point as a Favourite. Displays the Address Details screen from which you can: Show Details - View details of the selected point - Add the point to your multi-stop trip. - Set the point as your destination point - Save the point as a Favourite. Add Avoid Area Adds an Avoid Area for you to size. Delete Avoid Area Deletes the selected Avoid Area. Nearest POI Displays the Select POI screen. Select the POI type, then the POI to navigate to. 7. Press OK to confirm your selection. 13. 2D Map Screen Pop-up Menu 13 55 56 NAVMAN 14 Avoiding an Area You can calculate a route that avoids a specified area on the map. Up to ten Avoid Areas can be added. Avoid Areas are displayed as shaded areas. If no alternative route around an Avoid Area exists, you will be routed through an Avoid Area. Adding an Avoid Area • • • • From the Main Menu screen, select Map, then press OK. The 2D Map screen will display. Press OK and use the 8-way toggle to place the cross-hair over the area that you want to avoid. Press OK to display the Pop-up menu. Select Add Avoid Area, then press OK. An Avoid Area is displayed. • Set the Avoid Area to the correct size and position using the 8-way toggle. • Press OK to enable the Avoid Area. Deleting an Avoid Area • From the Main Menu screen, select Map, then press OK. The 2D Map screen will display. • Press OK and use the 8-way toggle to place the crosshair over the Avoid Area that you want to delete. • Press OK to display the Pop-up menu. • Select Delete Avoid Area, then press OK. The Avoid Area is deleted. Deleting All Avoid Areas • • • • From the Main Menu screen, select Preferences, then press OK. From the Preferences screen, select My Data, then press OK. The My Data screen will display. From the My Data screen, select Clear Data, then press OK. The Clear Data screen will display. Select Clear Avoid Areas, then press OK. When the warning dialog-box opens, select Yes, then press OK. • To return to the Main Menu, press . M-Nav 650 || User Manual Route Demonstrator The Route Demonstrator allows you to: turns into a ‘S’ icon, reminding you that • Preview a route. During the preview, the the demonstration is a ‘S’imulation, not your actual progress on your journey. • Plan and view a route without a GPS fix, such as when you are inside a building. 15.1 Select Departure Point If you have a GPS fix, you do not need to select a departure point unless you want the demonstrated route to start elsewhere. 1. From the Main Menu screen, select Map. The 2D Map screen will display. 2. Press OK to display the cross-hair on the 2D Map screen. 3. Position the intersection of the cross-hair using the 8-way toggle. Where the cross-hair intersect on a street, the street name will display at the bottom of the 2D Map screen. 4. Press OK. The Pop-up menu will display. 5. Select Set as Start Location, then press OK.The Pop-up menu will close. 15.2 Select Destination Point Set a destination either by using the Destination screen (see Section 7) or by using the 2D Map screen Pop-up menu by completing the following: 1. Press OK to display the cross-hair on the 2D Map screen. 2. Position the intersection of the cross-hair using the 8-way toggle. Where the cross-hair intersect, with a street, the street name will display at the bottom of the 2D Map screen. 3. Press OK. The Pop-up menu will display. 4. Select Navigate To, then press OK. The Pop-up menu will close. The 3D Map screen will display the calculated route in Route Demonstrator mode. • If you have selected the Route Demonstrator check box on the Routing screen, the Route Demonstrator will demonstrate the route. 15.3 Activate Route Demonstrator 1. From the 2D Map screen, then press OK. The crosshair will display. 2. Press OK again. The Pop-up Menu will display. 3. Select Start Demonstrator. 14. Avoiding an Area / 15. Route Demonstrator 15 57 58 NAVMAN 15.4 To Deactivate Route Demonstrator To deactivate the current route demonstration: • From the 2D Map screen, press OK twice. The Pop-up Menu will display. • Select Stop Demonstrator. To deactivate all route demonstrations: 1. Press to display the Main Menu screen. 2. From the Main Menu screen, select Preferences, then press OK. 3. From the Preferences screen, select Routing, then press OK. The Routing screen will display. 4. Press twice. The Route Demonstrator preferences screen will display. 5. Clear the Demonstrate Route check box, then press OK. 6. Select Save, then press OK. Route Demonstrator will be disabled. The Main Menu screen will display. M-Nav 650 || User Manual Favourites and My Home You can save up to 200 destinations as Favourites, one of which can be saved as My Home. My Home can be any designated Favourite, but we recommend that it is your home or other common destination You can save a Favourite from the Preview screen after searching for an address, or from the Pop-up Menu on the 2D Map screen. 16.1 Saving a Favourite 1. Either search for an address using the Destination and Keyboard screens as described in Section 7-9, or create a multi-stop trip as described in Section 11, until the Preview screen is displayed. 2. Select Save, then press OK. The New Favourite screen will display. 3. To change the name of the Favourite, select the Name box, then press OK. The Enter text screen will display. • • • • • • • Use the 8-way toggle to move around the Enter text screen. To select a character, press OK. To delete a character, press ESC; hold ESC to delete the line. To display the number/symbol Enter text screen, select 123, then press OK. To display the alternate Enter text screen, press , or select Alt, then press OK. To display the alphabet Enter text screen, press , or select ABC, then press OK. After you have entered a name for the Favourite, select Enter, then press OK. The New Favourite screen will display. 16. Favourites and My Home 16 59 60 NAVMAN 4. Complete one of the following: • To save as a favourite, select Save as Favourite, then press OK. The Favourite is saved. The Go To screen will display. • To save as My Home, select Save as My Home, then press OK. The Favourite is saved as My Home. The Go To screen will display. 16.2 Saving a Favourite from the 2D Map Screen • From the Main Menu, select Map, then press OK. The 2D Map screen will display. • Press OK to display the cross-hair. • Position the cross-hair on a destination using the 8-way toggle. Where the crosshair intersect on a street, the street will highlight and the street name will display. • Press OK. The Pop-up menu will display. 5. Select Add to Favourites, then press OK. The New Favourite screen will display. M-Nav 650 || User Manual 61 6. To change the name of the Favourite, select the Name box, then press OK. The Enter text screen will display. 16.3 Editing the Name of the Favourite 1. From the Main Menu, select Go To, then press OK. 2. From the Go To screen, select Favourites, then press OK. The Favourite screen will display. 3. Select a Favourite to edit using the 8-way toggle, then press OK. The Preview Favourite screen will display. 16. Favourites and My Home Use the 8-way toggle to move around the Enter text screen. To select a character, press OK. To delete a character, press ESC; hold ESC to delete the line. To display the number/symbol Enter text screen, select 123, then press OK To display the alternate Enter text screen, press , or select Alt, then press OK. To display the alphabet Enter text screen, press , or select ABC, then press OK. After you have entered a name for the Favourite, select Enter, then press OK. The New Favourite screen will display. 7. Complete one of the following: • To save as a favourite, select Save as Favourite, then press OK. The Favourite is saved. The 2D Map screen will display. • To save as My Home, select Save as My Home, then press OK. The Favourite is saved as My Home. The 2D Map screen will display. • • • • • • • 62 NAVMAN 4. Select the Name box, then press OK. The Enter text screen will display. Use the 8-way toggle to move around the Enter text screen. To select a character, press OK. To delete a character, press ESC; hold ESC to delete the line. To display the number/symbol Enter text screen, select 123, then press OK To display the alternate Enter text screen, press , or select Alt, then press OK. To display the alphabet Enter text screen, press , or select ABC, then press OK. After you have entered a name for the Favourite, select Save, then press OK. The New Favourite screen will display. 5. Complete one of the following: • To save as a favourite, select Save as Favourite, then press OK. The Favourite is saved. The Favourite screen will display. • To save as My Home, select Save as My Home, then press OK. The Favourite screen will display. • • • • • • • 16.4 Deleting a Favourite 1. From the Main Menu, select Go To, then press OK. 2. From the Go To screen, select Favourites, then press OK. The Favourite screen will display. 3. Select a Favourite to delete using the 8-way toggle, then press OK. The Preview Favourite screen will display. M-Nav 650 || User Manual 16.5 Navigating to a Favourite 1. From the Main Menu, select Go To, then press OK. 2. From the Go To screen, select Favourites, then press OK. The Favourite screen will display. 3. Select a Favourite using the 8-way toggle, then press OK. The Preview Favourite screen will display. 4. Select Go, then press OK. The route is calculated and displayed on the 3D Map screen. 16.6 Navigating to My Home 1. From the Main Menu, select Go To then press OK. 2. From the Go To screen, select My Home then press OK. The route is calculated and displayed on the 3D Map screen. 16. Favourites and My Home 4. Select Delete, then press OK. A Warning dialogue box will display asking for confirmation to delete the Favourite. 5. Select Yes, then press OK. The Favourite is deleted. The Favourite screen will display. 63 64 NAVMAN 17 Preferences You can modify the following preferences to suit your needs. 17.1 Screen Brightness 1. Press and hold the Zoom/Brightness button to display the Brightness scale. 2. To increase screen brightness, press +. To decrease screen brightness, press -. Warning: The M-Nav can heat up when the Brightness scale enters the red zone. To reduce the risk of over-heating, avoid red brightness levels where possible. 17.2 Volume 1. Press and hold the Volume button to display the Volume scale. 2. To increase volume, press +. To decrease volume, press -. 17.3 Routing 1. From the Main Menu, select Preferences. Press OK. 2. From the Preferences screen, select Routing. The first of three Routing screens will display. to move through the Routing screens. 3. Press M-Nav 650 || User Manual 65 3. Complete one of the following: Then... change the Route Type move the Route Type slider towards Quickest to give more weighting to the fastest time when calculating a route. move the Route Type slider towards Shortest distance to give more weighting to the shortest distance when calculating a route. change the Preference for motorways move the Preference for motorways slider towards Less often to use roads other than motorways where possible when calculating a route. move the slider towards More often to use motorways where possible when calculating a route. change the Preference for urban roads move the Preference for urban roads slider towards Less often to use roads other than urban roads where possible when calculating a route. move the Preference for urban roads slider towards More often to use urban roads where possible when calculating a route. revert to default settings select Set default, then press OK on the first Routing screen. This will restore default setting for Route Type, Preference for motorways and Preference for urban roads. avoid toll roads select the Avoid toll roads check box. avoid unsurfaced roads select the Avoid unsurfaced roads check box. avoid ferries select the Avoid ferries check box. receive a warning if your route includes toll roads select the Toll roads check box to display a warning message at the start of your trip, if your route includes toll roads. receive a warning if your route includes unsurfaced roads select the Unsurfaced roads check box to display a warning message at the start of your trip, if your route includes unsurfaced roads. receive a warning if your route includes ferries select the Ferries check box to display a warning message at the start of your trip, if your route includes ferries. enable the Route Demonstrator select the Demonstrate Route check box. This allows you to plan and view a route without a GPS fix. See Section 15 for more information. enable the Route Demonstrator to play repeatedly select the Repeat check box. enable Smart Demonstration to be played select the Smart Demonstration check box. The demonstration willl navigate between the first and second Favourite after a 10-second delay. enable Track Recording (only to be used if required by Navman Customer Support) contact Navman Customer Support, as we recommend this feature be used only under the supervision of a Navman technician. 4. Select Save, then press OK. The Main Menu screen will display. 17. Preferences If you want to... 66 NAVMAN 17.4 Language 1. From the Main Menu, select Preferences, then press OK. 2. From the Preferences screen, select Language, then press OK. The Language screen will display. 3. To change your language, including the voice scheme used for voiceguidance during navigation, select your preferred voice scheme from the Language box using the left and right sides of the 8-way toggle. 4. To enable Voice guidance instructions during navigation, select the Enable check box. Press OK. 5. To switch the Keyboard Layout between Qwerty and standard alphabetical, select your choice and press OK. 6. Select Save, then press OK. The Main Menu screen will display. M-Nav 650 || User Manual 17.5 67 Maps 1. From the Main Menu, select Preferences, then press OK. 2. From the Preferences screen, select Maps, then press OK. 3. From the Maps screen, select the Display option. The first of two Display screens will display. Press to move through the Display screens. 4. Complete the following: If you want to... Then... enable Auto Zoom during navigation select the Auto Zoom check box. If selected, the 2D Map and 3D Map screen will automatically zoom in or out, depending on your speed, to allow optimal route-viewing. enable access to the Next Turn screen select the Display Next Turn screen check box. enable access to the Next 4 Turns screen select the Display Next 4 Turns screen check box. change the colour scheme select your preferred scheme from the Map colour scheme box using the left and right side of the 8-way toggle. improve screen contrast in light or dark conditions under Map colours, select either Day or Night. display a topographical map on the 2D Map and 3D Map screens select the Topographic display check box. display grid lines on the 2D Map and 3D Map screens select the Display Map Grid check box. display a north-pointing compass on the 2D Map and 3D Map screens select the Display Compass on Map check box. display “no entry” icons on “no entry” roads on the 2D Map and 3D Map screens select the Display no entry roads check box. 5. Select Save, then press OK. The Main Menu screen will display. 17. Preferences Display 68 NAVMAN Internal Memory • • • • From the Main Menu, select Preferences, then press OK. From the Preferences screen, select Maps, then press OK. From the Maps screen, select Internal memory. The Maps - Internal memory screen will display. To activate a map, use the 8-way toggle to select the desired map, then press OK to select the map check box Note: There may be more than one page of map listings, depending on the number of maps installed. To view additional pages of map listings, scroll down using the 8-way toggle, or press • Repeat step 4 until all required maps are selected. • Select Save, using the right side of the 8-way toggle, then press OK. The Main Menu screen will display. Points of Interest (POIs) Points of Interest in a region are grouped into types. This function allows you to select the types you need. For example, you may be only interested in entertainment venues and want to disable other POI types such as schools. 1. From the Main Menu, select Preferences, then press OK. 2. From the Preferences screen, select Maps, then press OK. 3. From the Maps screen, select Points of Interest. The Points of Interest screen will display. 4. You may either choose to display (or hide) icons of all POI types on the 2D Map and 3D Map screens, or to selectively display desired icons chosen from the list of POI types. • To display all POI icons (i.e., icons from all POI types) on the 2D Map and 3D Map screens, select Turn all on, then press OK. To display no icons, select Turn all off, then press OK. • To select a specific POI type icon for display, use the 8-way toggle to select the desired POI type, then press OK to select the check box. Repeat until all desired POI types are selected. Note: There may be more than one page of POI types, depending on the installed maps. To view additional pages of POI types, scroll down using the 8-way toggle, or press . 5. On any page of POI types, select Save, using the right side of the 8way toggle, then press OK. The Main Menu screen will display. . M-Nav 650 || User Manual 17.6 Alerts The Active POI settings allow you to set warning chimes and visual warnings for custom POIs that will activate within a chosen distance-radius of your location. For example, a warning chime will sound or a visual warning will display when an active POI is within 150 ft, but not necessarily on your route. 1. From the Preferences menu, select Safety Alerts, then press OK. The Safety Alerts screen will display. 2. On the Safety Alerts screen, select Active POI, then press OK. The Select Active POI screen will display. 3. Use the 8-way toggle to select a custom POI type, then click OK. The POI Activation Settings screen will display. Select the Active check box to activate the POI. Modify the settings as required: To enable a warning chime when the POI is in close proximity, select the Audio warning check box. To enable a visual warning when the POI is in close proximity, select the Visual warning check box. Move the Distance to POI slider to select the distance at which the warnings will activate. Use the 8-way toggle to select Save, then press OK. The Main Menu screen will display. 17. Preferences Active POIs 4. 5. • • • 6. 69 70 NAVMAN Speed The Safety settings allow you to set safety-related warnings. 1. From the Preferences menu, select Safety Alerts, then press OK. The Safety Alerts screen will display. 2. On the Safety Alerts screen, select Safety, then press OK. The Safety screen will display. 3. Complete the following: If you want to... Then... enable a warning chime when travelling at or above a designated speed select the speed in the Speed box using the left and right buttons on the 8-way toggle. Select Save, then press OK. The Safety alerts screen will display. Note: The GPS signal alert will be active when a Speed alert is selected. enable a visual warning if the Main Menu screen is accessed in a moving vehicle enable a warning chime and visual warning when the GPS signal has been lost select the Warn driver when operating check box, then press OK. select the Warn when GPS lost check box, then press OK. Note: The GPS signal alert will be active when a Speed alert is selected. 4. Use the 8-way toggle to select Save, then press OK. The Main Menu screen will display. M-Nav 650 || User Manual 17.7 My Data Custom Points of Interest (POIs) are pre-installed and listed on the My POIs screen. From the Main Menu, select Preferences. Press OK. From the Preferences screen, select My Data. Press OK. From the My Data screen, select My POI. Press OK. The My POI screen will display. Use the 8-way toggle to select the POI file or files you require. Press OK to select the POI check box Note: There may be more than one page of POI types, depending on the number of maps installed. To view additional pages of POI types, scroll down using the 8-way toggle, or press 5. Use the 8-way toggle to select Save, then press OK. The Main Menu screen will display. Clear Data 1. 2. 3. 4. From the Main Menu screen, select Preferences. Press OK. The Preferences screen will display. From the Preferences screen, select My Data. Press OK. The My Data screen will display. From the My Data screen, select Clear Data, then press OK. The Clear Data screen will display. Complete the following: If you want to... Then... clear recent destinations select Clear Recent, then press OK. When the warning dialog-box opens, select Yes, then press OK. clear favourites select Clear Favourites, then press OK. When the warning dialog-box opens, select Yes, then press OK. Note: This option will not clear My Home. clear avoid areas 5. Press select Clear Avoid Areas, then press OK. When the warning dialog-box opens, select Yes, then press OK. to return to the Main Menu screen. . 17. Preferences My Points of Interest (My POI) 1. 2. 3. 4. 71 72 NAVMAN 17.8 More Preferences GPS Status Signals are transmitted by Global Positioning System (GPS) satellites orbiting the Earth. The Satellite Signal Strengths screen provides a visual representation of the information being received. Latitude and longitude are displayed, along with a north-pointing compass, the heading in degrees and ground speed. The strength of each satellite is displayed on a bar chart. From the Main Menu screen, select Preferences > More Preferences > GPS status. The Satellite Signal Strengths screen will display. The circle on the right side of the screen displays green when there is a valid fix (2D or 3D), and red when no fix is available. A fix will be obtained more quickly if the vehicle is stationary than if it is moving. The satellites available from your current position are shown as grey, red and green coloured bars: Bar Colour Description Grey No signal at all Red A valid signal, but not being used to fix your position Green A valid signal being used to fix your position OnlineAVL Status The GPS Status screen also allows access to the OnlineAVL Status screen. This is a diagnostic tool you can use to monitor several internal settings, and may be useful if you encounter trouble with e M-Nav’s normal operation. • From the GPS Status screen, press . M-Nav 650 || User Manual 73 Measurements If you want to... Then... change the Position format select either the Decimal degrees or the Degrees, minutes, seconds option. change the local time offset select the offset from the Coordinated Universal Time (UTC) for your location from the Local time offset box using the lefthand and righthand buttons of the 8-way toggle. Next, select either the 12 Hour or 24 Hour option for time-format. choose distance units* select either the kilometres or miles option. 5. Use the 8-way toggle to select Save, then press OK. The Main Menu screen will display. * Only available when UK English or US English language is selected. 17. More Preferences 1. From the Main Menu screen, select Preferences. Press OK. The Preferences screen will display. 2. From the Preferences screen, select More Preferences. Press OK. The second Preferences screen will display. 3. On the second Preferences screen, select Measurements, then press OK. The Measurements screen will display. 4. Complete the following: 74 NAVMAN Startup 1. From the Main Menu screen, select Preferences. Press OK. The Preferences screen will display. 2. From the Preferences screen, select More Preferences. Press OK. The second Preferences screen will display. 3. On the second Preferences screen, select Startup, then press OK.The Startup screen will display. 4. Complete the following: If you want to... Then... display the Tutorial on startup select the Tutorial screen check box. display the Language Selection screen on startup select the Language selection screen check box. view the Tutorial select Show Tutorial. The first Tutorial screen will display. repeatedly to cycle through the Tutorial screens. Press 5. Use the 8-way toggle to select Save, then press OK. The Main Menu screen will display. M-Nav 650 || User Manual The M-Nav 650 has 3 power operation states. On Stand-by Mode Off The display will be showing information. The power LED is on. Current drawn may be several hundreds of milliamps. In this mode the unit is operational but is attempting to save power. The display will appear blank. The power LED is on. Current drawn will be in the tens of milliamps. The unit is powered down. Both the display and the power LED is off. There will only be a small current draw. Powering Up from Off While Off the M-Nav buttons are inactive, i.e. the Power button does not work. The unit turns On when it receives power from the Qube, which receives power from starting the vehicle’s ignition. At power up, the M-Nav detects the ignition state. • If the Qube reports the ignition state ON, the M-Nav turns on. • If the Qube reports the ignition state is OFF (the Qube is running from the vehicle battery), the M-Nav enters Stand-by mode. Powering Up from Standby The M-Nav will turn On from Standby Mode if: • Any button on the unit is pressed. • The unit receives a text message. Powering Down from On The M-Nav will enter Standby Mode if: • If the ignition state is off and no key has been pressed for more than 60 seconds. • The power button is pressed for more than 3 seconds. The M-Nav will turn Off if: • The Qube is not functioning. M-Nav 650 Power Summary • Ensure the Qube is receiving power from the vehicle • Press any button on the M-Nav 650, OR; • Ensure the Qube is connected to the M-Nav 650 (LED ON) • A text message is received Off • Disconnect Qube from unit, OR • Qube no longer has power (LED OFF) Stand-by Mode ON • Press for 3 seconds, OR; • Ignition state is off; no key pressed for more than 60 seconds 17. More Preferences Appendix A: Power Management 75 76 NAVMAN Appendix B: Street Types Note: Belgium and Switzerland each list street types and their abbreviations in three languages. Country Street Type Abbreviation Austria BOULEVARD CHAUSSEE PLATZ STRASSE BVD CH PL STR Belgium (Dutch) BAAN BERG DREEF LAAN MARKT PARK PLEIN SQUARE STEENWEG STRAAT BN BG DR LN MKT PK PL SQ STWG STR Belgium (French) AVENUE BOULEVARD CHAUSSÉE IMPASSE MONT MONTAGNE PLACE ROUTE ROUTE NATIONAL RUE SQUARE AVE BVD CH IMP MT MT PL RTE RN R. SQ Belgium (German) CHAUSSEE PLATZ STRASSE CH PL STR Finland GATAN GATE GATA VÄGEN VÄG GT GT GT V. V. France ALLEE AVENUE BOULEVARD CHAUSSÉE DOMAINE FAUBOURG IMPASSE MONT MONTAGNE PASSAGE PLACE QUARTIER ROND-POINT ROUTE ROUTE NATIONALE RUE SQUARE TRAVERSE ALL AVE BVD CH DOM FG IMP MT MT PAS PL QU RPT RTE RN R. SQ TRA M-Nav 650 || User Manual Street Type Abbreviation Germany BOULEVARD CHAUSSEE PLATZ STRASSE BVD CH PL STR Ireland AVENUE BOULEVARD CENTRE CRESCENT PLACE ROAD ROUTE SQUARE STREET YARD AVE BVD CTR CR PL RD RTE SQ ST YD Italy CONTRADA CORSO FRAZIONE LARGO PIAZZA PIAZZALE STRADA STATALE SUPERSTRADA VIA VIALE C.DA C.SO FR LGO P.ZA P.LE SS SS V. VL Luxembourg ALLÉE AVENUE BOULEVARD CHAUSSÉE DOMAINE FAUBOURG IMPASSE MONT MONTAGNE PASSAGE PLACE QUARTIER ROND-POINT ROUTE ROUTE NATIONALE RUE SQUARE TRAVERSE ALL AVE BVD CH DOM FG IMP MT MT PAS PL QU RPT RTE RN R. SQ TRA Netherlands BOULEVARD DIJK DWARSSTRAAT DWARSWEG GRACHT KADE KANAAL LAAN LEANE LOANE PARK PLANTSOEN PLEIN SINGEL STRAAT STRJITTE STRAATWEG WEG BVD DK DWSTR DWWG GR KD KAN LN LN LN PK PLNTS PLN SNGL STR STR STRWG WG Appendices Country 77 78 NAVMAN Country Street Type Abbreviation Norway GATA GATE PLASSEN VEGEN VEI GT GT PL V. V. Portugal AVENIDA BAIRRO CALÇADA CAMINHO ESTRADA LARGO LARGUINHO PRAÇA QUARTO QUARTA QUINTA RUA SÃO SANTA SANTO AVE BA CC CAM EST LGO LARG PR QT QT QU R. S. S. S. Spain AVENIDA CALLE CALLEJÓN CAMINO CARRETERA GLORIETA PASEO PLAZA RAMBLA RONDA AVE C/ CJ CM CR G P.O P. RBLA RD Switzerland (German) BOULEVARD CHAUSSEE PLATZ STRASSE BVD CH PL STR Switzerland (French) AVENUE CHAUSSÉE IMPASSE MONT MONTAGNE PLACE QUARTIER ROUTE ROUTE NATIONAL RUE SQUARE AVE CH IMP MT MT PL QU RTE RN R. SQ Switzerland (Italian) CONTRADA CORSO FRAZIONE LARGO PIAZZA PIAZZALE VIA VIALE C.DA C.SO FR LGO P.ZA P.LE V. VL United Kingdom AVENUE BOULEVARD CENTRE CRESCENT AVE BVD CTR CR M-Nav 650 || User Manual Navman NZ Limited Navman Wireless UK 7-21 Kawana Street, Northcote PO Box 68 155 Newton Auckland New Zealand Tel: +64 (0)9 481 0500 Fax: +64 (0)9 480 3176 Customer Support: fl[email protected] Website: www.navman.com Innovation Centre 2 Keele University Science Park Keele, Staffodshire, ST5 5NH UNITED KINGDOM Tel: +44 (0) 1782 55 79 50 Fax: +44 (0) 1782 55 79 79 Email: [email protected] Website: www.navmanwireless.co.uk Navman Wireless Australia Navman Wireless NZ Navman Australia Pty. Ltd Suite 2, 408 Victoria Rd PO Box 479 Gladesville NSW 2111 AUSTRALIA Tel: +61 2 9879 9000 Fax: +61 2 9879 9001 Website: www.navman.com 7-21 Kawana St, Northcote PO Box 68 155 Newton Auckland New Zealand Customer Support and Info: 0800 GPS FLEET (0800 477 353) Email: [email protected] Website: www.navman.com NAVMAN DISCLAIM ALL LIABILITY FOR ANY USE OF THIS PRODUCT IN A WAY THAT MAY CAUSE ACCIDENTS, DAMAGE OR VIOLATE THE LAW. Compliance This device complies with part 15 of the FCC Rules. Operation is subject to the following two conditions: (1) This device may not cause harmful interference, and (2) this device must accept any interference received, including interference that may cause undesired operation. Copyright © 2005 Navman NZ Limited. Navman is a registered trademark of Navman NZ Limited. All rights reserved. Smart, Drive-Away and Back-On-Track are trademarks of Navman NZ Limited. All rights reserved. Microsoft Windows 98 SE, ME, 2000 or XP SP1, Microsoft Internet Explorer are registered trademarks of Microsoft Corporation. Adobe Reader is a registered trademark of Adobe Systems Incorporated. All rights reserved. All other trademarks and registrations are the property of their respective owners. Published in New Zealand. MN000330A Contacts / Legal Contacts 79 80 NAVMAN Notes M-Nav 650 || User Manual 81 Notes 82 NAVMAN MN000285A