1
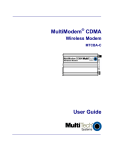
MultiModemII Quick Start Guide
MultiModemII Quick Start Guide
Models MT5600BA and MT5600BL
P/N 82086201 Revision B
Copyright © 1999–2001 by Multi-Tech Systems, Inc.
All rights reserved. This publication may not be reproduced, in whole or in part, without
prior expressed written permission from Multi-Tech Systems, Inc.
Multi-Tech Systems, Inc. makes no representations or warranties with respect to the contents hereof and specifically disclaims any implied warranties of merchantability or fitness
for any particular purpose. Furthermore, Multi-Tech Systems, Inc. reserves the right to
revise this publication and to make changes in the content hereof without obligation of
Multi-Tech Systems, Inc. to notify any person or organization of such revisions or changes.
Record of Revisions
Revision
Date
B
6/1/01
Description
Updated phone numbers, added patent list and system CD,
deleted BBS and fax-back references, and revised Chapter 2.
Trademarks
MultiModemII, Multi-Tech, and the Multi-Tech logo are trademarks of Multi-Tech
Systems, Inc. Adobe and Acrobat are trademarks of Adobe Systems Incorporated. MNP
and Microcom Network Protocol are trademarks of Microcom Incorporated. K56flex is a
registered trademark of Rockwell International Corporation and Lucent Technologies
Corporation. Microsoft, Windows, Windows 95, and Windows NT are either registered
trademarks or trademarks of Microsoft Corporation in the United States and/or other
countries. PhoneTools is a trademark of BVRP Software.
Patents
This device is covered by one or more of the following patents: 6,031,867; 6,012,113;
6,009,082; 5,905,794; 5,864,560; 5,815,567; 5,815,503; 5,812,534; 5,809,068; 5,790,532;
5,764,628; 5,764,627; 5,754,589; D394,250; 5,724,356; 5,673,268; 5,673,257; 5,644,594;
5,628,030; 5,619,508; 5,617,423; 5,600,649; 5,592,586; 5,577,041; 5,574,725; D374,222;
5,559,793; 5,546,448; 5,546,395; 5,535,204; 5,500,859; 5,471,470; 5,463,616; 5,453,986;
5,452,289; 5,450,425; D361,764; D355,658; D355,653; D353,598; D353,144; 5,355,365;
5,309,562; 5,301,274. Other patents pending.
Notice
Though these modems are capable of 56K bps download performance, line impairments,
public telephone infrastructure and other external technological factors currently prevent
maximum 56K bps connections.
Multi-Tech Systems, Inc.
2205 Woodale Drive
Mounds View, MN 55112 U.S.A
(763) 785-3500 or (800) 328-9717
Fax (763) 785-9874
Technical Support (800) 972-2439
Internet http://www.multitech.com
ii
MultiModemII Quick Start Guide
Contents
Introduction ....................................................................................................... 1
What Is in Your Modem Package? ................................................................. 1
What You Will Need ........................................................................................ 2
Safety Warnings ................................................................................................ 2
Step 1: Connect the Modem to Your System ................................................ 3
RS232 Connection .................................................................................. 3
Dialup Connection ................................................................................. 4
Two-Wire Leased Line Connection ..................................................... 4
Four-Wire Leased Line Connection .................................................... 4
Phone Connection .................................................................................. 4
Power Connection .................................................................................. 5
Power-On Test ........................................................................................ 5
Step 2: Install the Modem Driver ................................................................... 5
Step 3: Install and Configure Your Software ................................................ 6
How to Get a Copy of the User Guide .......................................................... 8
iii
MultiModemII Quick Start Guide
iv
MultiModemII Quick Start Guide
Introduction
Congratulations on your purchase of the MultiModemII modem. You have acquired one of the finest data/fax dialup and
leased line modems available today from one of the world’s
oldest modem manufacturers: Multitech Systems, Inc.
This Quick Start Guide will help you install and set up your
modem. A full User Guide containing detailed configuration
information, a command reference, a troubleshooting chapter,
and an index, can be found on one of the disks in the modem
package. The User Guide, which is in Adobe Acrobat 4.0 format, can be viewed on your monitor or printed out for easy
reference.
What Is in Your Modem Package?
Your modem package has several components. Make sure you
have them all before trying to operate your modem. Your
package should include:
4
4
4
4
4
4
An MT5600BA or MT5600BL modem
An external transformer module
One (MT5600BA) or more (MT5600BL) modular telephone
cables
This Quick Start Guide
A CD containing data communications and other programs
An installation CD containing modem drivers and a User
Guide
If any of these items are missing, please contact Multi-Tech
Systems or your dealer/distributor (see Appendix D of the User
Guide for information about contacting Multi-Tech via telephone,
fax, or the Internet).
1
MultiModemII Quick Start Guide
What You Will Need
In addition to the contents of the MultiModemII package, you
will need the following items:
4
4
4
4
4
A computer with an unused serial port
A shielded RS-232 serial cable with a male DB-25 connector on one end and a connector to match your computer’s
serial port on the other end
A nearby AC power outlet
A nearby telephone line
A nearby leased line jack or terminals (optional)
Safety Warnings
• Use this product only with UL- and CUL-listed computers.
• To reduce the risk of fire, use only 26 AWG or larger telephone wiring.
• Never install telephone wiring during a lightning storm.
• Never install a telephone jack in a wet location unless the
jack is specifically designed for wet locations.
• Never touch uninsulated telephone wires or terminals
unless the telephone line has been disconnected at the
network interface.
• Use caution when installing or modifying telephone lines.
• Avoid using a telephone (other than a cordless type) during an electrical storm; there is a risk of electrical shock
from lightning.
• Do not use a telephone in the vicinity of a gas leak.
2
MultiModemII Quick Start Guide
Step 1: Connect the Modem to Your System
Turn off your computer. Placing the modem in a convenient
location, connect it to your computer’s serial port, to the telephone line, to your leased line, to AC power, and, optionally, to
your telephone.
PHONE
LINE
LEASED
EIA RS232C
VOLUME
POWER
Figure 1. MT5600BL connections.
RS232 Connection
Plug one end of the serial cable into the RS232 connector on
the modem, and the other end into a serial port connector on
your computer, such as COM1 or COM2.
3
MultiModemII Quick Start Guide
Dialup Connection
Plug one end of the modular phone cable into the modem’s
LINE jack, and the other end into a public switched telephone
network (PSTN) wall jack.
Note: The LINE jack is not interchangeable with the PHONE
jack. Do not plug the phone into the LINE jack or the line cable
into the PHONE jack.
Note: Regulatory agencies may impose certain restrictions on
equipment connected to public telephone systems. For more
information, see Appendix A of the User Guide.
Two-Wire Leased Line Connection
MT5600BA Plug one end of a two-wire phone cable into the
modem’s LINE jack, and connect the other end to a leased line
wall jack or terminals.
MT5600BL Plug one end of a two-wire phone cable into the
modem’s LEASED jack, and connect the other end to a leased
line wall jack or terminals.
Four-Wire Leased Line Connection
On an MT5600BL only, plug one end of a four-wire phone cable into the modem’s LEASED jack, and connect the other end
to a four-wire leased line wall jack or terminals. For dial backup operation, plug one end of the modular phone cable into the
modem’s LINE jack, and the other end into a PSTN wall jack.
Phone Connection
For voice-only calls, plug a telephone into the modem’s
PHONE jack (optional).
4
MultiModemII Quick Start Guide
Power Connection
Plug the transformer module into an AC power outlet or power
strip. Plug the transformer module’s cable into the POWER
jack on the modem.
Note: Use only the transformer module supplied with the
modem. Use of any other module voids the warranty and can
damage the modem.
Power-On Test
Test the modem by turning it on (a power switch is located on
the front panel). When you apply power, the modem performs
a diagnostic self-test, indicated by the TM indicator lighting
for a few seconds, after which the LCD should light. If this
does not happen, check that the power switch is on, the transformer module supply is solidly connected, and the AC outlet
is live. If these measures do not work, see Chapter 8 of the
User Guide, “Solving Problems.”
Step 2: Install the Modem Driver
If you use Windows 95, Windows 98, Windows Me, Windows
NT 4.0, or Windows 2000, you must install the modem driver.
(If you use Windows 3.1 or another operating system, skip this
step and go to Step 3.)
1. Make sure your modem is connected properly, and then
turn on your computer. Windows should detect your new
modem and open the Install New Modem wizard.
Note: If Windows cannot find a modem, your modem may
be turned off, it may be plugged into the wrong connector
on your computer, or the serial cable may be faulty. See
“None of the LEDs Light When the Modem Is Turned On”
and “The Modem Does Not Respond to Commands” in
Chapter 5 of the User Guide, “Solving Problems.”
5
MultiModemII Quick Start Guide
2. In the Install New Modem wizard, select Don’t detect my
modem; I will select it from a list, and then click Next. A
dialog box with a list of manufacturers and a list of modem
models appears.
3. Insert the installation CD into your CD-ROM drive, and
then click Have Disk.
4. In the Install from Disk dialog box, select the drive the CD
is in, and then click OK.
5. A list of modems appears. Select your modem from the list,
and then click Next.
6. Select the port the modem is connected to, and then click
Next.
7. Windows installs and configures the modem.
8. Click Finish to exit.
Step 3: Install and Configure Your Software
You may use either the communication program included
with your modem or a third-party program. Communication
programs designed for Windows 95/98/Me and Windows
NT/2000 normally do not need to be manually configured,
since they use the Plug and Play configuration of the Windows modem driver. Communication programs designed for
DOS and other operating systems, however, may need to be
manually configured to work with your modem. Though each
communication program is different, the following procedure
should work with most of them.
1. Install and run your communication program.
2. Find the dialog box or menu that lets you select your modem. (In Windows Terminal select Settings | Modem
Commands; in HyperTerminal select File | Properties |
Phone Number; and in PhoneTools select Configure |
General Configuration | Communication | Change
Modem.
6
MultiModemII Quick Start Guide
3. Choose your modem from the software’s modem list. If it
isn’t listed, choose a generic modem and modify the settings as necessary.
4. Change the modem initialization string, if necessary. The
factory default configuration works well for most purposes. To load the factory default configuration, use AT&F. To
load a custom configuration that was saved using the &W
command, use ATZ. Note that the Z command must be in
a command string by itself. For a Macintosh, the initialization string should include the &D0 command. If you do not
want the modem to always answer the phone, add S0=0 to
the string. To use Caller ID with the modem, add S0=2 to
the string (Caller ID information is sent between the first
and second rings, so the phone must ring at least twice befor the modem picks up the line). Depending on the software, you might have to end the string with a carriage
return character (^M).
Note: To change the modem’s default configuration, type
new commands in the communication program’s terminal
window, adding the &W command to store them in the
modem’s nonvolatile memory. For instance, to create a
default configuration for a Macintosh computer that turns
off autoanswer, type AT&F&D0S0=0&W. The new configuration loads automatically whenever the modem is turned
on or receives the ATZ command.
5. Select the port the modem is connected to (normally COM1
or COM2).
6. Select your serial port speed. This can be labeled “maximum
speed,” “DTE bps,” or “baud rate.” Ideally, if you use data
compression, you should set your serial port baud rate to
four times the modem’s maximum transmission speed or
faster; however, few files can be compressed enough to
require speeds that high, and not all serial ports can handle
speeds that high.
7
MultiModemII Quick Start Guide
7. If the software has an autobaud selection, make sure it is
disabled. Autobaud applies only to older modems, and can
cause problems if enabled.
8. If the software allows you to edit the no-connect messages
(NO CARRIER, BUSY, NO ANSWER, NO DIALTONE),
make sure there is no space between DIAL and TONE in
NO DIALTONE.
9. Refer to the software manual or online help for other configuration choices; in most cases you can accept the default
values.
How to Get a Copy of the User Guide
The full MultiModem II User Guide can be found on a compact
disc included with your modem. The User Guide describes the
modem’s features, connections, front panel operation, and
AT command set in detail. It also describes how to upgrade
the modem's firmware and resolve common problems. If you
have any problems getting your modem to work, please refer
to the User Guide before calling Technical Support (800-9722439 or 763-785-3500).
The User Guide is in Adobe Acrobat format, and requires Adobe
Acrobat Reader 4.0 or later. The Adobe Acrobat Reader program
can be found on the installation CD included with your modem.
The latest version of Adobe Acrobat Reader can be downloaded from the Adobe Web site at http://www.adobe.com/products/
acrobat/readstep2.html.
8