1
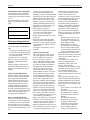
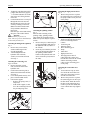
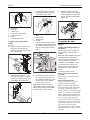
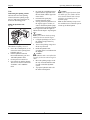
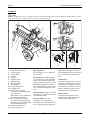
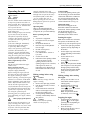
A06
FORM NOK=769-01847
jqa=mêçÇìÅíë=^âíáÉåÖÉëÉääëÅÜ~Ñí=√=p~~êÄêΩÅâÉå=√=dÉêã~åó
English
Information on the rating plate
This information is very important
for subsequent identification when
ordering spare parts and for customer
service.
Enter all information on the rating
plate of your unit in the following
field.
Safe operating practices
Using the unit correctly
This wood splitter is designed to be
used
– for splitting firewood for private use
– in accordance with the descriptions
and safety instructions indicated in
this operating manual.
Any other use is not as intended.
The user is liable for all injuries to
third parties and damage to their
property.
Arbitrary changes to the unit will
exclude the manufacturer from any
liability for resulting injury and/or
damage.
General safety instructions
Before switching on the unit for the
first time, please carefully read and
then comply with this operating
manual. Inform other users how to
operate the unit correctly. Do not
operate the unit unless it is in the
technical condition as stipulated
and supplied by the manufacturer.
Keep this operating manual in a safe
place and always ready to hand. If the
owner of the unit changes, always
include the operating manual.
Before working with the unit
Persons who are under the influence
of intoxicants, such as alcohol, drugs
or medication must not use the unit.
Persons under 18 years of age must
not operate the unit. Local regulations
may specify the minimum age of the
user.
Operating Manual for Wood Splitter
The unit may be operated by one
person only. Before starting work,
familiarise yourself with all equipment
and controls as well as their functions.
Before using the unit, always check
that all controls, safety devices and
guards are in perfect working order
and that all threaded connections are
tight. Before using the unit, have all
damaged, worn or incorrectly
functioning parts replaced.
Store the fuel in designated containers
only and never near heat sources
(e.g. ovens or hot water tanks).
Replace a damaged exhaust, fuel tank
or fuel cap.
Spare parts must satisfy the requirements specified by the manufacturer.
Therefore use only original spare parts
or those spare parts authorised by the
manufacturer.
Have repairs carried out by a repair
shop only.
While operating the unit
When operating or working on the
unit, wear appropriate work clothes
such as: long trousers, hard-toed
boots, ear protection, protective
gloves, tight-fitting clothing, goggles.
Do not operate the unit unless it is in
the technical condition as stipulated
and supplied by the manufacturer.
Operate the unit on a level, firm
surface only and secure it against
unintentional movements. Never fuel
the unit while the engine is running
or hot. Fuel the unit outdoors only.
Avoid naked flames and sparks and
do not smoke. Operate the unit in
daylight or adequate artificial lighting
only. Always ensure that all persons,
particularly children, and animals are
outside the working area (minimum
distance 15 metres). When inserting
a piece of wood, always hold it at the
sides, never at the ends; never steady
the wood by supporting it with your
foot or leg. Otherwise, this may result
in the crushing or amputation of
fingers, toes, hands or feet. Operate all
controls with your hands only. Never
attempt to split more than one piece of
wood at a time unless the splitting
head has pulled itself all the way back
and a second piece of wood is required
to complete the splitting of the first.
1
If an assistant is passing pieces of
wood, he must be at least 5 metres
from the unit before the unit is
switched on. Pieces of wood should
have straight cutting surfaces; if not,
the least straight end and longest
section of the wood should be laid
towards the splitting column and
splitting wedge, and the straight end
towards the stop plate. If the unit is
operated in a vertical position, the
piece of wood should be stabilised
before the operating lever is actuated.
To split wood vertically, proceed as
follows:
–
Place the piece of wood on the
stop plate and turn the piece of
wood until it is situated securely
on the splitting column.
–
When splitting very thick or
uneven pieces of wood, stabilise
the wood with wooden wedges
or split wood placed between the
piece of wood and the stop plate.
When splitting wood, always keep
fingers away from cracks in the wood;
cracks can close quickly and trap or
crush fingers.
Always keep the work area clean.
To prevent tripping hazards,
immediately remove split wood
from the area of the unit.
Never move the unit while the engine
is running. Exercise extreme caution
when pulling/pushing the unit.
Never sit or lie down on the unit.
Never transport people or cargo on the
unit.
During operation hydraulic wood
splitters build up high fluid pressures.
Leaking hydraulic fluid may damage
skin and result in septicaemia or even
death. Always observe the following
instructions:
–
Never attempt to locate leaks with
your hand.
–
Do not use the unit if hoses,
hose connections or pipelines
are frayed, kinked, cracked or
damaged.
–
Stop the engine and relieve
the hydraulic pressure before
changing or adjusting hose
connections, hoses, pipelines
or other system components.
–
Never change the pressure
settings of the pump or valve.
English
Before detecting leaks, put on goggles
and protective gloves and then move
a piece of cardboard or wood over the
suspected area and ascertain whether
the cardboard or wood has changed
colour. If escaping liquid causes
injury, immediately cause a doctor.
Serious inflammation or reactions
may occur if medical treatment is not
implemented immediately. To ensure
a secure footing / safe working
environment, always keep the work
area and the area around the unit free
of objects. Ensure that all statutory
regulations are observed.
Operating Manual for Wood Splitter
Symbols on the unit
Various symbols are stuck on the unit.
Below is an explanation of the
symbols:
!
Keep third parties
out of the danger
area.
Keep hands and other
body parts from leaking
hydraulic lines.
Before carrying out any work on
the unit
Protect yourself from injury. Before
carrying out any work on this unit:
– Switch off the engine,
– Wait until all moving parts have
come to a standstill; leave the
engine to cool down,
– Remove spark-plug terminal from
the engine to prevent the engine
from starting unintentionally,
– Before repairing, adjusting or
checking hoses, hose connections,
pipelines or other components,
depressurise the hydraulics.
After operating the unit
Before leaving the unit, switch off
the engine and remove the sparkplug terminal. Leave the engine to
cool down before putting the unit
away or in storage.
Safety devices
Safety devices, e.g. controls and
protective devices and guards, are for
your protection and must always be
functional.
Never modify safety devices or bypass
their function.
Attention!
Before switching on
the unit, read the
operating
instructions.
Graphical representations
The graphical representations may
deviate slightly in detail from the
purchased unit.
Assembling the unit
Attention!
When unpacking this unit, exercise
extreme caution. Some components
are very heavy and several persons or
a hoist are required.
Attaching the wheels
Fig. 1
Jack up the tank module by approx.
20–30 cm. Remove the plastic
transportation caps from the outsides
of the wheels. Remove cotter pin,
hexagon castellated nut and washer
from each axle.
Never place hands or feet
between splitting wedge
and wood or near moving
parts.
2
1
Wear eye and ear
protection.
5
11
6
Wear protective
gloves.
7
10
MAX. 16%
Working on steep
slopes may be
dangerous.
Before carrying out any
work on the unit: follow
instructions in the
operating manual.
Always keep these symbols on the
unit in a legible state.
Symbols in this manual
The following symbol is used in this
manual:
Caution Danger
These symbols refer to dangers
associated with the described activity
which may cause injury and/or
damage.
2
4
3
9 8
Fig.1
1 Bolts
2 Mudguard (optional)
3 Lock washer
4 Hexagon nut
5 Hydraulic tank
6 Washer
7 Wheel
8 Castellated nut
9 Cotter pin
10 Cap
11 Washer
Note: Before attaching the wheels,
it is recommended to polish the axles
with emery cloth.
•
Place the wheels, with the tyre
valve on the outside, onto the
respective axle ends.
Push on the washer and secure
with a castellated nut.
English
Operating Manual for Wood Splitter
•
Tighten the castellated nut until it
is tight, then slacken it by approx.
1
/3 revolution and until one of the
slots in the nut is facing the hole
in the axle.
• On both wheels insert a cotter pin
through the slot in the nut and
through the hole in the axle and
secure by bending out the ends.
Note: The wheels should rotate
freely and there should be no
lateral play.
Place the caps on the hubs and tap
into place with a rubber mallet.
Attention!
The maximum tyre pressure is
2 bar. The tyre pressure should always
be the same for both tyres.
Attaching the mudguards (optional)
Fig. 1
• Remove nuts, lock washers,
washers and hexagon bolts
from the mudguards.
• Attach mudguards to the
hydraulic tank with bolts,
washers, lock washers and nuts
from step 1.
Attaching the connecting rod
Figs. 2a and 2b
• Remove the bolts (2) and
nuts (4) from the front of the
hydraulic tank.
• Position the connecting rod (3)
and attach with the bolts and nuts
from step 1.
• Lower the hydraulic tank (1) and
place on the attached wheels.
• Fold out the support:
–
Remove the spring cotter (7)
and pin (8).
–
Fold out the support (5) and
fix to the connecting rod with
the pin and spring cotter.
8
6
7
Attaching the high-pressure hoses
Fig. 4
• Remove the protective cap from
the connecting piece on the side of
the pump (a little oil may flow out
of the pump).
3
5
5
4
Fig. 2b
6
2
Attaching the splitting column
Fig. 3
Place the unit consisting of the
splitting wedge, splitting column
and cylinder in an upright position.
Note: Two persons may be required
for this.
• Remove the pin (1) and cotter pin
(2) from the holders and position
the hydraulic tank (4) relative to
the column.
• Insert the pin, which has just been
removed, through the holders on
the splitting column and the
holder on the hydraulic tank unit.
Secure with cotter pin (bend out
the ends).
2
3
1
4
Fig.3
1
2
3
4
Fig. 2a
3
1
7
Fig.4
1
2
3
4
5
6
7
•
Position of the high-pressure hose
between connecting rod and
column
Connecting rod
Splitting column
Hose connecting piece
Pump
Intake hose
High-pressure hose
The high-pressure hose is
connected to the control valve.
Feed the hose between the column
and the connecting rod and
connect to the connecting piece
on the pump.
Attaching the return-flow hose
Fig. 5
• Loosen the hose clip (2) on the
free end of the return-flow hose
and remove the protective insert
from the end of the hose.
• Remove the protective cap from
the connecting piece at the top of
the filter head. Attach the end of
the hose to the connecting piece
(at the top of the filter head) and
secure with the hose clip (tighten
well).
English
Operating Manual for Wood Splitter
3
•
4
2
Unscrew the support (10) from
the splitting column, on the side
of the control valve. Fig. 8
9
8
1
•
Re-attach support (10) to the
control valve side of the splitting
column, aligning the ends of the
support with the column flanges.
See Fig. 9b.
5
5
6
7
10
Fig.5
1
2
3
4
5
6
7
Filter head
Hose clip
Control valve
Connected to the cylinder
Return-flow hose
Filter
To the hydraulic tank
7
Fig.8
Assembly work on the splitting
column
Figs. 6–9
• Pull out vertical column lock (1),
rotate backwards and tilt the
column horizontally until it locks
into position. Fig. 6
7
8
9
10
•
Bolt
Lock washer
Hexagon nut
Support
Lift the cylinder up to the end of
the splitting column and slide into
the welded-on mount block (pin A
must be situated in the recesses).
Fig. 9a
A
2
A
1
Fig.9a
Fig.6
•
Disconnect the stripper (5) – by
removing the six bolts (3) and the
washers (4) from the mount block
(6) welded to the column. Fig. 7
4
3
5
•
Re-attach the stripper (5) above
the wedge module and screw to
the welded-on mount block with
the previously removed small
parts (see Fig. 7). Fig. 9b
Note: When the bolts have been
tightened, there may be a small gap
between the stripper and the weldedon mount block. This is normal.
6
F ig .7
4
10
Fig.9b
Preparing the unit
Engine
Fuelling and checking/topping up
the oil level
Fill the engine with petrol and oil as
described in the enclosed engine
manual.
Note: The engine should already have
been filled with oil at the factory –
please check and, if required, top up
(oil level must be between the
“Full/Max.” and “Add/Min.” mark).
Never fill the petrol tank to overflowing, but to no more than 1 cm
below the lower edge of the inlet
nozzle.
Close the fuel tank securely.
Risk of suffocation from carbon
monoxide.
Run the internal combustion engine
outdoors only.
Risk of explosion and fire.
Fuel/petrol vapours are explosive
and fuel is highly flammable.
Before starting the engine, fill with
fuel. Keep the fuel tank closed while
the engine is running or still hot.
Before refuelling, switch off the engine
and leave to cool down. Avoid naked
flames and making sparks and do not
smoke. Refuel the unit outdoors only.
Do not start the engine if fuel has
overflowed. Move the unit away from
the spilled fuel and wait until the fuel
vapours have evaporated. To prevent
the risk of fire, please keep the
following parts free of foliage, small
twigs and leaking oil: engine, exhaust,
fuel tank.
English
Operating Manual for Wood Splitter
•
Unit
Lubricating the splitting column
Lubricate the area of the splitting
column (where the splitting wedge
moves to and from) with engine oil;
do not use lubricating grease.
Filling the hydraulic tank
Fig. 10
1
2
Fig.10
The tank has a capacity of 13.2 l.
• Screw the vented dipstick (1) out
of the inlet nozzle opening in the
hydraulic tank (2).
• Fill the hydraulic tank with
Dexron III automatic gear oil or
10W AW hydraulic fluid.
• Do not pour in too much oil.
• Check the level with the dipstick.
The oil level must be between the
“Full/Max.” and “Add/Min.”
mark.
Re-insert the vented dipstick and
tighten until the upper side of the
thread is flush with the upper side
of the nozzle.
• Disconnect the spark-plug
terminal from the engine
• Slowly pull out the pull starter on
the engine, approx. 10 times, in
order to flood the hydraulic pump.
Reconnect the spark-plug terminal
to the engine and start the engine as
indicated in the chapter “Operating the
unit”.
Caution
Please first read the whole operating
manual for the unit and the engine.
• Using the operating levers, move
the splitting wedge all the way
backwards.
• Then let the splitting wedge move
all the way forwards.
• Refill the hydraulic tank
according to the level indicated on
the dipstick.
Caution
If the hydraulic tank is not refilled, the
warranty for the unit will no longer be
valid.
• Move the splitting wedge 12x all
the way forwards and backwards
in order to bleed the hydraulic
system.
• Top up the hydraulic tank as far
the mark on the dipstick.
5
Caution
A part of the original hydraulic fluid
was taken up by the cylinder and the
hoses. Ensure that the tank is always
refilled to prevent damage to the
hydraulic pump.
Note: A little fluid may escape out of
the ventilation screw; when the system
warms up, the fluid expands.
English
Operating Manual for Wood Splitter
Controls
Fig. 11
Caution
Compare the diagram in Fig. 11 with the controls on your unit and familiarise yourself with their functions before you start
work. In an emergency you must know how to switch off the unit quickly.
4
A
5
6
12
6
7
B
8
9
A
13
2
B
3
1
10
11
14
15
F ig .1 1
1
2
3
4
5
6
7
8
9
10
11
12
Horizontal column lock
Connecting rod
Support block
Cylinder
Stripper
Operating levers
Splitting wedge
Splitting column
Wood support
Vertical column lock
Hydraulic tank
Feed position = forward
movement of the splitting wedge
to split the wood.
Note: Both levers (A and B) must
be pressed simultaneously.
13 Reverse position = backward
movement of the splitting wedge.
Note: Both levers (A and B) must
be pressed simultaneously.
14 Horizontal column lock
15 Vertical column lock
Operating levers
The operating levers (6 or A/B) have
three positions.
Feed position: Press both operating
levers to the left or down (depending
on the column position) to drive the
splitting wedge into the piece of wood.
Note: Both operating levers must be
pressed simultaneously; as soon as one
lever is released, the splitting wedge
stops.
Neutral position: Release one or both
operating levers to stop the movement
of the splitting wedge.
Reverse position: Press both
operating levers to the right or up
(depending on the column position) to
move the splitting wedge backwards.
6
Note: Both operating levers must be
pressed simultaneously; as soon as one
lever is released, the splitting wedge
stops.
Column locks
As the name suggests, these two locks
are used to lock the splitting column
horizontally or vertically. The vertical
column lock is situated next to the oil
filter, the horizontal column lock on
the support of the column holder.
Engine controls
The positions and functions of the
controls for the engine can be found
in the enclosed engine manual.
English
Operating the unit
Also follow the instructions in the
engine manual!
Danger
Risk of injury.
Persons, children and/or animals must
be kept away from the unit while it is
being operated. They could be injured
by ejected objects, etc. Children must
never operate the unit.
Always secure the unit to prevent it
from rolling away.
When working on slopes, the unit may
tip over and you may be injured.
Therefore be especially careful if
working in this situation. Never work
on slopes which have a gradient of
more than 16 %.
If the unit is damaged: Immediately
switch off the engine and contact
a repair shop. When working,
always wear protective gloves made
of leather, hard-toed boots, ear
protection, goggles and tight-fitting
clothing. Always split pieces of wood
along the wood grain. Never attempt
to remove partially split wood
manually from the splitting wedge.
Risk of suffocation by carbon
monoxide.
Run the internal combustion engine
outdoors only.
Risk of explosion and fire.
Fuel/petrol vapours are explosive
and fuel is highly flammable.
Before starting the engine, fill with
fuel. Keep the fuel tank closed while
the engine is running or still hot.
Before refuelling, switch off the engine
and leave to cool down. Avoid naked
flames and making sparks and do not
smoke. Refuel the unit outdoors only.
Do not start the engine if fuel has
overflowed. Move the unit away from
the spilled fuel and wait until the fuel
vapours have evaporated. To prevent
the risk of fire, please keep the
following parts free of foliage, small
twigs and leaking oil: engine, exhaust,
fuel tank.
Risk of injury from defective
unit.
Do not operate the unit unless it is in
perfect working order. Before operating the unit, always carry out a visual
inspection. Check in particular that
the safety devices, covers, holders,
Operating Manual for Wood Splitter
controls, hydraulic hoses and
threaded connections are undamaged
and tight. Do not operate the unit if
the hydraulic fluid is colder than
–6 °C or warmer than +65 °C.
Before operating the unit, have all
damaged parts replaced or repaired
by a repair shop.
Operating times
Observe the national/municipal
regulations concerning times of use
(if required, ask your local authority).
Before operating the unit
Check:
• all protective equipment.
• the engine oil level (see engine
manual).
• the hydraulic fluid level.
• that hose clips on the hydraulic
lines are tight.
• the tank is full (petrol).
• the tyre pressure
(see “Maintenance” section or
tyre wall).
• air filter area for dirt
• lubrication of the splitting column
– Lubricate the area of the
splitting column (where the
splitting wedge moves to and fro)
with engine oil; do not use
lubricating grease. Remember to
lubricate the front and rear stops
as well.
Making settings before using
the unit:
Caution!
Do not make any settings while the
engine is running
• Remove the spark-plug terminal.
• Park the unit on firm, level and
dry ground.
• Secure both wheels at the front
and rear with wedges to prevent
the unit from rolling away.
• Set the splitting column either
vertically or horizontally and lock
into position.
Caution!
Always ensure that the splitting
column is locked properly.
Vertical setting
To release the splitting column, pull
out the locking pin for the horizontal
column lock and tilt the column into
the vertical position and lock and
secure with the locking pin for the
vertical column lock (see Fig. 11).
Horizontal setting
Pull out the locking pin for the
horizontal column lock and rotate
downwards. Tilt the splitting column
into the horizontal position.
It automatically engages in the
horizontal position and is locked.
Starting the engine
Note: Some models have no throttle,
the speed is set automatically. The
engine always runs at optimum speed.
•
•
•
•
•
•
Making settings after starting
the engine
•
•
Slowly reset the choke lever to
“RUN/OFF” until the engine is
running quietly.
Push the throttle (if featured)
between the “Fast /
” and
“Slow/
” positions to warm
up the engine briefly.
Note: To operate the throttle
(if featured), set to “Fast / ”.
Stopping the engine
•
•
•
7
Connect the spark-plug terminal.
Open the fuel tap (depending on
the model).
Set the engine stop switch on the
engine (depending on the model)
to “ON”.
Set the choke lever to
“Choke/ ”.
Set the throttle (if featured) to
“Fast /
”.
Slowly pull the pull-starter handle
until it begins to resist, then pull it
through quickly and forcefully.
Do not let the pull-starter handle
spring back, but guide it back
slowly.
Set the throttle (if featured) to
position “ / 0” or the engine
operating switch (depending on
the model) to “OFF”.
Close the fuel tap.
Before leaving the unit, remove
the spark-plug terminal.
English
Splitting wood with the unit
Caution
Follow all safety instructions when
operating the unit. Always secure the
unit to prevent if from rolling away.
The pieces of wood which are to be
split must not exceed or fall below the
following dimensions:
Maximum length:
700 mm
Minimum length:
150 mm
Maximum diameter:
500 mm
Minimum diameter:
100 mm
Always split pieces of wood along the
wood grain. Never remove
incompletely split wood manually
from the splitting wedge – your fingers
could become trapped between the
split pieces of wood. If splitting
heavy/large pieces of wood, always
operate the splitting column in
a vertical position.
• Start the engine as indicated.
• In cold weather, before work,
run the wedge forwards and
backwards 6–8 times to warm up
the hydraulic fluid.
• Place a piece of wood either
upright (vertical) or prone
(horizontal) on the stop plate.
• To steady the piece of wood,
always grip the wood by the side.
Never take hold of the end
between the piece of wood and
splitting wedge.
• Only one person should steady
the piece of wood and actuate the
operating levers so that he always
has control over the wood and the
splitting wedge.
Note: Pieces of wood should have
straight cutting surfaces. If pieces of
wood have not been cut straight, the
least straight end and longest section
of the wood should be laid towards the
splitting column and splitting wedge,
and the straight end towards the stop
plate. If the unit is operated in a
vertical position, the piece of wood
should be stabilised before the
operating lever is actuated. To split
wood vertically, proceed as follows:
Operating Manual for Wood Splitter
Place the piece of wood on the
stop plate and turn the piece of
wood until it is situated securely
on the splitting column
–
When splitting very thick or
uneven pieces of wood, stabilise
the wood with wooden wedges
or split wood placed between the
piece of wood and the stop plate.
Caution
If splitting wood vertically, always
stand in front of the unit when
operating it.
If splitting wood horizontally, always
stand behind the hydraulic tank when
operating the unit.
–
A
B
Fig.12
•
Simultaneously press both
operating levers to the FEED
position, i.e. to the left or down
(depending on the position of the
splitting column).
Note: To stop the wedge movement,
release one or both operating levers.
To move the splitting wedge backwards, simultaneously press both
operating levers to the REVERSE
position, i.e. to the right or up
(depending on the position of the
splitting column).
• When the splitting wedge is
moving backwards, the stripper
removes partially split wood from
the splitting wedge. This may be
required when splitting freshly cut
wood or thick pieces of wood.
Note: Pieces of wood with ingrowing
branches are always difficult to split.
If a piece of wood becomes jammed
in the splitting wedge, first switch the
unit off. When removing the piece of
wood, do not place hands between the
two parts.
Then attempt to split the piece of
wood at another point.
8
After working with the unit
Before leaving the unit, switch off
the engine and remove the sparkplug terminal. Leave the engine to
cool down before putting the unit
away or in storage.
Transporting the unit
Caution
Before transporting the unit, always:
• close the fuel tap
• remove the spark-plug terminal
• move the splitting column into the
horizontal position and secure.
Never manually pull or push the unit
over hilly or uneven terrain.
To change the place of use, push or
pull the unit over short distances only
and on absolutely flat terrain/surfaces
only. Otherwise use a suitable means
of transport.
Short distances
Danger
Slowly and carefully move the unit
over flat surfaces.
Long distances
Caution
Damage in transit
The utilised means of transport
(e.g. transportation vehicle, loading
platform, etc.) must be used as
intended (see associated operating
manual). If transported on a transportation vehicle, the unit must be
secured to prevent it from slipping.
Leaking fuel is an
environmental hazard.
Transport the unit in a horizontal
position only.
Maintenance/Cleaning
Caution /Danger
Risk of injury from engine starting
unintentionally.
Protect yourself from injuries.
Work carefully and always wear
goggles and protective gloves.
English
Before carrying out any work on this
unit
• Switch off the engine.
• Move the operating lever to
Neutral.
• Wait until all moving parts have
come to a standstill; leave the
engine to cool down.
• Remove spark-plug terminal from
the engine to prevent the engine
from starting unintentionally.
• Before repairing, adjusting or
checking hoses, hose connections,
pipelines or other components,
depressurise the hydraulics.
Cleaning
Caution
Risk of damaging the unit.
Do not clean the unit with a highpressure cleaner, garden hose or water.
• If possible, clean the unit directly
after work.
• Park the unit on firm and level
ground.
• Secure the unit to prevent it from
rolling away.
Maintenance
Operating Manual for Wood Splitter
•
Retighten the locknuts to fix the
adjusting screws in this position.
Adjusting the skid
Fig. 14
The skid blocks (3) between the
wedge module and the guide plates (6)
should be adjusted regularly.
Note: To ensure that the skid blocks
wear evenly, they can be rotated
and/or turned over.
• Loosen the nuts (5) under each
guide plate (6) and push out the
4 skid blocks (3).
• Turn over or replace skid blocks.
• Re-attach the guide plates (6) and
secure with the lock washers (4)
and nuts (5).
• Re-adjust the adjusting screws (2)
on the side of the wedge module.
2
3
1
6
Disposal and the environment
Caution
Oil is an environmental hazard.
When changing the oil, hand over
waste oil to a waste oil collection
centre or a disposal company.
Adjustment work
Adjusting the splitting wedge
module
Fig. 14
On account of normal wear and too
much “play” between the splitting
wedge and splitting column, the
screws on the side of the splitting
wedge module should be re-adjusted
in order to eliminate an excessively
large gap between the splitting wedge
and splitting column.
• Loosen the lock nuts (1) on the
two adjusting screws (2).
• Screw in the adjusting screws
until they are tight, then slowly
slacken them a little (approx.
1.5 revolutions) until the wedge
can be moved on the column.
5
4
Fig.14
Servicing the unit
Hydraulic fluid and oil tank filter
• Before using the unit, always
check the hydraulic fluid level in
the oil tank of the wood splitter.
Always maintain the level within
the indicated area between “Min
and Max” (see dipstick).
• Have a repair shop change
the hydraulic fluid every
100 operating hours and clean
the oil tank filter.
Note: Contaminants in the hydraulic
fluid may damage parts of the
hydraulic system. Any work,
maintenance and service work on the
hydraulic system may be carried out
by an authorised repair shop only.
9
Hydraulic filter
Change the hydraulic filter every
50 operating hours. Use a 10-micron
hydraulic filter (original filter) only.
Splitting column and splitting
wedge
• Before using the unit, always
lubricate both sides of the splitting
column (where it comes into
contact with the splitting wedge)
with engine oil. The wedge plate
on the wood splitter has been
designed in such a way that the
skid blocks on the side of the
wedge plate can be removed and
rotated and/or turned over to
ensure even wear.
• When re-adjusting the adjusting
screws, ensure that the wedge can
move freely, however there
should not be too much play
between the wedge plate and
splitting column.
Hose clips
Before using the unit, always check
that the hose clips on the intake hose
and return-flow hose are tight.
Flexible pump coupling
The flexible pump coupling is a nylon
insert designed like a cross coupling
between the pump and engine shaft.
Eventually the coupling hardens and
the function deteriorates. The coupling
should be replaced if vibrations or
noises can be detected in the area
between the pump and engine.
Caution
Never strike the engine shaft in any
way, as the engine may be
permanently damaged.
Tyres
Check the tyre pressure each month.
The maximum tyre pressure is 2 bar
(see also manufacturer’s
recommendation on the tyre walls)
and should always be the same for
both tyres.
Engine
Follow all instructions in the engine
operating manual.
English
The complete unit with engine
Once per season have a repair shop
inspect and service the unit. Also
follow the instructions in the engine
manual concerning maintenance of the
engine.
Shutting down the unit
Caution
Material damage to the unit.
When the engine has cooled down,
store the unit in a clean and dry
location. If storage is prolonged,
always protect the unit, e.g. in winter,
from rust. After the season or if the
unit is not used for more than a month:
• Clean the unit.
• Protect all metal parts from rust
by wiping them with an oiled
cloth or spraying them with oil.
• Drain fuel (outdoors only) and
disconnect the engine as
described in the engine manual.
• Inflate the tyres to the appropriate
pressure.
• Store the unit in a clean,
dry location.
Warranty
The warranty regulations issued by
our company or the importer are valid
in all countries. We shall repair any
faults on your unit free of charge in
accordance with the warranty,
provided the fault was due to defective
materials or manufacturing.
If claiming under the warranty, please
contact your seller or your nearest
branch.
Operating Manual for Wood Splitter
Additional information concerning
the warranty
The warranty will be deemed null and
void with immediate effect if:
• there is too little or incorrect
hydraulic fluid in the unit.
• settings of the pressure-relief
valve or pressure of the control
valve were changed without the
knowledge and instruction of the
factory.
Caution
A higher pressure could cause the
hoses to burst, the pump to crack
and aggressive fluid to escape,
resulting in serious injuries.
• The hydraulic pump was
disassembled.
• Flexible pump coupling worn due
to incorrect or irregular
inspection/maintenance.
• No or improper lubrication of the
splitting column or unit.
• Incorrectly set splitting
wedge/splitting wedge module
causes damage.
• The hydraulic system overheats.
• The unit was started at a
temperature below –6 °C or above
+65 °C.
• Unnoticed leaks in the hydraulic
system cause damage.
Information about the
engine
The engine manufacturer is liable for
all engine-related problems with
regard to power, power measurement,
technical specifications, warranty and
service. Information can be found in
the owner’s/user’s handbook supplied
separately by the engine manufacturer.
10
Troubleshooting
Danger
Risk of injury from engine starting
unintentionally.
Protect yourself from injury. Before
carrying out any work on the unit:
• Switch off the engine.
• Move the operating lever to
Neutral.
• Wait until all moving parts have
come to a standstill and the
engine has cooled down.
• Remove spark-plug terminal from
the engine to prevent the engine
from starting unintentionally.
• Before repairing, adjusting or
checking hoses, hose connections,
pipelines or other components,
depressurise the hydraulics.
Faults which occur while you are
operating your unit often have simple
causes which you should recognise
and which to some extent you can
eliminate yourself. If in doubt, please
contact your repair shop.
English
Operating Manual for Wood Splitter
Troubleshooting the engine
Problem
Engine does not start
Engine is misfiring
Engine is overheating
Cause
Solution
Ignition cable removed.
Tank empty or fuel stale.
Throttle/engine operating switch not in start
position.
Choke not actuated
Spark plug defective.
Spark-plug terminal is loose.
Choke still actuated.
Fuel line blocked or petrol stale.
Air filter dirty.
Carburettor misaligned.
Too little engine oil.
Air filter dirty.
Carburettor incorrectly set.
Troubleshooting the hydraulics
Problem
Cause
Reconnect ignition cable to spark plug.
Top up tank with fresh, clean petrol.
Set throttle to or engine operating switch to “ON”.
Actuate choke.
Clean, adjust or change.
Connect spark-plug terminal.
Set choke lever to OFF.
Have fuel line cleaned. Top up tank with fresh, clean
petrol.
Clean or change air filter.
Contact an authorised dealer.
Top up crankcase with correct oil.
Clean or change air filter.
Contact an authorised dealer.
Solution
Hydraulic splitting cylinder
does not move
Drive shaft broken.
Shaft coupling slack.
Gearwheel areas damaged.
Pressure-relief valve damaged.
Hydraulic lines blocked.
Oil level too high/low.
Control valve damaged/blocked.
Hydraulic splitting cylinder
Gearwheel areas damaged.
moves slowly to and from
Engine speed too low.
Pressure-relief valve damaged.
Oil level too high/low.
Oil contaminated.
Control valve leaking internally.
Cylinder damaged internally.
Hydraulic cylinder leaking
Seals broken.
Cylinder run in.
Engine is running, but wood is Small gearwheel area damaged.
not being split or is being split Non-return valve of the pump leaking.
too slowly
Oil level too high/low.
Oil contaminated.
Control valve leaking internally.
Cylinder overloaded.
Cylinder damaged internally.
Engine stalls during the
Too little power / weak engine.
splitting process
Cylinder overloaded.
Engine is not running or stalls Hydraulic pump defective.
under load
Engine has too little power.
Hydraulic lines/control valve blocked.
Pump shaft seal leaking
Drive shaft broken.
Gearwheel areas damaged.
Shaft seal defective.
Vent hole in the oil tank blocked.
Contact an authorised dealer.
Contact an authorised dealer.
Contact an authorised dealer.
Contact an authorised dealer.
Contact an authorised dealer.
Check oil level.
Contact an authorised dealer.
Contact an authorised dealer.
Set throttle on the engine to
.
Contact an authorised dealer.
Check oil level.
Contact an authorised dealer.
Contact an authorised dealer.
Contact an authorised dealer.
Contact an authorised dealer.
Contact an authorised dealer.
Contact an authorised dealer.
Contact an authorised dealer.
Check oil level.
Contact an authorised dealer.
Contact an authorised dealer.
Do not attempt to split wood against the grain.
Contact an authorised dealer.
Contact an authorised dealer.
Do not attempt to split wood against the grain.
Contact an authorised dealer.
Contact an authorised dealer.
Contact an authorised dealer.
Contact an authorised dealer.
Contact an authorised dealer.
Contact an authorised dealer.
Ensure that the tank has been vented correctly.
Note: Contact an authorised customer service for repairs which go beyond the measures mentioned above.
11