1
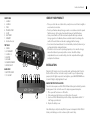
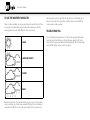
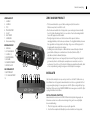
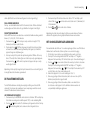
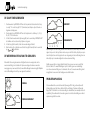
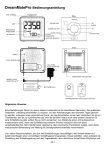
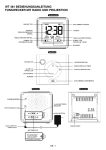
EN
Instruction Manual
NL
Gebruiksaanwijzing
Clock radio
Weather indication - hi-lo dimmer
CL-1489MT
Instruction Manual
CARE OF YOUR PRODUCT
FRONT VIEW
1. ALARM 1
2. ALARM 2
3. TIME
4. PM INDICATOR
5. SLEEP
6. NAP TIMER
7. MEMORY
8. Weather forecast
TOP VIEW
9. DOWN
10. SET/MEMORY
11. ALARM 1-2
12. NAP/UP
13. VOLUME
14. SNOOZE/DIMMER
15. RADIO/SLEEP
1
5
2
7
3
• Place your clock radio on a stable surface, away from sources of direct sunlight or
excessive heat or moisture.
• Protect your furniture when placing your units on a natural wood and lacquered
finish by using a cloth or protective material between it and the furniture.
• Clean your unit with a soft cloth moistened only with mild soap and water.
Stronger agents such as Benzine, thinner or similar materials can damage the
surface of the unit. Make sure the unit is unplugged before cleaning.
• Do not mix old and new batteries. Do not mix alkaline, standard (carbon-zinc), or
rechargeable (nickel-cadmium) batteries.
• If the unit is not to be used for a prolonged period, such as a month or longer,
remove the batteries to prevent possible corrosion. Should the battery
compartment become corroded or dirty, clean the compartment thoroughly
and replace the batteries.
6
4
8
BACK VIEW
16. BATTERY DOOR
17. DC SOCKET
9 13 15
16
14
11 10 12
17
INSTALLATION
Plug the AC/DC adaptor to an AC household outlet, and then plug the DC jack to
the back of the unit. Your clock radio is ready to work for you. For power saving
purpose, the LED digits are preset at low brightness, press SNOOZE.DIMMER once
to turn LED digits to high brightness if need.
BACKUP BATTERY INSTALLATION
Your clock radio requires one fresh CR2032 lithium battery (not included) to provide
backup power to the clock in the event of a temporary power interruption.
1. Place your unit face down on a flat surface.
2. Slide and remove the battery cover at the bottom of your unit.
3. Insert one CR2032 lithium battery into the battery compartment with the “+”
side facing up as indicated.
4. Replace the battery cover.
Note this battery is only for backup if the AC power is interrupted. A fresh CR2032
battery could backup your clock continuously for around 3 days.
en
Instruction Manual
SETTInG TIME, 12/24HR TIME
AND THE SNOOZE DURATION
6. Press AL1.2 again or if no key pressed for approx. 10 seconds to exit the alarm
setting mode.
1. Press SET once, the hour digits flash. Press
or
to set the current hour
(hold to advance rapidly).
or
to set minutes.
2. Press SET again, the minute digits flash. Press
or
to select
3. Press SET again, the display shows “24Hr” and flashes, Press
“12Hr” or “24Hr” time format.
or
to select
4. Press SET again, the display shows “05” and flashes, Press
your snooze time from 5 to 60 minutes.
5. Press SET again or if no key pressed for approx. 10 seconds to exit the setting
mode.
STOPPING AND RESETTING THE ALARM
TO COME ON THE NEXT DAY
Note: when 12-hour time format is selected, the P (PM) icon will appear on the
lower middle time display to indicate the afternoon time; there is no AM indicator.
SNOOZE OPERATION (default snooze duration is 5 minutes)
once, the alarm will be silenced and
When alarm is sounding, presses
come on again after the set snooze duration.
SETTING THE ALARMS
1. Press AL 1.2 once, the A1 icon and the hour digits flash. Press
or
to set
the alarm 1 hour.
or
to set the alarm 1 minutes.
2. Press AL 1.2 again to adjust minutes. Press
3. Press AL 1.2 again, LED displays “OFF” (alarm off). To select wake to sound
or
to select :sources, press
rd = wake-by-radio
bu = wake-by-buzzer
OFF = alarm off
4. Press AL 1.2 again, the A2 icon and the hour digits flash. Press
or
to set
the alarm 2 hour. Repeat step 2) and 3) to set alarm 2.
5. Press AL1.2 again or no button around 10 seconds to exit alarm setting mode.
When wake-to-radio or wake-to-buzzer is selected, the related alarm is turned on,
indicated by apperance of the A1 and / or the A2 icon on the left side of the display.
When alarm 1 or 2 is sounding, the related A1 or A2 icon flashes. Press the AL 1.2
once to stop the alarm and reset it to come on the following day. After that A1 or
A2 icon keep lighting up on the display.
/ NAP or RADIO / SLEEP will activate
Note: When alarm is sounding, press thes
the nap timer or the radio and stop the alarm for the day.
Note: if your second alarm activates while the first alarm is sounding or it is in the
snooze mode, the second alarm overrides the first alarm (the first alarm is reset to
come on the next day).
USING THE HI-LO DIMMER
to adjust the brightness of the LED time display. This can only be
Press
done when the radio is off or the unit is not sounding.
USING THE NAP TIMER
The NAP Timer allows you to rest and automatically wake up in 5, 15, 30, 45, 60,75
or 90 minutes.
/ NAP once, the display shows the nap icon and the default naptime
1. Press
“05” (5 minutes).
/ NAP again to select your desired naptime. It will exit to time display
2. Press
if no button pressed for around 5 seconds.
3. The nap icon lights up when the nap timer is counting. When the nap timer
/ NAP
reaches 0, the alarm will sound and the nap icon will flash. Press
once to stop the nap alarm , the nap icon will go off.
Instruction Manual
Note: if the nap time is set up then your alarm is sounding, your nap time will be
cancelled automatically.
6. To edit a preset station, select another station and then repeat Step 2 to 4. This
overrides the original settings.
SETTING UP THE FM ANTENNA
TO USE THE SLEEP TIMER
Extend the FM wire antenna fully and vary the direction for best FM reception. Do
not strip, alter or attach to other antennas.
1. Press the RADIO/SLEEP twice to enter the sleep mode. The sleep icon “SL” and
the sleep time “05” (5 minutes) and will flash on the display.
2. Press the RADIO/SLEEP again as needed to adjust the sleep timer from 5, 15, 30,
45, 60, 75 or 90 minutes..
3. When the display changes back to show the time, press the RADIO/SLEEP once
to show the sleep time remaining.
4. The radio will play for the programmed sleep time and then shut off.
once.
5. To turn off the radio before the sleep time has elapsed, press
LISTENING TO THE FM RADIO
1. To turn on the radio, press SLEEP/RADIO once, the display shows “ON” and then
the radio frequency “87.5” readings in Mhz.
/
to tune the radio to a desired station. Press and hold
/
to
2. Press
scan for the next clear station.
/
to
3. To adjust the volume, press VOL once, the display shows “L07”, press
adjust volume from L01 (minimum) to L15 (maximum)
to turn off the radio.
4. Press
Remark: keep your radio away from fluorescent lamps or other electronic devices,
which may cause interference to the radio.
USING THE PRESET MEMORY
This clock radio features a total of 10 preset memories of FM stations. These allow
you to preset your favorite stations and access them quickly.
1. Turn on the radio and select a radio station you like to memorize.
2. Press and hold the SET until “ME” appears and “01” flashes. Press SET once to
store Memory 1.
or
to select another station you like to memorize. Then press and
3. Press
or
once, “02” appears.
hold SET until “ME” appears and “01” flashes. Press
Press SET once to store Memory 02.
4. Repeat Step 2 to 3 to preset memories 3 through 10.
5. To access a preset station at any time, press the SET one at a time while the
radio is on.
en
Instruction Manual
TO USE THE WEATHER FORECASTER
There is a built-in humidity sensor in your unit to make the weather forecast. There
are four types of weather display in your weather station (please note that the
weather graphics may look a little different to those on your unit):-
SUNNY
SUNNY AND CLOUDY
CLOUDY
RAINY
Remarks: for better use of your weather station, place your unit at a location with
open air circulation e.g. close by an open window. Placing it at an air-conditioned
environment will affect its accuracy. After your weather station is powered up, it
will take around one hour to get stable. The weather icons on the display give a
reference to the next 3-4 hours weather conditions. It may not match with the
current weather condition outside.
TROUBLE SHOOTING
If your clock displays irrelevant time or does not function properly, which maybe
caused by electro-static discharge or other interference, unplug the DC jack to
disconnect the AC power (and remove the backup battery). The clock radio will be
reset to default settings and you need to set it again.
Gebruiksaanwijzing
ZORG VOOR UW PRODUCT
VOORAANZICHT
1. ALARM 1
2. ALARM 2
3. TIJD
4. PM-INDICATOR
5. SLAAP
6. NAP-TIMER
7. GEHEUGEN
8. Weersverwachting
BOVENAANZICHT
9. OMLAAG
10. SET/GEHEUGEN
11. ALARM 1-2
12. NAP/OMHOOG
13. VOLUME
14. SNOOZE/DIMMER
15. RADIO/SLAAP
1
5
2
7
3
6
4
8
ACHTERAANZICHT
16. BATTERIJKLEP
17. DC AANSLUITPUNT
18.
9 13 15
14
11 10 12
• Plaats uw wekkerradio op een stabiele ondergrond, uit de buurt van
hittebronnen, direct zonlicht of vocht.
• Bescherm uw meubilair als u het apparaat op een ondergrond van natuurlijk
hout of gelakte afwerking plaatst, door een doek of een beschermingsmiddel
tussen het apparaat en het meubel.
• Reinig het apparaat met een zachte doek en mild sopwater. Sterkere
reinigingsmiddelen, zoals benzeen, verdunner of soortgelijke middelen, kunnen
het oppervlak van het apparaat beschadigen. Zorg ervoor dat het apparaat is
losgekoppeld, alvorens deze te reinigen.
• Gebruik geen oude batterijen in combinatie met nieuwe batterijen. Gebruik
geen alkaline batterijen in combinatie met standaard (zink-koolstof) of
oplaadbare (nikkel-cadmium) batterijen.
• Indien het apparaat voor een langere tijd (een maand of langer) niet gebruikt
gaat worden, dient u de batterijen te verwijderen om eventuele corrosie te
voorkomen. Als er zich roest of vuil in het batterijencompartiment bevindt, dient
u het compartiment grondig te reinigen en de batterijen te vervangen.
INSTALLATIE
Sluit de netstroomadapter aan op een stopcontact en sluit de DC stekker aan op
de achterkant van het apparaat. Uw wekkerradio is nu klaar voor gebruik. Met het
oog op energiebesparing is de weergave van de LED-cijfers vooringesteld op lage
helderheid. Druk eenmaal op SNOOZE.DIMMER om de weergave van de LED-cijfers
op hoge helderheid in te stellen.
16
17
INSTALLATIE BACK-UP BATTERIJ
Uw wekkerradio vereist een volle CR2032 lithium batterij (niet inbegrepen) om
te kunnen voorzien in noodstroomvoorziening in het geval van een tijdelijke
stroomonderbreking.
1. Plaats het apparaat ondersteboven op een plat oppervlak.
2. Verschuif en verwijder de batterijklep aan de onderkant van het apparaat.
nl
Gebruiksaanwijzing
3. Plaats een CR2032 lithium batterij in het batterijencompartiment met de “+”
zijde omhoog gericht, zoals aangegeven.
4. Plaats de batterijklep terug.
Let op, deze batterij dient uitsluitend als back-up in het geval dat de netstroom
wordt onderbroken. Een volle CR2032 batterij kan ongeveer 3 dagen continu
back-up bieden.
INSTELLEN TIJD, 12/24 UUR TIJDSAANDUIDING EN
DUUR SLUIMERFUNCTIE
1. Druk eenmaal op SET. De uuraanduiding zal gaan knipperen. Druk op
of
om het uur in te stellen (houd ingedrukt om snel langs de uren te gaan).
2. Druk nogmaals op SET. De minuutaanduiding zal gaan knipperen. Druk op
om de minuten in te stellen.
of
3. Druk nogmaals op SET. Op het scherm verschijnt al knipperend de indicatie
of
om het “12Hr” of “24Hr” tijdaanduiding te selecteren.
“24Hr”. Druk op
4. Druk nogmaals op SET. Op het scherm verschijnt al knipperend de indicatie “05”.
of
om de sluimerfunctie in te stellen tussen de 5 en 60 minuten.
Druk op
5. Druk nogmaals op SET of voer ongeveer 10 seconden lang geen handelingen
uit op het apparaat om de instelmodus te verlaten.
Opmerking: als er is gekozen voor de 12-uur tijdsaanduiding, zal er een P-icoontje (PM)
verschijnen onder de tijdweergave om de middagtijd aan te duiden; er is geen AM-indicator.
DE ALARMEN INSTELLEN
1. Druk eenmaal op AL 1.2. Het A1 icoontje en de uuraanduiding beginnen te
of
om het juiste uur voor alarm 1 in te stellen.
knipperen. Druk op
of
om
2. Druk nogmaals op AL 1.2 om de minuten in te stellen. Druk op
de juiste minuten voor alarm 1 in te stellen.
3. Druk nogmaals op AL 1.2. “OFF” (alarm uit) verschijnt op het scherm. Om een
of
en selecteer :alarmmodus te selecteren voor het alarm, druk op
rd = Radio-alarm
bu = Buzzeralarm
OFF = Alarm uit
4. Druk nogmaals op AL 1.2. Het A2 icoontje en de uuraanduiding beginnen
of
om het juiste uur voor alarm 2 in te stellen.
te knipperen. Druk op
Herhaal de stappen 2) en 3) om alarm 2 in te stellen.
5. Druk nogmaals op AL 1.2 of voer ongeveer 10 seconden lang geen
handelingen uit op het apparaat om de alarm instelmodus te verlaten. Als er
voor radio-alarm of buzzeralarm is gekozen, zal het gerelateerde alarm worden
ingeschakeld en aangeduid met het verschijnen van het A1 en / of A2 icoontje
aan de linkerzijde op het scherm.
6. Druk nogmaals op AL 1.2 of voer ongeveer 10 seconden lang geen
handelingen uit op het apparaat om de alarm instelmodus te verlaten.
HET ALARM STOPPEN EN RESETTEN VOOR DE
VOLGENDE DAG
Als alarm 1 of 2 afgaat, zal het overeenkomstige icoontje A1 of A2 knipperen. Druk
eenmaal op AL 1.2 om het alarm te stoppen en te resetten voor de volgende dag.
Het A1 en A2 icoontje zullen opgelicht blijven op het scherm.
/ NAP of RADIO / SLAAP om de
Opmerking: Als er een alarm afgaat, druk op
nap timer of de radio te activeren en het alarm te stoppen voor de huidige dag.
SLUIMERFUNCTIE (vooringestelde sluimerduur bedraagt 5 minuten)
als het alarm afgaat. Het alarm wordt stil gezet en zal
Druk eenmaal op
opnieuw klinken nadat de ingestelde sluimerduur is verstreken.
Opmerking: Als het tweede alarm wordt geactiveerd, terwijl het eerste alarm
gaande is of zich in de sluimermodus bevindt, zal het tweede alarm het eerste
Gebruiksaanwijzing
alarm opheffen (het eerste alarm wordt gereset naar de volgende dag).
DE H-L DIMMER GEBRUIKEN
Druk op om de helderheid van het LED scherm in te stellen. Dit kan uitsluitend
worden uitgevoerd als de radio uit is geschakeld en het apparaat niet afgaat.
DE NAP TIMER GEBRUIKEN
Met de NAP Timer kunt u even uitrusten en automatisch wakker worden gemaakt
binnen 5, 15, 30, 45, 60, 75 of 90 minuten.
/ NAP. Het nap icoontje en de basis nap tijd “05” (5
1. Druk eenmaal op
minuten) verschijnen op het scherm.
/ NAP om de gewenste nap tijd te selecteren. Indien
2. Druk nogmaals op
er binnen 5 seconden niet wordt gehandeld op het apparaat, schakelt het
apparaat terug naar de tijdweergave.
3. Het nap icoontje licht op zodra de nap timer begint met aftellen. Als de nap
timer “0” bereikt, zal het alarm afgaan en zal het nap icoontje gaan knipperen.
/ NAP om het nap alarm te stoppen. Het nap icoontje
Druk eenmaal op
wordt uitgeschakeld.
Opmerking: Als de nap tijd is ingesteld op het moment dat er een alarm afgaat, zal
de nap tijd automatisch worden geannuleerd.
DE FM-ANTENNE INSTELLEN
Trek de FM draadantenne volledig uit en wijzig de richting voor de beste FMontvangst. De antenne niet verwijderen. Geen aanpassingen verrichten aan de
antenne of verbinden met andere antennes.
LUISTEREN NAAR DE FM-RADIO
1. Druk eenmaal op SLAAP/RADIO om de radio in te schakelen. “ON” verschijnt op
het scherm en vervolgens de radiofrequentie “87,5” en de aanduiding Mhz.
/
om de radio af te stemmen op het gewenste station. Druk op
2. Druk op
/
en houd ingedrukt, om te zoeken naar het volgende station.
3. Druk eenmaal op VOL om het volume in te stellen. “L07” verschijnt op het
scherm. Druk op
/
om het volume in te stellen van L01 (minimum) tot
L15 (maximum).
om de radio uit te schakelen.
4. Druk op
Opmerking: houd de radio uit de buurt van fluorescerende lampen of andere
elektronische apparaten, die mogelijk interferentie kunnen veroorzaken.
HET VOORKEUZEGEHEUGEN GEBRUIKEN
Deze wekkerradio beschikt over 10 voorkeuze geheugen stations voor FM-stations.
Hiermee kunt u uw favoriete stations opslaan voor een snelle toegang.
1. Zet de radio aan en selecteer een radiostation die u wenst op te slaan.
2. Druk op SET en houd ingedrukt totdat “ME” verschijnt en “01” begint te
knipperen. Druk eenmaal op SET om het station op te slaan onder Geheugen 1.
of
om een ander station dat u wenst op te slaan te selecteren.
3. Druk op
Druk op SET en houd ingedrukt totdat “ME” verschijnt en “01” begint te
of
. “02” verschijnt. Druk eenmaal op SET
knipperen. Druk eenmaal op
om het station op te slaan onder Geheugen 02.
4. Herhaal de stappen 2 tot 3 voor de Geheugens 03 tot 10.
5. Om een opgeslagen station te betreden, dient u één voor één op SET te
drukken, terwijl de radio is ingeschakeld.
6. Om een opgeslagen station te bewerken, dient u een ander station
te selecteren en de stappen 2 tot 4 te herhalen. Hiermee worden de
oorspronkelijke instellingen opgeheven.
nl
Gebruiksaanwijzing
DE SLAAP TIMER GEBRUIKEN
1. Druk tweemaal op RADIO/SLAAP om de slaap modus te betreden. Het slaap
icoontje “SL” en de slaap tijd “05” (5 minuten) verschijnen op het scherm en
beginnen te knipperen.
2. Druk nogmaals op RADIO/SLAAP om de slaap timer in te stellen op 5, 15, 30,
45, 60, 75 of 90 minuten.
3. Als het scherm wederom de tijd weergeeft, kunt u eenmaal op RADIO/SLAAP
te drukken om de resteren slaap tijd weer te geven.
4. Als de slaap tijd is bereikt, zal de radio worden uitgeschakeld.
5. Om de radio uit te schakelen voordat de slaap tijd is bereikt, dient u eenmaal
te drukken.
op
DE WEERVERWACHTING FUNCTIE GEBRUIKEN
Er bevindt zich een ingebouwde vochtigheidssensor in uw apparaat om de
weersverwachting aan te duiden. Er zijn vier weertypes die kunnen worden
weergegeven op uw weerstation (de weerafbeeldingen kunnen mogelijk afwijken
van de afbeeldingen die zich op uw apparaat bevinden):-
BEWOLKT
REGENACHTIG
Opmerkingen: voor een beter gebruik van uw weerstation, raden wij u aan om het
apparaat op een locatie te plaatsen met een open luchtcirculatie, bijv. bij een open
raam. Het plaatsen van het apparaat in een omgeving met airconditioning kan van
invloed zijn op de nauwkeurigheid van de weersverwachting.
Nadat uw weerstation is ingeschakeld, duurt het ongeveer een uur voordat het
station stabiel is. De weerafbeeldingen op het scherm geven een aanduiding
voor de weersverwachting voor de komende 3-4 uur. De weersverwachting komt
mogelijk niet overeen met de huidige weerconditie buiten.
PROBLEEMOPLOSSING
ZONNIG
ZONNIG EN BEWOLKT
Als uw wekkerradio een niet relevante tijd weergeeft of niet goed werkt, wordt
dit mogelijk veroorzaakt door elektrostatische ontlading of andere interferentie.
Koppel de DC stekker los om de netvoeding te onderbreken (en verwijder de backup batterij). De wekkerradio zal worden gereset naar de basisinstellingen en dient
opnieuw ingesteld te worden.
Tristar Europe B.V., Jules Verneweg 87, 5015 BH Tilburg, The Netherlands , www.tristar.eu
CL-1489MT