1
OPERATION GUIDE
FOR BECKER 1480
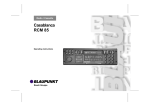
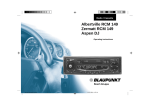
BASIC CONTROLS
1 On-Off Switch
2
Volume Bar
3
Bass/Treble Control Buttons/
Stereo Balance Control Buttons
TUNING
1 Station Select
Buttons
2 Function Control
Button
3 Seek Bar
CASSETTE OPERATION
1 Cassette Port
DISPLAY PANEL
1 Bass/Treble Bar Graph
2
CrO2/"Metal" Tape
Equalization
Eject Button
2
Stereo Indicator
3
4 Scan Bar
4
4
5 Tuning Sensitivity
Control Button
6. Fine Adjustment
Tuning Buttons
5
Forward Music Search/
Fast Forward Button
Reverse Music Search/
Rewind Button
Track Selection Button
Digital Display of
Station Frequency
Station Memory Indicator
Dolby® B /C Noise
Reduction Button
7
3
6
7
1480.doc
5
6
AM and FM Band
Indicator
Tuning Sensitivity
Indicator
Balance Display
BASIC CONTROLS
POWER
The stereo system will operate with the
car's ignition switch in either the "on" or
"off" position. To operate the radio, simply
touch the "on" side of the on-off switch
located at the lower left corner of the radio
faceplate.
TONE
Two tone buttons, identified by musical
notes, are located above the volume bar.
The left button controls bass, the right
controls treble. A bar graph at the left of
the radio display indicates relative bass and
treble settings.
A tape cassette can be played without
using the on-off switch by simply inserting
the tape into the cassette port. As soon as
the cassette is drawn into position, it will
begin to play.
To bring both bass and treble tones to their
midrange settings, press both buttons
simultaneously. To bring either bass or
treble tone to maximum level, press and
hold
the
respective
button.
In
approximately three seconds, the graph
will indicate maximum level. If the button
is released and pressed again, the tone level
will reach minimum in approximately five
seconds. To reverse adjustment direction,
the maximum level must be reached first.
The system is equipped with a memory
function that will return the adjustment
levels of AM, FM and cassette modes
separately to their latest settings.
VOLUME
Sound level is manually adjusted by means
of the volume bar located on the left side
of the radio faceplate. Press upward to
increase volume, downward to decrease
volume.
SPEED-DEPENDENT VOLUME
ADJUSTMENT
A special function adjusts the radio and
cassette player volume a preset amount
according to vehicle speed. Thus, increased
wind and road noise are compensated for
as the vehicle is driven faster. When
leaving high-speed roads to resume local
driving, the volume is automatically
lowered a preset amount as vehicle speed
and thus ambient sound level drop.
1480.doc
BALANCE
Left-to-right stereo balance is adjusted
using the same buttons that control bass
and treble levels. First press the function
control button, which is on the right side of
the display and marked with a star (*). To
shift sound balance to the left speakers,
press the bass control. To shift balance to
the right speakers, press the treble control.
Balance can be set to the mid position by
pressing both buttons simultaneously. A
visual indication of the balance setting is
provided on the display when the balance
feature is activated.
FADER
A fader control is provided on models
equipped with both front and rear speakers.
Located on the lower console near the gear
selector, this thumbwheel control can be
adjusted to suit your preference. Dialing
the thumbwheel forward will increase
output of the front speakers while reducing
that of the rear. Conversely, dialing the
thumbwheel backward will increase the
output of the rear speakers, while reducing
that of the front. Positioning the
thumbwheel in its center detent will
equalize sound levels.
ANTENNA
The automatic antenna is controlled by a
three-position rocker switch located above
the radio. Under normal conditions the
switch should be set to its maximum
position, allowing the antenna to extend to
its full height for optimum reception in
almost all circumstances.
TUNING
The radio is capable of receiving monaural
AM broadcasts and monaural and stereo
FM broadcasts. A "STEREO" indicator
will appear on the radio display whenever
a stereo signal is received. To select the
waveband you wish to hear, simply press
any one of the numbered station select
buttons located along the top of the radio
faceplate - 1 through 6 for FM, 7 through 0
for AM. To tune to a specific station, you
may use any of the following methods:
SEEK AND SCAN TUNING
The "SEEK" bar, located on the right side
of the radio faceplate, can be used to tune
in broadcast frequencies within AM or FM
wavebands. Pressing the bar up will cause
stations to be scanned in ascending
frequencies; pressing it down will result in
a descending scan.
The "SCAN" Bar, located directly to the
right of the "SEEK" bar, allows sampling
of radio stations within a waveband for
approximately five seconds each. If no
action is taken during the five-second
period, the radio will tune to the next
station. Pressing either the "SEEK" bar or
the "SCAN" bar a second time will cause
1480.doc
the radio to stay tuned to the station being
sampled.
SENSITIVITY CONTROL
This feature enables you to choose two
tuning sensitivity levels, low and high, by
pressing the sensitivity control button
located on the far right side of the radio
faceplate. The level you select will be
indicated by a single- or triple-ringed
symbol appearing on the right side of the
radio display. In the low level, the radio
will seek and scan only the strongest
signals. In the high level it will seek and
scan less powerful signals as well. The
sensitivity level is automatically increased
after the entire waveband has been sampled
without finding a station.
DIRECT FREQUENCY TUNING
To tune directly to a specific frequency,
switch to your desired waveband - AM or
FM - as described, then press the function
control button, which is identified by a star
and located just to the right of the radio
display. The display will go blank. Next
press the numbered buttons corresponding
to the digits of your desired station. For
example, to select the frequency 98.5, you
would first press the function control
button to clear the display. Then you would
press button numbers 9,8,5 in consecutive
order. The display would then register
98.5, and the station at that frequency
would begin playing. The driver, of course,
should not use the direct frequency method
when the vehicle is in motion.
FINE ADJUSTMENT
The radio can also be fine-tuned in
increments up or down through either
waveband. This is done using the two
buttons marked by arrows and located on
the lower right of the faceplate.
PUSH-BUTTON MEMORY TUNING
The most common and convenient method
of tuning is to store your favorite stations
in the radio's memory. Six FM stations and
four AM stations may be stored by using
the numbered station select buttons located
along the top of the radio faceplate.
First, using either the seek, scan, or direct frequency
tuning methods, tune in the station you wish to store.
Next push and hold the numbered station select
button you wish to use. The radio will display the
station currently stored at that number. Continue
holding the button until this station is deleted from
memory and the frequency of your newly selected
station appears on the display. The new frequency
will be stored in memory.
CASSETTE OPERATION
To play a cassette, insert it into the
cassette port, exposed tape side first.
The
cassette
will
be
drawn
automatically into the deck. At the
conclusion of the first side played, the
auto-reverse
mechanism
will
automatically begin playing the other
side of the tape.
All cassette functions are located
directly above the cassette port and
appear from left to right in the
following order:
TAPE SWITCH ("CR")
This feature allows you to select the
proper equalization setting for playing
chromium dioxide (CrO2) or "metal"
cassette tapes. An LED located on the
face of this button will illuminate when
this option has been elected.
EJECT
To remove a cassette, push the eject
button. The tape will automatically
disengage and can then be retrieved
from the cassette port. Ejecting a
cassette switches the system to radio
operation.
1480.doc
FORWARD MUSIC SEARCH/
FAST FORWARD
A cassette tape can be automatically
advanced to the next selection by
pressing the forward button once. An
LED light on the face of the forward
button illuminates to indicate that
music search has been activated.
To fast forward the tape to the end of
the side, press the forward button twice.
The LED will blink to indicate that the
fast forward function has been
activated.
REVERSE MUSIC
SEARCH/REWIND
A cassette tape selection can be
repeated by pressing the reverse button
once. The LED light will illuminate to
indicate that music search has been
activated. Push the reverse button twice
to completely rewind the tape. Once
engaged, it will lock into position until
the tape is fully rewound or until
another tape function is activated. The
LED will blink to indicate that the
rewind function has been activated.
TRACK SELECTION
Once a cassette has been engaged, this
button can be used to switch to the
tape's other side without having to
remove and flip the cassette.
DOLBY® B AND DOLBY® C
NOISE REDUCTION
This function, which is activated by
pressing the Dolby noise reduction
button, reduces background hiss while
playing a cassette that was recorded
using the Dolby B® or Dolby® C noise
reduction system. Most prerecorded
cassettes indicate which type of noise
reduction was used during recording (if
any). LEDs on the face of the control
button illuminate to indicate the noise
reduction system selected.