1
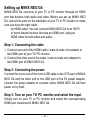
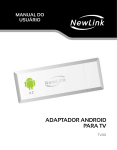
Android™ is a trademark of Google Inc.
Thank you for purchasing MINIX NEO G4.
Follow this guide to setup your device.
MINIX NEO G4 is a revolutionary pocket PC based on Rockchip
RK3066 dual-core ARM Cortex-A9 processor with quad core Mali-400
GPU and the latest Android™ 4.0.4 OS. Sign in to Google Play Store to
download the favorite applications and install them directly into NEO G4.
YouTube™, Internet radio and lots of other applications are all readily
available on Google Play Store.
Content
Chapter 1: Connect .......................................................5
What's in the box ....................................................................................6
MINIX NEO G4 at a glance ....................................................................7
What you need ......................................................................................10
Setting up MINIX NEO G4 ....................................................................11
Chapter 2: Basic Setup ................................................12
Language setup ....................................................................................13
Time zone setup ...................................................................................13
Wi-Fi setup (basic) ...............................................................................13
Chapter 3: Google Play Store ......................................14
Chapter 4: Control .......................................................16
Different control methods ......................................................................17
To use the GridShow launcher .............................................................17
Chapter 1
Connect.
--
What’s in the box
-
MINIX NEO G4 x 1
-5V Power adapter x 1
-
Micro-USB cable x 1
-
HDMI male-to-male cable x 1
-
Setup guide x 1
--
MINIX NEO G4 at a glance
6
1
2
5
4
3
1.
2.
3.
4.
5.
6.
Power LED
Recover button USB 2.0 port
OTG/Power-IN port
Micro-SD (TF) card reader
HDMI port
--
Power LED
The LED glows when the MINIX NEO G4 is on.
HDMI port
Connect MINIX NEO G4 to the HDMI port of a high-definition TV or PC
monitor using an HDMI cable, or the HDMI male-to-male mini adapter.
USB 2.0 port
Connect an external USB device to MINIX NEO G4 such as USB flash
drive, receiver of wireless keyboard and mouse, USB mouse, receiver
of wireless headset…etc.
Note:If you need to connect multiple USB devices to this port, you
MUST use with a USB hub with an external power source as the USB
2.0 port of MINIX NEO G4 is limited to output max. 500mA. Device
may NOT work if the current required is over 500mA without such extra
power source.
Micro-SD (TF) card slot
Increase the storage size or read files directly from a Micro-SD (TF)
card, support up to 32GB max.
OTG/Power-IN port
Connect the micro end of the micro-USB cable to this port and the other
end to the 5V power adapter to power up.
--
Note: Alternatively, you may connect the other end to the USB port of
the TV or PC monitor directly to get the power. However, because of
the different power output designs and power up sequences of these
devices, it is not recommended to do so.
Recover button
This button is to be used together with the OTG port when connecting
to a computer for service/upgrade purpose. Simply press and hold this
button before connecting to the computer’s USB port and release it
once MINIX NEO G4 is powered on.
--
What you need
To start using MINIX NEO G4, you need the following:
High-definition TV/ PC monitor
A high-definition TV or PC monitor that can display 720p or 1080p video
with at least one HDMI input
Cable
An HDMI cable to connect MINIX NEO G4 to your TV, or using the
HDMI male-to-male mini adapter included in the package
Wireless network
An 802.11 a, b, g, or n Wi-Fi wireless network (wireless video streaming
requires 802.11g or n)
Your wireless network name and password
Software and accounts
To play content (videos, photos, music) from a smartphone or PC on
MINIX NEO G4, you need:
- A UPnP™/DLNA® software pre-loaded in your smartphone or PC
- A Google account to sign-in to Google Play Store to download the corresponding applications (e.g. iMediaShare, eHomeMediacenter) necessary for streaming the content from a smartphone or PC
-
Other accounts may be required for full access to some Internet contents.
- 10 -
Setting up MINIX NEO G4
MINIX NEO G4 connects to your TV or PC monitor through an HDMI
port that delivers both audio and video. Before you set up MINIX NEO
G4, look at the ports on the side/back of your TV or PC monitor to make
sure you have the right cable:
An HDMI cable: You can connect MINIX NEO G4 to an HDTV or home theater receiver that has an HDMI port, using an HDMI cable for both video and audio.
Step 1: Connecting the cable
1. Connect one end of the HDMI cable / male-to-male mini adapter to
the HDMI port of your TV/ PC monitor.
2. Connect the other end of the cable / male-to-male mini adapter to the HDMI port of MINIX NEO G4.
Step 2: Connecting the power
Connect the micro end of the micro-USB cable to the OTG port of MINIX
NEO G4 and the other end to the USB port of the 5V power adapter,
connect the power adapter to a power outlet. MINIX NEO G4 will then
power on by itself.
Step 3: Turn on your TV/ PC monitor and select the input
Simply turn on your TV or PC monitor and select the corresponding
HDMI port connected to MINIX NEO G4.
- 11 -
Chapter 2
Basic Setup.
- 12 -
Language setup
You may choose the desired system language by the following steps:
Launcher Home Screen > Settings > Language & input > Language
The default language is English, you may choose your desired language
and confirm.
Time zone setup
You should adjust the time zone according to your current location by
the following steps:
Launcher Home Screen > Settings > Date & time > Select time zone
Choose your time zone and confirm.
Wi-Fi setup (basic)
Connect to your wireless network so that you could access to the
Internet by the following steps:
Launcher Home Screen > Settings > Wi-Fi > Check the option “To
see available networks turn Wi-Fi on”
Wi-Fi will turn on and automatically scan the wireless networks
available, then select the wireless network that you want to connect to
and confirm, key-in the password of the Wi-Fi network when the virtual
keyboard prompts, finally, hit the “Connect” button.
- 13 -
Chapter 3
Google Play Store.
- 14 -
Sign-in to your Google Account
Launch the Google Play Store by the following steps:
Launcher Home Screen -> Google Play Store, hit and confirm.
To use Google Play Store you need a Google Account. If you already
had a Google Account, select “Sign in” and login with your Google
Account. If you don’t have a Google Account yet, select “Get a Google
Account” and complete the rest of the process.
Upon completion of the sign-in process will bring you into the Google
Play Store which allows you to download and install the applications you
need.
Alternatively, if you cannot find the applications you need on Google
Play Store because of language restriction, location restriction or some
other reasons; you may look for and download the application files in the
form of “.apk” from the Internet and install them through the “ApkInstaller”
which is pre-loaded in the system.
- 15 -
Chapter 4
Control.
- 16 -
Different control methods
You may control your MINIX NEO G4 with the following input devices:
1.) RKRemoteControl App. (for Android Smartphone or tablet PC);
2.) Wired mouse;
3.) 2.4GHz USB wireless keyboard and mouse set;
4.) 2.4GHz USB wireless AirMouse remote control (MINIX NEO A1,
MINIX NEO A2, to be sold separately).
To use the GridShow launcher:
Home -> Select “GridShow” launcher
- 17 -
Copyright © 2012 MINIX Tech. All rights reserved.
No part of this guide, including the products and software described
in it, may be reproduced, transmitted, transcribed, stored in a retrieval
system, or translated into any language in any form or by any means,
except documentation kept by the purchaser for backup purposes,
without the express written permission of MINIX. This clause does
not apply to such software which is licensed under the General Public
License (“GPL”) or other Free Open Source Licenses. Copies of the
respective license terms, and where required an offer to provide the
respective source code, are included in the product.
Google, Android, Gmail, Google Maps, Chrome, Google Play, YouTube,
Google+, and other trademarks are property of Google Inc. A list of
Google trademarks is available at http://www.google.com/permissions/
guidelines.html. MINIX and the MINIX logo are trademarks of MINIX
Tech. All other marks and trademarks are properties of their respective
owners.
The content of this guide may differ in some details from the product or
its software. All information in this document is subject to change without
notice.
For online help and support, please visit www.minix.com.hk, or join our
facebook fanpage at: www.facebook.com/minixtech
- 18 -
Note: This equipment has been tested and found to comply with the
limits for a Class B digital device, pursuant to part 15 of the FCC
Rules. These limits are designed to provide reasonable protection
against harmful interference in a residential installation. This equipment
generates, uses and can radiate radio frequency energy and, if not
installed and used in accordance with the instructions, may cause
harmful interference to radio communications. However, there is no
guarantee that interference will not occur in a particular installation. If
this equipment does cause harmful interference to radio or television
reception, which can be determined by turning the equipment off and
on, the user is encouraged to try to correct the interference by one or
more of the following measures:
•
Reorient or relocate the receiving antenna.
•
Increase the separation between the equipment and receiver.
•
Connect the equipment into an outlet on a circuit different from
that to which the receiver is connected.
•
Consult the dealer or an experienced radio/TV technician for help.
Modifications not expressly approved by the manufacturer could
void the user's authority to operate the equipment under
FCC rules.
FCC IDENTIFIER: WMFNEOG4
- 19 -
- 20 -