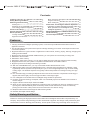
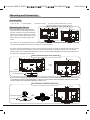
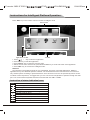
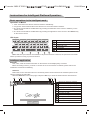
1
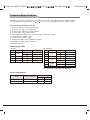
Forensis 39S61F 50S31
UC39G6000
(
)(T9E
UC50G6500
V59+RK2908
)
190x250mm
Forensis 39S61F 50S31
(
)(T9E
V59+RK2908
)
190x250mm
Contents
Features
Safety Warning and Notice
Mounting and Connecting
Packing list
Mounting the TV set
Connecting peripheral equipment
Panel Control Keys
Remote Control
Basic Operations
Turning on/Standby
Signal source selection
1
1
4
4
4
5
8
9
10
10
10
Menu operation description
Program scanning
Menu setting list
Instructions for Intelligent Platform Operation
Instruction of status indication icons
Basic operations in the intelligent mode
Intelligent application
Important Statement on Network Services
Troubleshooting
Technical Specifications
10
11
11
13
13
14
14
21
21
22
Features
1. Carrying Android 4.0 intelligent operating system, it can be freely installed with extended functions of
application software.
2. The Google Android 4.0 system with a special UI design will bring you a better visual experience and more
convenient operation.
3. Support download of a great number of applications on the Internet; chatting, inquiry, learning, shopping and
reading are all available.
4. Support mouse and keyboard with USB interfaces; you can operate as conveniently as using a PC.
5. With built-in Wi-Fi module.
6. With built-in mass memory.
7. With built-in mass cache memory, you can watch 1080p HD movies and play massive games smoothly.
8. Equipped with browser, the system is compatible with Adobe flash and HTML5 Edition.
9. Support synchronous sending and receiving of emails.
10. With the eHomeMediaCenter, you may use the Multi-media Wireless Share at will.
11. With the high-quality LCD with LED backlight panel, it is flicker-free and produces low radiation, which
significantly relieves eyestrain and protects your eyes; it also has high brightness, high contrast and big
viewing angle. The ultrafast response time greatly reduces the persistence of images moving at a high
speed.
12. Line-oriented image processing is adopted and the state-of-the-art motion compensation technology is
applied, which thoroughly corrects the jags and blurs at the image edges.
13. Four intelligent sound modes and four intelligent image modes are presented.
14. Dynamic contrast technology is adopted, which can remarkably improve the definition and contrast of
various images.
15. Support HD line-oriented input: YPbPr and HDMI.
16. Green energy-saving design is adopted; the standby power consumption is ultra-low; should there be no
input signal, it will automatically enter the standby mode several minutes later, which can effectively
prolong the service life of this product and at the same time save electric energy.
17. Multiplex USB interface which supports HD streaming media.
18. Ultra-thin and super narrow design.
Safety Warning and Notice
Thanks for choosing the high-performance and multifunctional intelligent LED-backlit LCD produced by our
company. This precious thing will bring you better audiovisual enjoyment. The design of this product has given
consideration to factors affecting personal safety, and the product itself has gone through strict tests prior to
1
Forensis 39S61F 50S31
(
)(T9E
V59+RK2908
)
190x250mm
Safety Warning and Notice
delivery. However, improper operation may result in electric shock and fire disaster. To ensure safety, prolong
the service life of this product, and make sure the best performance of this product can be given full play to,
Please read the manual and marking label carefully before using it and comply with the following safety
instructions. Please keep the user manual for later use.
Warning
May result in personal injury or
May result in casualties
Attention property losses
Indicate the behaviors that must be
prohibited
Indicate the operations that must be
performed
Under Following Conditions
Power failure or unstable voltage.
Abnormal sound or smell from the device.
AC power cord is damaged.
TV set is damaged due to falling off, knock or impact.
Any liquid or foreign matters enter into the TV set.
Turn off the TV set immediately,
unplug the power cord from the
power outlet, and contact
authorized maintenance
personnel.
If coal gas or other flammable gases leak, do not unplug the power cord of the TV set or other electric
appliances; instead, close the valve of the gas immediately and open the doors and windows.
Warning
Only use 100-240VAC, 60/50Hz power supply.
This TV must be connected to a three pin socket outlet for safety.
All cables can be connected or pull out only after power supply is turned off.
Do not fix the TV set on instable position, or else it may cause falling off, damage, or even
fire.
Do not put the TV set in the environment:
1. With direct sunshine, moisture, overheating or heavy dust;
2. With flammable or explosive substance;
3. With flammable or corrosive gas;
4. In bathroom, kitchen, etc.
Do not use damaged or improper power socket, and ensure that the plug and socket are
connected properly.
Keep the power plug and socket free of dust and metal pieces.
Do not damage the power cord:
1. It is prohibited to refit the power cord;
2. Do not put heavy object on the power cord;
3. Keep the power cord away from heat source;
4. Do not drag the power cord when unplugging.
Do not connect too many appliances to one power strip, or else it may cause fire due to high
power consumption.
Do not let open flame (e.g. lit candle) approach the TV set, or else it may cause electric shock
or fire.
Do not put the container filled with water on the TV set, to avoid electric shock or fire caused
by water drop of splashing.
Do not penetrate any sharp object, metal or liquid into the signal connector or air vents, to
avoid short circuit and product damage as well as electric shock.
2
Forensis 39S61F 50S31
(
)(T9E
V59+RK2908
)
190x250mm
Safety Warning and Notice
Warning
The slots on the case is designed to release heat so as to assure that all inside components
will not reach an extra high temperature and can work normally for a long time. Please do not
cover the holes while place it.
Do not touch the plug with wet hands, or else it may cause electric shock.
Do not turn on the TV set in thunderstorm weather; instead, unplug the power plug and antenna
connector to avoid lightning strike.
Do not disassemble the TV set by yourself, or else it may cause electric shock or fire. Contact
qualified personnel for maintenance.
Attention
Do not let children climb onto the TV set.
Keep the small accessories away from children's reach to avoid swallowing.
If the TV set won't be used for a long time, please turn off the device and unplug the power cord.
Before cleaning the TV set, unplug the power cord and wipe with soft cloth; do not use chemical
reagents and avoid foreign substances entering into the device. The incorrect cleaning(such as
cleaning fluid, water, etc) may lead to damage of product's appearance, erasing products printing
information, even flow into the machine and damage components, cause machine can not display.
To adjust the position or angle of the TV set, please disconnect all wires and move slowly to
avoid falling off.
Do not rub with hard object, knock at, bend or squeeze the screen.
Do not use machine immediately after transfering machine to the places with high temperature
from low temperature, which will cause fogging inside machine and failures.
If the screen is broken and the liquid splashes on skin, please wash with clean water immediately
for 15 minutes, and go to see your doctor.
To carry the TV set with hands, please grasp the corners and hold the bottom; do not apply force
on the panel.
Displaying the same image for a long time or active image with fixed words, icons will leave
"image persistence" on screen which will not disappear after powering off for a long time. This
undesirable phenomenon is not covered by warranty.
Healthy TV watching:
1. Watch in appropriate light; poor light or long time watching may hurt your eyes.
2. If a headset is used, adjust the volume appropriate to avoid hurting your hearing.
Unplug the power cord of the device to cut off the power supply.
If a power plug or appliance coupler is used as disconnecting device, it should ensure easy
operation.
Power plug shall be connected reliably. Loose power plugs may cause sparkle and fire.
All the technical specifications in the user manual and on the packaging are subject to changes
without prior notice. If there is slight deviation between the user manual and actual operation,
the latter shall prevail.
3
Forensis 39S61F 50S31
(
)(T9E
V59+RK2908
)
190x250mm
Mounting and Connecting
Packing list
1. The TV set;
2. User Manual;
3: Remote control;
4: Power cord (or attached to TV set)
Base installation figure (except 50")
Mounting the TV set
Base installation method (except 50"):
Insert the base into the support hole in
the rear enclosure in the arrow direction
shown in the picture, aligning the screw
hole in the rear enclosure and the screw
hole in the base, and then tighten the
screw.
Screw
The base
50" model can be compatible with many kinds of base, have A and B installation methods, please choose the
corresponding installation method according to the actual situation.
A: Fasten the base supporting cover to the back cover of machine (It needn't to operate this step when base
support cover had been installed.), and then Insert base assembly to supporting shield hole of complete
machine back cover as illustrated direction of arrow, to make supporting shield and supporting hole center in
the same line, finally fasten the screw.
Base installation figure of 50" model (A)
Screw
Screws
Base supporting cover
Screws
The base assembly
B: Insert base supporting to supporting holes of base (Need to align the locating bulge on base supporting and
the locating slot in base supporting holes.). Align the screw holes on base supporting and base, then fasten
screws. Fasten base supporting assembly to back cover.
50" model base installation figure (B)
Screws
The base supporting
The base
Screws
4
Forensis 39S61F 50S31
(
)(T9E
V59+RK2908
)
190x250mm
Mounting and Connecting
Remark: The actual base and appearance may be different from the picture; please refer to the device.
Tips on Installation
The TV set should be mounted near the AC power socket for easy plugging and unplugging.
For your safety, please select appropriate wall mount bracket or base.
To avoid hurt, it is required to place the TV set on stable plane, or fix on firm wall.
Ask qualified personnel to mount the TV set on the wall. Improper mounting may result in instable TV set.
Do not place the TV set at any place susceptible to mechanical vibration.
Do not place the TV set at any place that insects may enter.
Do not mount the TV set against air conditioner, or else the internal panel of the display may
condense moisture and cause failure.
Do not place the TV set at any place with strong magnetic field, or else it may be interfered with
and damaged by electromagnetic wave.
Mount on the base
Mount on the wall
30cm
10cm
30cm
10cm
10cm
10cm
7cm
10cm
Obstruct the air circulation
Wall
Ventilation
Please keep this space at least around
the TV, as shown in the figure.
Do not cover the air vents or insert any
object into the enclosure.
Do not put the device in limited space,
e.g. bookcase or embedded closet,
unless the TV set is properly ventilated.
Obstruct the air circulation
Wall
Connecting peripheral equipment
You can connect various devices to the TV set and view high quality images. If the video device has HDMI,
YPbPr, AV, PC and other video output/input ports. You can select one of them and connect to corresponding
input or output ports of the TV set. After connected, press "SOURCE" key, then menu of signal source will be
displayed on the screen. Press the " / " key to select the input signal, and press "OK" key to confirm. The
connecting mode is shown in the figure.
5
Forensis 39S61F 50S31
(
)(T9E
V59+RK2908
)
190x250mm
Mounting and Connecting
Router
Connecting power supply
To power socket
(100-240VAC 60/50Hz)
Power cord
USB 1 interface
USB 2 interface
W
R
Antenna connection
RF
G
B
R
Audio cable
HDMI signal cable
YPbPr cable
Earphone port
Connect to the device with
YPbPr/YCbCr output interface
Component input connection
G
Green (Y signal cable)
B Blue (Pb/Cb signal cable)
Connect to the AV device
with HDMI interface
HDMI signal cable
W White(AUDIO-L signal cable)
R Red (AUDIO-R and Pr/Cr signal cables)
HDMI input connection
Warning
When connecting outdoor antenna to signal port of the TV set, please turn off the main power
switch of the TV set first. Do not approach the outdoor antenna to high voltage mains power line
to avoid electric shock. The wired network antenna connected to this TV set must be isolated
from the protective grounding, or else it will cause fire or other hazards.
Remark:
1. The VIDEO-2 and component Y signal of the device share same input interface. AV2 and component audio
share same input interface.
2. If an earphone is inserted, the speaker of the TV set turns off automatically.
USB Device Connection
SERVICE: USB interface (It's used only for software upgrade).
USB1/USB2: Support playing of video, audio and image files; support access of mouse and keyboard;
USB1/USB2 interface should enter the intelligent mode for operation.
6
Forensis 39S61F 50S31
(
)(T9E
V59+RK2908
)
190x250mm
Mounting and Connecting
R
W
Y
Y
R
W
W
Y
R
Y Yellow (VIDEO signal cable)
W White(AUDIO-L signal cable)
Audio cable
Connect to the devices with AV output
interface (e.g. DVD, VCR, game console)
Video cable
Audio cable
Video cable
Video cable
Audio cable
R Red (AUDIO-R signal cable)
Connect to the devices with AV
input interface (e.g. Monitor)
VGA input connection
AV output connection
AV input connection
Note: The peripheral equipment and cables described in this manual should be purchased separately.
7
PC audio cable
VGA cable
Forensis 39S61F 50S31
(
)(T9E
V59+RK2908
)
190x250mm
Mounting and Connecting
Attention
The streaming media system has certain restriction on the format of each type of playing file; if
beyond the system restriction, there will be a playing error.
Please do not unplug the USB storage device during system playing to avoid possible problems
happening to the system or device.
This system supports standard storage devices conforming to USB1.1 and USB2.0 interface
transfer protocol such as USB flash drive and mobile HDD. In case that some nonstandard USB
storage device cannot be identified, please replace it with a standard storage device.
The USB interface of this TV set can supply a voltage of 5V and the maximum current is 500mA;
accurate identification of the multimedia player will be affected when a storage device above
500mA is used, which is a normal phenomenon.
The system of this set is very complicated, equivalent to a computer system. Therefore, when
reading or playing files, image stop or function failure may occur due to such factors as the
compatibility and stability of the USB storage device; in case of such situation, please try to turn
off this set and reinitialize the system.
USB1 interface support USB1.1 version only. There could be sluggish respond if transfer data
through this USB interface, so we recommend users insert the receiver of wireless mouse and
keyborad to this USB interface.
Network Connection
1. Cable network connection: connect one end of the network cable to the network port of this TV set, and
the other end to the LAN port of the Router.
2. Wireless network connection: for wireless network connection, please refer to the instructions for
"Intelligent application¡ú
Network Setting" in the operating instructions for intelligent platform.
Panel Control Keys
1) Power LED indicator and
remote receiving window.
2
2) SOURCE: Press this key
to enter the menu of signal
3
source and choose signal
source.
3) CH+/CH-: Press these two
4
keys to select the channel.
In OSD menu, press the two
1
5
keys to adjust the items, which
6
have the same functions as / key on the remote control.
7
4) VOL+/VOL-: Press these two keys to add or reduce volume.
In OSD menu, press the two keys to adjust the analog value of selected item, which have the same functions
as t/u key on the remote control.
5) MENU: Press this key to enter main menu.
6) Standby: To switch the TV on or back to standby.
7) Power switch (press '' I '' end to turn power on, and press ''O'' end to turn power off).
Note: . Appearance may vary between different TV models.
. The ''SOURCE'', ''CH+'', ''CH-'', ''VOL+'', ''VOL-'' and ''MENU'' keys cannot be operated under the
intelligent mode. Please use a remote control for operation in the intelligent mode.
8
Forensis 39S61F 50S31
(
)(T9E
V59+RK2908
)
190x250mm
Remote Control
Keys of the Remote Control
Key
POWER ( )
NET ( )
MUTE ( )
Numerical key
F1 (3D)
Channel list ( )
SOURCE (
F1
MENU (
)
Cursor key
( , ,t ,u )
VOL+/VOL-
)
Function
Conversion between normal working and standby.
Intelligent mode on or off.
Sound on or off.
Numeric input keys, effective under the TV mode.
Freeze picture.
To check the channel list, effective under the TV mode
Press this key to display the source selection menu. Under the intelligent mode,
press this key to return to the home page.
Press this key to display the main menu. Under the intelligent mode, press this
key to display the operation menu.
Select or adjust menu options.
Adjust the volume.
Under the TV mode, press this key to fast return to the last channel. Under the
Return ( )
intelligent mode, press this key to return to the previous menu or the last webpage.
Shortcut key for searching local media files or for website edit, effective under
Search ( )
the intelligent mode.
Progressive increase or decrease of channel number, effective under the TV mode.
CH+/CHSound mode conversion key, disabled under the intelligent mode.
SMART S
Button for sleep time setting. Press this key to set the power-off time. Disabled
Sleep ( )
under the intelligent mode.
System screen information display key, disabled under the intelligent mode.
INFO
Display mode switch key, disabled under the intelligent mode.
16:9
Image mode conversion key, disabled under the intelligent mode.
SMART P
Color temperature conversion key, disabled under the intelligent mode.
COLOR
Color system selection, disabled under the intelligent mode.
P/N
AUDIO(optional) NICAM mode selection, disabled under the intelligent mode.
Confirm the operation.
OK
PLAY ( )
PAUSE ( )
STOP ( )
ROTATE ( )
Used for intelligent platform multimedia function operation.
PREV. ( )
NEXT ( )
REV. ( )
FWD. ( )
Note: The appearance of the remote control may be different from this diagram; please refer to the real
object as standard.
Method for Installation of Remote Control Battery
Remove the battery compartment cover and insert two AAA (No. 7, 1.5V) batteries; make sure the polarity
of the batteries is in compliance with the polarity mark ''+'' and ''-'' in the battery compartment of the remote
control.
Precautions for using the remote control:
The remote control should be pointed at the remote control sensor during operation. An object placed
between the remote control and the remote control sensor may impede normal operation.
The remote control should be prevented from strenuous vibration. Besides, please do not set or place the
remote control under direct sunshine, as heating power may result in deformation of the remote control.
Remote control failure may occur when the remote control sensor of the main unit is under direct
sunshine or strong lighting; in this case, please change the angle of lighting or this TV set, or operate the
remote control near the remote control sensor.
9
Forensis 39S61F 50S31
(
)(T9E
V59+RK2908
)
190x250mm
Remote Control
Low battery will influence the remote control distance, in which case, the battery should be replaced with
a new one. If the remote control is going to be idle for a long time or the battery runs out, please take the
battery out to prevent the remote control from being corroded by battery leakage which may result in
damage and failure of the remote control.
Please do not use batteries of different types. It is not allowed to use old and new batteries together; the
batteries should be replaced in pair.
Please do not throw the batteries into fire or charge or decompose the batteries; do not charge, shortcircuit, disassemble/assemble, heat or burn used batteries. Please dispose the waste batteries pursuant
to relevant regulations on environmental protection.
Basic Operations
Turning on/Standby
Insert the power plug into the power socket and energize power supply. Press '' '' button on the panel to
power on the TV set, and then press '' '' key on the remote control or on the panel to turn on the TV set.
When the '' '' key on the remote control is pressed again, the TV set will enter the standby state.
Special Notice
This product applies environment-protection and energy-saving technology:
1. In the power-on state, if there is no signal input, it will automatically enter the standby state about 5min
later;
2. If the automatic power-off time you set is reached, it will automatically enter the standby state.
Signal source selection
Input Source
When the ''SOURCE'' key on the remote control or on the panel is pressed, the
screen will display the signal source selection menu; at this moment, the " / " key
on the remote control or the ''CH+/CH-'' key on the panel can be pressed to select the
signal source. When the ''OK'' key on the remote control or the ''MENU'' key on the
panel is pressed, the TV set will switch to the input signal source that you have
selected.
TV
AV1
AV2
YPbPr
PC
HDMI1
HDMI2
Menu operation description
Press the ''MENU'' key on the remote control or on the panel, then The TV will display the main menu.
1. Press "t/u" key on the remote control or ''VOL+/VOL-'' key
on the control panel to select the adjustment sort menu,
which includes 4 sorts: PICTURE, SOUND, OSD, TV.
2. Press " " key on the remote control or ''CH-'' on the control
Picture Mode
Soft
48
Contrast
panel to enter the adjustment sort menu.
Brightness
48
3. Press " / " key on the remote control or ''CH+/CH-'' on the
Saturation
50
Hue
50
control panel to select what is needed to adjust in sort menu.
Sharpness
55
4. Press "t/u" key on the remote control or ''VOL+/VOL-''on
Aspect Ratio
Full
the control panel to adjust the value or setting.
Color Temp.
Standard
Noise Reduction
Off
5. Press ''MENU'' key to exit the main menu when the TV
displays the Main Menu; Press ''MENU'' key to return to
Adjust
Select
Menu:Exit
previous menu when the TV displays the submenu; Press
''SOURCE'' key to display the signal source menu or exit signal source menu.
6. During the operation, the selections which can not be adjusted at current mode will be hidden automatically
and the color of the selections will be changed into gray.
10
Forensis 39S61F 50S31
(
)(T9E
V59+RK2908
)
190x250mm
Basic Operations
7. Menu Operation Instruction in this manual is explained according to TV mode. The operations in other
modes are similar to the one in TV mode. Users can take it as reference.
Note: the " / /t/u" key in this Manual stand for the direction cursor keys on the remote control unless
specifically defined. The operating instructions in the text below are all based on keys on the remote control.
Please understand the keys on the panel by yourself.
Program scanning
Before watching programs with the TV set for the first time, you need to scan the programs. Make sure that
the antenna is connected properly before scanning.
Auto Search
After auto scanning, the channels will be sorted according to the frequency automatically. The original
program list will be overwritten.
Auto Search
Press "MENU" key to show the main menu on the screen: press "t/u" key
to select
, press " " key to enter TV menu; press " / " key to select Auto
Search and press "u" key to scan the channels automatically (in the process
of auto-scan, press "MENU" key and the screen shows "Do you want to exit
searching?"; you can press "t" key to exit, or press "u" key to cancel). All the
TV programs will be saved automatically. The scanning requires a period of time.
Found
0
:
0
Progtranme
%... 50.25 MHz
VHF-L
Menu:Exit
Manual Search
Select
to enter TV menu; press " / " key to select Manual Search
and then press "u" key to enter the menu. Press "t/u" key to adjust the
channel, press " / " key to select SEARCH, and then press the "t/u"
key to start scanning (in the process of scanning, you can press "MENU" key
to interrupt the scanning).
Manual Search
CH: 1
Search
Frequency 45.25 MHz
Menu:Exit
Menu setting list
Refer to the table below for the specific menu settings.
Adjust the overall effect of images: Standard, Soft, User, Bright
Adjust the overall layering of images: increase the analog value to improve the
Contrast
contrast and decrease the analog value to reduce the contrast (0-100)
Adjust the overall brightness of images: increase the analog value to improve the
Brightness
brightness and decrease the analog value to reduce the brightness (0-100)
Adjust the color depth of images: increase the analog value to improve the depth and
Saturation
decrease the analog value to reduce the depth (0-100)
Adjust the hue of images: increase analog value to increases green and decrease
Hue
analog value to increases purple(0-100); the hue function is only valid in NTSC system
Adjust the sharpness of images: increase the analog value to increases the definition
Sharpness
and decrease the analog value to reduce the definition (0-100).
Adjust the aspect ratio: Full, 4:3, Subtitle, Film.
Aspect Ratio
Adjust the overall color temperature of images: Standard, Warm, Cool.
Color Temp.
Set the grade of noise reduction: Middle, High, Off, Low.
Noise Reduction
Remark: The values of Contrast, Brightness, Hue, Saturation and Sharpness adjusted by the user will be
saved automatically.
Picture Mode
PICTURE
11
Forensis 39S61F 50S31
(
)(T9E
V59+RK2908
)
190x250mm
Basic Operations
Sound Mode
SOUND
OSD
Select the audio mode: Standard, Music, Movie, User.
Adjust the treble: increase the analog value to increase the treble and decrease the
Treble
analog value to reduce the treble (0-100).
Adjust the bass: increase the analog value to increase the bass and decrease the
Bass
analog value to reduce the bass (0-100).
Adjust balance degree of right&left sound track: move the analog value to left to
Balance
increase the left volume; move the analog value to right to increase the right volume
(L50-R50). Generally, the balance is set to 0.
Remark: The values of treble and bass adjusted by the user will be saved automatically.
OSD Language
Set the menu language: There are many languages to select.
OSD Duration
Adjust duration of OSD menu: 15, 30, 45, 60. Unit: second.
Adjust the menu transparency: increase the analog value to increase the transparency
OSD Transparency
and decrease the analog value to reduce the transparency (0-100).
Blue Screen
Set up whether screen turns to blue when there is no signal: On and Off.
Sleep Time
Set the waiting time of standby: Off, 15M, 30M, 45M, 60M,90M, 120M, 240M. unit: min.
Recall
Restore factory settings.
Select the color system: PAL, NTSC, SECAM, AUTO; please select the proper system,
Color System
or else the picture isn't clear.
Select the audio system: I, DK, M(or L) and BG; please select the proper audio system,
Sound System
or else there will be noise.
Skip
Select skip: On and Off.
Auto Search
Refer to "Program scanning".
Manual Search
Press " / " key to select " Fine Tune", and press "t /u " key to adjust from low
Fine Tune
frequency or high frequency; observe while tuning to achieve the best image and audio
effect.
Press " / " key to select Channel Edit and
Channel Edit
then press "u " key to edit the submenu.
1.Delete: Press " / " key to select desired
channel, and then press number key "1" on
the remote control to delete the item.
TV
Channel Edit
2.Move: Press " / " key to select desired
channel, and press number key "2" on the
remote control, then press " / " key to move
to desired position, and press "OK" key to
confirm, and then press "MENU" key to return.
3.Skip: Press " / " key to select desired
channel, and then press number key "3" on the
remote control to turn on/off skip.
1 CH
2 CH
3 CH
4 CH
5 CH
6 CH
7 CH
8 CH
9 CH
1:Delete
OK:Enter
2:Move
3:Skip
Menu:Exit
Note: The operation methods under AV, YPbPr, PC and HDMI signal source modes are basically the same as
those under the TV mode, for users' reference. The HDMI can realize DVI function through external HDMI and
DVI adaptor.
12
Forensis 39S61F 50S31
(
)(T9E
V59+RK2908
)
190x250mm
Instructions for Intelligent Platform Operation
Press "NET" key on the remote control to enter the intelligent mode
Shortcut Bar
Application List Bar
Tool Bar
1. Press " / /t /u " key to select an application.
2. Press "OK" key to start the application.
3. Press "Return" key to return the previous page.
4. Select an item on the shortcut bar, press and hold "OK" key to create a shortcut of the application.
5. Press "NET" key to exit from the intelligent mode.
¡ ïAttention
The operation in the intelligent mode is very complicated, and users can install applications. Different
applications may have different operation methods. The method introduced in this instruction is for reference
only. Please operate according to practical situation. Some functions even can't be operated by remote control.
To obtain a better experience, we suggest that you use a mouse and a keyboard for operation through the USB
port. The mouse and the keyboard should be connected with the USB1 or USB2.
Instruction of status indication icons
Icon
Instruction
Downloading a file.
Uploading a file.
Icon
You've got new Emails.
Wi-Fi connection and indication of signal.
Uploading data by Wi-Fi.
Warning
The prompt of software update.
Indication to start hotspot of Access Point (AP).
This device is connected with PC.
13
Forensis 39S61F 50S31
(
)(T9E
V59+RK2908
)
190x250mm
Instructions for Intelligent Platform Operation
Basic operations in the intelligent mode
Operation of Mouse
1. Click: Press the mouse button and then release it immediately.
2. Long Press: Press and hold the mouse button for 3 seconds and then release it.
3. The same function will be enabled either by pressing the left button of the mouse or "OK" key on the
remote control.
4. The same function will be enabled either by pressing the right button of the mouse or the "Return" key
on the remote control.
URL Input
1
2
3
4
5
6
1
2
3
4
5
Small - Capital Letter Switch
Slash
Space
Decimal point
Complete
Backspace
6
Note: Different input methods have difference keyboard interfaces. However, the operations are similar.
Please operate according to practical situation.
Intelligent application
Browser
Text, video, audio and other information on the internet can be displayed by a browser.
Before accessing internet, you have to connect the TV to the internet. For details, please refer to the
Installation Connection and Setting.
¡ ïAttention
Data traffic occurs when the internet is connected, please contact with the local network operator for an
optimum package of data traffic.
Select the Browser on the home page, and press "OK" key to enter the main interface of the browser.
1
2
3
4
5
6
7
8
9
10
11
14
Back to the previous webpage
Go forward to the next webpage
Refresh the webpage
Webpage window of the browser.
Close the current webpage window.
Add a new webpage window.
Input box for URL.
Option for adding a bookmark.
Input option of URL
Menu option of browser
Option for viewing bookmark
Forensis 39S61F 50S31
(
)(T9E
V59+RK2908
)
190x250mm
Instructions for Intelligent Platform Operation
Basic operations of browser
How to access URL?
1. Press "Search" key on the remote control, or click the URL input box by the mouse;
2. Input a URL you want to visit in the URL input box;
3. Select the "
" icon, and press "OK" key to visit the URL.
How to reload a webpage?
1. Press "MENU" key on the remote control or single click the menu icon
on the upper right corner of the
screen by the mouse;
2. Select the Refresh option on the menu, and press "OK" key.
Bookmark Folder
You can save your favorite webpage by the bookmark folder, so that you can quickly find out this webpage
and open it on the next visit.
How to bookmark a webpage?
1. Select the
icon on the main interface of the browser and press "OK" key;
2. Confirm the bookmark and the URL;
3. Select an account to save and press "OK" key;
4. Select OK and press "OK" key to add the bookmark.
Text and Image Management
How to copy and paste a text on a webpage?
1. Position the cursor onto the text paragraph to copy, and long press the left key of the mouse;
2. When a pair of cursors for selection show on the screen, drag the cursors to select the text content you
want;
3. Select Copy on the top of the screen, and click the Confirm button.
How to save an image on a webpage to the local disk?
1. Select an image to save and long press "OK" key;
2. Select save image on the operation menu, and press "OK" key to save the image to the default path of
the browser.
Download Management
How to download software, music or video, etc.?
1. Input a download link in the URL box;
2. The data download icon will appear on the status bar on the bottom of the screen;
3. Click the status bar on the bottom right of the screen to view download details.
Browser Setting
You may set the font size and clear browser cache, etc.
How to set the home page of the browser?
1. Press "MENU" key on the browser interface;
2. Select Setting on the menu and press "OK" key;
3. Select Home Page Setting on the General option and press "OK" key;
4. Select Others on the options shown and press "OK" key;
5. Input a home page URL, select confirm, and press "OK" key to save.
How to clear browser cache?
1. Press "MENU" key on the browser interface;
2. Select Setting on the menu shown and press "OK" key;
15
Forensis 39S61F 50S31
(
)(T9E
V59+RK2908
)
190x250mm
Instructions for Intelligent Platform Operation
3. Select Privacy & Security on the menu shown, and press "OK" key;
4. Select Clear Cache and press "OK" key to clear the content and data saved on the local cache by the
browser.
You may conduct operation to other options on the setting menu.
APK Installer
Through APK Installer, you can install a setup file saved on the local disk or uninstall an application
installed on the local disk.
How to install application?
1. Start the APK installer, select the Install option and press "OK" key to enter;
2. Select a path for a file to install in the local disk, find out the application installation package in the right
box, and press "OK" key;
3. A prompt to prohibit installation pops up. By default, applications obtained from markets other than the
Android e-market will be prohibited by the system. Select the Setting option and press "OK" key;
4. Select Unknown Source on the setting page of the application, and press "OK" key to check;
5. Select the OK option on the attention box, and press "OK" key;
6. Press "Return" key to go back to the previous interface, reselect an application to install and press "OK"
key;
7. Select Install on the popup window to confirm the installation and the application will be installed by the
system automatically.
How to remove applications?
1. Select Manage, and press "OK" key to enter;
2. Select an application to uninstall, and press "OK" key;
3. Select Uninstall, and press "OK" key to remove the application by the system automatically.
Email
By the Send Email option, you can login personal or company Email account to receive and send Emails.
How to login Email?
1. Start the Email, input Email address and password in the text box, select Next, and press "OK" key;
2. Select an account type (POP3/IMAP/Exchange) according to the services provided by Email provider;
3. Select Next and press "OK" key to confirm the setting of the server to receive;
4. Select Next and press "OK" key to confirm the setting of the server to send;
5. Account setting option;
6. After the account is set successfully, select Setting Account Name for the account, and set your name as
the Email signature;
7. Select the inbox, and press "OK" key to receive Emails.
How to send Email?
1. After logging in the Email box, select the
icon on the top of the screen, and press "OK" key;
2. After recipients, subject, and content are input, select the Send button on the top of the screen, and
press "OK" key to send.
eHomeMediaCenter
By the eHomeMediaCenter option, users under the same wireless network can share multimedia resources
if they enable the DLNA function.
Select the eHomeMediaCenter in the applications, and press "OK" key to run.
Play Shared documents on the Network
1. Select Media Player, and press "OK" key;
16
Forensis 39S61F 50S31
(
)(T9E
V59+RK2908
)
190x250mm
Instructions for Intelligent Platform Operation
2. Select a media device, and press
"OK" key;
3. Select a file in a shared media device
by network. press "OK" key to play
the file; long press "OK" key and a
prompt of "Confirm to download the
file?" shows up; Select OK and press
"OK" key to download the file to the
local disk.
Share Media Files
1. Select Media Server, and press
"OK" key;
2. Select Start Share, press "OK" key
to start; select Add Share, and press
"OK" key.
3. After the Media Library is set to be
shared, files on the device in the
media format will be shared on the
Media Server.
4. After Share User-defined Folders is
selected, folders specified can be
shared on the Media Server. Select a
folder, and long press "OK" key to
share.
Start Share
Video Player
Select Movie in the tool bar, and press "OK" key to run the application
Select a video file and press "OK" key to play.
1
00:00:05
2
10
00:03:25
3
4
5
6
7
8
9
1 10 Volume button -/+: turn the volume down/up.
2
3
4
5
6
7
8
9
Bookmark Setting: After the option is successfully set, the system will prompt you whether to play from the
bookmark location on you next play.
Fast Rewind/Previous Section: Long press the icon to fast rewind, or click it to play the previous section.
Pause/Play: When playing a video, press this button to pause, and click the icon again to continue playing.
Progress Bar: By moving the cursor leftward or rightward to adjust the progress.
Fast Forward/Next Section: Long press the icon to fast forward, or click the icon to play the next section.
Screen Size Adjustment: you may adjust the screen to original size, full screen, 16:9, 4:3 etc.
Return to the play list.
Other options: Delete Bookmark, Set the play mode as Loop Playback, etc.
17
Forensis 39S61F 50S31
(
)(T9E
V59+RK2908
)
190x250mm
Instructions for Intelligent Platform Operation
Music Player
Select Music on the tool bar, and press "OK" key to run the application.
Selecting the category of Music Playlist
1. Select the icon of music list, and press "OK" key.
2. Select Songs, Artist, or Album in the Category, and press "OK" key.
Songs: List according to the names of songs.
Artist: List according to the category of artists.
Album: List according to folder names of albums.
Introduction to option icons on the play interface
1
2
3
4
5
6 7
8
14 13 12 11 10 9
Image Player
Select Picture in the tool bar, and press "OK" key.
Select a file to play in the folder shown, and press "OK" key.
1
2
3
4
5
6
7
8
9
Equalizer Setting
Play songs at random.
Setting of the repeat play mode.
Display the lyric of the playing song.
The artist name of the playing song
The album name of the playing song
The name of the playing song
Play List
Turn the volume up
Fast Forward/Next Section: Long press
10 the icon to fast forward, or click the
icon to play the next section.
11 Play/Pause
Fast Rewind/Previous Section: Long
12 press the icon to fast rewind, or click
the icon to play the previous section.
Turn
the volume down
13
14 Play the progress bar
Introduction to the option icons on the play interface
1 2 3
1
2
3
18
Share pictures.
Delete pictures.
Option for settings.
Forensis 39S61F 50S31
(
)(T9E
V59+RK2908
)
190x250mm
Instructions for Intelligent Platform Operation
File Management
By the option, users can manage files saved on the local disk and external U disk. You can run, copy, move,
delete and rename a file.
Edit Files
1. Select the disk, press "OK" key to
enter.
2. Select the folder, press "OK" key to
enter.
3. Select the target file, press "OK" key
to run the file; long press "OK" key to
display the edit menu, conduct
operations by selecting options like
Copy, Delete, Move, Paste and
Rename, etc.
4. By the Multi-Select function on the
menu, several files and folders can be
selected at the same time (names of
selected files will become light red);
click the Edit option on the tool bar to do operations like Copy, Delete, Move and Rename, etc. for the
files.
Network Setting
Select the Setting option on the tool bar, press "OK" key to enter.
¡ö
What is Wi-Fi technology?
Wi-Fi is a short range wireless transmission technology, supporting radio signal accessed by the internet
within a range of several hundred inches. If the location where the TV locates is covered by Wi-Fi network, you
can connect the TV with the internet in the wireless connection way by Wi-Fi; the intensity of the Wi-Fi network
signal is related with the location, that is, the closer TV is to an access point, the stronger signal is obtained.
¡ö
How to connect with the Wi-Fi network?
1. Select the Wi-Fi option, press "OK" key ;
2. After the Start Wi-Fi option is selected, press "OK" key to enable the Wi-Fi function;
3.The system will auto search the Wi-Fi network signal in your area. Available network signals will show on
the screen. You also can select the Scan option on the top of the screen, and press "OK" key to rescan;
if the
icon appears next to the searched network, it indicates the network can be connected without
password; if the
icon appears, it indicates the network cannot be connected without password, and in
this case, you need to input the correct password to connect it;
4. Select a network to connect in the network list, and press "OK" key;
5. Input the network access password, if DHCP function is enabled on the router, select the Connection
option, and press "OK" key to connect. If DHCP function is not enabled on the router, you have to
configurate the static IP address by the following steps;
6. After the password is input, select Display Advanced Option, and press "OK" key;
7. Select Static in the IP setting, and press "OK" key;
8. Input information like static IP address, gateway, network prefix length, domain name, etc. Select the
Connection option, and press "OK" key (information to be input manually).
9. After the Wi-Fi is successfully connected, the
icon will display on the status bar on the right bottom of
the screen.
After the network is successfully connected, the system will keep record of the connected Wi-Fi network;
19
Forensis 39S61F 50S31
(
)(T9E
V59+RK2908
)
190x250mm
Instructions for Intelligent Platform Operation
when you start the TV next time, the system will auto connect to the network.
¡ö
How to set Wi-Fi as a portable hotspot for sharing?
1. Select the Portable Hotspot in the More option, and press "OK" key to enter;
2. Select the Portable Wi-Fi hotspot, press "OK" key to start the Portable Hotspot, the Wi-Fi hotspot start
status icon
will display on the top of the screen;
3. Select Configure Wi-Fi hotspot, press "OK" key to enter;
4. Input the network name (SSID) in the text box; which is "AndroidAP" by default, or you may set it to other
values;
5. Select Security, press "OK" key to select the security type; you can set the network as open type
without password, but in this case, any device that is able to reach the network can connect to the Wi-Fi
network; if the network is set as encrypted with WPA PSK/WPA2 PSK, you have to input a password with
8 or above letters or digits, in this case, other devices that is able to reach the network can't connect to
the Wi-Fi network unless the correct password is input;
6. After the Encryption is selected, the system will auto assign a password for you, or you can input a
password manually;
7. Select Save, and press "OK" key to save the setting, and you're your network will be visible to other WiFi devices in the area when searching Wi-Fi networks. If your device is connected with Ethernet, devices
connected to your Wi-Fi network can share the network traffic. (8 devices are available to connect at
most.)
Attention: For security, please set a network password, and try to set it with high security.
What is Virtual Private Network (VPN)?
VPN is a technology building a private network on a public network. By this technology, you can securely
access the company internal network by a public network. Before setting a virtual private network, you need to
ask an administrator to get information of the server like IP address, user name, password, etc.
How to connect with the VPN?
1. Select VPN, press "OK" key to enter;
2. To guarantee the security of the network, under the condition without screen saver, the system will
request you to set a PIN code; select the OK option in the Attention, and press "OK" key.
3. Set screen unlock manner according to your need.
4. Select Add VPN, and press "OK" key to enter;
5. Input a VPN name, type and server address, select Save, and press "OK" key.
6. Select the VPN created, and press "OK" key;
7. Input the user name and the password to access the network; (obtained from network administrator)
8. Select Connect, and press "OK" key to connect.
How to set Ethernet?
1. Connect one connector of a cable to the RJ-45 port of the TV, and the other connector to the router;
2. Select Ethernet, and press "OK" key;
3. Select Ethernet, and press "OK" key to start the Ethernet function. After the Ethernet function is
activated, the system will auto obtain IP address; if Auto-Obtain IP Address Allowed is set for the router,
the TV will auto obtain the IP address; If not, set a static IP address by the next step.
4. Select the Static IP Setting, and press "OK" key to enter;
5. Select Use Static IP, and press "OK" key to check;
6. Input an available IP address, gateway, netmask and DNS;(obtained from network administrator)
7. Press "Return" key, the system will prompt you to save or cancel the setting;
8. Select Save, and press "OK" key to save.
20
Forensis 39S61F 50S31
(
)(T9E
V59+RK2908
)
190x250mm
Important Statement on Network Services
All contents and services obtained from this TV set belong to the third party and are protected by laws on
copyright, patent right, trademark right and/or other intellectual property right. The said contents and services
are only for your non-commercial purposes. It is not allowed to use any content or service without the
authorization of the content owner or the service provider.
Our company will undertake no liability for any direct, indirect and accidental losses or damages caused by
your or a third party's access to any content or service or any information or any third party software through
this set under any circumstances.
Third party service may be changed, deleted or stopped without prior notice. Our company neither implies
nor guarantees the continuous availability of some service or content within any period of time.
Our company is not held responsible for services related to the said service and content. Besides, we will
not bear any liability for client service. Please directly contact relevant content and service providers if you
have any problem and service request concerning relevant service or content.
Troubleshooting
Problem
Possible causes
1. The antenna connector is loose, or the
cable is damaged.
2. The channel setting is improper.
3. The antenna type is improper.
4. The antenna direction or position is
inaccurate.
5. The signal is weak.
Solutions
1. Check if the antenna plug is loose or the
cable is in good condition.
2. Reset by referring to "TV" setting method.
3. Check the antenna type (VHF/UHF).
4. Adjust the direction and position of the
antenna.
5. Try to use signal enhancer.
The TV images are good, but
there is noise.
The setting of TV accompanying sound is
improper.
Enter "TV" setting menu and reset the
accompanying sound system.
There is neither display nor
sound on the screen. The
indication light is not on.
1. The power plug is loose or the power
supply is not connected.
2. The power switch is not turned on.
1. Check if the power line is connected.
2. Press the " " button on the panel.
Snowflake spots occur in the
TV images and there is noise
in accompanying sound.
Dotted line or strip disturbance The signal is disturbed by car, neon
occurs in TV images.
light, electric hair dryer, etc..
Do not use electric hair dryer aside the TV
set and adjust the antenna direction to reduce
disturbance.
Double images occur on the
TV screen.
1. TV signals are reflected by surrounding
high mountains or mansions.
2. The direction of the antenna is
inaccurate.
1. Use high oriented antenna and use the
Fine Tune function of "TV".
2. Adjust the direction of the antenna.
The images are colorless.
1. The color saturation is adjusted too low.
2. The setting of color system is improper.
1. Enter "PICTURE" setting to increase color
saturation.
2. Enter "TV" setting to change color system.
The TV has no accompanying
sound.
1. The volume is set too low.
2. The sound becomes mute.
3. The accompanying sound system is not
properly set.
1. Adjust the volume to a proper degree.
2. Press "MUTE" key on the remote control
to cancel mute mode.
3. Enter "TV" setting to change sound system.
There is no display on the PC,
with the prompt of "No Signal
Input". The red indicator light
is blinking.
The signal connecting cable is loose or
falls off.
Check if the signal connecting cable is loose
or falls off. Reconnect it.
Images displayed on the PC
deviate. The screen is not full
or is exceeded. The display is
fuzzy.
1. The adjustment is improper.
2. The display mode is inaccurate.
1. Use automatic adjustment function.
2. Enter "GEOMETRY" adjustment level or
vertical position.
3. Use the recommended mode.
21
Forensis 39S61F 50S31
(
)(T9E
V59+RK2908
)
190x250mm
Troubleshooting
Problem
Possible causes
Solutions
1. The remote control receiving window of
The remote control distance is
the machine is blocked by some object.
short or out of control.
2. The battery of the remote control is low.
1. Remove the object to avoid blocking the
remote control receiving window.
2. Replace the battery.
1. Ask the network administrator to obtain
available IP address and other parameters.
2. Check if the network connecting cable is
normally connected.
3. Consult the network service provider.
The browser cannot access
any link.
1. Errors occur in network parameter
configuration.
2. The network connection is improper.
3. Network service is not activated.
Online video play is very slow.
1. The network bandwidth is low.
1. Please upgrade your network bandwidth to
2. Multiple films are buffered or other files
a higher one.
are downloaded at the same time.
2. Please try to replace with other addresses
3. Several PCs share one network.
to obtain better resources.
4. The video on demand has no resources.
Technical Specifications
Master unit
Panel Size
Max. Resolution
Best Resolution
Pixel Pitch
Active Area
Power Supply
Power Consumption of Speaker
39" (HD)
39"(FHD)
1920 1080
1366 768
1920 1080@60Hz
1360 768@60Hz
0.44475mm 0.44475mm
0.62475mm 0.62475mm
853.92mm 480.33mm
853.41mm 479.81mm
100-240VAC 60/50Hz
8W+8W
Unpacking: 886 514 71(mm3)
Excluding base
Unpacking: 886
Dimension (L
H
W) and Weight
Panel size
71(mm3)
Packing: 1100 622 152(mm3)
Net Weight: 8.5kg
Gross Weight: 11.5kg
Including base
50"
Max. Resolution
1920
1080
Best Resolution
1920
1080@60Hz
Pixel Pitch
0.5708mm
Active Area
1095.84mm
Power Supply
100-240VAC 60/50Hz
Power Consumption of Speaker
8W+8W
Dimension (L
574
H
W) and Weight
0.5708mm
616.41mm
Excluding base
Unpacking: 1134 660
Packing: 1250
Including base
782
47(mm3)
150(mm3)
Unpacking: 1134 717
Net Weight: 16.5kg
Gross Weight: 20kg
3
47(mm )
The relevant parameters of instructions are variable, without prior notice, if there is any discrepancy, please
in accordance with actual object.
22
Forensis 39S61F 50S31
(
)(T9E
V59+RK2908
)
190x250mm
Technical Specifications
Operating environment: temperature: 5 ~40
Storage environment: temperature: -20 ~55
; RH: 10%~85%; atmospheric pressure: 86kPa~104kPa
; RH: 5%~95%; atmospheric pressure: 86kPa~104kPa
Technical specifications for TV
1. Supported standard: PAL+NTSC+SECAM
2. Antenna input: 75 coax, unbalanced
3. AV video input: 75 , 1Vp-p, RCA terminal
4. AV audio input: 20K , 500mV RMS
5. YPbPr/HDMI video input: 480i, 480P, 576i, 576P, 720P, 1080i, 1080P
6. Internal memory capacity: 2GB
7. Cache memory capacity: 1GB
8. Wireless connection: Wi-Fi (IEEE 802.11 b/g/n)
9. Intelligent operating system: Android 4.0
10. Browser: Google
VGA display mode
39"(HD)
NO.
1
2
3
4
5
39"(FHD) 50"
Mode
VGA
SVGA
XGA
WXGA
Resolution
720
640
800
1024
1360
400
480
600
768
768
Refresh rate
70Hz
60Hz
60Hz
60Hz
60Hz
Recommended mode:1360X768@60Hz
NO.
1
2
3
4
5
6
7
8
Mode
VGA
SVGA
XGA
WXGA
WUXGA
Resolution
720
640
800
1024
1280
1360
1600
1920
400
480
600
768
720
768
900
1080
Refresh rate
70Hz
60Hz
60Hz
60Hz
60Hz
60Hz
60Hz
60Hz
Recommended mode:1920X1080@60Hz
Power management
Mode
Power LED state
Normal working
Standby
Off
On
Power consumption
39"
88W
0.5W
50"
110W
0.5W
23