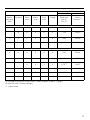
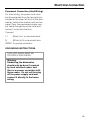
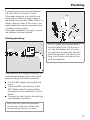
1
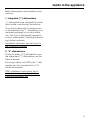
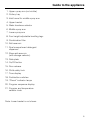
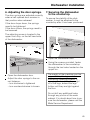
Operating instructions
for dishwashers
To prevent accidents and reduce
the risk of damaging the machine,
read the Operating Manual
before installing or using
the machine.
ö
M.-Nr. 04 390 922
Contents
Contents
Guide to the appliance. . . . . . . . . . . . . . . . . . . . . . . . . . . . . . . . . . . . . . . . . . . . . . 3
Important safety instructions . . . . . . . . . . . . . . . . . . . . . . . . . . . . . . . . . . . . . . . . 6
Caring for the environment . . . . . . . . . . . . . . . . . . . . . . . . . . . . . . . . . . . . . . . . . . 8
Before using for the first time . . . . . . . . . . . . . . . . . . . . . . . . . . . . . . . . . . . . . . . . 9
Opening and closing the door . . . . . . . . . . . . . . . . . . . . . . . . . . . . . . . . . . . . . 10
Water softener . . . . . . . . . . . . . . . . . . . . . . . . . . . . . . . . . . . . . . . . . . . . . . . . . . . 11
Setting the water hardness /Filling the salt reservoir . . . . . . . . . . . . . . . . . . . . 12/14
Salt indicator lamp . . . . . . . . . . . . . . . . . . . . . . . . . . . . . . . . . . . . . . . . . . . . . . . . . 15
Adding rinse aid . . . . . . . . . . . . . . . . . . . . . . . . . . . . . . . . . . . . . . . . . . . . . . . . . . 16
Loading the dishwasher . . . . . . . . . . . . . . . . . . . . . . . . . . . . . . . . . . . . . . . . . . . 18
Loading examples . . . . . . . . . . . . . . . . . . . . . . . . . . . . . . . . . . . . . . . . . . . . . . . . . 19
Adjusting the upper basket . . . . . . . . . . . . . . . . . . . . . . . . . . . . . . . . . . . . . . . . . . 22
Items not suitable for dishwashers . . . . . . . . . . . . . . . . . . . . . . . . . . . . . . . . . . 23
Adding detergent . . . . . . . . . . . . . . . . . . . . . . . . . . . . . . . . . . . . . . . . . . . . . . . . . 24
Choosing a program . . . . . . . . . . . . . . . . . . . . . . . . . . . . . . . . . . . . . . . . . . . . . . 25
Program chart. . . . . . . . . . . . . . . . . . . . . . . . . . . . . . . . . . . . . . . . . . . . . . . . . . . . 26
Operating the dishwasher . . . . . . . . . . . . . . . . . . . . . . . . . . . . . . . . . . . . . . . . . . 28
Changing programs; interrupting a program; program sequence indication . . . 28/29
Additional features. . . . . . . . . . . . . . . . . . . . . . . . . . . . . . . . . . . . . . . . . . . . . . . . 30
Unloading the dishwasher. . . . . . . . . . . . . . . . . . . . . . . . . . . . . . . . . . . . . . . . . . 32
Cleaning and care . . . . . . . . . . . . . . . . . . . . . . . . . . . . . . . . . . . . . . . . . . . . . . . . 33
Problem solving guide. . . . . . . . . . . . . . . . . . . . . . . . . . . . . . . . . . . . . . . . . . . . . 39
After sales service . . . . . . . . . . . . . . . . . . . . . . . . . . . . . . . . . . . . . . . . . . . . . . . . 41
Accessories . . . . . . . . . . . . . . . . . . . . . . . . . . . . . . . . . . . . . . . . . . . . . . . . . . . . . 42
Dishwasher installation . . . . . . . . . . . . . . . . . . . . . . . . . . . . . . . . . . . . . . . . . . . .
Electrical connection . . . . . . . . . . . . . . . . . . . . . . . . . . . . . . . . . . . . . . . . . . . . . .
Plumbing. . . . . . . . . . . . . . . . . . . . . . . . . . . . . . . . . . . . . . . . . . . . . . . . . . . . . . . .
Technical data. . . . . . . . . . . . . . . . . . . . . . . . . . . . . . . . . . . . . . . . . . . . . . . . . . . .
2
43
54
56
60
Guide to the appliance
Guide to the appliance
Miele dishwashers are available in two
versions:
1. Integrated (“i”) dishwashers
“i”- dishwashers are designed for installation under a continuous countertop.
The control panel with its accessories
is included with the “i”- dishwasher in a
separate package for on-site installation. The front is designed to accept a
custom made panel, matching the existing kitchen cabinets.
Installation directions can be found in
the Installation chapter.
2. “U” dishwashers
The built-under (“U”) dishwashers use
the integrated (“i”) dishwashers as the
basic machine.
By using a decor set (GDU) the “i”dishwasher can be converted into a “U”
model dishwasher.
GDU installation instructions are included in a separate pamphlet supplied with the decor set.
3
Guide to the appliance
4
Guide to the appliance
1. Upper spray arm (not visible)
2. Cutlery tray
3. Inlet funnel for middle spray arm
4. Upper basket
5. Water hardness selector
6. Middle spray arm
7. Lower spray arm
8. Four height adjustable levelling legs
9. Combination filter
10. Salt reservoir
11. Dual compartment detergent
dispenser
12. Rinse aid reservoir
(with dosage selector)
13. Data plate
14. On/Off button
15. Door release
16. Child safety lock
17. Time display
18. Pushbutton switches
19. “Check” indicator lamps
20. Program sequence display
21. Program and temperature
selector knob
Note: Lower basket is not shown.
5
IMPORTANT SAFETY INSTRUCTIONS
WARNING
When using your dishwasher, follow all basic
safety precautions.
This appliance conforms to
all uniform safety codes and
regulations. To avoid injury
and machine damage, read
the operating instructions
carefully.
The manufacturer cannot be held
responsible for damage or injury
caused by improper use or for
uses other than those for which
the appliance is intended.
Repairs should only be carried out
by qualified personnel. Disconnect
the appliance from the power supply
before servicing (pull out the plug or
turn off the circuit breaker).
If not purchased specifically as a
“Freestanding” model, only install
the dishwasher under a continuous
countertop which is secured to adjacent cabinetry.
The dishwasher must be electrically grounded. Install the dishwasher as per the included Installation
instructions.
Use only detergents and rinse aids
recommended for dishwashers.
Do not use commercial or industrial grade detergents, as these
may cause adverse chemical reactions
and damage the machine. Use detergents made for residential dishwashers
only.
Do not use your dishwasher unless
all enclosure panels are properly in
place.
Do not allow children to play in or
on the dishwasher.
Keep all detergents and rinse aids
out of the reach of children.
Dishwasher detergents contain Sodium Silicate and Sodium Carbonate. In case of eye contact, immediately flush with water. Call a physician or
poison control.
Do not tamper with the
controls.
6
IMPORTANT SAFETY INSTRUCTIONS
When loading items to be
washed:
– Locate pointed items so that they are
not likely to damage the door seal.
– Load knives with the cutting edge
down to reduce the risk of injuries.
Do not wash plastic items unless
they are labeled “dishwasher safe”
or the equivalent. For items not labeled,
check the manufacturer’s recommendations.
Do not abuse, sit, or stand on the
door or dishracks of the dishwasher.
Remove the front door and cut off
the power cord of the dishwasher
before removing it from service or discarding it. This will help protect children from injury and accidentally locking
themselves in.
Under certain conditions, hydrogen gas may be produced in a
hot water system that has not been
used for two weeks or more.
HYDROGEN GAS IS EXPLOSIVE. If the
hot water system has not been used for
such a period, turn on all hot water
faucets and let the water flow from
each for several minutes before using
the dishwasher. This will release any accumulated hydrogen gas. Do not
smoke or use an open flame during this
time.
Do not drink the water from the
wash cabinet.
SAVE THESE INSTRUCTIONS
7
Caring for the environment
Caring for the environment
Disposal of the packing material.
The cardboard box and packing material protects the appliance during
shipping. It has been deliberately designed to be biodegradable and recyclable. Please dispose of these materials as you would any other
recyclable products.
Disposal of your old machine.
Old machines contain materials which
can be recycled. Please contact your
local recycling center or scrap merchant about the possibility of recycling
these materials and make certain the
machine has been made child resistant
as outlined in the “Important safety instuctions”, before disposing of the appliance.
8
Energy saving washing.
These dishwashers are exceptionally efficient in their use of water and electricity. You can make the most of your
appliance by following these tips:
Make full use of the baskets without
overloading the dishwasher for the
most economical washing.
For small loads:
Select the “Top Solo” function (see
“Additional features” chapter).
Choose a program that best suits the
degree of soiling and the type of
dishes being washed.
If baskets are only half full, use the
ECONOMY program.
Use the correct amounts of detergent and rinse aid.
Before using for the first time
Before using for the first time
Before using for the first time please
note the following points:
Setting the water softener.
The water softener must be set to correspond to the water hardness in your
area. This can be obtained from your
local water company, or by using a test
kit that can be purchased from the
Miele Parts Department.
The salt reservoir must only be filled
with water and salt. Never fill it with
detergent.
Adding rinse aid.
Inadvertently filling the rinse aid
reservoir with liquid or powder detergent will damage the reservoir.
Only use detergents and rinse aids formulated for domestic dishwashers.
It is important to choose the correct
program.
Different wash programs should be selected for different loads and different
degrees of soiling. See the program
chart for further program descriptions.
Add the correct amount of detergent.
Follow the detergent manufacturer’s
recommendations on how much detergent to use. Not enough or too much
detergent can lead to poor wash results.
Cleaning results vary from brand to
brand. If you are not satisfied with the
results from one brand, try another
quality brand before contacting the
Miele Service Department for advice.
Load the dishes correctly.
Load the dishes so that water can contact all surfaces. Ensure that the spray
arms are not blocked by items which
are too tall for the basket or which extend through the bottom of the basket.
If necessary, manually rotate the spray
arms to test for clearance.
The combination filter in the base of
the wash cabinet and the spray arms
must be kept clean.
These should be regularly inspected
and cleaned if necessary.
See the corresponding chapters for detailed information on the above points.
When the dishwasher is run for the
first time, the selected program will
not start for approximately 7
minutes.
During these 7 minutes, the Water
softener reactivation program is run,
and the “Softener” indicator lamp
will be on.
9
Opening and closing the door
Opening and closing the door
To open the door.
Press the release catch inside the
door grip.
If the door is opened during operation,
all functions are automatically interrupted.
Child safety lock.
The child safety lock is designed to
deter children from opening the dishwasher door.
Use the key provided to turn the
child safety lock to the required setting.
To close the door.
Push the baskets in.
Lift the door and push until it clicks
into position.
Horizontal setting = The door is
locked.
Vertical setting = the door can
be opened.
10
Water softener
Water softener
The water softener must be set to correspond to the water hardness in your
area. This can be obtained from your
local water company, or by using a test
kit that can be purchased from the
Miele Parts Department.
To avoid the build up of calcium deposits on dishes, cutlery, and in the
dishwasher, if the water hardness is
above 4 gr/gal, the water should be
softened.
The dishwasher is factory set for a hardness level of 22 gr/gal. If your water is
harder or softer, the setting will need to
be adjusted.
To ensure a steady supply of softened water, the built in water softener must be:
1. Correctly set.
2. Reactivated with salt when depleted.
Where the water hardness fluctuates
(e.g. 8 - 17 gr/gal) always set the machine to the higher value (17 gr/gal in
this example).
Settings
gr/gal
1
2
3
4
5
6
7
8
9
10
11
12
13
14
15
16
17
18
19
20
21
22 *)
23
24
25
26
27
28
29
30
31
32
33
34
35
ppm
value
water
for
level
program- selector
ming
(Setting)
°f
20
40
50
70
90
110
130
140
160
180
200
220
230
250
270
290
310
320
340
360
380
400
410
430
450
470
490
500
520
540
560
580
590
610
630
2
4
5
7
9
11
13
14
16
18
20
22
23
25
27
29
31
32
34
36
38
40
41
43
45
47
49
50
52
54
56
58
59
61
63
1
2
3
4
5
6
7
8
9
10
11
12
13
14
15
16
17
18
19
20
21
22
23
24
25
26
27
28
29
30
31
32
33
34
35
6
6
6
6
6
6
6
6
6
6
6
6
6
6
6
6
6
6
6
6
6
6
6
6
6
6
6
6
6
6
6
6
6
6
6
36-47 650- 850
65- 85
36
4
48-65 860-1170
86-117
36
5
66-70 1190-1260 119-126
36
6
*) factory setting
11
Water softener
To set the water softener for a hardness level of 1-35 gr/gal:
Press the “Top Solo” button as often
as necessary until the value of your
water hardness in gr/gal appears in
the display.
Example:
For a water hardness of 30 gr/gal:
Keep pressing the “Top Solo” button
until “30” appears in the time display.
After the figure “36” is reached the
counter returns to “0”.
Value “0” must not be set!
Check that the water hardness selector in the wash cabinet is set to setting 6.
Turn the dishwasher off.
Turn the program selector knob to
the “STOP” position.
Press the “Delay start” and “START”
buttons at the same time, while turning the machine on. A “P” and a number will appear in the time display.
Set the program selector knob to the
“NORMAL 55/130” position. The
number “22” will appear in the time
display.
“22” = The factory setting for a water
hardness of 22 gr/gal.
12
Press the “START” button twice to
store the change in memory.
Water softener
Setting the water softener for a hardness level of 36 - 70 gr/gal requires
the following two step procedure:
Example:
The water hardness is 60 gr/gal.
The water hardness selector in the
wash cabinet must be set to 5,
(48 - 65 gr/gal).
1.
Turn the dishwasher off.
Turn the program selector knob to
the “STOP” position.
Press the “Delay start” and “START”
buttons at the same time, while turning the machine on. A “P” and a number will appear in the time display.
Set the program selector knob to the
“NORMAL 55/130” position. The
number “22” will appear in the time
display.
“22” = The factory setting for a water
hardness of 22 gr/gal.
Using a screwdriver:
Press the “Top Solo” button as often
as necessary until the value “36” appears in the display.
Remove the cover from the water
hardness selector.
Press the “START” button twice
to store the “36” in memory.
Adjust the water hardness selector
as necessary. There will be a click as
each setting is reached.
2.
Do not set the selector on setting 1 - 3.
The water hardness selector in the
wash cabinet must be set according to
the following chart.
Replace the cover on the water hardness selector.
gr/gal
36-47
48-65
66-70
650- 850
value
water
for
hardness
program selector
-ming (Setting)
65- 85
36
4
860-1170
86-117
36
5
1190-1260 119-126
36
6 *)
ppm
°f
*) factory setting
13
Water softener
Filling the salt reservoir.
The salt reservoir should be filled before the first use and when the “Salt” indicator lamp lights up. Use water softener reactivation salt (1 - 4 mm grain
size), as other salts may contain insoluble additives which can impair the
functioning of the softener.
The salt reservoir holds approx. 4 lbs
(2 kg) of salt.
Inadvertently filling the salt reservoir
with dishwashing detergent will
damage the water softener. Make
sure that only water softener reactivation salt of the proper grain size is
used.
Remove the lower basket.
Unscrew and remove the salt reservoir cap.
Before filling the salt reservoir for
the first time:
Fill the salt reservoir with approximately 2 quarts (2 l) of water.
Place the funnel (provided) over the
salt reservoir.
Carefully fill with salt. As it is filled,
water will run out.
Clean any excess salt from the
threads of the reservoir opening.
Screw the cap on firmly.
If the dishwasher will not be used immediately after reactivation, run the
RINSE & HOLD program. This will
remove any traces of salt from the
cabinet.
14
Water softener
Salt indicator.
Bypassing the Salt indicator lamp.
In order to bypass the salt indicator
lamp, you will need a screwdriver and
needle nose pliers.
Remove the salt reservoir cap.
Looking into the salt reservoir, you will
see the top of the float chamber on the
right hand side b.
When the salt reservoir is empty, the
“Salt” indicator lamp will light, notifying
you that the reservoir should be refilled
with reactivation salt.
After the reservoir has been filled, the
water softener is automatically reactivated the next time the dishwasher is
run.
The “Softener” indicator lamp illuminates during this process.
Note:
If the water used is very soft (below
4 gr/gal), the salt indicator lamp will
stay on. In this case the reservoir
should not be filled with salt. The indicator lamp will remain lit and should be
disregarded or bypassed.
The “Salt” indicator lamp has also been
designed for future program updates
(PC). See the “After Sales Service” section for further details.
Using a screwdriver, carefully pivot
the float chamber towards the center
of the reservoir.
Using the needle nose pliers, first
pull the cap c off of the float chamber, then remove the float d.
Replace the float chamber cap,
push the chamber back into its upright position, and replace the salt
reservoir cap. The indicator lamp
should now remain off.
15
Adding rinse aid
Adding rinse aid
The use of Rinse Aid is recommended
to prevent spotting on dishes and glassware that normally occurs during the
drying phase of automatic dishwashing.
Adding rinse aid.
Inadvertently filling the rinse aid
reservoir with detergent always
leads to damage to the reservoir.
Only pour rinse aid formulated for
residential dishwashers into the
reservoir.
Add Rinse Aid before the first use
and anytime the “Rinse Aid” indicator lamp comes on.
Press the button in the direction of
the arrow until the flap springs open.
16
Adding rinse aid
Setting the dosage.
Close the dishwasher door halfway
and pour liquid rinse aid into the storage container until it is visible on the
surface of the screen. Do not add
aid until the “Rinse aid” indicator
lamp comes on.
Only use rinse aid specifically
labeled for residential dishwashers.
Inadvertently using powder or liquid
detergents will damage the rinse
aid dispenser.
The dosage selector comes factory set
to 3. It can be adjusted from 1 to 6, depending on your requirements.
Use a higher setting if spots appear
on dry glassware.
If streaking appears on dishes or
glasses, use a lower setting.
Close the flap and wipe up any
spilled rinse aid. The flap will remain
closed during normal operation.
17
Loading the dishwasher
Loading the dishwasher
Load the dishes so that water can
contact all surfaces.
Do not place dishes and cutlery inside other pieces where they may be
concealed.
Hollow items such as cups and
glasses should be inverted and
placed in the upper basket.
Concave based items should be
placed at an angle on top of the coffee bar, (see page 21),so that water
can run off them freely.
Tall, narrow, hollow pieces should be
placed in the center of the basket,
rather than in the corners, to ensure
water coverage.
Small cups and glasses should be
placed on the cup racks. Taller mugs
and glasses can be placed underneath the rack.
Do not cover the funnel in the middle
of the upper basket.
The spray arms must not be blocked
by items which are too tall or hang
through the baskets. If in doubt, test
for free movement by manually rotating the spray arms.
Some food items may contain natural
dyes that can discolor plastic items
in the dishwasher ( e.g. carrots, tomatoes, ketchup, etc.). The stability
of plastic items is not affected by this
discoloration.
18
Some loading examples are shown on
the following pages.
Note
If the additional feature “Top Solo” has
been selected with a wash program, all
items must be loaded into the upper
basket and cutlery tray. See the “Additional features” section for further information.
In areas where the water has high
mineral content, it may be necessary to polish silverware after washing to achive a high shine.
Loading the dishwasher
Loading examples.
Cutlery tray.
The easily loaded cutlery tray ensures
thorough cleaning of cutlery and cooking utensils. In addition, the cutlery tray
insert is removable and can be carried
to a drawer or table for easy loading or
unloading, thereby eliminating much of
the handling of the cutlery.
Upper basket.
For small, lightweight, or delicate items
such as cups, saucers, glasses, dessert bowls, etc.
The plate inserts on the left and right
rear of the lower basket are removable.
To remove, push the handles of both inserts toward the inside of the basket.
Once removed, the open area can accommodate large pots, casserole
dishes, or accessory inserts (see “Accessories”).
Bottom basket.
For larger and heavier items such as
plates, serving platters and saucepans.
Glasses should only be placed in the
bottom basket if the special glassware
insert is used.
19
Loading the dishwasher
To make unloading easier, cutlery can
be grouped in zones, one for knives,
one for forks, etc.
Place the heads of cutlery with round
or oval handles in the holders. This will
secure them during the wash cycle.
Spoon heads should be placed so that
water can run off them freely.
Ensure that spoon heads are in contact
with at least one holder so they cannot
flip over and collect water.
Do not cover the opening in the
middle of the cutlery tray, and make
sure that the upper spray arm can
rotate freely after the tray is slid in;
otherwise the rotation of the spray
arms may be inadequate for a
thorough cleaning.
20
Loading the dishwasher
Adjustable cup racks.
Coffee bar.
To make room for tall glasses, raise the
rack upwards. Lower it to double stack
smaller items.
Place coffee mugs on top of the bar so
that they sit at a slant. This allows all
water to run off the base of the mug.
The bar can also be used as a separator between two rows of glasses keeping them from leaning against each
other. This protects the glasses and ensures good wash results. For wide
items, flip the bar over to the right.
21
Loading the dishwasher
Adjusting the upper basket.
(depending on model)
The upper basket height is adjustable.
If tall items of dishware are being
washed, more room can be obtained
by raising or lowering the upper basket.
Depending on the setting of the upper
basket, the following dishware dimensions can be accommodated:
Upper
basket
position
Top
Middle
Bottom
Pull out the upper basket and loosen
the two locknuts on either side of the
basket.
Adjust the basket up or down to the
desired height.
Tighten the locknuts.
The upper basket can also be set on
an angle, if required.
Do not set the angle to the extreme one side at the highest setting and
one side at the lowest, as this will
impede the function of the middle
spray arm.
22
Upper
basket
diameter
8"
(20.5 cm)
9"
(22.5 cm)
10"
(24.5 cm)
Lower
basket
diameter
12"
(30 cm)
11"
(28 cm)
10"
(26 cm)
Items not suitable for dishwashers
Items not suitable for dishwashers
– Cutlery with wooden handles.
– Wooden cutting boards.
– Glued items such as old knives with
handles that are glued together
around the shank of the blade.
– Hand made craft items.
– Copper or tin items.
– Plastic items which are not heat resistant.
Please note:
– Silver or aluminum items may suffer
some discoloration.
– Aluminum parts (eg. oven hood
grease filters) should not be cleaned
using commercial or industrial detergents. These high alkaline detergents may damage the machine,
and in extreme instances, cause explosive chemical reactions.
– Silverware previously cleaned with a
silver polish may be damp or
spotted at the end of a program
where water has adhered to the polish. This can be rubbed off with a
soft, dry cloth. Silver that has previously been cleaned in an immersion dip is usually dry at the end of a
program, but may discolor (tarnish).
– Colors on dishware that have been
painted over the glaze may fade
over time.
– Clouding may occur on glasses after
frequent washing.
Miele recommends:
Wash delicate glassware using the
ECONOMY program or the CHINA &
CRYSTAL program with a temperature of 45 °C/115 °F (if so equipped).
This will reduce the risk of clouding.
There are no standard guidelines for
washing glassware. When in doubt,
wash by hand.
When purchasing new dishes and
cutlery, make sure they are dishwasher safe.
23
Adding detergent
Adding detergent
Use only powder detergents formulated for residential dishwashers.
Do not use gels or liquid detergents.
Generally, filling the dispenser with
detergent will be sufficient to ensure
thorough cleaning. If dishes are extra
dirty, or if the soil has been allowed to
dry on the dishes before washing, a
program utilizing a prewash cycle
should be selected. In this case, extra
detergent can be added to the small
compartment labeled ( I ) in the center
of the dispenser.
Dishwasher detergents contain irritant and corrosive ingredients. They
can cause burns in the mouth and
throat if swallowed, or inhibit breathing. Keep children away from
detergent and from the dishwasher
when the door is open.
Press the latch on the detergent dispenser. The cover will spring open.
Fill the dispenser using the amount
of detergent recommended by the
detergent manufacturer.
To avoid the danger of children coming into contact with dishwasher
detergent, only fill the detergent dispenser immediately before starting
the program.
Capacities:
Compartment I (prewash) takes a maximum of 1 ounce (25 ml) and Compartment II (main wash) takes a maximum
of 3 ounces (80 ml) when completely
filled. There are horizontal marks to assist you in filling Compartment II. The
marks indicate a level of approximately
3/4, 1, and 1 1/4 ounces (20, 25 and
30 ml respectively).
Close the cover. The cover will always be open at the end of a wash
program (excluding the RINSE &
HOLD program).
24
Choosing a program
Choosing a program
The wash program chosen should depend on the type of dishes and the degree of soiling.
In most cases a NORMAL program will
give excellent results.
The available programs and some of
their applications are listed in the Program Chart on the next two pages.
“ENERGY SAVER” Program.
Use this program for lightly to normally soiled dishware.
A warm water intake (temperature of
the incoming water) of at least
45 °C/115 °F is necessary for this
program.
Water is not heated in this program.
Only 0,20 kWh of electricity (approx.) is
used during this cycle.
The drying result may not match that of
a program with a full drying cycle.
The higher the temperature of the intake water, the better the drying results.
Open the door of the dishwasher
2-3 inches (5-6 mm) at the end of the
program to speed the drying process.
25
Program chart
Program chart
Program
NORMAL
55 °C/130 °F
NORMAL
65 °C/150 °F
INTENSIVE
55 °C/130 °F
INTENSIVE
65 °C/150 °F
ENERGY SAVER
POTS & PANS
75 °C/170 °F
ECONOMY
55 °C/130 °F
CHINA & CRYSTAL
45 °C/115 °F
SHORT
45 °C/115 °F
RINSE & HOLD
When to use
Detergent
A1)
Compart- Compartment
ment
I
II
(Pre-wash)
(Main
wash)
Universal Programs
This program is for normal everyday loads.
Same as NORMAL 55 °C/130 °F, but at a
higher temperature for stubborn dried on
particles.
Same as NORMAL 55 °C/130 °F, but with a
preliminary pre-wash for heavy soiling.
Same as INTENSIVE 55 °C/130 °F, but at a
higher wash temperature for stubborn dried
on particles and lightly soiled pots and pans.
Special programs
Only select ENERGY SAVER if the dishwasher is connected to a hot water supply
(minimum temperature 45 °C/115 °F).
– see chapter "Choosing a program"
For pots, pans and dishware with dried on
particles of food and very heavy soiling.
For half a, normal everyday load, or:
for full loads with very light soiling (e.g.
coffee cups).
“Gentle program”, for lightly soiled and
heat sensitive tableware.
“Quick program”, for lightly soiled
dishware (e.g. party dishware).
For rinsing dishes when a complete cycle
is not needed.
20 %
80%
100 %
20 %
80 %
100 %
20 %
80 %
100 %
20 %
80 %
100 %
20 %
80 %
100 %
20 %
100 %
120 %
50 %3)
50 %3)
50 %3)
50 %3)
50 %3)
50 %3)
The dispensing method will depend on the type of detergent being used:
A 1) Use this method for:
– detergents which contain phosphates and chlorine.
Divide the total amount, as shown, between compartment I and compartment II.
B 2)
Use this method for:
– detergent which is chlorine and phosphate free.
– detergent which is chlorine free but contains phosphates.
In this instance the whole amount is placed in compartment II.
3) Use half of the manufacturers recommended amount of detergent.
26
B2)
Compartment
II
(Main
wash)
Program cycle
1.
2.
Prelimi- Pre-wash
nary prewash
USAGE
Electric (kWh)
Water
Main
wash
Interim
rinse
Final
rinse
Drying
Water hot
(49 °C /
120 °F)
Liters/
Gallons 4)
X
X
X
X
X
0.9
19/5.0
X
X
X
X
X
1.13
19/5.0
X
X
X
X
X
X
0.89
24/6.3
X
X
X
X
X
X
0.98
24/6.3
X
X
X
X
X
X
0.20
24/6.3
X
X
X
X
X
1.13
19/5.0
X
X
X
X
0.75 5)
14/3.7
X
X
X
X
0.47
19/5.0
X
X
X
0.56
14/3.7
0.06
5/1.3
X
X
4) Average consumption values are for a water hardness of up to 17 gr/gal.
5) With half loads (7 place settings).
X = cycle used
27
Operating the dishwasher.
Operating the dishwasher.
Turning on.
Close the door.
Open the water valve (if it is closed).
Press the “ON/OFF”-button (14).
When the program and temperature selector knob (21) is in the “STOP” position, a dot will light up in the display
field (17).
Starting a program.
Turn the program and temperature
selector knob (21) clockwise or
counterclockwise to the desired program.
The length of the selected program appears in hours and minutes in the Time
display (17).
At the same time the indicator lamp
next to the “START”-button (18) illuminates.
Before starting the program, additional features “Delay start” or “Top
Solo” can be selected (see “Additional features” on page 30).
Press the “START” -button (18).
The indicator lamp next to the “START”button will go out, and the program will
start.
28
Note.
The time displayed may vary using the
same program. When the dishwasher
is turned on, it will display a Wash time
calculated using a water supply temperature of 60 °F/15 °C. (the temperature used for factory testing).
With subsequent programs the dishwasher will recalculate the time according to actual conditions. The most current value will then be displayed the
next time the dishwasher is turned on.
The time remaining is displayed as the
program progresses.
To prevent children from coming
into contact with detergent, only
place it in the dispenser immediately before starting the program.
Program end
The program has finished when no indicator lamps are illuminated and a “0”
appears in the display. the dishwasher
can now be unloaded.
If the dishwasher door remains closed,
the drying fan will continue to operate
for a few additional minutes to help
dissipate any remaining moisture.
Operating the dishwasher.
Turning off.
At the end of a program:
Turn the program selector knob to
the “STOP” position.
If any appliance will not be used for an
extended period (e.g. while on vacation), it is recommended that the water
supply valve be shut off.
Your Miele dishwasher is designed
to shut off the water flow and drain
the machine in the rare event of a
valve failure. In order for this function to be active, the door must be
shut, the machine must be “ON”,
and the Program knob must be in
the “STOP” position.
Sequence indicator (20).
Once a program has started, the sequence indicator lamps (20) show the
actual program stage reached by the
dishwasher.
Note:
When required, the water softener
reactivation process is performed
before the wash program. It may
last several minutes and occurs in
intervals.
During this process only the “Softener” indicator will be on.
The hardness of the water supply will
dictate how often (after how many
washes) the water softener needs to be
reactivated. For example, with a water
hardness of 21 gr/gal, reactivation will
take place after every 3 programs. With
a water hardness of 8 gr/gal, reactivation
will only take place after 11 programs.
Interrupting a program.
A program can be interrupted by opening the door.
If the door is then closed, the program
will continue from the point it was at before the door was opened.
Warning!
The water in the dishwasher may
be hot, and steam may be present!
Only open the door if absolutely
necessary and exercise extreme
caution when doing so. The danger
of burns and scalding exists.
Once the door has been opened,
allow 20-30 seconds for the internal temperature to equalize before
closing it again, and make sure it
clicks into place.
Changing a program.
A program can be changed at any
time. The new program will start as
soon as it has been selected.
Turn the program selector knob to
the desired program.
If you wish to start the new program at
its beginning:
Turn the program selector knob to
“STOP”,
(a point will appear in the display
field).
Select the new program and press
“START”.
It may be necessary to add additional
detergent, depending on where the
original program was interrupted.
29
Additional features
Additional features
Delay start (18).
The starting time of a program can be
delayed up to 9 hours and 30 minutes
(in 30 minute increments), in order to
take advantage of off peak utility rates
that exist in some areas. To set a Delay
time:
Select a program.
The length of the program is displayed
(17) in minutes and seconds.
Press the “Delay start” (18) button
once for every 30 minutes of delay
desired.
The program length displayed will now
change to a display of the Delay time,
also in hours and minutes. The “Delay
start” indicator lamp will illuminate.
30
Press the “START” button (18).
The dishwasher counts down the
minutes of the chosen delay, then
starts the program automatically.
Once started, the display will show the
time remaining in the wash program.
Example:
Press “Delay start” once for a 30
minute delay.
30 (mins) is displayed.
Press “Delay start” twice for a 1 hour
delay.
1.00 is displayed (1 hr. 00min.)
To prevent the detergent form prematurely dissolving when using the
“Delay Start” feature, make certain
that the dispenser is dry before putting in detergent.
Additional features
Top Solo (18).
When this feature is selected, the majority of the water is directed to the top
and middle spray arms of the dishwasher. Its use is recommended when
all the dishes or cutlery needing cleaning can be loaded into the upper basket and cutlery tray.
Note:
Lightly soiled plates or serving platters
can still be placed in the bottom basket
if large spaces are left between them.
Do not place dishes, bowls or other hollow containers in the bottom basket.
Adjusting the upper basket to its lowest
position will allow it to accommodate
larger plates.
“Top Solo” can be selected with all
wash programs.
Choose a program.
The length of the program will appear
in the time display (17) in hours and
minutes.
Press the “Top Solo” button (18). The
“Top Solo” indicator lamp illuminates,
and the program duration changes.
Press the “START” button (18).
The “START” indicator lamp goes out
and the program starts.
Using “Top Solo” will also save water,
detergent and energy.
For example, using Top Solo with the
NORMAL 55°C/130°F program uses
3.2 gallons (12 liters) of water instead
of the usual 5 gallons (19 liters).
Because smaller amounts of dishware
are being washed, the amount of detergent used can be reduced accordingly.
31
Unloading the dishwasher
Unloading the dishwasher
Dishes tend to break and chip easier
when they are hot. Allow the dishes
to cool until they are comfortable
enough to handle before unloading
them.
If the door is opened at the completion of the drying cycle, the dishes
will cool much faster.
Unload the lower basket first, then
the upper basket and cutlery tray (if
so equipped). This will prevent water
drops from the upper basket or cutlery tray from falling onto the dishes
in the lower basket.
32
Cleaning and care
Cleaning and care
Cleaning the filters in the wash
cabinet.
The combination filter in the base of
the wash cabinet should be regularly inspected and cleaned as
necessary. Any broken glass or
dishware should be removed immediately upon discovery.
Use caution when cleaning the filters, non-return valve or drain
pump, as glass or bone splinters
may be caught in the bottom of the
wash cabinet.
Turn the handle counterclockwise to
release the filters.
Lift the combination filter out of the
machine. Remove any coarse particles and rinse it under running
water. A nylon brush can be used, if
necessary.
33
Cleaning and care
Turn the combination filter over and
open the coarse filter cover by pulling back on the locking tab.
After cleaning, make sure that the
coarse filter cover is properly locked
in place.
34
Replace the combination filter so
that it lies flat in the base of the wash
cabinet. Secure it by turning the
handle clockwise.
Cleaning and care
Cleaning the spray arms.
On rare occasions particles of food
may get stuck in the spray arm jets.
They can be easily cleaned as follows:
Remove the lower basket and the
cutlery tray (if so equipped). The cutlery tray frame can be pushed back
in.
Unscrew and remove the upper
spray arm.
Lift up on the lower spray arm to
remove it.
To remove the middle spray arm located beneath the upper basket,
gently push upwards until it engages
in the ratchet b, then unscrew it c.
To clean the spray arms, use a
pointed object to push the the food
particles into the jets.
Rinse under running water to complete the process.
After cleaning, replace the spray
arms.
Important:
After replacing the spray arms,
check that they rotate freely.
35
Cleaning and care
Cleaning the drain pump and non-return valve.
Use caution when cleaning the filters, non-return valve or drain
pump, as glass or bone splinters
may be caught in the bottom of the
wash cabinet.
If the water in the dishwasher is not
completely drained at the end of a program, the drain pump or non-return
valve may be blocked. To clean them:
Remove the combination filter.
Tilt the locking clamp to the side and
pull out the non-return valve.
Rinse the non-return valve under running water.
The drain pump is situated under the
non-return valve (see arrow).
Before replacing the non-return
valve, check to make sure that nothing is obstructing the drain pump.
Carefully replace the non-return
valve and secure it with the locking
clamp.
Replace and secure the combination
filter.
36
Cleaning and care
Cleaning the water inlet filter.
The water valve housing on the inlet
hose contains electrical components and should not be immersed,
or run through water.
Cleaning the filter.
Disconnect the dishwasher from the
electrical supply (unplug it or shut off
the circuit breaker).
A filter is incorporated in the inlet hose
that is attached to the dishwasher’s
main shutoff valve. If your water supply
is hard, or the pipes contain sediment;
this filter may clog and prevent sufficient water from entering the wash
cabinet. It can be cleaned as follows:
Turn off the main shutoff valve and
unscrew the inlet hose.
Carefully remove the rubber seal.
Remove the filter using needle nose
pliers and clean it by rinsing under
running water.
Replace the filter and seal. Make
sure they are seated correctly.
Screw the inlet hose back onto the
water valve, making certain it is not
cross-threaded.
Slowly turn on the valve and test for
leaks.
37
Cleaning and care
Installing an in-line water filter.
If your water supply contains a large
number of insoluble substances, we recommend installing a filter between the
valve and the inlet hose connection.
These filters can be obtained from the
Miele Parts Department.
Cleaning the control panel.
The control panel can be cleaned
using a damp cloth and mild detergent.
Do not use abrasive, all purpose, or
glass cleaners, as their use may
damage plastic surfaces.
Cleaning the door panel.
Plastic laminate panels should be
cleaned using a suitable, non-abrasive cleaning agent, or mild soapy
water.
Panels made from wood should be
cleaned using a soft damp cloth and
an appropriate wood cleaner.
38
Problem solving guide
Problem solving guide
With the aid of the following guide,
minor problems can be easily corrected. If you are unable to correct the
problem, please contact the Miele Service Department.
Any work on the electrical components of the appliance should only
be performed by a qualified and
trained person in accordance with
local and national regulations. Unauthorized or incorrect repairs
could cause personal injury or damage the machine.
Problems/possible causes.
The dishwasher does not start.
– The door is not properly closed.
– The plug is not properly inserted.
– The circuit breaker is defective or
has tripped.
If the lines are still displayed, call the
Miele Service Department.
The “Spray arm” indicator lamp
flashes.
– The middle spray arm is obstructed
by an item in the basket.
– The spray arm jets are blocked - see
“Cleaning and care”.
– The opening in the center of the cutlery tray is covered, restricting the
flow of water to the middle spray arm.
Shortly after starting a program the
“Water Intake” indicator lamp
flashes.
– The water shutoff valve is closed.
– The water intake filter is clogged see “Cleaning and care”.
– Too little water may be entering the
machine. This may be due to insufficient water pressure.
The wash cycle finishes too early
and the “Drain” indicator lamp
flashes.
– The drain hose is kinked.
– The drain pump is blocked – see
“Cleaning and care”.
The wash cycle finishes too early
and three horizontal lines “---” appear in the time display.
Press the “ON-OFF” button to turn
the machine off. After 5 seconds turn
it on again. Select a program and
start the machine.
39
Problem solving guide
The dishes are not clean.
– The dishes are incorrectly loaded.
– The correct amount of detergent was
not used - see “Program chart”.
– The filters in the wash cabinet are
not clean, or the spray arm jets are
blocked - see “Cleaning and care”.
– The wrong program was selected –
see “Program chart”.
White residue is visible on cutlery
and dishware.
– No salt in the salt reservoir.
– Salt reservoir lid has not been
screwed on properly.
– Not enough rinse aid was used.
Water remains in the dishwasher at
the end of a program.
– The drain hose is kinked or clogged.
– The drain pump or non-return valve
may be blocked - see “Cleaning and
care”.
40
The “Water Intake” indicator lights
during the “ENERGY SAVER” program.
The “ENERGY SAVER” program requires a water supply temperature of at
least 45 °C/115 °F. If the incoming
water is less than this temperature, the
“Water Intake” lamp illuminates (see
also “Program selection”). If your hot
water system has been used recently,
not enough hot water may have been
available to adequately clean the
dishes.
If necessary, repeat the program.
If the “Water Intake” lamp lights again,
select a different program.
After sales service
After sales service
Should you still have difficulties,
please contact:
– your Miele Dealer or
– the Miele Service Department. (See
back cover for addresses).
Please have the model number of your
appliance available. This information
can be found on the data plate on the
upper edge of the door.
Program update function - PC
The Salt indicator lamp has a second
function: It allows a technician with the
proper equipment to access the programming of the dishwasher to take advantage of the latest technological developments.
For instance, if a detergent that gives
good wash results using only cold
water becomes available, the wash programs can be changed to take advantage of this development to help reduce
your energy costs.
41
Accessories
Accessories
Bottle holder.
(depending on model)
A bottle holder (for milk or baby bottles)
is available for use in the lower basket.
To achieve the proper cleaning results,
the bottle holder should only be placed
in the positions marked with white. Do
not place them in the X marked positions.
Glass insert for the bottom basket:
provides the ability to safely wash
glasses in the bottom basket.
(Only available for models with removable inserts in the lower basket.)
Glass insert for the upper basket:
provides special support for long
stemmed glassware.
42
Dishwasher installation
Dishwasher installation
The “i” model dishwasher is specially
designed for installation under a continuous countertop.
A panel can be custom made for installation on the front of the dishwasher, assuring a perfect match with the kitchen
cabinetry.
If a standard non-cabinet matching
dishwasher installation is desired, the
“i” model dishwasher can be converted
into a “U” model through the addition of
a GDU 60/65 decor set. The decor set
comes supplied with separate installation instructions.
1. Install the steam deflector,
(if applicable).
A stainless steel plate is supplied to
protect the underside of the countertop
against steam rising from the dishwasher when the door is opened. If the
countertop is made of Corian®, granite, marble or other solid, waterproof
material, the steam deflector should not
be used.
To ensure stability, these dishwashers should only be installed
under a continuous countertop
which is securely fastened to the
cabinet base units.
Dimensions:
Squeeze a bead of sealant from the
supplied tube into the angle formed
by the curved edge b of the coverplate.
Align the plate c with the lower front
edge of the countertop (see illustration) and use the supplied tacks to
nail it into place.
1) with
2) with
35"
33 1/8"
(890 mm) machine height
(840 mm) machine height
On countertops with wood or laminate edging, the tacks should be
nailed through the rear holes of the
plate.
Range of adjustment is approximately
2" (5 cm).
43
Dishwasher installation
2. Install the dishwasher under
the countertop.
It is preferable to install the main water
and electric supplies so that they can
be accessed through an adjacent
cabinet, rather than situating them behind the machine. See the “Plumbing”
and “Electrical” sections for proper connection procedures before continuing.
Place the slides, with the ratchet at
the rear, onto the dishwasher legs.
Unscrew the legs to raise the machine to within 1/4" (5 mm) of the
underside of the countertop, and
check that the machine is level,
before sliding it into its opening.
Certain steps in the installation procedures require that the dishwasher be
pulled out of its opening. For this reason, perform the plumbing and electrical connections after the machine has
been levelled and the front panel has
been mounted.
Install the slides.
Two slides are included and should be
installed on the feet of the dishwasher
before the machine is pushed under
the countertop. This will allow the machine to slide easier, protect the floor,
and allow adjustment of the rear leveling legs from the front of the machine.
44
Push the machine into the opening,
making sure the electrical cable and
hoses can reach their connection
points without being kinked.
Dishwasher installation
Adjust the rear leveling legs to the required height.
To raise the machine - turn clockwise.
To lower the machine - turn counterclockwise.
Several turns may be needed to set the
correct height.
Adjust the front leveling legs by pushing on the foot with a slotted screwdriver.
Tipping the machine slightly, if
possible, will make adjusting the front
legs easier. Make sure the machine is
level when adjustments are complete.
The dishwasher should be raised until it
just touches the underside of the countertop.
45
Dishwasher installation
3. Installing the control panel.
The control panel and hardware is
packaged separately from the dishwasher. It should be installed using the
following procedure.
If the GDU decor set is being used,
(to convert an “i” dishwasher to a “U”
version), the spacer bars i must first
be removed and stored for possible
use in the future, (See the separate instructions for installing the GDU
decor set). If the GDU kit is not being
used, skip the following step.
point near the bottom of the control
panel. This will release the mounting
bolts from their slots.
Install the necessary spacer bars i
on the control panel.
Place the seal b onto the ventilation
grill. c
Push the ventilation grill c into the
metal backing plate.
Place the covers d over the pushbutton switches.
Install the adapter disc e.
Position the control panel f over the
backing plate and fasten it from the
inside of the doorg using the six
screws provided.
Align and press the program knob
onto its shaft h.
To remove the spacer bars from the
control panel, place the panel on a
table, printed side up, and gently
push down on the spacer bars at a
46
Dishwasher installation
4. Aligning the control panel
with the drawer fronts.
The control panel can be aligned
with the drawer fronts of the kitchen
cabinets by adjusting the spacer
bars.
5. Installing the custom
door panel.
A custom door panel matching the kitchen cabinetry can be installed on the
dishwasher by using the provided
bracket.
Length: 21" - 25 3/4" (53.3 - 65.4 cm)
Width:
23 1/2" (59.8 cm)
Note: The maximum panel length is
only applicable when no spacer bars
are used.
If a Stainless Steel panel is being used,
please follow the separate installation
instructions included with the panel.
After panel installation, see Step 6 “Adjusting the door springs”.
Proceed as follows:
Using an 8 mm socket, turn the nut
clockwise or counterclockwise until
the spacers reach the required
height.
If necessary, individual (or all)
spacer bars can be removed.
Adjustment range:
from 4 1/2" (112 mm) (control panel
without spacer bars)
to 5 3/4" (145 mm) (control panel with
four spacer bars).
In special circumstances a fifth spacer
bar (optional accessory) can be used to
increase the panel height to 6" (154 mm).
After adjusting the control panel
height, cut off the plastic screw excess.
Measure the distance (X) between
the lower mounting hole on the dishwasher front door (see inset arrow)
and the lower edge of the neighboring cabinet door.
47
Dishwasher installation
Attach the bracket to the panel using
the 4 screws provided.
Double check the location of the
bracket before mounting the panel to
the dishwasher.
Attaching the panel.
Place the door panel on a flat surface, good side face down, taking
care not to scratch the surface.
Make certain that the bottom of the
panel is closest to you.
Using a pencil, lightly draw a centerline from top to bottom.
Using the previous measurement,
draw a horizontal line “X” inches
above the bottom of the panel.
Important: Make certain the line drawn
using measurement “X” is located at
what will be the bottom of the panel
when it is attached to the dishwasher.
The mounting bracket is marked in
the middle A. Lay the bracket on the
rear side of the door front so that the
mark A in the middle of the bracket
aligns with the vertical guide line,
and the lower holes of the bracket
are centrally positioned in the horizontal guide line (see illustration).
Use strips of adhesive tape to hold
the bracket in this position.
Mark and drill pilot holes for the
screws using a 3/32" (2.5 mm) drill bit.
48
Pull the dishwasher out from under
the countertop about 4" (10 cm).
If the dishwasher is installed at the
end of the kitchen cabinets: Pull the
machine out as far as is necessary
to reach the 4 locking screws located on the edge of the door.
Attach the panel to the dishwasher
by aligning the bracket tabs with the
slots on the door.
Straighten the panel and lock it into
place by tightening the 2 locking
screws on each edge of the door.
Use the provided caps to plug the
locking screw access holes.
Push the dishwasher back under the
countertop, and proceed to Step 6,
“Adjusting the door springs”.
Dishwasher installation
6. Adjusting the door springs.
The door springs are adjusted correctly
when a half opened door remains in
that position when released.
If the door drops down, the springs
need to be tightened.
If the door closes, the springs need to
be loosened.
7. Securing the dishwasher
to the countertop.
To ensure the stability of the dishwasher, it must be attached to the
countertop after it has been positioned.
The adjusting screw is located in the
upper front strip, on the left hand side
of the dishwasher.
Open the dishwasher door.
Using the screws provided, fasten
the dishwasher to the countertop
through the two holes located on the
upper rim.
Open the dishwasher door.
Adjust the door springs to the correct balance:
– turn clockwise to tightened
– turn counterclockwise to loosen.
The weight of the machine must be
supported by the legs, not the
countertop fastening screws. If
securing the top takes the weight
off of the legs, extend the legs
further until they are tight against
the floor.
Do not drill any additional holes
through any portion of the wash
cabinet. If in doubt about how to secure the dishwasher, please call the
Miele Service Department.
49
Dishwasher installation
If the edge of the countertop is too narrow, or the machine is being installed
under a cut out area, use the securing
bracket provided.
Pull the dishwasher out from under
the countertop about 4" (10 cm).
Position the securing bracket.
Push the dishwasher back into the
opening, and secure it through the
hole in the bracket.
For Corian® or granite countertops,
fasten the dishwasher to the adjacent
cabinets as follows:
For openings greater than 23 5/8"
(60 cm) wide:
Pull the dishwasher 4" (10 cm) out of
its opening.
Insert the tab of each optional mounting bracket into the guide hole on
top of the dishwasher, and then
swing it to the right or left as required.
Push the dishwasher back into its opening, align and fasten it to the adjacent
cabinets using 2 screws for each
bracket.
50
Dishwasher installation
For openings 23 5/8" (60 cm) wide:
Open the dishwasher door and
remove the caps covering the mounting holes on the outer edge of the
wash chamber.
8. Installing the toekick.
For kitchens utilizing one continuous
toekick
To prevent damaging the front
panel, and before installing the toekick, measurements must be taken
to ensure that the toekick will not interfere with the complete opening of
the dishwasher door.
Fasten the dishwasher to the adjacent cabinets using the supplied
screws and bushings. Make sure a
bushing is placed over the screw before inserting it into its mounting hole.
Tighten the screws and replace the
caps.
The side mounting holes should
only be used for securing the
dishwasher if the opening is
23 5/8" (60 cm) wide. Use of this
method on larger openings will
damage the machine and cause
leaks.
The panel overhang (P), and toekick
depth of recess (R), determine the maximum dishwasher toekick height (H).
If the panel contacts the toekick while
the dishwasher door is being opened,
the dishwasher toekick must be cut
shorter or recessed deeper.
If (H) is equal to or less than the toekick
height of the adjoining cabinetry, no interference will exist, provided that (R) is
at least 3/4".
Note: If a decorative or flush mount toekick is desired, and (R) is less than
3/4", other modifications, such as beveling the top rear edge of the toekick,
may be adequate.
51
Dishwasher installation
For kitchens utilizing a non-continuous
toekick
Adjusting the toekick recess.
The included toekick will fit without
modification when:
– The machine is set to its maximum
height (legs fully extended), and
– the toekick is recessed as far as
possible (4 ").
If the machine height is less than maximum, or if the toekick is recessed less
than 4 ", the toekick must be shortened
(see following page).
After installation, carefully open the
dishwasher door to check that the
front panel does not hit the toekick.
If it does, remove the toekick and trim
it accordingly.
52
To adjust the depth (recess) of the
toekick, release the tension on the
spring clips as shown, and push the
mounting brackets in as far as
possible.
Dishwasher installation
Trimming the toeckick
The rear of the toekick has two cutting
lines.
Carefully open the dishwasher door
until it hits the toekick.
Using the front lower edge of the
door panel as a guide, draw a line
across the toekick.
Unscrew and remove the toekick.
If one of the cutting lines is close to
the line just drawn, score the front of
the toekick, and snap off the excess,
or, trim the toekick along the line
using a saw.
Screw the toekick back onto the
brackets, with the cut edge at the
bottom.
Screw the toekick onto the installed
brackets, with the cutting lines towards the top, and pull out evenly
until it aligns with the toekick of the
adjoining cabinets.
If the dishwasher door does not open
completely, the toekick may need further trimming.
The toekick cannot be pushed back
in. It must be unscrewed, so that the
tension on the spring clips can be
released. The brackets can then be
pushed in, and the toekick re-attached.
53
Electrical connection
Electrical connection
It is the responsibility and obligation
of the customer to ensure that the
electrical and plumbing installation
is carried out by a qualified installer
in compliance with national and
local codes and ordinances.
Disconnect the appliance from the
power supply before servicing the machine by pulling the plug or turning off
the circuit breaker.
Specifications.
Power Supply: 120 VAC, 60 Hz
Rated Load:
12.5 A / 1500 W
Circuit breaker:15 AMPS
The unit is equipped with a 5 ft (1.5 m)
power supply cord for connection to a
120 V, 15 AMP grounded receptacle.
Using an outlet:
It is recommended that the power
outlet for the appliance be installed
in a cabinet or on a wall adjacent to
the undercounter space in which the
appliance itself will be located. An
opening through the partition between the compartments of 1" to
1 1/2" (3 to 4 cm) can be made to
allow the plug to pass through.
Make certain that there are no rough
edges that could damage the power
cord. If metal cabinets are used,
place the supplied rubber grommet
around the edge of the opening before passing the cable through.
54
Exercise care when pulling the dishwasher in or out, so as not to damage the power cord or hoses.
GROUNDING INSTRUCTIONS.
THIS APPLIANCE MUST BE
PROPERLY GROUNDED.
In the event of a malfunction, grounding reduces the risk of electric shock
by providing a path of least resistance
for the electric current. This appliance
is equipped with a cord that has a
grounding conductor and plug. The
plug must be connected to an appropriate outlet that has been installed and
grounded in accordance with all local
and national codes and regulations.
DANGER - Improper installation
of the electrical outlet or improper grounding can result in
the risk of electric shock. Check
with a qualified electrician if you
are in doubt as to whether the appliance is properly grounded. Do
not modify the plug provided with
the appliance. If it will not fit the
outlet, have the correct outlet installed by a qualified electrician.
Electrical connection
Permanent Connection (Hard Wiring).
For hard wiring, the power cord must
be disconnected from the terminal box
located at the lower left front of the dishwasher, behind the toekick and service
panel. Pass the permanent power supply cable through the strain relief and
secure it to the terminal box.
Connect:
L1
(Black) to L on terminal block
N
(White) to N on terminal block
GRND To ground connector
GROUNDING INSTRUCTIONS.
THIS APPLIANCE MUST BE
PROPERLY GROUNDED.
Warning.
Hardwiring the dishwasher
should only be done if required
by local electrical codes, and
then in a manner consistent with
those codes. Do not cut the plug
off the power supply cord and
connect it directly to the house
wiring.
55
Plumbing
Plumbing
It is the responsibility and obligation
of the customer to ensure that the
electrical and plumbing installation
is carried out by a qualified installer
in compliance with national and
local codes and ordinances.
Hot water connection.
New plumbing:
All dishwashers that carry the following
blue and white sticker are designed to
shut off the water and drain the wash
chamber in the rare event of an internal
water valve failure.
In order for this function to be active,
the door must be shut, the machine
must be “ON”, and the Program knob
must be in the “STOP” position.
Hot water supply specifications:
Recommended temperature: 120°F
(49°C)
Maximum temperature: 140°F (60°C)
Water pressure: 14.5 - 145 psi
(0.3 - 10 bar)
An air gap is built into the water inlet
system to prevent potable water mixing
with waste water.
56
The water inlet hose comes equipped
with a 3/4" female hose thread connector. This can be directly connected to a
shut off valve with 3/4" male hose
thread ends.
It is preferable that the hose assembly be installed vertically so the hose
exits from the bottom of the valve
box.
If this is not possible, it can be installed
hoizontally, provided the hose exit remains beneath the main body of the
box (see illustration). (The “lightning
bolt” should be above the “arrow” when
the installation is complete).The valve
box should also be installed so that it is
at least 8" (24 cm) above the floor (or
base of the cabinet), and so the excess
coiled hose will remain lower than the
box at all points.
A 2" x 4" (60 x 115 mm) cutout in either
the side or bottom of the cabinet adjoining the dishwasher is necessary if the
valve box needs to be passed through.
Plumbing
The water pressure must be between
4.5 and 145 psi (0.3 and 10 bar).
If the water pressure is too low the machine may not take in enough water in
the alloted time and the “Water Intake” indicator lamp will flash. If this occurs, the
water intake time can be increased (see
“Problem solving guide”).
If the water pressure is too high, a pressure reducer must be installed.
Existing plumbing:
Do not, under any circumstances,
cut the intake hose. If the hose is
cut, the dishwasher will not work,
you will have a water leak and you
could be injured. If the hose is too
long, coil it neatly and place it behind the machine.
If the standard 3/8" copper plumbing for
a dishwasher already exists with a compression fitting and valve as pictured:
Cut the 3/8" copper tubing after the
valve.
Install the 3/8" compression to 3/4"
MHT (Male Hose Thread) adapter
(supplied with the machine), as illustrated.
Connect the inlet hose to the existing
valve/adapter assembly.
Electrical wiring and components
should not come into contact with
any plumbing fixtures or hoses.
57
Plumbing
Drain system specifications:
Drain connection:
The machine comes equipped with:
– A 5 ft. long (1.5 m) flexible drain
hose with an internal diameter of 7/8"
(22 mm).
– A built-in swivel connector which
allows the drain hose to be routed in
any direction.
– A built in non-return valve on the discharge side to prevent waste water
from flowing back into the dishwasher.
– A built-in odor trap on the discharge
side to prevent odors from entering
the kitchen.
Maximum drain height: 3 ft (1 m)
D = 24 " (60 cm) (nominal)
Connect the supplied drain hose to the
drain pipe of the kitchen sink either:
Maximum drain hose length: 12 ft (3.5 m)
A - above the trap using the clamp provided, or
Do not shorten the drain hose.
B - to the dishwasher connector of the
garbage disposal.
Electrical wiring and components
should not come into contact with
any plumbing fixtures or hoses.
IMPORTANT:
The dishwasher should be connected directly to the drain line.
When connecting the drain hose to
the garbage disposal, make sure to
remove the knockout from the connection nipple. (See disposal manufacturers instructions for this procedure.)
A sample of a correct water and drain
installation of a dishwasher is shown.
A hose that attaches to a sink spray
can burst if it is installed on the
same water line as the dishwasher.
If your sink has one, it is recommended that the hose be disconnected and the hole plugged.
58
Plumbing
Venting the drainage system
Additional note.
Only if the dishwasher drain hose is
connected to a floor drain or to a
drain pipe that is below the level of
the lower baskets wheels, the drain
must be vented; otherwise the water inside of the dishwasher may siphon out
during the course of a wash program.
Since all Miele dishwashers are
equipped with an odor trap and non-return valve, the drain hose can be connected directly to the drain pipe as illustrated.
Vent the drain:
Open the dishwasher door.
If plumbing codes require an external
air gap on the discharge side of the
dishwasher, the following requirements
must be met:
– No part of the drain hose should be
higher than 39" (1 mm).
– If installed horizontally, the drain
hose can be up to 12 ft. (3.5 m) long.
If the drain hose is angled upwards
in any way, it cannot be longer than
5 ft. (1.5 m).
– The drain connection should be
made as close as possible to the
dishwasher.
– The internal diameter (7/8" or 22 mm)
of the drain hose should not be reduced at any point.
Cut off the vent cap located at the
right rear of the dishwasher, behind
the filters, as illustrated
59
Technical Data
Technical Data
Height
33 1/8" (84 cm) adjustable to 35" (89 cm)
Width
23 1/2 " (59.8 cm)
Width of opening
23 5/8" (60 cm)
Depth
22 1/2" (57 cm) U and i models
Depth with door open
47 1/2" (120.5 cm) U and i models
Voltage
110/120 V AC
Rated load
12.5 A / 1500 W
Fuse rating
15 A
Water pressure
4.5 - 145 psi (0,3 - 10 bar)
Hot water connection
120°F (49°C ) (max 140°F (60°C))
Drain height
3 ft (1 m) maximum
Drain length
12 ft (3.5 m) maximum
Power cord length
approx. 5 ft (1.5 m)
60
61
62
63
Alteration rights reserved (G885) /000
These instructions are printed on 100% recycled paper and are completely Biodegradable.
0697