1
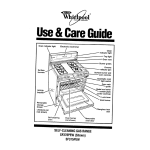
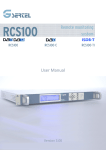
INSTRUCTION BOOK
MINI SYSTEM DIGITAL AM/FM 5 CD CHANGER
DUAL CASSETTE RECORDER
WITH TURNTABLE AND REMOTE CONTROL
MODEL: MX5510
BEFORE OPERATING THIS PRODUCT,
PLEASE READ THESE INSTRUCTIONS COMPLETELY
This symbol indicates that dangerous voltage constituting a risk of electric shock is
C A U IT IO N
present within this unit.
DO NOT OPEN
CAUTION: TO PREVENT THE RISK OF ELECTRIC
This symbol indicates that there are important operating and maintenance instructions
SHOCK, DO NOT REMOVE COVER (OR BACK).
NO USER-SERVICEABLE PARTS INSIDE.
REFER SERVICING TO QUALIFIED SERVICE PERSONNEL.
in the literature accompanying this unit.
WARNING: UNAUTHORIZED RECORDING OF COPYRIGHTED
MATERIAL MAY VIOLATE APPLICABLE COPYRIGHT LAWS,
MANUFACTURER ASSUMES NO RESPONSIBILITY FOR UNAUTHORIZED DUPLICATION, USE OR OTHER ACTS WHICH
INFRINGE UPON THE RIGHT S OF COPYRIGHT OWNERS.
WARNING: TO PREVENT FIR OR SHOCK HAZARD, DO
NOT EXPOSE THIS APPLIANCE TO RAIN OR MOISTURE.
Explanation of Symbols
This symbol is intended to alert the user of
the presence of
important operating
and maintenance
(servicing) instructions in the literature
accompanying the
appliance.
This symbol is intended to
alert the user of the
presence of uninsulated
''dangerous voltage'' within
the product encasement
that may be of sufficient
magnirude to constitute a
risk of electric shock to
persons.
WARNING
To prevent fire or shock hazard, do not expose this appliance to rain or moisture.
If this happens, make sure
the power to the electrical
outlet is turned off before.
SAFETY CERTIFICATION
This unit is made and tested to meet exacting safety standards.
It meets UL and FCC requirements and complies with safety
performance standards of the U.S Department of Health and
Human Services.
CAUTION - USE OF CONTROLS OR ADJUSTMENTS OR PERFORMANCE OF PROCEDURES OTHER THAN THOSE SPECIFIED
HEREIN MAY RESULT IN HAZARDOUS RADIATION EXPOSURE.
THIS UNIT SHOULD NOT BE ADJUSTED OR REPAIRED BY ANYONE EXCEPT PROPERLY QUALIFIED SERVICE PERSONNEL.
FCC INFORMATION
For CD player section:
This device complies with Part 15 of the FCC Rules.
Operation is subject to the following two conditions:
(1) This device may not cause harmful interference, and (2) this device must accept any interference received, including
interference that may cause undesired operation.
NOTE:
This equipment has been tested and found to comply with the limits for a Class B digital device, pursuant to Part 15 of the
FOC Rules. These limits are designed to provide reasonable protection against harmful interference in a residential
installation. This equipment generates, uses and can radiate radio frequency energy and, If not installed and used in
'
accordance with the Installed and used in accordance with the Instructions, may cause
harmful interference to radio
communications. However, there is no guarantee that interference will not occur in a particular installation. If this
equipment does cause harmful interference to radio or television reception, which can be determined by turning the
equipment off and on, the user is encouraged to try to correct the interference by one or more of the following measures:
Relocate the receiving antenna.
Increase the separation between the equipment and receiver.
Connect the equipment into outlet on a circuit different from that to which the receiver is connected.
Consult the dealer or an experienced radio/TV technician for help.
1.Read Instructions - All the safety and
operating instructions should be read
before the appliance is operated.
2.Retain Instructions - The safety and
operating instructions should be
retained for future reference.
3.Heed Warning - All warnings on the
appliance and in the operating instructions should be followed.
Safety Instructions
Do not operate the unit from any power
scurce except that indicated on the
stereo or in the owner 's manual.
Do not install the unit near or over a radiator,or other heat sources.
Do not mount the unit to a wall or ceiling
except as recommended by the manufacturer.
Do not place the unit in a built-in enclosure such as a bookcase or cabinet, unless proper ventllation is provided.
Do not block the ventilation openings of
the unit by placing it on a bed, soft, rug,
etc.
Do not allow objects to fall or liquids to
spill into the unit through the openings.
Do not use the unit near water, such as
bath tub, washbowl, sink, laundry tub,
swimming pool, etc.
Do not allow anything to rest on, roll over,
or pinch the power cord, or place the
power cord where it is subject to traffic
or abuse; this may result in a fire hazard.
Do not use a cart or stand
not recommended by the manufacturer.
Do not try to roll cart with
small castors across
thresholds or deep pile carpets. Quick stops, excessive
force, and uneven surfaces
may cause the unit and cart
combination to overturn.
Do not clean the unit except as described
in the owner' s manual.
Do not leave the unit on when unattended;
a malfunction may result in a fire hazard.
NOTE: For added protection during a lightning storm or whenever the unit will be
left unattended for a long period of time,
disconnect the power source.
Have The Unit Serviced
If
--the power cord or the plug has been
damaged.
--objects have fallen, or liquid has been
spilled onto the unit.
--the unit has been exposed to rain or
excessive molsture.
--the unit does not appear to operate normally or exhibits a marked change in
performance.
--the unit has been dropped or the encasement damaged.
Do not attempt to service the unit beyond
that described in the owner 's manual: all
other servicing should be referred to quelified service personnel.
Example of Antenna Grounding as per NEC - National Electric Code
CAUTION: TO REDUCE THE RISK
OF ELECTRIC SHOCK, DO NOT
REMOVE COVER (OR BACK).
NO USER SERVICEABLE PARTS
INSIDE; REFER SERVICING TO
QUALIFIED SERVICE PERSONNEL.
G ROUND
CLAMP
G ROUNDING
CO NDUCTO RS
(NEC SECTION)
G ROUND CLAMPS
POW ER SER VICE G ROUNDING
ELECTRODE SYSTEM
NEC - NATIONAL ELECTRICAL CO DE
TABLE OF CONTENTS
INSTALLATION...................................................................................................................................................2~5
Accessories...........................................................................................................................................................2
Positioning Your Main Unit.....................................................................................................................................2
Rear Panel Connections........................................................................................................................................3
Connecting the Speakers.......................................................................................................................................4
Connecting Optional Equipment............................................................................................................................5
FUNCTIONAL OVERVIEW.....................................................................................................................................6~11
Front Panel..................................................................................................................................................6 - 8
LCD Display...........................................................................................................................................................9
Remote Control...........................................................................................................................................10-11
AMPLIFIER............................................................................................................................................................12
General...............................................................................................................................................................12
TIMER SETTING .........................................................................................................................................12~13
Clock Setting..........................................................................................................................................................12
Time On/Off Setting......................................................................................................................................12-13
Sleep Timer....................................................................................................................................................13
TURNTABLE/ PHONO..............................................................................................................................................14
CD CHANGER.................................................................................................................................................15~17
Loading Disc Into The CD Tray................................................................................................................................15
Disc Status..........................................................................................................................................................15
Normal CD Playback.......................................................................................................................................15
CD Random Playback......................................................................................................................................16
CD Repeat Playback..........................................................................................................................................16
Displaying Time Information..........................................................................................................................16-17
CD Program ( CD Memory )..............................................................................................................................17
TAPE PLAYER..................................................................................................................................................18~19
Loading One Tape............................................................................................................................................18
Normal Playback ( Deck A and Deck B )............................................................................................................18
Recording ( Deck A )....................................................................................................................................18-19
Sequential Playback ( Deck B to Deck A).............................................................................................................19
TUNER.............................................................................................................................................................20
Auto (automatic)/Manual Tuning...........................................................................................................................20
Preset Memory................................................................................................................................................20
GENERAL INFORMATION...............................................................................................................................21
Troubleshooting....................................................................................................................................................21
System Specifications.........................................................................................................................................22
4
INSTALLATION
Front Left/Right Speakers
MAIN UNIT
POWER
MUTE
8
4
EQ
PH/AUX
7
3
+10
M-UP/
REPEAT+
INTRO
TAPE
6
SLEEP
2
0
DISC-SKIP
TUNER/BAND
MEMO/
C.ADJ
M-DOWN/
STOP
PLAY/
PAUSE
1
9
5
RANDOM
+
_ +
CD
OPEN/
CLOSE
SKIP
TIMER
TUNING
SEARCH
VOLUME
MODE/
REMAIN
_
_
FM Antenna
REMOTE CONTROL
ACCESSORIES
POSITIONING YOUR MAIN UNIT
This package contains:
- 1 Main Unit
- 2 Front Speakers
- 1 FM Antenna
- 1 Remote Control
- 1 Instruction book
Place the unit on stable, level surface, out of direct sunlight
and away from sources of excessive dust, dirt, heat, water,
moisture, vibration and strong magnetic fields.
Do not connect the unit to the AC power supply until all
other connections have been made and the AC voltage (indicated on the type plate on the back cover) has been
checked.
When positioning the unit, bear in mind that every receiver
produces heat which must be able to dissipate freely. For
this reason do not cover any vents and make sure that
there is sufficient ventilation around the unit.
Always remove all CDs from the changer before moving the
system.
5
INSTALLATION
1
2
3
R
AU X IN
F M ANT
SPEA KER S
L
L
+
+
R
_
_
REAR PANEL CONNECTIONS
CONNECTING THE FM ANTENNA
Plug the FM antenna to the FM terminal of the main unit.
1. FM ANTENNA (FM 300 ohm)
For connecting the 300 ohm antenna supplied.
ANTENNA OR SPEAKER WIRE CONNECTION TO
TERMINALS
2. AUX IN (L/R)
For connecting optional video equipment.
NOTE: Push and hold speaker terminal tab down to insert
wire. Release tab to lock wire in terminal. Make sure
the insulation is completely removed from the ends of
the antenna and speaker wires at all connection points.
3. FRONT SPEAKERS (4 OHM)
Connect supplied left and right front speakers here.
4. AC POWER CORD
Plug into a standard 120V/60Hz household wall outlet.
6
INSTALLATION
LEFT
R IG H T
SPEAKERS
L
+
+
R
-
-
L
L
CONNECTING THE SPEAKERS
Connecting the Front Speakers
Connect the right front speaker to the front speaker ² R ²
terminal on the back of the main unit, and the left front
speaker to the front speaker ²L ²terminal.
Make sure the (+) (red) and (-) (black and red) cables are
connected to the correct front speaker terminals [(+) to (+)
and (-) to (-)].
7
INSTALLATION
CONNECTING OPTIONAL EQUIPMENT
Connecting a Video system
Connect the ²L ²and ²R ²Audio output terminals of your
laser disc or VCR system to the ² L ² and ² R ² VIDEO
INPUT terminals of the main unit.
8
FUNCTIONAL OVERVIEW
FRONT PANEL
FRONT PANEL
7
8
9 10 11
13
12
14
15
16
17
VO L U ME
R
FL AT
TU N E R /BAN D
CD
TA PE
PH O N O /AU X
O PE N /C LO SE
D ISC SK IP
18
6
M OD E /
R EM A IN
SL EEP
5
4
3
PH O N ES
19
M EMO /
C -AD J .
20
21
22
23
2
1
A
B
R EC O R D /P LAY BA C K
P LAY BA C K
25
24
5
IN TR O .
26
CH AN GE R
DIS C
PL AY/PA U SE
27
9
R AN D O M
28
FUNCTIONAL OVERVIEW
FRONT PANEL
FRONT PANEL
1. REPEAT / MEMO • UP
•In CD mode, press to change the following repeat play
mode : All disc, Rpeat all disc, Repeat one disc,
Repeat one track.
•In TUNER mode, press to display the preset memory
in ascending order.
2. STOP / MEMO • DOWN
•In CD mode, press to stop CD playing and exit CD
memory registration mode. When CD is stoped, press
this key to clear CD memory.
•In TUNER mode, press to display the preset memory
in descending order.
3. TIMER
Press to set timer on or off. When timer is on,
illuminate.
4.
will
ST. / NOR & MONO. / H.S.D.
•In TAPE RECORD mode, press to select normal mode
or to increase the TAPE recording speed to twice the
normal recording speed.
•In FM mode, press to select either STEREO sound or
MONO sound.
5. SLEEP
Press to select the SLEEP timer on or off. Keep pressing this key to set the sleep time from 00 to 90 minutes.
6. POWER
Press the POWER button to switch the main power of
the unit to ON or STANDBY.
7. FLAT
Press to select FLAT sound mode.
12. TUNER / BAND
•Not in TUNER mode, press to set TUNER mode.
•In TUNER mode, press to change the receiving BAND
between FM and AM
13. CD
•Not in CD mode, press to set CD mode.
•In CD mode, it has the same function as the DISC
SKIP key. Press to set or skip to next valid disc in
ascending order.
14. TAPE
Press to select the function of TAPE.
15. PHONO / AUX
Press to select the PHONO function or the AUX input
source. Both PHONO and AUX are mixing-channels.
You can mix sounds if you play the PHONO and input
another signal from the AUX at the same time.
16. OPEN / CLOSE
Press to open or close the CD door
17. DISC SKIP
•In CD memory set mode, press to set to next valid
disc number in ascending order.
•In CD normal play or stop mode,press to skip to next
valid disc in ascending order.
•Not in CD mode, press to skip to next valid disc in
ascending order when the door is open.
18. VOLUME
Press the VOLUME button to adjust the volume level
up or down.
19. MODE / REMAIN
•In TUNER mode, press to change the following dis8. ROCK
play : Band and Frequency, Time display.
Press to select ROCK sound mode.
•In CD normal play mode, press to change the following display : Each playing time, Each remaining time,
9. CLASSIC
Total remaining time, Total playing time, Time display.
Press to select CLASSIC sound mode.
•In CD random play mode, press to change the following display : Each playing time, Each remaining time,
10. POP
Time display.
Press to select POP sound mode.
•In CD memory play mode, press to change the following display : Each playing time, Each remaining
11. SENSOR
time, Program number, Time display.
Infrared rays sensor, to receive the information
•In CD stop mode, press to change the following distransmitted from the remote control.
play : All time display, Time display.
•In TAPE or AUX mode, press to change the following
display : AUX or TAPE, Time display.
NOTE: The above Time display includes: Clock display,
Time ON, Time OFF.
10
FUNCTIONAL OVERVIEW
FRONT PANEL
FRONT PANEL
25. [ DECK B ] CASSETTE FUNCTION KEYS
20. PHONES
Plug headphones into this jack. Press the volume button
to adjust the sound level.
•
21. MEMO / C-ADJ.
•In TUNER mode, press to store AM/FM stations in
the memory locations.
•In CD mode, press to do CD program in memory
locations.
•In clock adjust mode, press to set clock or timer
adjustment.
•
22. TUNING • UP / NEXT
•In TUNER mode, press less than 0.5 second to do
manual tuning in ascending order.
•In TUNER mode, press longer than 0.5 second to do
auto tuning in ascending order.
•In CD mode, press less than 0.5 second to move track
in ascending order.
•In CD mode, when CD is playing, press longer than
0.5 second to search in ascending order.
•In clock or timer adjusting mode, press to adjust clock
time in ascending order.
•
•
•
26. INTRO
Press to set or release the intro scan play mode in CD
mode.
27. PLAY / PAUSE
Press to begin playback of the CD and press again to
pause CD playback.
28. RANDOM
Press to toggle CD random play mode. The RANDOM
indicator appears on the display and tracks on all discs
are played in random order. When the last track of the
last disc is played, the system will automatically stop,
unless you have selected REPEAT mode.
23. TUNING • DOWN / PREVIOUS
•In TUNER mode, press less than 0.5 second to do
manual tuning in descending order.
•In TUNER mode, press longer than 0.5 second to do
auto tuning in descending order.
•In CD mode, press less than 0.5 second to move track
in descending order.
•In CD mode, when CD is playing, press longer than
0.5 second to search in descending order.
•In clock or timer adjusting mode, press to adjust clock
time in descending order.
24. [ DECK A ] CASSETTE FUNCTION KEYS
RECORD ............. Press to activate cassette
•
recording.
•
PLAY ..................... Press to activate cassette
playing.
•
•
•
•
PLAY .................. Press to activate cassette
playing.
REWIND ............. Press to activate cassette
rewinding.
F. FWD. ............. Press to activate cassette
fast forwarding.
STOP / EJECT ... Press once to stop play, rewind or fast forward. Press a
second time to eject the
cassette.
PAUSE ............... Press to pause playback.
REWIND ............ Press to activate cassette
rewinding.
F. FWD. ............. Press to activate cassette
fast forwarding.
STOP / EJECT .. Press once to stop play, rewind or fast forward. Press a
second time to eject the
cassette.
PAUSE ............... Press to pause playback.
11
FUNCTIONAL OVERVIEW
2
3
4 5 6
7
8
9
10
11
12
13
2
1
3
4 5 6
7
8
9
10
11
12
13
1
14
19
18
17
16
14
15
19
LCD DISPLAY
18
17
16
15
LCD DISPLAY
1. TOTAL
Illuminates if you select the total remain time or total
time in CD normal play mode.
13. CLASSIC
Illuminates if the CLASSIC EQ mode is selected.
14. DISC NUMBER
Illuminates if the corresponding tray has disc in CD
mode.
2. MEMORY
Illuminates if any track or station has been stored to a
CD program or tuner memory in CD mode or TUNER
mode.
15. FLAT
IIIuminates if the FLAT EQ mode is selected.
3. REMAIN
Illuminates if you select the each remain time or total
remain time in CD play mode.
16. REC CD SYNC
Illuminates if the CD-SYNC tape recording function has
been selected.
4. SLEEP
Illuminates if you select the SLEEP function.
17. MHz/KHz
Illuminates while the FM or AM station has been selected in TUNER mode.
5. STEREO
Illuminates if a stereo singal is received in tuner mode.
18. INTRO
Illuminates if you select the INTRO play function in CD
mode.
6. MUTE
Illuminates if you select the MUTE function.
7. RANDOM
Illuminates if you select the random play function in CD
mode.
19.
ON / OFF
will illuminate if the Timer is on by pressing the
TIMER button on the remote to select.
8.
Illuminates during CD playback mode.
ON will flash if Time ON function is selected by
pressing the MODE / REMAIN button on the remote
repeatedly.
OFF will flash if Time OFF function is selected
by pressing the MODE / REMAIN button on the remote
control repeatedly.
9.
Illuminates when CD playback has been paused.
10. REPEAT
Illuminates if you select the repeat play function in CD
mode.
11. POP
Illuminates if the POP EQ mode is selected.
12. ROCK
Illuminates if the ROCK EQ mode is selected.
12
FUNCTIONAL OVERVIEW
REMOTE CONTROL
REMOTE CONTROL
INSTALLING BATTERIES:
1. Remove the battery cover from the back of the remote.
2. Insert 2 *AA* batteries into the remote, paying careful attention to the polarity
diagram (+ / -) on the battery compartment cover.
3. Replace the battery cover.
POWER
MUTE
1
2
3
4
4. 0 - 9 / +10
•In CD mode, press to select favorite track.
•In TUNER mode,press to select favorite preset station.
6
CD
TUNER/BAND
TAPE
PH/AUX
1
2
3
4
5
6
7
8
9
0
+10
EQ
MODE/
REMAIN
MEMO/
C.ADJ
SLEEP
INTRO
OPEN/
CLOSE
RANDOM
7
8
5. MODE / REMAIN
•In TUNER mode, press to change the following display : Band and Frequency, Time display.
•In CD normal play mode, press to change the following display : Each playing time, Each remaining time,
Total remaining time, Total playing time, Time display.
•In CD random play mode, press to change the following display : Each playing time, Each remaining time,
Time display.
•In CD memory play mode, press to change the following display: Each playing time, Each remaining
time, Program number, Time display.
•In CD stop mode, press to change the following display : All time display, Time display.
•In TAPE or AUX mode, press to change the following
display : AUX or TAPE, Time display.
9
5
_
_
SKIP
TIMER
TUNING
SEARCH
DISC-SKIP
+
_ +
M-UP/
REPEAT+
M-DOWN/
STOP
PLAY/
PAUSE
VOLUME
6. MUTE
Press to cancel sound. Press again to return the sound
to its previous level. The MUTE indicator will illuminate
when the MUTE function is on.
1. POWER
Press the POWER button to switch the main power of
the unit to ON or STANDBY.
7. PH. / AUX
Press to select the PHONO function or the AUX input
source. Both PHONO and AUX are mixing channels.
You can mix sounds if you play the PHONO and input
another signal from the AUX at the same time.
2. CD
•If not in CD mode, press to set CD mode.
•In CD mode, it has the same function as the DISC
SKIP key. Press to set or skip to next valid disc in
ascending order.
8. TAPE
Press to select the function of TAPE.
3. TUNER/BAND
•If not in TUNER mode, press to set TUNER mode.
•In TUNER mode, press to change the receiving BAND
between FM and AM.
9. EQ
Press EQ button repeatedly to select ROCK, CLASSIC,
POP or FLAT EQ setting and the adjacent indicator will
illuminate.
13
FUNCTIONAL OVERVIEW
REMOTE CONTROL
REMOTE CONTROL
POWER
10
11
12
MUTE
CD
TUNER/BAND
TAPE
PH/AUX
1
2
3
4
5
6
7
8
9
0
+10
EQ
MODE/
REMAIN
MEMO/
C.ADJ
SLEEP
INTRO
OPEN/
CLOSE
RANDOM
DISC-SKIP
M-UP/
REPEAT+
SKIP
TIMER
TUNING
SEARCH
+
M-DOWN/
STOP
_
_
14. SLEEP
Press to select the SLEEP timer on or off. Keep pressing this key to set the sleep time from 00 to 90 minutes
_ +
PLAY/
PAUSE
VOLUME
15. M-UP / REPEAT
•In CD mode, press to change the following repeat play
mode : All disc, Repeat all disc, Repeat one disc,
Repeat one track.
•In TUNER mode, press to call the preset memory in
ascending order..
13
14
16. DISC SKIP
•In CD memory set mode, press to set to next valid
disc number in ascending order.
•In CD normal play or stop mode,press to skip to next
valid disc in ascending order.
•Not in CD mode, press to skip to next valid disc in
ascending order when the door is open.
15
16
17
18
19
20
17. STOP / DOWN
•In CD mode, press to stop CD playing and exit CD
memory registration mode. When CD is stoped, press
this key to clear CD memory.
•In TUNER mode, press to display the preset memory
in descending order.
NOTE: The above Time display includes: Clock display,
Time ON, Time OFF.
18. SKIP (-) or (+)
•In TUNER mode, press less than 0.5 second to do
manual tuning.
•In TUNER mode, press longer than 0.5 second to do
auto tuning.
•In CD mode, press less than 0.5 second to move track
up or down.
•In CD mode, when CD is playing, press longer than
0.5 second to search up or down.
•In clock or timer adjusting mode, press to adjust clock
time.
10. MEMO / C-ADJ.
•In TUNER mode, press to store AM/FM stations in
the memory locations.
•In CD mode, press to do CD program in memory
locations.
•In clock adjust mode, press to set clock or timer
adjustment.
11. OPEN / CLOSE
Press to open or close the CD door.
19. PLAY/PAUSE
Press to begin playback of the CD and press again to
pause CD playback.
12. RANDOM
Press to toggle CD random play mode. The RANDOM
indicator appears on the display and tracks on all discs
are played in random order. When the last track of the
last disc is played, the system will automatically stop,
unless you have selected REPEAT mode.
20. VOLUME (-) or (+)
Press (+) or (-) button to adjust the sound level up or
down.
13. INTRO
Press to set or release the intro scan play mode in CD
mode.
14
AMPLIFIER
TIMER SETTING
GENERAL
CLOCK SETTING
1. Press the POWER button to turn the system on.
1. Turn the system on and press the MODE / REMAIN
button until the clock appears in the display.
2. Select the source by pressing the desired source selector button:
•Press the TUNER button to listen to a radio station.
•Press the TAPE button for audio cassette.
•Press the CD button to listen to a compact disc.
•Press the PHONO / AUX button to select phonograph
function or for a laser disc player, camcorder or VCR,
etc...
2. Press the MEMO / C-ADJ button one time and hour
digit will flash .Then press the TUNING • DOWN / PREVIOUS or TUNING • UP / NEXT button until the correct
hour digit appears.
3. Press the VOLUME button on the front panel or on the
remote control to adjust the volume level up or down.
4. Press the EQ button repeatedly to select a preset equalizer mode: ROCK , CLASSIC, POP or FLAT.
NOTE: The Graphic Equalizer separates and adjusts the
bass, midrange and treble levels. These preset selections adjust the sound to simulate and enhance the
acoustical effects of ROCK, CLASSIC, POP or FLAT.
3. Press the MEMO / C-ADJ button again and minute digit
will flash. Then press the TUNING • DOWN / PREVIOUS or TUNING • UP / NEXT button until the correct
minute digit appears.
5. Press the MUTE button to cancel the sound. The MUTE
indicator will illuminate. Press again to return to original sound level.
TIME ON / OFF SETTING
Your music center can automatically turn itself on or off
when the on or off time arrives.
TIME ON SETTING
1. Turn the system on and press the MODE / REMAIN
button until the Time ON appears.
15
TIMER SETTING
2. Press the MEMO / C-ADJ button one time and hour
digit will flash. Then press the TUNING • DOWN /
PREVIOUS or TUNING • UP / NEXT button until the
correct hour digit appears.
3. Press the MEMO / C-ADJ button again and minute digit
will flash. Then press the TUNING • DOWN / PREVIOUS or TUNING • UP / NEXT button until the correct
minute digit appears.
3. Press the MEMO / C-ADJ button again and minute digit
will flash. Then press the TUNING • DOWN / PREVIOUS or TUNING • UP / NEXT button until the correct
minute digit appears.
4. Press the TIMER button until the
appears, then
press the POWER button to turn the system to
STANDBY mode.
NOTE: Make sure the
is displayed. The system will
automatically turn on/off itself when set time arrives.
TIME OFF SETTING
1. Press the MODE / REMAIN button until the Time OFF
appears.
SLEEP TIMER
2. Press the MEMO / C-ADJ button one time and hour
digit will flash. Then press the TUNING • DOWN /
PREVIOUS or TUNING • UP / NEXT button until the
correct hour digit appears.
Your system can automatically turn itself off after 10 to 90
minutes. Choose the period that you wish system to stay
on, and when the “SLEEP” time arrives, the system will
turn itself off automatically.
1. Turn the system on and press SLEEP button. The
“SLEEP” indicator will illuminate.
2. Press the SLEEP button continuously to set the sleep
time from 90 to 10.
NOTE: Make sure TIMER appears in the top left corner.
If TIMER dose not appear on LCD display, press
TIMER button on remote control and follow steps
above to set.To cancel TIMER ON/OFF setting,
press TIMER button on remote control again until
the TIMER disappears from LCD display.
16
TURNTABLE
PHONO
PHONO
CONTROLS AND FEATURES
1.
2.
3.
4.
5.
6.
2
45 rpm Adaptor
Turntable platter
Cueing lever
Speed selector
Tone arm
Tone arm rest
3
33
4
45
5
6
1
PLAYING A RECORD:
1. Switch the system on using the POWER button.
2. Remove the stylus (needle) cover.
3. Unlock the tone arm using the tone arm lock.
8. Adjust the VOLUME control to obtain desired listening
level.
4. Use the function selector to select the PHONO / AUX
position.
9. Adjust the graphic equalizer to suit your listening
pleasure.
5. Set the speed selector to either 33 rpm or 45 rpm
according to the record to be played.Use the 45 rpm
spindle adaptor to play 45 rpm records.
10. During play(if you wish so) move the tone arm inward
towards the center of the turntable platter, thus switching
it off. Be sure the tone arm is replaced and locked
correctly using the tone arm lock. This will avoid damage
to the stylus when the record deck is not in use.
6. Place a record on the turntable. Using the cueing lever,
raise the tone arm. Move the tone arm outwards, away
from the turntable platter. The turntable platter will start
to rotate.
11. When the record has finished playing, the turntable platter
will switch off automatically. Secure tone arm using the
tone arm lock.
7. Move the tone arm over the record and release gently.
The stylus will lower onto the record and start to play.
NOTE: If you input a signal from the AUX jack while Phono
is playing, you may hear both simultaneously.
17
CD CHANGER
LOADING A DISC INTO THE CD TRAY
NORMAL CD PLAYBACK
1. Press the POWER button to switch on the system.
1. Press the PLAY / PAUSE button to start playback.
Press repeatly to start or pause the CD playback.
2. Select the CD function by pressing the CD button on
the front panel. You can also press the CD button on
the remote control.
2. The playback sensor will search the disc trays.
3. If the first disc tray is empty, the disc number indicator
for that disc will disappear. Then the playback sensor
will detect the next disc and the semi-circle indicator
for the next disc will illuminate.
3. The disc indicator corresponding to the currently selected disc will be surrounded by an illuminating semicircle at all times.
1
2
1
2
3
3
5
5
4
4
4. When the first disc is found, it will immediately begin to
read and display the total tracks number and total time
of this disc. Press the PLAY / PAUSE button to begin
playback from track 1.
4. Press the OPEN / CLOSE button to open the CD door.
5. Insert only one disc into each of the five CD trays.
5. Press the TUNING • DOWN / PREVIOUS or TUNING
• UP / NEXT button briefly to select the desired track.
6. To insert a disc into the fifth tray, press the DISC SKIP
or CD button and the fifth disc position will rotate to the
front automatically.
6. Press and hold the TUNING • UP / NEXT button to
move forward.
7. Press the OPEN / CLOSE button again to close the
CD door.
7. Press and hold the TUNING • DOWN / PREVIOUS
button to move backward.
DISC STATUS
8. Press the STOP / MEMO • DOWN button to stop CD
playback.
To check the disc status, first press the PLAY / PAUSE
button to start playback, then press the DISC SKIP button
once for each disc.
9. You can interrupt CD playback by pressing PLAY /
PAUSE. Press the same key again to resume playback.
1. When the particular disc tray is being checked by the
playback sensor, the total tracks number and total time
will be read and displayed.
10. To select another disc, simply press the DISC SKIP or
CD button repeatedly until the desired disc is selected.
2. If there is no disc in the selected tray, the disc number
indicator light will go out.
18
CD CHANGER
CD RANDOM PLAYBACK
CD REPEAT PLAYBACK
1. Press the RANDOM button before or during play.
2. The RANDOM indicator illuminates and tracks are now
played in a random order.
1
2
3
1
2
5
4
3
5
4
3. Press the REPEAT / MEMO • UP button three times
before or during playback to select the REPEAT ONE
mode. When this mode is selected, the same track
will be played repeatedly.
3. Each time you press the TUNING • UP / NEXT button
the next random track will play.
1
2
4. Press the TUNING • DOWN / PREVIOUS button to
return to the beginning of the track.
5
4
3
5. Press the RANDOM button again if you wish to return
to normal play.
4. Press the REPEAT / MEMO • UP button four times to
cancel the Repeat Playback function.
CD REPEAT PLAYBACK
1. Press the REPEAT / MEMO • UP button once before or
during playback to select the REPEAT ALL DISC mode,
and the ²REPEAT ALL DISC ² indicator will illuminate.
When this mode is selected, the tracks on all discs
will be played repeatedly.
DISPLAYING TIME INFORMATION
1. In CD normal play mode, press MODE / REMAIN button to change the following display :
•Playing time of current track.
1
2
3
5
4
1
2
2. Press the REPEAT / MEMO • UP button twice before
or during playback to select the REPEAT ONE DISC
mode, and the ² REPEAT ONE DISC ² indicator will
illuminate. When this mode is selected, all tracks on
one particular disc will be played repeatedly.
5
4
3
•Remaining time of current track.
1
2
3
19
5
4
CD CHANGER
•Total remaining time of current disc
4. Press the MEMO / C-ADJ. button to store the track
number you selected into the CD program, and the CD
program number will skip one step forward to wait for
you to select and store another track number.
1
2
5
NOTE: You can also select and store the track number
directly with the number keys 0-9 / +10 on the remote
control.
4
3
5. Select another track number and store the track into
the CD program by following step 3 to step 4.
•Total playing time of current disc.
1
2
6. Up to 40 CD tracks can be programmed. When 40
tracks have been stored, the ² FULL ² indicator will
illuminate.
5
4
3
Checking a Program
1. In CD PLAYBACK mode, press the TUNING • DOWN
/ PREVIOUS or TUNING • UP / NEXT button to check
the CD program which you stored.
CD PROGRAM ( CD MEMORY )
2. Each time the TUNING • DOWN / PREVIOUS or TUNING • UP / NEXT button is pressed, the CD program
number appears together with the corresponding disc
and track number.
Storing a Program
1. In CD stop mode, press the MEMO / C-ADJ button to
select the CD program function.
Playing a Program
2. The track number, program number and “MEMORY”
indicators will flash.
1. Press the PLAY / PAUSE button to start the CD program from the first track you stored.
2. Also you can press the TUNING • DOWN /PREVIOUS
or TUNING • UP / NEXT button to select a particular
track to play from the CD program.
1
2
3
5
3. Programmed tracks will remain stored in the memory
(even when the system is switched off) until they are
erased.
4
Erasing a Program
In CD stop mode, press the STOP / MEMO • DOWN
button to erase the CD program. The MEMORY indicator goes out and the program is erased.
3. Select the disc number by pressing the DISC SKIP
button, and press the TUNING • UP / NEXT or TUNING
• DOWN / PREVIOUS button until the desired track
number that you wish to program appears on the display.
NOTE: When the CD program has been done, you can
only play the memory tracks. Unless you erase the CD
program, the CD normal playing cannot be resumed .
20
TAPE PLAYER
LOADING ONE TAPE
RECORDING [ DECK A ]
1. Press the POWER button to switch on the system.
Recording from TAPE to TAPE
2. Select the TAPE function by pressing the TAPE button
on the front panel or remote control.
1. Insert a blank tape into [ DECK A ].
2. Insert the tape to be copied into [ DECK B ].
3. Press the PAUSE button on [ DECK A ], then press
the RECORD button. Press the PLAY button on [ DECK
B ] to begin dubbing.
4. If you wish to double the recording speed, simply depress the
ST. / NOR &
MONO. / H.S.D. button
to HSD mode before starting.
3. Depress the STOP / EJECT button of either [ DECK A]
or [ DECK B ] to open the door.
NOTE: When the HSD (High Speed Dubbing) function is
activated, the playback speed of [ DECK B ] will also
double.
4. Insert only one tape into either [ DECK A ] or [ DECK
B ].
5. To cancel the HSD function, press the
&
MONO. / H.S.D. button again.
5. To close the tape deck door, simply push the door back
to its previous position.
ST. / NOR
6. To stop or pause the recording, press the STOP / EJECT
or PAUSE button on [ DECK A ].
NORMAL PLAYBACK [ DECK A ] or [ DECK B ]
1. Press the PLAY button to start playback.
7. To stop or pause playback, press the STOP / EJ or
PAUSE button on [ DECK B ].
2. Depress the REW button to rewind the tape.
Recording from CD to TAPE
3. Depress the F.FWD button to start fast forward.
1. Insert a blank tape into [ DECK A ].
4. Depress the STOP / EJECT button to stop tape playback. Depress the STOP / EJECT button again to open
the tape deck door.
2. Select CD function by pressing the CD button on the
front panel or remote control.
3. Insert the CD disc which is to be copied to the blank
tape in [ DECK A ].
5. You can interrupt tape playback by pressing the PAUSE
button. Press the same button again to resume playback.
4. Press the RECORD and PLAY buttons on [ DECK A ]
to start the CD-to-TAPE synchro recording. The ²REC
CD SYNC ² indicator will illuminate on the display and
the CD will start at the same time.
1
2
3
21
5
4
TAPE PLAYER
RECORDING [ DECK A ]
SEQUENTIAL PLAYBACK [ DECK B ] TO [ DECK A ]
NOTE: To set up a CD program before recording, see
page 17.
NOTE: The sequential play feature automatically plays
[ DECK A ] after [ DECK B ] has played and shut off.
5. To stop recording , press the STOP / EJECT button on
[ DECK A ] ,and at this time , the CD playback will be
in the Pause mode. If you press the RECORD and
PLAY buttons on [ DECK A ] again, the CD playback
will continue playing automatically.
1. Insert a tape into [ DECK A ] and [ DECK B ].
2. Press the PLAY button on [ DECK B ] to begin playback.
3. Press the PAUSE button on [ DECK A ].
6. To stop or pause CD playback, press STOP button or
PLAY / PAUSE button of CD controls.
4. Press the PLAY button on [ DECK A ]. When the tape
in [ DECK B ] reaches the end. The PAUSE button on
[ DECK A ] will release automatically and playback will
begin.
Recording from TUNER to TAPE
1. Insert a blank tape into [ DECK A ].
2. Select the TUNER function by pressing the TUNER /
BAND button on the front panel or remote control.
3. Press the TUNER / BAND button repeatedly until the
desired band (FM or AM) is selected.
4. Press the TUNING • UP / NEXT or TUNING • DOWN /
PREVIOUS button to select the desired frequency.
5. Press the RECORD and PLAY button on [ DECK A ] to
start TUNER-to-TAPE recording.
6. To stop or pause recording, press the STOP/EJ or
PAUSE button on [ DECK A ].
NOTE: The HSD (high speed dubbing) function does not
operate during CD-to-TAPE or TUNER-to-TAPE recording.
22
TUNER
AUTO ( automatic ) / MANUAL TUNING
PRESET MEMORY
1. Press the POWER button to switch on the system.
Select the TUNER function by pressing the TUNER /
BAND button on the front panel or remote control.
Storing preset stations
You can store preferred stations in the TUNER¢s memory
(Each 20 stations for FM and AM).
2. Press the TUNER / BAND button repeatedly until the
desired band (FM or AM) is selected.
1. Press TUNER / BAND button to select TUNER function and FM or AM band.
3. For manual tuning, quickly press and release the TUNING • DOWN / PREVIOUS or TUNING • UP / NEXT
button to select the desired frequency.
2. Press the TUNING • DOWN / PREVIOUS or TUNING
• UP / NEXT button to select the frequency you wish to
store.
4. For auto tuning, press and hold the TUNING • DOWN /
PREVIOUS or TUNING • UP / NEXT button for 1 second. The system will search until a station of sufficient
strength is found. If the station is not the desired one,
simply press and hold the TUNING • DOWN / PREVIOUS or TUNING • UP / NEXT button for 1 second again.
Weak stations are skipped during automatic tuning.
3. Press MEMO / C-ADJ button, the “Memory” indicator
will flash, then press REPEAT / MEMO • UP or STOP
/ MEMO • DOWN or 0-9/+10 digit buttons to select the
desired location to be preset.
4. Press MEMO / C-ADJ button again to store the station
into the designated location.
NOTE: When tuning, the sound will be muted to eliminate
interfering background noises. When a station is found,
the audio signal will come back on. ² STEREO ² will appear on the display when an FM-stereo signal is received.
With weak FM stereo signals, you may hear static or background noise. These noises can be suppressed by switching to MONO. Simply press the
ST./NOR. & MONO
/H.S.D. button to select MONO mode. ² STEREO ² will
disappear from the display.
5. To set another preset station, follow steps 2 to 4.
Selecting preset stations
1. Select the TUNER function and FM or AM band with
the TUNER / BAND button on the front panel or remote
control.
2. Press the REPEAT / MEMO •UP or STOP / MEMO
•DN button on the front panel or remote control until
the required preset memory number appears. Or press
the 0-9/+10 digit buttons on the remote control to select the preset stations directly.
23
GENERAL INFORMATION
TROUBLESHOOTING
Please make these simple checks before calling for service. These tips can save you time and money.
NO POWER
NO VOLUME
•
•
•
•
•
•
•
•
REMOTE CONTROL •
DOESN'T WORK
•
•
•
CAN'T TUNE
•
RADIO STATIONS
•
Make sure the power cord is inserted fully into a 120V/60Hz outlet.
Check to be sure that the outlet is not controlled by a wall switch.
Unplug the power cord, wait 1 minute, then reinsert the plug and push the POWER button.
Check the VOLUME control setting.
Make sure the correct feature has been selected ( for instance,² CD ² should be selected when
playing a CD ).
Make sure the speakers are properly connected.
Make sure the speaker wires are not shorted together.
If headphones are plugged in, disconnect them.
Check and if necessary, replace the batteries.
Make sure the remote is pointed head-first at the Music Center.
Make sure the Music Center is plugged into an operating wall outlet.
The remote may be too far away from Music Center.
Repeat channel selection.
Make sure the antennas are properly connected.
NOTE: if the operation of the unit or display is not normal, you should reset the unit by disconnecting it from the household
wall outlet for 1 minute and then reinserting the plug.
WARNING: IF YOU ARE UNABLE TO REMEDY A PROBLEM BY FOLLOWING THESE HINTS, CONSULT YOUR DEALER
OR AN AUTHORIZED SERVICE CENTER. UNDER NO CIRCUMSTANCES SHOULD YOU TRY TO REPAIR
THE SYSTEM YOURSELF, AS THIS WILL INVALIDATE YOUR WARRANTY.
24
GENERAL INFORMATION
SYSTEM SPECIFICATIONS
RECEIVER
Power output:
Front .................................................................................................................................................. 5Wx2
Total harmonic distortion ................................................................................................................................... 10%
Power supply .......................................................................................................................................... 120V/60Hz
Tuning Range:
FM .................................................................................................................................................. 87.5~108.0MHz
AM ..................................................................................................................................................... 530~1710KHz
*Specifications subject to change without notice.
25